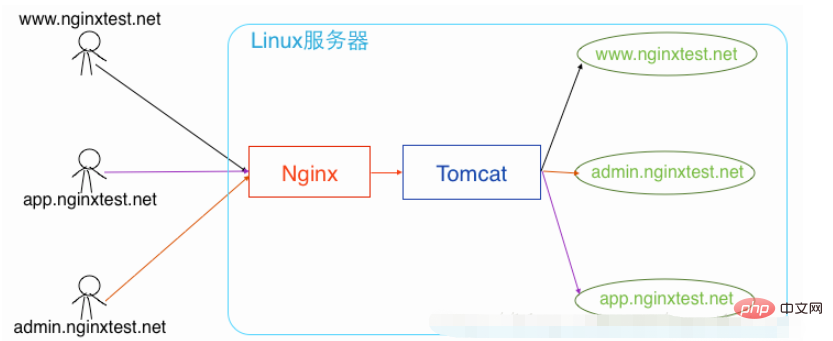
Let’s take a look at our needs. I have three website projects that need to be deployed (corresponding to three domain names in turn). A Linux server is provided to enable access to the corresponding domain name to jump to the corresponding website.
Let’s take a look at the system architecture diagram I designed to solve this problem:

Here we assume that the Linux server in the picture is on the public network The IP is 192.168.2.100, and then assume that three sites are to be built on this server: www.nginxtest.net, admin.nginxtest.net, app.nginxtest.net.
Okay, let’s configure it in detail:
1. Configure nginx reverse proxy
We still connect to ssh first, and then perform the following operations (It is generally not recommended to modify the default main configuration file nginx.conf, so we create a new load balancing configuration file fxdl.conf to ensure server security, as follows):
$ ssh root@192.168.2.100             //ssh连接
# cd /usr/local/nginx/conf
# touch fxdl.conf                 //创建代理配置文件
# vi fxdl.conf                  //用vi编辑器打开文件,然后按键盘的i
Note: In the vi editor, press i on the keyboard to enter insert status, press esc to exit the insert status.
Then enter the following configuration code (customize the domain name part to your own domain name, and open the comment part as needed):
#设置低权限用户,为了安全而设置的
user nobody;

#工作衍生进程数
worker_processes 4;

#设置错误文件存放路径
#error_log logs/error.log;
#error_log logs/error.log notice;
#error_log logs/error.log info;

#设置pid存放路径(pid是控制系统中重要文件)
#pid logs/nginx.pid;

#设置最大连接数
events{
  worker_connections 1024;
}

http {
  #用来设置日志格式
  log_format main '$remote_addr - $remote_user [$time_local] "$request" '
           '$status $body_bytes_sent "$http_referer" '
           '"$http_user_agent" "$http_x_forwarded_for"';
  #用来指定日志文件的存放路径
  access_log /data/wwwlogs/access_nginx.log main;

  #开启高效文件传输模式
  sendfile      on;
  #防止网络阻塞
  tcp_nopush     on;
  #防止网络阻塞
  tcp_nodelay     on;
  #长连接超时时间,单位是秒
  keepalive_timeout  65;
  #散列表的冲突率,默认1024,越大则内存消耗更多,但散列key的冲突率会降低,检索速度就更快
  types_hash_max_size 2048;

  #文件扩展名与文件类型映射表
  include       /usr/local/nginx/conf/mime.types;
  #默认文件类型
  default_type    application/octet-stream;

  #include /etc/nginx/conf.d/*.conf;

  #主要是用于设置一组可以在proxy_pass和fastcgi_pass指令中使用额代理服务器,默认负载均衡方式为轮询
  upstream tomcat_client {
    server localhost:8080;
  }

  #开启gzip压缩,开启后,访问网页会自动压缩
  #gzip on;

  #指定服务器的名称和参数
  server {
    listen 80;
    server_name app.nginxtest.net;
    location / {
      proxy_pass http://tomcat_client;
      proxy_redirect default;
      #设置代理
      proxy_set_header host $host;
      proxy_set_header x-real-ip $remote_addr;
    }
  }
  server {
    listen 80;
    server_name admin.nginxtest.net;
    location / {
      proxy_pass http://tomcat_client;
      proxy_redirect default;
      proxy_set_header host $host;
      proxy_set_header x-real-ip $remote_addr;
    }
  }
  server {
    listen 80;
    server_name www.nginxtest.net;
    location / {
      proxy_pass http://tomcat_client;
      proxy_redirect default;
      proxy_set_header host $host;
      proxy_set_header x-real-ip $remote_addr;
    }
    location = / {
      #判断是否为手机移动端
      if ($http_user_agent ~* '(iphone|ipod|ipad|android|windows phone|mobile|nokia)') {
        rewrite . http://www.nginxtest.net/phone break;
      }
      rewrite . http://www.nginxtest.net/pc break;
    }
  }
}Okay, it’s that simple, the nginx reverse proxy configuration is completed . Come down and configure tomcat:
2. Configure tomcat to deploy multiple sites
$ ssh root@192.168.2.100             //ssh连接
# cd /usr/local/tomcat
# cp /usr/local/tomcat/conf/server.xml /usr/local/tomcat/conf/server.xml_bk //备份server.xml原文件
# vi server.xml                  //用vi编辑器打开文件,然后按键盘的i
We edit server.xml and add the following host node under the engine node (the domain name and domain name in the node The site project directory needs to be customized and modified to your own):
<host name="www.nginxtest.net" unpackwars="true" autodeploy="true"
      xmlvalidation="false" xmlnamespaceaware="false">
  <context path="/" docbase="/data/wwwroot/www.nginxtest.net/webcontent" reloadable="true"/>
</host>
<host name="admin.nginxtest.net" unpackwars="true" autodeploy="true"
      xmlvalidation="false" xmlnamespaceaware="false">
  <context path="/" docbase="/data/wwwroot/admin.nginxtest.net/webcontent" reloadable="true"/>
</host>
<host name="app.nginxtest.net" unpackwars="true" autodeploy="true"
      xmlvalidation="false" xmlnamespaceaware="false">
  <context path="/" docbase="/data/wwwroot/app.nginxtest.net/webcontent" reloadable="true"/>
</host>Note: If you want to directly access the public network IP without the web page effect, delete the
<host name="localhost" ..>..</host>
under the engine node. .
After completing the input, press esc, and then enter:
:wq!
to save and exit the configuration file. At this point, tomcat is also configured.
Next we can place our multiple site project codes under /data/wwwroot/. Then start nginx and tomcat.
Now you can try it and access the second-level domain names of each site www.nginxtest.net, admin.nginxtest.net, app.nginxtest.net. We found that you can jump to the corresponding site ( If you deploy a server for each site, you will see the same effect).
The above is the detailed content of How can Nginx efficiently deploy multiple sites on one server?. For more information, please follow other related articles on the PHP Chinese website!


