 Backend Development
 Python Tutorial
 How to implement low-pass filter blur image function in Python
How to implement low-pass filter blur image function in Python
Use low-pass filter to blur the image
0. Introduction
Low Pass Filter(Low Pass Filter, LPF) filters out the high-frequency parts of the image and allows only the low-frequency parts to pass. Therefore, applying LPF on an image removes details/edges and noise/outliers in the image. This process is also called image blurring (or smoothing). Image smoothing can be used as a precursor to complex image processing tasks. processing part.
1. Different types of kernels and convolutions in the frequency domain
1.1 Image blur classification
Image blur usually includes the following types:
Edge Blur (
Edge) This type of blur is usually applied explicitly to the image through convolution, such as a linear filter kernel or a Gaussian kernel, etc., using these filter kernels it can be smoothed/removed Unnecessary detail/noise in the image.Motion blur (
Motion) is usually caused by camera shake when capturing images, that is, the camera or the subject being photographed is moving. We can use the point spread function to simulate this blur.Defocus blur (
de-focus) This type of blur occurs when the object captured by the camera is out of focus; we can use blur (blur) kernel to simulate this blur.
Next, we create the above three different types of kernels and apply them to the image to observe the results of different types of kernels processing the image.
1.2 Perform image blur using different kernels
(1) We first define the function get_gaussian_edge_blur_kernel() to return 2D Gaussian blur kernel is used for edge blur. This function accepts the standard deviation of the Gaussian ( σ σ σ) and the size of the created 2D kernel (for example, sz = 15 will create a kernel) as a parameter of the function. As shown below, a 1D Gaussian kernel is first created, and then the outer product of two 1D Gaussian kernels is calculated to return the 2D kernel: <div class="code" style="position:relative; padding:0px; margin:0px;"><pre class='brush:php;toolbar:false;'>import numpy as np
import numpy.fft as fp
from skimage.io import imread
from skimage.color import rgb2gray
import matplotlib.pyplot as plt
import cv2
def get_gaussian_edge_blur_kernel(sigma, sz=15):
# First create a 1-D Gaussian kernel
x = np.linspace(-10, 10, sz)
kernel_1d = np.exp(-x**2/sigma**2)
kernel_1d /= np.trapz(kernel_1d) # normalize the sum to 1.0
# create a 2-D Gaussian kernel from the 1-D kernel
kernel_2d = kernel_1d[:, np.newaxis] * kernel_1d[np.newaxis, :]
return kernel_2d</pre><div class="contentsignin">Copy after login</div></div>
Next, define the function get_motion_blur_kernel() to generate a motion blur kernel, and obtain a line of a given length and a specific direction (angle) as a convolution kernel to simulate the input Motion blur effect of the image: <div class="code" style="position:relative; padding:0px; margin:0px;"><pre class='brush:php;toolbar:false;'>def get_motion_blur_kernel(ln, angle, sz=15):
kern = np.ones((1, ln), np.float32)
angle = -np.pi*angle/180
c, s = np.cos(angle), np.sin(angle)
A = np.float32([[c, -s, 0], [s, c, 0]])
sz2 = sz // 2
A[:,2] = (sz2, sz2) - np.dot(A[:,:2], ((ln-1)*0.5, 0))
kern = cv2.warpAffine(kern, A, (sz, sz), flags=cv2.INTER_CUBIC)
return kern</pre><div class="contentsignin">Copy after login</div></div>Function
takes the blur length and angle and the size of the blur kernel as parameters, and the function uses OpenCV The warpaffine() function returns the kernel matrix (taking the center of the matrix as the midpoint, using the given length and the given angle to obtain the kernel). (3)
get_out_of_focus_kernel() to generate an out-of-focus kernel (simulating image out-of-focus blur), which creates a circle based on a given radius as Convolution kernel, this function accepts the radius R (Deocus Radius) and the size of the kernel to be generated as input parameters:
 def get_out_of_focus_kernel(r, sz=15):
    kern = np.zeros((sz, sz), np.uint8)
    cv2.circle(kern, (sz, sz), r, 255, -1, cv2.LINE_AA, shift=1)
    kern = np.float32(kern) / 255
return kerndft_convolve(), which performs frequency domain convolution using element-wise multiplication of the image and a convolution kernel in the frequency domain (based on the convolution theorem). This function also plots the input image, the kernel, and the output image resulting from the convolution calculation:
def dft_convolve(im, kernel):
    F_im = fp.fft2(im)
    #F_kernel = fp.fft2(kernel, s=im.shape)
    F_kernel = fp.fft2(fp.ifftshift(kernel), s=im.shape)
    F_filtered = F_im * F_kernel
    im_filtered = fp.ifft2(F_filtered)
    cmap = 'RdBu'
    plt.figure(figsize=(20,10))
    plt.gray()
    plt.subplot(131), plt.imshow(im), plt.axis('off'), plt.title('input image', size=10)
    plt.subplot(132), plt.imshow(kernel, cmap=cmap), plt.title('kernel', size=10)
    plt.subplot(133), plt.imshow(im_filtered.real), plt.axis('off'), plt.title('output image', size=10)
    plt.tight_layout()
plt.show()get_gaussian_edge_blur_kernel() kernel function to the image, and plot the input, kernel and output blur images:
im = rgb2gray(imread('3.jpg'))

kernel = get_gaussian_edge_blur_kernel(25, 25)
dft_convolve(im, kernel)
get_motion_blur_kernel() function to the image and plot the input, kernel and Output blurred image:
kernel = get_motion_blur_kernel(30, 60, 25)
dft_convolve(im, kernel)
get_out_of_focus_kernel() function to the image and draw the input, kernel and output blurred image:
kernel = get_out_of_focus_kernel(15, 20)
dft_convolve(im, kernel)
2. Use the scipy.ndimage filter to blur the imagescipy.ndimage
The module provides a series of functions that can apply low-pass filters to images in the frequency domain. In this section, we learn how to use some of these filters through several examples.2.1 Using the fourier_gaussian() function
fourier_gaussian()
function in thescipy.ndimage library to perform the volume using a Gaussian kernel in the frequency domain accumulation operation. (1)
FFT:
import numpy as np
import numpy.fft as fp
from skimage.io import imread
import matplotlib.pyplot as plt
from scipy import ndimage

im = imread('1.png', as_gray=True)
freq = fp.fft2(im)
fourier_gaussian() function to perform a blur operation on the image, using two Gaussian kernels with different standard deviations, plot the input, output images and Power spectrum:
fig, axes = plt.subplots(2, 3, figsize=(20,15))
plt.subplots_adjust(0,0,1,0.95,0.05,0.05)
plt.gray() # show the filtered result in grayscale
axes[0, 0].imshow(im), axes[0, 0].set_title('Original Image', size=10)
axes[1, 0].imshow((20*np.log10( 0.1 + fp.fftshift(freq))).real.astype(int)), axes[1, 0].set_title('Original Image Spectrum', size=10)
i = 1
for sigma in [3,5]:
    convolved_freq = ndimage.fourier_gaussian(freq, sigma=sigma)
    convolved = fp.ifft2(convolved_freq).real # the imaginary part is an artifact
    axes[0, i].imshow(convolved)
    axes[0, i].set_title(r'Output with FFT Gaussian Blur, $\sigma$={}'.format(sigma), size=10)
    axes[1, i].imshow((20*np.log10( 0.1 + fp.fftshift(convolved_freq))).real.astype(int))
    axes[1, i].set_title(r'Spectrum with FFT Gaussian Blur, $\sigma$={}'.format(sigma), size=10)
    i += 1
for a in axes.ravel():
    a.axis('off')
plt.show()2.2 Use the fourier_uniform() function scipy.ndimage
The function of the modulefourier_uniform() implements the multi-dimensional uniform Fourier filter . The frequency array is multiplied by the Fourier transform of a square kernel of given size. Next, we learn how to blur an input grayscale image using LPF (Mean Filter). (1)
DFT to obtain its frequency domain representation:
im = imread('1.png', as_gray=True)
freq = fp.fft2(im)
(2) 然后,使用函数 fourier_uniform() 应用 10x10 方形核(由功率谱上的参数指定),以获取平滑输出:
freq_uniform = ndimage.fourier_uniform(freq, size=10)
(3) 绘制原始输入图像和模糊后的图像:
fig, (axes1, axes2) = plt.subplots(1, 2, figsize=(20,10))
plt.gray() # show the result in grayscale
im1 = fp.ifft2(freq_uniform)
axes1.imshow(im), axes1.axis('off')
axes1.set_title('Original Image', size=10)
axes2.imshow(im1.real) # the imaginary part is an artifact
axes2.axis('off')
axes2.set_title('Blurred Image with Fourier Uniform', size=10)
plt.tight_layout()
plt.show()
(4) 最后,绘制显示方形核的功率谱:
plt.figure(figsize=(10,10))
plt.imshow( (20*np.log10( 0.1 + fp.fftshift(freq_uniform))).real.astype(int))
plt.title('Frequency Spectrum with fourier uniform', size=10)
plt.show()
2.3 使用 fourier_ellipsoid() 函数
与上一小节类似,通过将方形核修改为椭圆形核,我们可以使用椭圆形核生成模糊的输出图像。
(1) 类似的,我们首先在图像的功率谱上应用函数 fourier_ellipsoid(),并使用 IDFT 在空间域中获得模糊后的输出图像:
freq_ellipsoid = ndimage.fourier_ellipsoid(freq, size=10)
im1 = fp.ifft2(freq_ellipsoid)
(2) 接下来,绘制原始输入图像和模糊后的图像:
fig, (axes1, axes2) = plt.subplots(1, 2, figsize=(20,10))
axes1.imshow(im), axes1.axis('off')
axes1.set_title('Original Image', size=10)
axes2.imshow(im1.real) # the imaginary part is an artifact
axes2.axis('off')
axes2.set_title('Blurred Image with Fourier Ellipsoid', size=10)
plt.tight_layout()
plt.show()
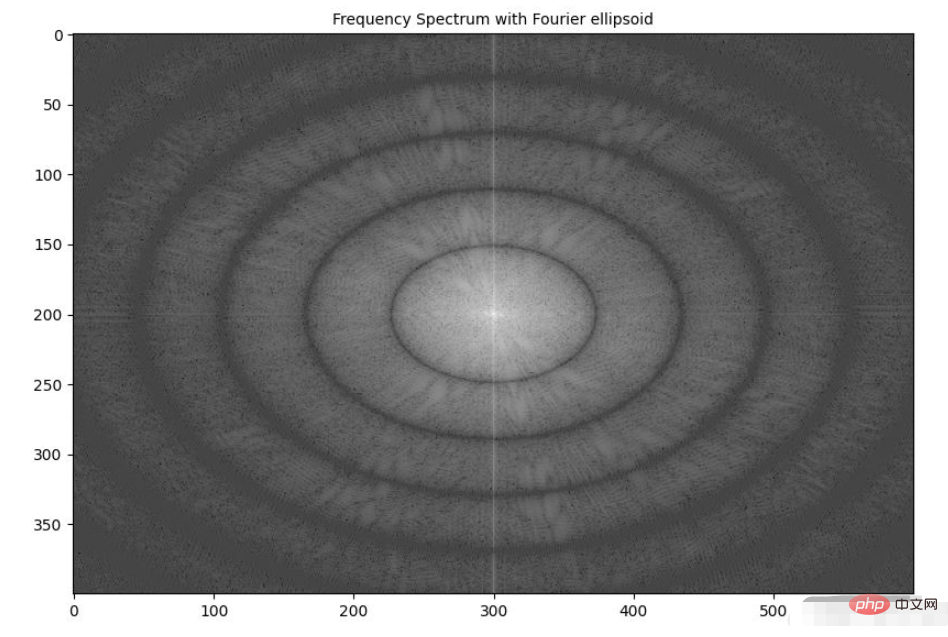
(3) 最后,显示应用椭圆形核后图像的频谱:
plt.figure(figsize=(10,10))
plt.imshow( (20*np.log10( 0.1 + fp.fftshift(freq_ellipsoid))).real.astype(int))
plt.title('Frequency Spectrum with Fourier ellipsoid', size=10)
plt.show()

3. 使用 scipy.fftpack 实现高斯模糊
我们已经学习了如何在实际应用中使用 numpy.fft 模块的 2D-FFT。在本节中,我们将介绍 scipy.fftpack 模块的 fft2() 函数用于实现高斯模糊。
(1) 使用灰度图像作为输入,并使用 FFT 从图像中创建 2D 频率响应数组:
import numpy as np
import numpy.fft as fp
from skimage.color import rgb2gray
from skimage.io import imread
import matplotlib.pyplot as plt
from scipy import signal
from matplotlib.ticker import LinearLocator, FormatStrFormatter

im = rgb2gray(imread('1.png'))
freq = fp.fft2(im)
(2) 通过计算两个 1D 高斯核的外积,在空间域中创建高斯 2D 核用作 LPF:
kernel = np.outer(signal.gaussian(im.shape[0], 1), signal.gaussian(im.shape[1], 1))
(3) 使用 DFT 获得高斯核的频率响应:
freq_kernel = fp.fft2(fp.ifftshift(kernel))
(4) 使用卷积定理通过逐元素乘法在频域中将 LPF 与输入图像卷积:
convolved = freq*freq_kernel # by the Convolution theorem
(5) 使用 IFFT 获得输出图像,需要注意的是,要正确显示输出图像,需要缩放输出图像:
im_blur = fp.ifft2(convolved).real
im_blur = 255 * im_blur / np.max(im_blur)
(6) 绘制图像、高斯核和在频域中卷积后获得图像的功率谱,可以使用 matplotlib.colormap 绘制色,以了解不同坐标下的频率响应值:
plt.figure(figsize=(20,20))
plt.subplot(221), plt.imshow(kernel, cmap='coolwarm'), plt.colorbar()
plt.title('Gaussian Blur Kernel', size=10)
plt.subplot(222)
plt.imshow( (20*np.log10( 0.01 + fp.fftshift(freq_kernel))).real.astype(int), cmap='inferno')
plt.colorbar()
plt.title('Gaussian Blur Kernel (Freq. Spec.)', size=10)
plt.subplot(223), plt.imshow(im, cmap='gray'), plt.axis('off'), plt.title('Input Image', size=10)
plt.subplot(224), plt.imshow(im_blur, cmap='gray'), plt.axis('off'), plt.title('Output Blurred Image', size=10)
plt.tight_layout()
plt.show()
(7) 要绘制输入/输出图像和 3D 核的功率谱,我们定义函数 plot_3d(),使用 mpl_toolkits.mplot3d 模块的 plot_surface() 函数获取 3D 功率谱图,给定相应的 Y 和Z值作为 2D 阵列传递:
def plot_3d(X, Y, Z, cmap=plt.cm.seismic):
    fig = plt.figure(figsize=(20,20))
    ax = fig.gca(projection='3d')
    # Plot the surface.
    surf = ax.plot_surface(X, Y, Z, cmap=cmap, linewidth=5, antialiased=False)
    #ax.plot_wireframe(X, Y, Z, rstride=10, cstride=10)
    #ax.set_zscale("log", nonposx='clip')
    #ax.zaxis.set_scale('log')
    ax.zaxis.set_major_locator(LinearLocator(10))
    ax.zaxis.set_major_formatter(FormatStrFormatter('%.02f'))
    ax.set_xlabel('F1', size=15)
    ax.set_ylabel('F2', size=15)
    ax.set_zlabel('Freq Response', size=15)
    #ax.set_zlim((-40,10))
    # Add a color bar which maps values to colors.
    fig.colorbar(surf) #, shrink=0.15, aspect=10)
    #plt.title('Frequency Response of the Gaussian Kernel')
plt.show()(8) 在 3D 空间中绘制高斯核的频率响应,并使用 plot_3d() 函数:
Y = np.arange(freq.shape[0]) #-freq.shape[0]//2,freq.shape[0]-freq.shape[0]//2)
X = np.arange(freq.shape[1]) #-freq.shape[1]//2,freq.shape[1]-freq.shape[1]//2)
X, Y = np.meshgrid(X, Y)
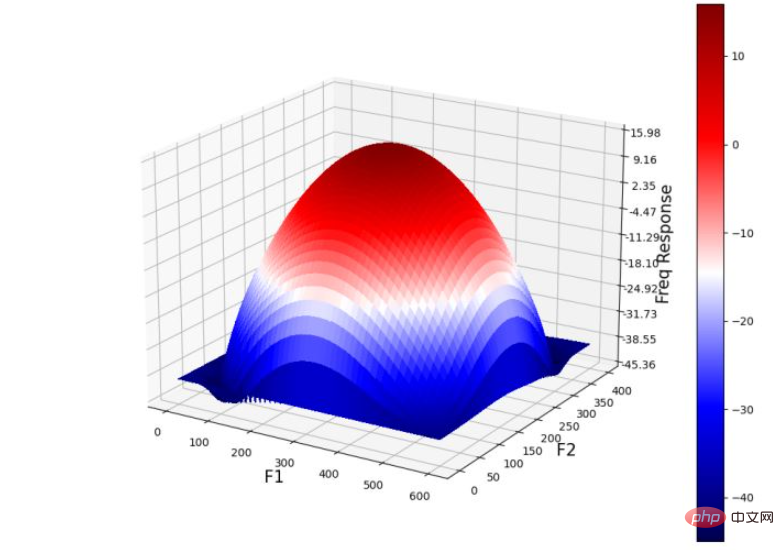
Z = (20*np.log10( 0.01 + fp.fftshift(freq_kernel))).real
plot_3d(X,Y,Z)
下图显示了 3D 空间中高斯 LPF 核的功率谱:

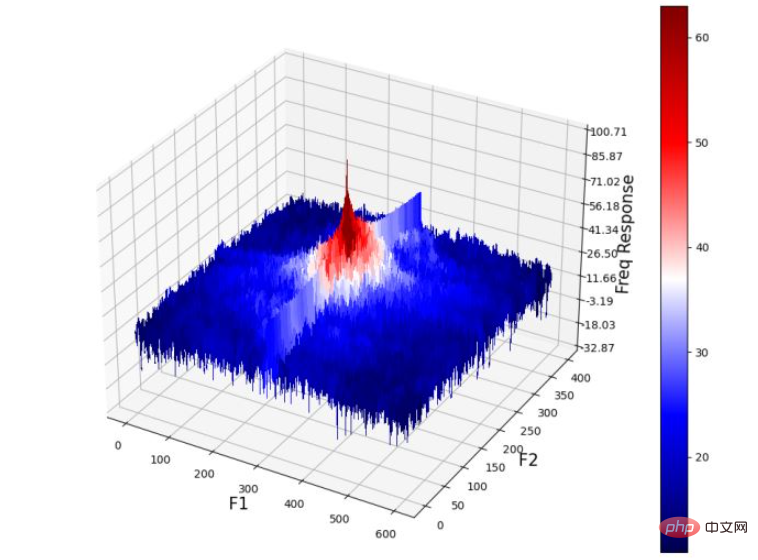
(9) 绘制 3D 空间中输入图像的功率谱:
Z = (20*np.log10( 0.01 + fp.fftshift(freq))).real
plot_3d(X,Y,Z)

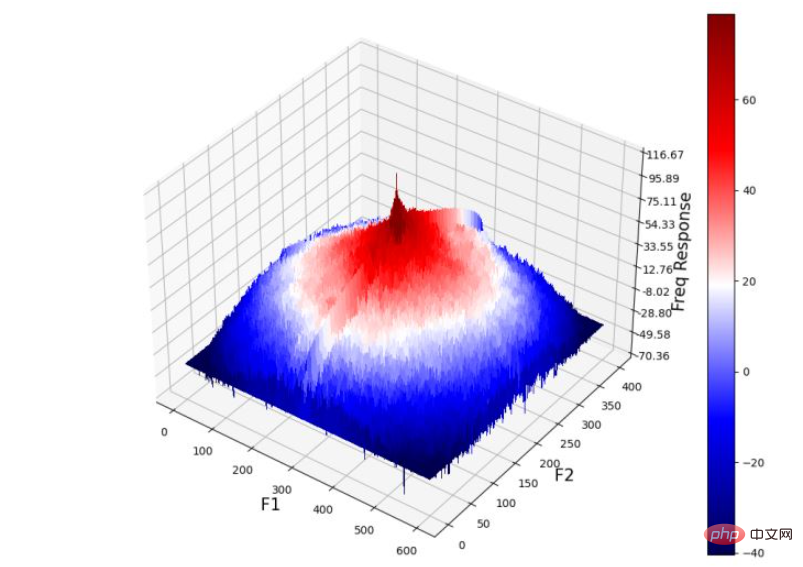
(10) 最后,绘制输出图像的功率谱(通过将高斯核与输入图像卷积获得):
Z = (20*np.log10( 0.01 + fp.fftshift(convolved))).real
plot_3d(X,Y,Z)

从输出图像的频率响应中可以看出,高频组件被衰减,从而导致细节的平滑/丢失,并导致输出图像模糊。
4. 彩色图像频域卷积
在本节中,我们将学习使用 scipy.signal 模块的 fftconvolve() 函数,用于与 RGB 彩色输入图像进行频域卷积,从而生成 RGB 彩色模糊输出图像:
scipy.signal.fftconvolve(in1, in2, mode='full', axes=None)
函数使用 FFT 卷积两个 n 维数组 in1 和 in2,并由 mode 参数确定输出大小。卷积模式 mode 具有以下类型:
输出是输入的完全离散线性卷积,默认情况下使用此种卷积模式
输出仅由那些不依赖零填充的元素组成,
in1或in2的尺寸必须相同输出的大小与
in1相同,并以输出为中心
4.1 基于 scipy.signal 模块的彩色图像频域卷积
接下来,我们实现高斯低通滤波器并使用 Laplacian 高通滤波器执行相应操作。
(1) 首先,导入所需的包,并读取输入 RGB 图像:
from skimage import img_as_float
from scipy import signal
import numpy as np
import matplotlib.pyplot as plt

im = img_as_float(plt.imread('1.png'))
(2) 实现函数 get_gaussian_edge_kernel(),并根据此函数创建一个尺寸为 15x15 的高斯核:
def get_gaussian_edge_blur_kernel(sigma, sz=15):
    # First create a 1-D Gaussian kernel
    x = np.linspace(-10, 10, sz)
    kernel_1d = np.exp(-x**2/sigma**2)
    kernel_1d /= np.trapz(kernel_1d) # normalize the sum to 1.0
    # create a 2-D Gaussian kernel from the 1-D kernel
    kernel_2d = kernel_1d[:, np.newaxis] * kernel_1d[np.newaxis, :]
    return kernel_2d
kernel = get_gaussian_edge_blur_kernel(sigma=10, sz=15)(3) 然后,使用 np.newaxis 将核尺寸重塑为 15x15x1,并使用 same 模式调用函数 signal.fftconvolve():
im1 = signal.fftconvolve(im, kernel[:, :, np.newaxis], mode='same')
im1 = im1 / np.max(im1)
在以上代码中使用的 mode='same',可以强制输出形状与输入阵列形状相同,以避免边框效应。
(4) 接下来,使用 laplacian HPF 内核,并使用相同函数执行频域卷积。需要注意的是,我们可能需要缩放/裁剪输出图像以使输出值保持像素的浮点值范围 [0,1] 内:
kernel = np.array([[0,-1,0],[-1,4,-1],[0,-1,0]])
im2 = signal.fftconvolve(im, kernel[:, :, np.newaxis], mode='same')
im2 = im2 / np.max(im2)
im2 = np.clip(im2, 0, 1)
(5) 最后,绘制输入图像和使用卷积创建的输出图像。
plt.figure(figsize=(20,10))
plt.subplot(131), plt.imshow(im), plt.axis('off'), plt.title('original image', size=10)
plt.subplot(132), plt.imshow(im1), plt.axis('off'), plt.title('output with Gaussian LPF', size=10)
plt.subplot(133), plt.imshow(im2), plt.axis('off'), plt.title('output with Laplacian HPF', size=10)
plt.tight_layout()
plt.show()
The above is the detailed content of How to implement low-pass filter blur image function in Python. For more information, please follow other related articles on the PHP Chinese website!

Hot AI Tools

Undresser.AI Undress
AI-powered app for creating realistic nude photos

AI Clothes Remover
Online AI tool for removing clothes from photos.

Undress AI Tool
Undress images for free

Clothoff.io
AI clothes remover

AI Hentai Generator
Generate AI Hentai for free.

Hot Article

Hot Tools

Notepad++7.3.1
Easy-to-use and free code editor

SublimeText3 Chinese version
Chinese version, very easy to use

Zend Studio 13.0.1
Powerful PHP integrated development environment

Dreamweaver CS6
Visual web development tools

SublimeText3 Mac version
God-level code editing software (SublimeText3)

Hot Topics
 1378
1378
 52
52
 Python: Exploring Its Primary Applications
Apr 10, 2025 am 09:41 AM
Python is widely used in the fields of web development, data science, machine learning, automation and scripting. 1) In web development, Django and Flask frameworks simplify the development process. 2) In the fields of data science and machine learning, NumPy, Pandas, Scikit-learn and TensorFlow libraries provide strong support. 3) In terms of automation and scripting, Python is suitable for tasks such as automated testing and system management.
 The 2-Hour Python Plan: A Realistic Approach
Apr 11, 2025 am 12:04 AM
You can learn basic programming concepts and skills of Python within 2 hours. 1. Learn variables and data types, 2. Master control flow (conditional statements and loops), 3. Understand the definition and use of functions, 4. Quickly get started with Python programming through simple examples and code snippets.
 Navicat's method to view MongoDB database password
Apr 08, 2025 pm 09:39 PM
It is impossible to view MongoDB password directly through Navicat because it is stored as hash values. How to retrieve lost passwords: 1. Reset passwords; 2. Check configuration files (may contain hash values); 3. Check codes (may hardcode passwords).
 How to use AWS Glue crawler with Amazon Athena
Apr 09, 2025 pm 03:09 PM
As a data professional, you need to process large amounts of data from various sources. This can pose challenges to data management and analysis. Fortunately, two AWS services can help: AWS Glue and Amazon Athena.
 How to start the server with redis
Apr 10, 2025 pm 08:12 PM
The steps to start a Redis server include: Install Redis according to the operating system. Start the Redis service via redis-server (Linux/macOS) or redis-server.exe (Windows). Use the redis-cli ping (Linux/macOS) or redis-cli.exe ping (Windows) command to check the service status. Use a Redis client, such as redis-cli, Python, or Node.js, to access the server.
 How to read redis queue
Apr 10, 2025 pm 10:12 PM
To read a queue from Redis, you need to get the queue name, read the elements using the LPOP command, and process the empty queue. The specific steps are as follows: Get the queue name: name it with the prefix of "queue:" such as "queue:my-queue". Use the LPOP command: Eject the element from the head of the queue and return its value, such as LPOP queue:my-queue. Processing empty queues: If the queue is empty, LPOP returns nil, and you can check whether the queue exists before reading the element.
 How to view server version of Redis
Apr 10, 2025 pm 01:27 PM
Question: How to view the Redis server version? Use the command line tool redis-cli --version to view the version of the connected server. Use the INFO server command to view the server's internal version and need to parse and return information. In a cluster environment, check the version consistency of each node and can be automatically checked using scripts. Use scripts to automate viewing versions, such as connecting with Python scripts and printing version information.
 How secure is Navicat's password?
Apr 08, 2025 pm 09:24 PM
Navicat's password security relies on the combination of symmetric encryption, password strength and security measures. Specific measures include: using SSL connections (provided that the database server supports and correctly configures the certificate), regularly updating Navicat, using more secure methods (such as SSH tunnels), restricting access rights, and most importantly, never record passwords.


