How to use SpringBoot integrated interface management tool Swagger
1. Introduction to Swagger
Swagger is a series of RESTful API tools. Through Swagger, you can get an interactive document of the project, automatic generation of client SDK and other functions.
The goal of Swagger is to define a standard, language-independent interface for REST APIs, so that people and computers can't see the source code or documents or can't pass network traffic detection. Ability to discover and understand the functionality of various services. When services are defined through Swagger, consumers can interact with remote services with a small amount of implementation logic.
2. Springboot integrates swagger
The idea of using Spring Boot to integrate Swagger is to use annotations to mark the information that needs to be displayed in the API document. Swagger will use the annotations marked in the project to mark the information. Generate corresponding API documentation. Swagger is known as the most popular API tool in the world. It provides a complete solution for API management. The factors that need to be considered for API document management are basically included. Here we will explain the most commonly used customization content.
1. Add swagger coordinates
Spring Boot integrates Swagger 3. It is very simple. You only need to introduce dependencies and do basic configuration.
<dependency>
    <groupId>io.springfox</groupId>
    <artifactId>springfox-boot-starter</artifactId>
    <version>3.0.0</version>
</dependency>2. Swagger Helloword implementation
2.1. Create springboot project
Add the @EnableOpenApi annotation to the startup class to enable the swagger api document function
import org.springframework.boot.SpringApplication;
import org.springframework.boot.autoconfigure.SpringBootApplication;
import springfox.documentation.oas.annotations.EnableOpenApi;

@SpringBootApplication
@EnableOpenApi  //启动swagger api文档注解
public class SpringBootWithSwaggerApplication {
    public static void main(String[] args) {
        SpringApplication.run(SpringBootWithSwaggerApplication.class, args);
    }

}2.2. Write an interface
import org.springframework.web.bind.annotation.GetMapping;
import org.springframework.web.bind.annotation.RestController;

/**
 * @author 阿水
 * @create 2023-04-11 9:54
 */
@RestController()
public class SwaggerController {
    @GetMapping ("hello")
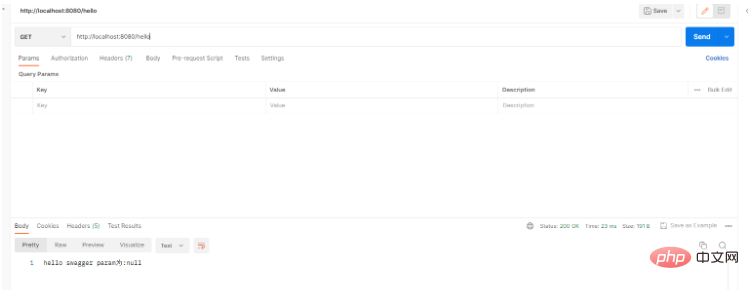
    public String hello(String params) {
        return "hello swagger"+" param为:"+params;
    }
}
2.3. Access address
http://localhost:8080/swagger-ui/index.html

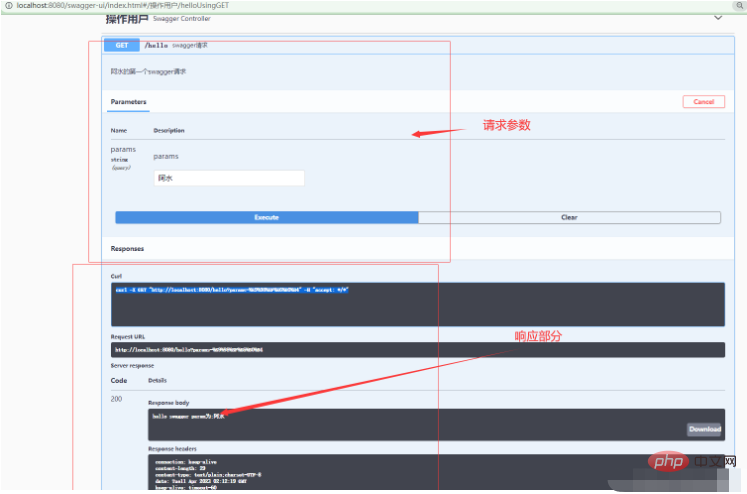
Swagger indicates through annotations that the interface will generate documents, including interface name, request method, parameters, return information, etc. 1,
Api annotations and ApiOperation annotations
@Api
语法:
  @Api(tags = "用户操作")
  或
@Api(tags = {"用户操作","用户操作2"})@ApiOperation
语法:
    @ApiOperation(value = "",
                  notes = "",
                  response = )
属性说明:
  value:方法说明标题
  notes:方法详细描述
response:方法返回值类型import io.swagger.annotations.Api;
import io.swagger.annotations.ApiOperation;
import org.springframework.web.bind.annotation.GetMapping;
import org.springframework.web.bind.annotation.RestController;
/**
* @author 阿水
* @create 2023-04-11 9:54
*/
@RestController()
@Api(tags = {"操作用户"})
public class SwaggerController {
@GetMapping ("hello")
@ApiOperation(value = "swagger请求",notes = "阿水的第一个swagger请求",response = String.class)
public String hello(String params) {
return "hello swagger"+" param为:"+params;
}
}ApiImplicitParams annotations and ApiImplicitParam
@ApiImplicitParams annotations and @ApiImplicitParam are used for non-object parameters (parameter binding) in methods Use when arriving at a simple type.) Explain
语法:
@ApiImplicitParams(value = {
     @ApiImplicitParam(name="", value = "", type = "", required = true, paramType = "", defaultValue  = "")
})

属性说明:
    name:形参名称
    value:形参的说明文字
    type:形参类型
    required:该参数是否必须  true|false
    paramType: 用于描述参数是以何种方式传递到 Controller 的,它的值常见有: path, query, body 和 header
        path 表示参数是『嵌在』路径中的,它和 @PathVariable 参数注解遥相呼应;
    	query 表示参数是以 query string 的形式传递到后台的(无论是 get 请求携带在 url 中,还是 post 请求携带在请求体中),它和 @RequestParam 参数注解遥相呼应;
    	header 表示参数是『藏在』请求头中传递到后台的,它和 @RequestHeader 参数注解遥相呼应的。
    	form 不常用.
defaultValue :参数默认值import io.swagger.annotations.Api;
import io.swagger.annotations.ApiImplicitParam;
import io.swagger.annotations.ApiImplicitParams;
import io.swagger.annotations.ApiOperation;
import org.springframework.web.bind.annotation.GetMapping;
import org.springframework.web.bind.annotation.RestController;
/**
* @author 阿水
* @create 2023-04-11 9:54
*/
@RestController()
@Api(tags = {"操作用户"})
public class SwaggerController {
@GetMapping ("hello")
@ApiOperation(value = "swagger请求",notes = "阿水的第一个swagger请求",response = String.class)
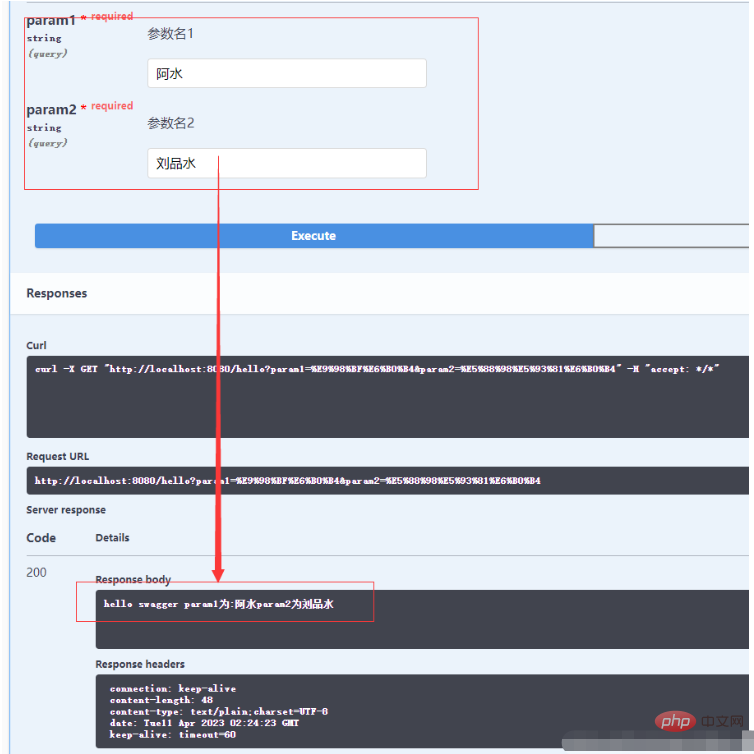
@ApiImplicitParams(value ={
@ApiImplicitParam(name="param1",
value = "参数名1",
type = "String",
required = true,
paramType = "query",
defaultValue = "阿水所想的默认值1" ),
@ApiImplicitParam(name="param2",
value = "参数名2",
type = "String",
required = true,
paramType = "query",
defaultValue = "阿水所想的默认值2" )
})
public String hello(String param1,String param2) {
return "hello swagger"+" param1为:"+param1+"param2为"+param2;
}
} ##3, ApiModel annotation and ApiModelProperty
- @ApiModel
is used on entity classes to describe the class and is used for parameter reception instructions in entity classes.
@ApiModel("用户类")
@Data
public class Users {

    @ApiModelProperty(value = "编码:主键")
    private Integer id;

    @ApiModelProperty(value = "用户名")
    private String username;

    @ApiModelProperty(value = "密码")
    private String password;

}
Copy after login4. ApiResponse and ApiResponses
@ApiResponses annotation and @ApiResponse annotation are marked on the Controller method to describe the response of the HTTP request
/**
     * 添加用户
     *
     * @param user
     * @return
     */
    @PostMapping("/add")
    @ApiOperation(value = "添加用户",notes = "添加用户信息",response = ResponseResult.class)
    @ApiResponses({ @ApiResponse(code = 200, message = "添加成功", response = ResponseResult.class),
            	    @ApiResponse(code = 500, message = "添加失败", response = ResponseResult.class) })
    public ResponseResult<Void> addUser(@RequestBody User user) {
        //获得生成的加密盐
        user.setSalt(SaltUtils.getSalt());
        int n = userService.addUser(user);
        if (n > 0) {
            return new ResponseResult<Void>(200, "添加成功");
        }
        return new ResponseResult<Void>(500, "添加失败");
}5. Create the SwaggerConfig configuration class
Add two methods in SwaggerConfig: (one method is to make auxiliary preparations for the other method)
api() method uses @Bean, Initialized at startup, the instance Docket (Swagger API summary object) is returned. What needs to be noted here is that .apis(RequestHandlerSelectors.basePackage("xxx.yyy.zzz")) specifies the package path that needs to be scanned. Only the Controller under this path Classes will automatically generate Swagger API documentation.
import org.springframework.context.annotation.Bean;
import org.springframework.context.annotation.Configuration;
import springfox.documentation.builders.ApiInfoBuilder;
import springfox.documentation.builders.PathSelectors;
import springfox.documentation.builders.RequestHandlerSelectors;
import springfox.documentation.service.ApiInfo;
import springfox.documentation.spi.DocumentationType;
import springfox.documentation.spring.web.plugins.Docket;

/**
 * Swagger配置类
 */
@Configuration  //项目启动时加载此类
public class SwaggerConfig {
    @Bean
    public Docket api(){
        return new Docket(DocumentationType.OAS_30)
                .apiInfo(apiInfo())
                .select()
                // 此处自行修改为自己的 Controller 包路径。
                .apis(RequestHandlerSelectors.basePackage("com.lps.controller"))
                .paths(PathSelectors.any())
                .build();
    }

    public ApiInfo apiInfo(){
        return new ApiInfoBuilder()
                .title("阿水的项目接口文挡")
                .description("阿水的 Project Swagger2 UserService Interface")  //说明信息
                .termsOfServiceUrl("http://localhost:8080/swagger-ui/index.html") //文档生成的主页地址
                .version("1.0")  //文档版本
                .build();
    }
}apiInfo() method configuration is relatively important. The basic information displayed on the main configuration page includes title, description, version, terms of service, etc. If you look at the source code of the ApiInfo class, you will also find more configurations such as license support.
4. Springsecurity integrates swagger
4.1, configures the release address
  http.authorizeRequests().antMatchers( "/swagger-ui.html",
                "/swagger-ui/*",
                "/swagger-resources/**",
                "/v2/api-docs",
                "/v3/api-docs",
                "/webjars/**").permitAll()
.anyRequest().authenticated();4.2, replaces the UI
The entire process above has been completed, but the generated In fact, many people don't like the interface document page, and feel that it is not in line with the usage habits of Chinese people. Therefore, some experts have provided other UI test pages. The use of this page is quite extensive.
Import the following dependencies, restart the project and access the address: http://localhost:8080/doc.html
	<dependency>
        <groupId>com.github.xiaoymin</groupId>
        <artifactId>swagger-bootstrap-ui</artifactId>
        <version>1.9.6</version>
</dependency>The above is the detailed content of How to use SpringBoot integrated interface management tool Swagger. For more information, please follow other related articles on the PHP Chinese website!

Hot AI Tools

Undresser.AI Undress
AI-powered app for creating realistic nude photos

AI Clothes Remover
Online AI tool for removing clothes from photos.

Undress AI Tool
Undress images for free

Clothoff.io
AI clothes remover

Video Face Swap
Swap faces in any video effortlessly with our completely free AI face swap tool!

Hot Article

Hot Tools

Notepad++7.3.1
Easy-to-use and free code editor

SublimeText3 Chinese version
Chinese version, very easy to use

Zend Studio 13.0.1
Powerful PHP integrated development environment

Dreamweaver CS6
Visual web development tools

SublimeText3 Mac version
God-level code editing software (SublimeText3)

Hot Topics
 1389
1389
 52
52
 How Springboot integrates Jasypt to implement configuration file encryption
Jun 01, 2023 am 08:55 AM
Introduction to Jasypt Jasypt is a java library that allows a developer to add basic encryption functionality to his/her project with minimal effort and does not require a deep understanding of how encryption works. High security for one-way and two-way encryption. , standards-based encryption technology. Encrypt passwords, text, numbers, binaries... Suitable for integration into Spring-based applications, open API, for use with any JCE provider... Add the following dependency: com.github.ulisesbocchiojasypt-spring-boot-starter2. 1.1Jasypt benefits protect our system security. Even if the code is leaked, the data source can be guaranteed.
 How to generate API documentation using Swagger in PHP
Jun 17, 2023 am 10:40 AM
With the continuous development of web applications, API has become one of the standards for modern web application development. However, as the number and complexity of APIs increases, maintaining and documenting them becomes increasingly complex. To solve this problem, Swagger came into being. It is a tool for generating API documentation, making it easier for developers to maintain and document APIs, while also providing visual documentation and various other features. In this article, we will discuss how to use Swagger in PHP to generate a
 Laravel development: How to use Laravel Swagger to generate API documentation?
Jun 13, 2023 am 09:35 AM
Laravel development: How to use LaravelSwagger to generate API documentation? When developing web applications, dealing with API documentation is often a tedious but essential task. Use Swagger to automatically generate and visualize API documentation. In Laravel development, we can use the LaravelSwagger extension package to easily generate SwaggerAPI documentation. This article will guide you how to use L
 How to use Redis to implement distributed locks in SpringBoot
Jun 03, 2023 am 08:16 AM
1. Redis implements distributed lock principle and why distributed locks are needed. Before talking about distributed locks, it is necessary to explain why distributed locks are needed. The opposite of distributed locks is stand-alone locks. When we write multi-threaded programs, we avoid data problems caused by operating a shared variable at the same time. We usually use a lock to mutually exclude the shared variables to ensure the correctness of the shared variables. Its scope of use is in the same process. If there are multiple processes that need to operate a shared resource at the same time, how can they be mutually exclusive? Today's business applications are usually microservice architecture, which also means that one application will deploy multiple processes. If multiple processes need to modify the same row of records in MySQL, in order to avoid dirty data caused by out-of-order operations, distribution needs to be introduced at this time. The style is locked. Want to achieve points
 How to solve the problem that springboot cannot access the file after reading it into a jar package
Jun 03, 2023 pm 04:38 PM
Springboot reads the file, but cannot access the latest development after packaging it into a jar package. There is a situation where springboot cannot read the file after packaging it into a jar package. The reason is that after packaging, the virtual path of the file is invalid and can only be accessed through the stream. Read. The file is under resources publicvoidtest(){Listnames=newArrayList();InputStreamReaderread=null;try{ClassPathResourceresource=newClassPathResource("name.txt");Input
 How to implement Springboot+Mybatis-plus without using SQL statements to add multiple tables
Jun 02, 2023 am 11:07 AM
When Springboot+Mybatis-plus does not use SQL statements to perform multi-table adding operations, the problems I encountered are decomposed by simulating thinking in the test environment: Create a BrandDTO object with parameters to simulate passing parameters to the background. We all know that it is extremely difficult to perform multi-table operations in Mybatis-plus. If you do not use tools such as Mybatis-plus-join, you can only configure the corresponding Mapper.xml file and configure The smelly and long ResultMap, and then write the corresponding sql statement. Although this method seems cumbersome, it is highly flexible and allows us to
 Comparison and difference analysis between SpringBoot and SpringMVC
Dec 29, 2023 am 11:02 AM
SpringBoot and SpringMVC are both commonly used frameworks in Java development, but there are some obvious differences between them. This article will explore the features and uses of these two frameworks and compare their differences. First, let's learn about SpringBoot. SpringBoot was developed by the Pivotal team to simplify the creation and deployment of applications based on the Spring framework. It provides a fast, lightweight way to build stand-alone, executable
 How SpringBoot customizes Redis to implement cache serialization
Jun 03, 2023 am 11:32 AM
1. Customize RedisTemplate1.1, RedisAPI default serialization mechanism. The API-based Redis cache implementation uses the RedisTemplate template for data caching operations. Here, open the RedisTemplate class and view the source code information of the class. publicclassRedisTemplateextendsRedisAccessorimplementsRedisOperations, BeanClassLoaderAware{//Declare key, Various serialization methods of value, the initial value is empty @NullableprivateRedisSe


