

What is the method for SpringBoot to integrate tomcat?

spring boot supports current mainstream servlet containers, including tomcat, jetty, and undertow. These servlet containers can be easily integrated in our projects, reducing the workload of development and operation and maintenance. Traditional application development requires complicated steps: install tomcat –> modify tomcat configuration –> deploy war package –> start tomcat –> operation and maintenance... this workload Not small, especially when deploying clusters and migrating applications. After adopting spring boot, everything becomes so simple. Packaging - java -jar - operation and maintenance, you only need a jar package to deploy and install at will.
SPI
Before analyzing the source code, let’s first understand the SPI mechanism of spring. We know that jdk provides a default SPI implementation (ServiceLoader) to facilitate application expansion, and dubbo also has its own SPI. The same is true for spring. It provides us with SpringFactoriesLoader, which allows developers to extend through the META-INF/spring.factories file. Here is an example for easy understanding
If I want to add an ApplicationContextInitializer to the spring container to do some initialization work, we can use the SPI function provided by spring to complete this requirement.
First, create the META-INF/spring.factories file in the project. The file content is as follows:
org.springframework.context.ApplicationContextInitializer= \
We write another test case, and then we can obtain the ApplicationContextInitializer we defined through SPI. It seems to be a very simple function, but spring boot uses this powerful extension point to integrate commonly used open source frameworks for us on the basis of spring framework
@Test
public void testSpringSpi() {
    List<ApplicationListener> listeners = SpringFactoriesLoader.loadFactories( ApplicationListener.class,
            ClassUtils.getDefaultClassLoader() );
System.out.println( listeners ); Let’s take a look at this SpringFactoriesLoader , the key code is as follows, it reads the META-INF/spring.factories file, finds the class specified by the method parameter, then creates the corresponding instance object, and returns it. In addition, sorting is also supported, which can be sorted in the following ways
org.springframework.core.Ordered: Implement this interface
org .springframework.core.annotation.Order: Annotation
javax.annotation.Priority: Annotation
public static <T> List<T> loadFactories(Class<T> factoryClass, ClassLoader classLoader) {
    List<String> factoryNames = loadFactoryNames(factoryClass, classLoaderToUse);
    List<T> result = new ArrayList<T>(factoryNames.size());
    for (String factoryName : factoryNames) {
        result.add(instantiateFactory(factoryName, factoryClass, classLoaderToUse));
    }
    AnnotationAwareOrderComparator.sort(result);
return result;Next, let’s analyze spring How boot uses the SPI mechanism to integrate tomcat
SpringBoot for Tomcat
Before analyzing the source code of tomcat integration, let’s first understand EmbeddedServletContainer
EmbeddedServletContainer:
spring uses EmbeddedServletContainer to encapsulate the embedded servlet container, providing start, stop and other interfaces to control the life cycle of the container, and spring has built-in tomcat , jetty, undertow container implementation, as shown in the class diagram
Let’s take a look at the most commonly used SpringBootApplication annotations in spring boot. It turns out to be a complex of multiple annotations, and this EnableAutoConfiguration is the annotation used by spring boot for automatic configuration
@SpringBootConfiguration
@EnableAutoConfiguration
@ComponentScan(excludeFilters = {
        @Filter(type = FilterType.CUSTOM, classes = TypeExcludeFilter.class),
        @Filter(type = FilterType.CUSTOM, classes = AutoConfigurationExcludeFilter.class) })
public @interface SpringBootApplication {
// code...... We can see a large number of SPI configurations in the spring-boot-autoconfigure module, some of which are as follows
# Auto Configure
org.springframework.boot.autoconfigure.EnableAutoConfiguration=\
org.springframework.boot.autoconfigure.web.EmbeddedServletContainerAutoConfiguration,\
Original EnableAutoConfiguration annotation introduced EmbeddedServletContainerAutoConfiguration, and this is the configuration class of the embedded servlet container. Tomcat, jetty, and undertow are all in this class, through @ConditionalOnClassAnnotation loads different servlet containers. However, this class only registers TomcatEmbeddedServletContainerFactory, which is not enough to help us resolve all confusions. Don't worry, let's take a look at the class diagram of TomcatEmbeddedServletContainerFactory first.
As can be seen from the above class diagram, it implements the following interface:
EmbeddedServletContainerFactory: It is a factory pattern used to create
EmbeddedServletContainer, That is, it is used to create an embedded Servlet container. There is only onegetEmbeddedServletContainermethod in this interface.- ##ConfigurableEmbeddedServletContainer: used to configure
EmbeddedServletContainer
, such as Talk about ports, context paths, etc.
EmbeddedServletContainerFactory, take a look at getEmbeddedServletContainerMethod call stack. The GenericWebApplicationContext#onRefresh() method is rewritten in EmbeddedWebApplicationContext, and the getEmbeddedServletContainer method is called to create a servlet container. We will analyze this creation process next.
EmbeddedWebApplicationContext.java
@Override
protected void onRefresh() {
    super.onRefresh();
    createEmbeddedServletContainer();
}
private void createEmbeddedServletContainer() {
    EmbeddedServletContainer localContainer = this.embeddedServletContainer;
    ServletContext localServletContext = getServletContext();
    if (localContainer == null && localServletContext == null) {
        // 从容器中获取bean,如果使用tomcat则返回TomcatEmbeddedServletContainerFactory
        EmbeddedServletContainerFactory containerFactory = getEmbeddedServletContainerFactory();
        this.embeddedServletContainer = containerFactory.getEmbeddedServletContainer(getSelfInitializer());
    }
    else if (localServletContext != null) {
        getSelfInitializer().onStartup(localServletContext);
    }
    initPropertySources();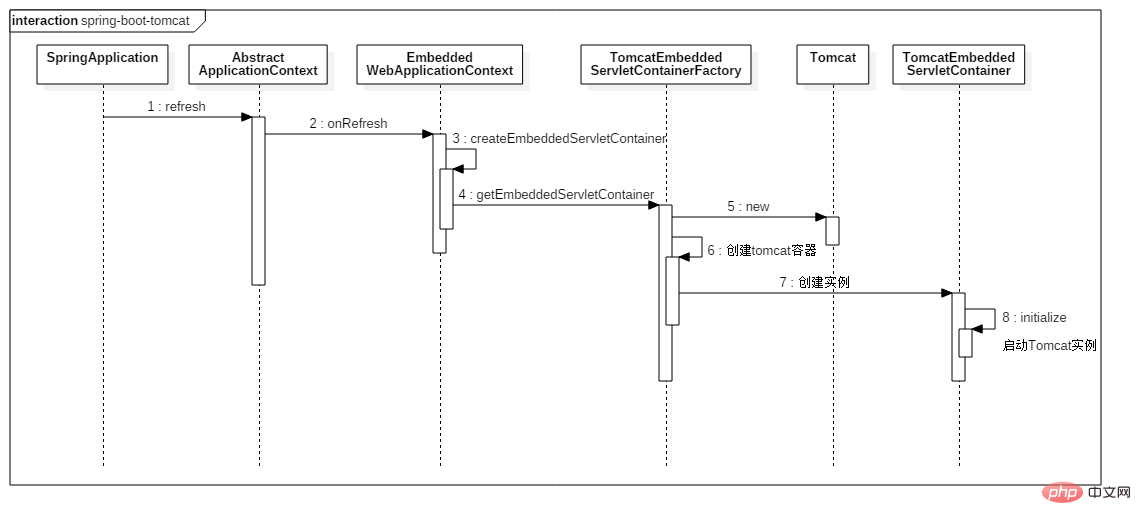
由上图可知,EmbeddedWebApplicationContext在执行onRefresh方法的时候,首先调用父类的onRefresh,然后从容器中获取EmbeddedServletContainerFactory的实现类。由于我们在 classpath 下面可以获取 tomcat 的 jar 包,因此EmbeddedServletContainerAutoConfiguration会在 spring 容器中注册TomcatEmbeddedServletContainerFactory这个 bean。然后,由它创建TomcatEmbeddedServletContainer,我们来看看具体的创建过程,代码如下所示:
TomcatEmbeddedServletContainerFactory.java
@Override
public EmbeddedServletContainer getEmbeddedServletContainer(
        ServletContextInitializer... initializers) {
    Tomcat tomcat = new Tomcat();   // 实例化 apache Tomcat
    File baseDir = (this.baseDirectory != null ? this.baseDirectory
            : createTempDir("tomcat"));
    tomcat.setBaseDir(baseDir.getAbsolutePath());
    // 创建 Connector 组件,默认使用org.apache.coyote.http11.Http11NioProtocol
    Connector connector = new Connector(this.protocol);
    tomcat.getService().addConnector(connector);
    // 支持对 Connector 进行自定义设置,比如设置线程池、最大连接数等
    customizeConnector(connector);
    tomcat.setConnector(connector);
    tomcat.getHost().setAutoDeploy(false);
    configureEngine(tomcat.getEngine());
    for (Connector additionalConnector : this.additionalTomcatConnectors) {
        tomcat.getService().addConnector(additionalConnector);
    }
    prepareContext(tomcat.getHost(), initializers);
return getTomcatEmbeddedServletContainer(tomcat);首先是实例化Tomcat对象,然后创建Connector组件,并且对Connector进行相关的参数设置,同时也允许我们通过TomcatConnectorCustomizer接口进行自定义的设置。OK,创建了Tomcat实例之后,需要创建TomcatEmbeddedServletContainer,它依赖Tomcat对象,在构造方法中便会启动 Tomcat 容器,从而完成各个组件的启动流程
public TomcatEmbeddedServletContainer(Tomcat tomcat, boolean autoStart) {
    Assert.notNull(tomcat, "Tomcat Server must not be null");
    this.tomcat = tomcat;
    this.autoStart = autoStart;
    initialize();
}
private void initialize() throws EmbeddedServletContainerException {
    synchronized (this.monitor) {
        addInstanceIdToEngineName();
        // Remove service connectors to that protocol binding doesn't happen yet
        removeServiceConnectors();
        // Start the server to trigger initialization listeners
        this.tomcat.start();
        // We can re-throw failure exception directly in the main thread
        rethrowDeferredStartupExceptions();
        Context context = findContext();
        ContextBindings.bindClassLoader(context, getNamingToken(context),
                    getClass().getClassLoader());
        // Unlike Jetty, all Tomcat threads are daemon threads. We create a
        // blocking non-daemon to stop immediate shutdown
        startDaemonAwaitThread();
}The above is the detailed content of What is the method for SpringBoot to integrate tomcat?. For more information, please follow other related articles on the PHP Chinese website!

Hot AI Tools

Undresser.AI Undress
AI-powered app for creating realistic nude photos

AI Clothes Remover
Online AI tool for removing clothes from photos.

Undress AI Tool
Undress images for free

Clothoff.io
AI clothes remover

Video Face Swap
Swap faces in any video effortlessly with our completely free AI face swap tool!

Hot Article
Hot Tools

Notepad++7.3.1
Easy-to-use and free code editor

SublimeText3 Chinese version
Chinese version, very easy to use

Zend Studio 13.0.1
Powerful PHP integrated development environment

Dreamweaver CS6
Visual web development tools

SublimeText3 Mac version
God-level code editing software (SublimeText3)
Hot Topics
 1393
1393
 52
37
110
52
37
110

 How to deploy jar project in tomcat
Apr 21, 2024 am 07:27 AM
How to deploy jar project in tomcat
Apr 21, 2024 am 07:27 AM
To deploy a JAR project to Tomcat, follow these steps: Download and unzip Tomcat. Configure the server.xml file, set the port and project deployment path. Copies the JAR file to the specified deployment path. Start Tomcat. Access the deployed project using the provided URL.
 How to allow external network access to tomcat server
Apr 21, 2024 am 07:22 AM
How to allow external network access to tomcat server
Apr 21, 2024 am 07:22 AM
To allow the Tomcat server to access the external network, you need to: modify the Tomcat configuration file to allow external connections. Add a firewall rule to allow access to the Tomcat server port. Create a DNS record pointing the domain name to the Tomcat server public IP. Optional: Use a reverse proxy to improve security and performance. Optional: Set up HTTPS for increased security.
 Where is the tomcat installation directory?
Apr 21, 2024 am 07:48 AM
Where is the tomcat installation directory?
Apr 21, 2024 am 07:48 AM
Tomcat installation directory: Default path: Windows: C:\Program Files\Apache Software Foundation\Tomcat 9.0macOS:/Library/Tomcat/Tomcat 9.0Linux:/opt/tomcat/tomcat9 Custom path: You can specify it during installation. Find the installation directory: use whereis or locate command.
 How to deploy multiple projects in tomcat
Apr 21, 2024 am 09:33 AM
How to deploy multiple projects in tomcat
Apr 21, 2024 am 09:33 AM
To deploy multiple projects through Tomcat, you need to create a webapp directory for each project and then: Automatic deployment: Place the webapp directory in Tomcat's webapps directory. Manual deployment: Manually deploy the project in Tomcat's manager application. Once the project is deployed, it can be accessed by its deployment name, for example: http://localhost:8080/project1.
 How to check the number of concurrent connections in tomcat
Apr 21, 2024 am 08:12 AM
How to check the number of concurrent connections in tomcat
Apr 21, 2024 am 08:12 AM
How to check the number of concurrent Tomcat connections: Visit the Tomcat Manager page (http://localhost:8080/manager/html) and enter your user name and password. Click Status->Sessions in the left navigation bar to see the number of concurrent connections at the top of the page.
 Where is the root directory of the tomcat website?
Apr 21, 2024 am 09:27 AM
Where is the root directory of the tomcat website?
Apr 21, 2024 am 09:27 AM
The Tomcat website root directory is located in Tomcat's webapps subdirectory and is used to store web application files, static resources, and the WEB-INF directory; it can be found by looking for the docBase attribute in the Tomcat configuration file.
 How to check the port number of tomcat
Apr 21, 2024 am 08:00 AM
How to check the port number of tomcat
Apr 21, 2024 am 08:00 AM
The Tomcat port number can be viewed by checking the port attribute of the <Connector> element in the server.xml file. Visit the Tomcat management interface (http://localhost:8080/manager/html) and view the "Status" tab. Run "catalina.sh version" from the command line and look at the "Port:" line.
 How to run html and jsp on tomcat
Apr 21, 2024 am 09:04 AM
How to run html and jsp on tomcat
Apr 21, 2024 am 09:04 AM
Tomcat can run HTML and JSP. The method is as follows: copy the HTML file to the corresponding subdirectory of the Tomcat directory and access it in the browser. Copy the JSP file to the corresponding subdirectory of the Tomcat directory, and use the <%@ page %> directive to specify the Java code and access it in the browser.
