

How to use Vuex in Vue3

What does Vuex do?
Vue Official: State Management Tool
What is state management?
State that needs to be shared among multiple components, and it is responsive, one change, all changes .
For example, some globally used status information: user login status, user name, geographical location information, items in the shopping cart, etc.
At this time we need such a tool. Global state management, Vuex is such a tool.
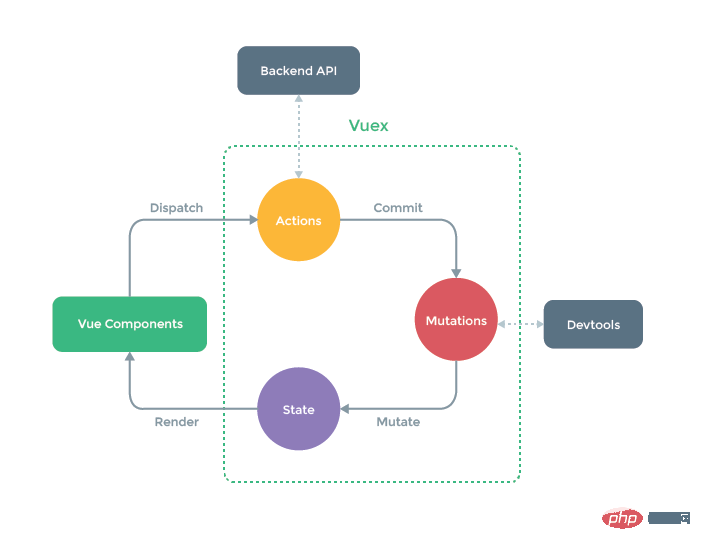
Single page state management
View–>Actions—>State
The view layer (view) triggers the operation (action) changes the state (state) and responds back to the view Layer (view)
vuex (Vue3.2 version)
store/index.js Create store object and export store
import { createStore } from 'vuex'

export default createStore({
  state: {
  },
  mutations: {
  },
  actions: {
  },
  modules: {
  }
})main.js Import and use
...
import store from './store'
...
app.use(store)
Multi-page state management
Introduction to vuex store object properties
Methods to obtain store instance objects in Vue3
vue2 You can get the instance object of the store through this.$store.xxx.
The setup in vue3 is executed before beforecreate and created. At this time, the vue object has not been created yet, and there is no previous this, so here we need to use another method to obtain the store object.
import { useStore } from 'vuex' // 引入useStore 方法
const store = useStore()  // 该方法用于返回store 实例
console.log(store) // store 实例对象1. state
Where to store data
state: {
  count: 100,
  num: 10
},Usage: The usage method is roughly the same as the version in vue2.x, through the $store.state.property name Get the attributes in state.
//template中
<span>{{$store.state.count}}</span>
<span>{{$store.state.num}}</span>You can perform data changes directly in the state, but Vue does not recommend this. Because for the Vue development tool devtools, if data changes are made directly in the state, devtools cannot track it. In vuex, it is hoped that data changes can be performed through actions (asynchronous operations) or mutations (synchronous operations), so that data changes can be directly observed and recorded in devtools, making it easier for developers to debug.
In addition, when adding attributes or deleting objects in the state in vue3, you no longer need to use vue.set() or vue.delete() to perform responsive processing of the object. You can directly new The added object properties are already responsive.
2. Mutations
The only way to update Vuex's store status is to submit mutations
Synchronization operations can be performed directly in mutations
mutations mainly include Part 2:
String event type (type)
A ** callback function (handler) ** The callback function’s One parameter is state
mutations: {
  // 传入 state
  increment (state) {
    state.count++
  }
}Triggered by $store.commit('method name') in template
In vue3.x, you need to get the ** store instance If so, you need to call a function like useStore **, and import the parameters and parameter passing methods of
// 导入 useStore 函数
import { useStore } from 'vuex'
const store = useStore()
store.commit('increment')mutation in vuex.
mution receives parameters and writes them directly in the defined method. The passed parameters can be accepted inside
// ...state定义count
mutations: {
  sum (state, num) {
    state.count += num
  }
}Parameters are passed through the commit payload
Use store.commit('function name in mutation', 'parameters that need to be passed') to add in commit Passing parameters in the form of parameters
<h3 id="this-store-state-count">{{this.$store.state.count}}</h3>
<button @click="add(10)">++</button>
...
<script setup>
// 获取store实例,获取方式看上边获取store实例方法
const add = (num) => {
store.commit('sum', num)
}
</script>Mutation submission style
As mentioned earlier, mutation mainly consists of two parts: type and callback function, and parameters are passed in the form of commit payload. (Submit), below we can
submit the mutation in this way
const add = (num) => {
  store.commit({
    type: 'sum',  // 类型就是mution中定义的方法名称
    num
  })
}

...
mutations: {
  sum (state, payload) {
    state.count += payload.num
  }
}3. actions
Asynchronous operations are performed in the action and then passed to mutation
The basic usage of action is as follows:
The default parameter of the method defined in action is ** context context**, which can be understood as the store object
Get the store through the context context object. Trigger the method in the mutation through commit to complete the asynchronous operation
...
mutations: {
  sum (state, num) {
    state.count += num
  }
},
actions: {
  // context 上下文对象,可以理解为store
  sum_actions (context, num) {
    setTimeout(() => {
      context.commit('sum', num)  // 通过context去触发mutions中的sum
    }, 1000)
  }
},Call the sum_action method defined in the action through dispatch in the template
// ...template
store.dispatch('sum_actions', num)
Use promise to complete the asynchronous operation and notify the component asynchronously The execution succeeds or fails.
// ...
const addAction = (num) => {
  store.dispatch('sum_actions', {
    num
  }).then((res) => {
    console.log(res)
  }).catch((err) => {
    console.log(err)
  })
}The sun_action method returns a promise. When the accumulated value is greater than 30, it will no longer be accumulated and an error will be thrown.
actions: {
sum_actions (context, payload) {
return new Promise((resolve, reject) => {
setTimeout(() => {
// 通过 context 上下文对象拿到 count
if (context.state.count < 30) {
context.commit('sum', payload.num)
resolve('异步操作执行成功')
} else {
reject(new Error('异步操作执行错误'))
}
}, 1000)
})
}
},4. getters
Similar to the computed properties of components
import { createStore } from 'vuex'

export default createStore({
  state: {
    students: [{ name: 'mjy', age: '18'}, { name: 'cjy', age: '22'}, { name: 'ajy', age: '21'}]
  },
  getters: {
    more20stu (state) { return state.students.filter(item => item.age >= 20)}
  }
})Use the input of calling the $store.getters.method name
//...template
<h3 id="store-getters-more-stu">{{$store.getters.more20stu}}</h3> // 展示出小于20岁的学生getters Parameters, getters can receive two parameters, one is state, and the other is its own getters, and calls its own existing methods.
getters: {
  more20stu (state, getters) { return getters.more20stu.length}
}Parameters and parameter passing methods of getters
The above are the two fixed parameters of getters. If you want to pass parameters to getters, let them filter people who are greater than age. , you can do this
Return a function that accepts Age and handles
getters: {
  more20stu (state, getters) { return getters.more20stu.length},
  moreAgestu (state) {
      return function (Age) {
        return state.students.filter(item =>
          item.age >= Age
        )
      }
    }
  // 该写法与上边写法相同但更简洁,用到了ES6中的箭头函数,如想了解es6箭头函数的写法
  // 可以看这篇文章 https://blog.csdn.net/qq_45934504/article/details/123405813?spm=1001.2014.3001.5501
  moreAgestu_Es6: state => {
    return Age => {
      return state.students.filter(item => item.age >= Age)
    }
  }
}Use
//...template
<h3 id="store-getters-more-stu">{{$store.getters.more20stu}}</h3> // 展示出小于20岁的学生
{{$store.getters.moreAgestu(18)}}
// 通过参数传递, 展示出年龄小于18的学生5. modules
When the application becomes complex , as more variables are managed in the state, the store object may become quite bloated.
In order to solve this problem, vuex allows us to divide the store into modules, and each module has its own state, mutation, action, getters, etc.
In the store file Create a new modules folder
You can create a single module in modules, and each module handles the functions of one module
store/modules/user.js 处理用户相关功能
store/modules/pay.js 处理支付相关功能
store/modules/cat.js 处理购物车相关功能
// user.js模块
// 导出
export default {
  namespaced: true, // 为每个模块添加一个前缀名,保证模块命明不冲突
  state: () => {},
  mutations: {},
  actions: {}
}最终通过 store/index.js 中进行引入
// store/index.js
import { createStore } from 'vuex'
import user from './modules/user.js'
import user from './modules/pay.js'
import user from './modules/cat.js'
export default createStore({
  modules: {
    user,
    pay,
    cat
  }
})在template中模块中的写法和无模块的写法大同小异,带上模块的名称即可
<h3 id="store-state-user-count">{{$store.state.user.count}}</h3>store.commit('user/sum', num) // 参数带上模块名称 store.dispatch('user/sum_actions', sum)
The above is the detailed content of How to use Vuex in Vue3. For more information, please follow other related articles on the PHP Chinese website!

Hot AI Tools

Undresser.AI Undress
AI-powered app for creating realistic nude photos

AI Clothes Remover
Online AI tool for removing clothes from photos.

Undress AI Tool
Undress images for free

Clothoff.io
AI clothes remover

AI Hentai Generator
Generate AI Hentai for free.

Hot Article
Hot Tools

Notepad++7.3.1
Easy-to-use and free code editor

SublimeText3 Chinese version
Chinese version, very easy to use

Zend Studio 13.0.1
Powerful PHP integrated development environment

Dreamweaver CS6
Visual web development tools

SublimeText3 Mac version
God-level code editing software (SublimeText3)
Hot Topics
 1378
1378
 52
52

 vue3+vite: How to solve the error when using require to dynamically import images in src
May 21, 2023 pm 03:16 PM
vue3+vite: How to solve the error when using require to dynamically import images in src
May 21, 2023 pm 03:16 PM
vue3+vite:src uses require to dynamically import images and error reports and solutions. vue3+vite dynamically imports multiple images. If vue3 is using typescript development, require will introduce image errors. requireisnotdefined cannot be used like vue2 such as imgUrl:require(' .../assets/test.png') is imported because typescript does not support require, so import is used. Here is how to solve it: use awaitimport
 How to refresh partial content of the page in Vue3
May 26, 2023 pm 05:31 PM
How to refresh partial content of the page in Vue3
May 26, 2023 pm 05:31 PM
To achieve partial refresh of the page, we only need to implement the re-rendering of the local component (dom). In Vue, the easiest way to achieve this effect is to use the v-if directive. In Vue2, in addition to using the v-if instruction to re-render the local dom, we can also create a new blank component. When we need to refresh the local page, jump to this blank component page, and then jump back in the beforeRouteEnter guard in the blank component. original page. As shown in the figure below, how to click the refresh button in Vue3.X to reload the DOM within the red box and display the corresponding loading status. Since the guard in the component in the scriptsetup syntax in Vue3.X only has o
 How Vue3 parses markdown and implements code highlighting
May 20, 2023 pm 04:16 PM
How Vue3 parses markdown and implements code highlighting
May 20, 2023 pm 04:16 PM
Vue implements the blog front-end and needs to implement markdown parsing. If there is code, it needs to implement code highlighting. There are many markdown parsing libraries for Vue, such as markdown-it, vue-markdown-loader, marked, vue-markdown, etc. These libraries are all very similar. Marked is used here, and highlight.js is used as the code highlighting library. The specific implementation steps are as follows: 1. Install dependent libraries. Open the command window under the vue project and enter the following command npminstallmarked-save//marked to convert markdown into htmlnpmins
 How to select an avatar and crop it in Vue3
May 29, 2023 am 10:22 AM
How to select an avatar and crop it in Vue3
May 29, 2023 am 10:22 AM
The final effect is to install the VueCropper component yarnaddvue-cropper@next. The above installation value is for Vue3. If it is Vue2 or you want to use other methods to reference, please visit its official npm address: official tutorial. It is also very simple to reference and use it in a component. You only need to introduce the corresponding component and its style file. I do not reference it globally here, but only introduce import{userInfoByRequest}from'../js/api' in my component file. import{VueCropper}from'vue-cropper&
 How to use Vue3 reusable components
May 20, 2023 pm 07:25 PM
How to use Vue3 reusable components
May 20, 2023 pm 07:25 PM
Preface Whether it is vue or react, when we encounter multiple repeated codes, we will think about how to reuse these codes instead of filling a file with a bunch of redundant codes. In fact, both vue and react can achieve reuse by extracting components, but if you encounter some small code fragments and you don’t want to extract another file, in comparison, react can be used in the same Declare the corresponding widget in the file, or implement it through renderfunction, such as: constDemo:FC=({msg})=>{returndemomsgis{msg}}constApp:FC=()=>{return(
 How to use vue3+ts+axios+pinia to achieve senseless refresh
May 25, 2023 pm 03:37 PM
How to use vue3+ts+axios+pinia to achieve senseless refresh
May 25, 2023 pm 03:37 PM
vue3+ts+axios+pinia realizes senseless refresh 1. First download aiXos and pinianpmipinia in the project--savenpminstallaxios--save2. Encapsulate axios request-----Download js-cookienpmiJS-cookie-s//Introduce aixosimporttype{AxiosRequestConfig ,AxiosResponse}from"axios";importaxiosfrom'axios';import{ElMess
 How to use defineCustomElement to define components in Vue3
May 28, 2023 am 11:29 AM
How to use defineCustomElement to define components in Vue3
May 28, 2023 am 11:29 AM
Using Vue to build custom elements WebComponents is a collective name for a set of web native APIs that allow developers to create reusable custom elements (customelements). The main benefit of custom elements is that they can be used with any framework, even without one. They are ideal when you are targeting end users who may be using a different front-end technology stack, or when you want to decouple the final application from the implementation details of the components it uses. Vue and WebComponents are complementary technologies, and Vue provides excellent support for using and creating custom elements. You can integrate custom elements into existing Vue applications, or use Vue to build
 How to use Vue3 and Element Plus to implement automatic import
May 22, 2023 pm 04:58 PM
How to use Vue3 and Element Plus to implement automatic import
May 22, 2023 pm 04:58 PM
1 Introduction 1.1 Purpose ElementPlus uses on-demand introduction to greatly reduce the size of the packaged file. 1.2 The final effect is to automatically generate the components.d.ts file and introduce it into the file. The ElementPlus component automatically generates the components.d.ts file and introduce it into the file. ElementPlusAPI2 Preparation Install ElementPlus#Choose a package manager you like#NPM$npminstallelement-plus--save#Yarn$yarnaddelement-plus#pnpm$pnpminstallelement-plus3 Press
