
 Backend Development
Python Tutorial
How to use request library to implement translation interface in Python
Backend Development
Python Tutorial
How to use request library to implement translation interface in Python
How to use request library to implement translation interface in Python

Basic use of the requests library
Installation
To use the requests library in Python, you first need to install it using pip. You can do this by running the following command in the terminal:
pip install requests
Using
Once the library is installed, you can use it to make HTTP requests. The following is an example of how to make a GET request:
import requests

response = requests.get('https://www.baidu.com')
print(response.text)
In this example, we import the requests library, and then use the get method to make a GET request to https://www.baidu.com. The server's response is stored in the response variable and we print the response text to the console.
You can also pass parameters to the get method to include query parameters in the request:
import requests

params = {'key1': 'value1', 'key2': 'value2'}
response = requests.get('https://www.example.com', params=params)
print(response.url)In this example, we pass a dictionary of query parameters to the params parameter of the get method. The generated URL will include query parameters and we print the URL to the console.
You can also use the post method to make a POST request:
import requests

data = {'key1': 'value1', 'key2': 'value2'}
response = requests.post('https://www.example.com', data=data)
print(response.text)In this example, we pass a dictionary of data to the data parameter of the post method. The data will be sent in the body of the request and we print the response text to the console.
Develop your own translation interface
Analyze Baidu translation
Open the Baidu translation address, then press F12 to open the developer mode and enter the translated content. Click Translate. Through the picture below, you can clearly see the requested address and requested parameters
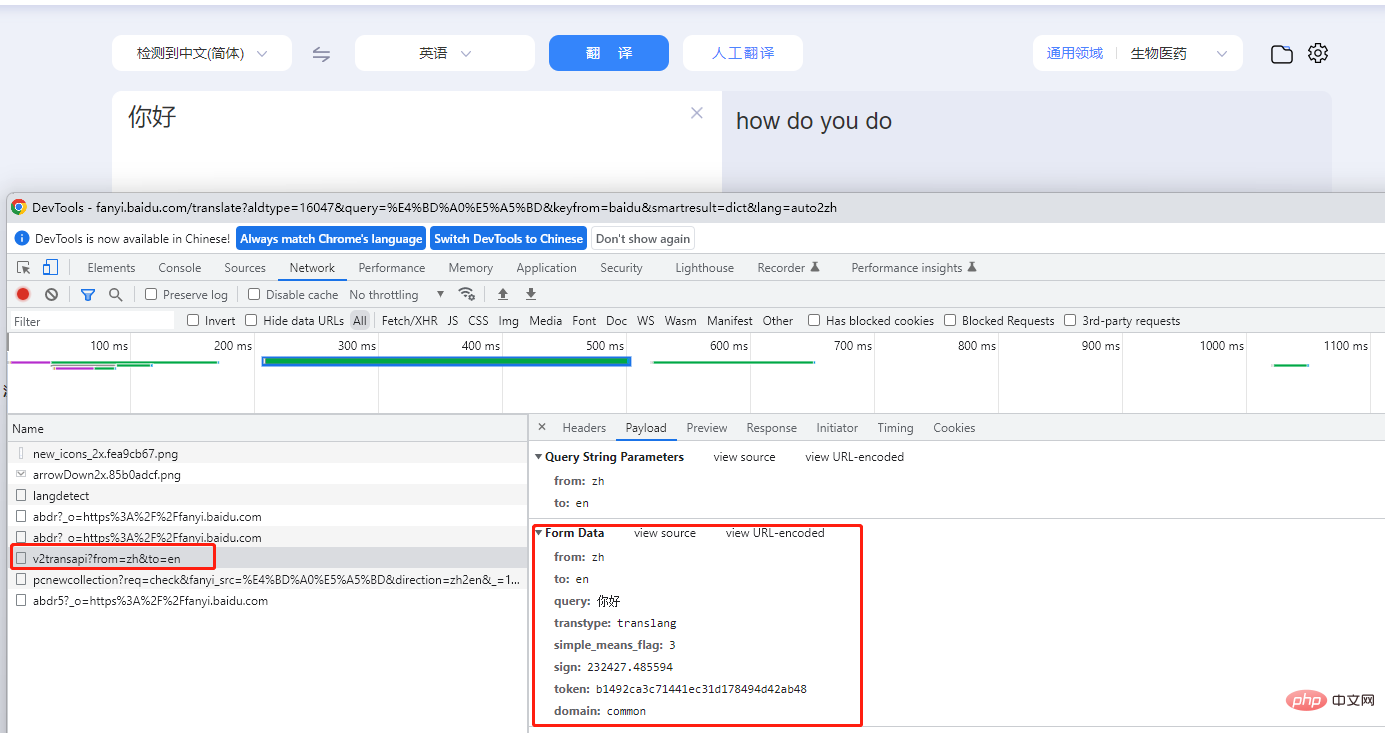
Baidu Translation sends a post to https://fanyi.baidu.com/v2transapi In the request, only sign is constantly changing in the data sent. Searching v2transapi found that the sign field is encrypted through js through the data string you want to send.
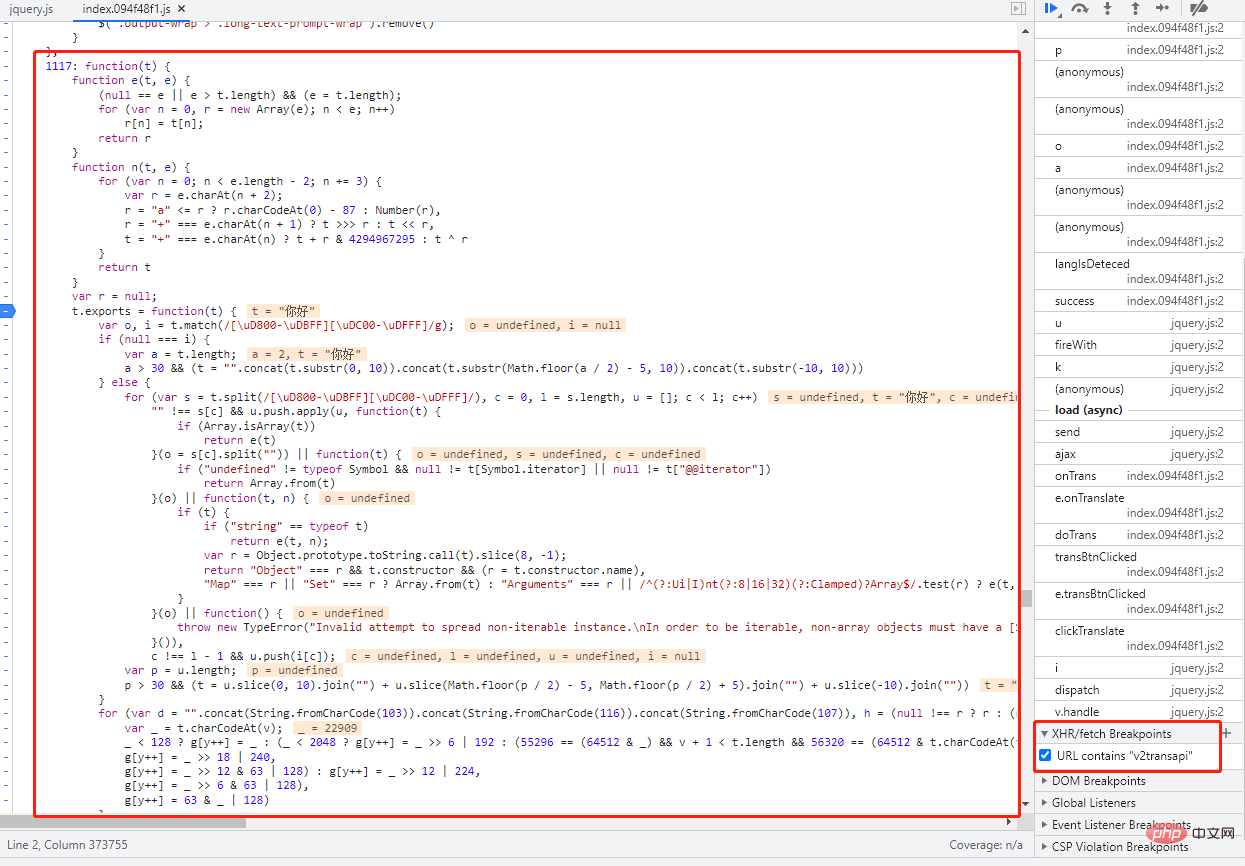
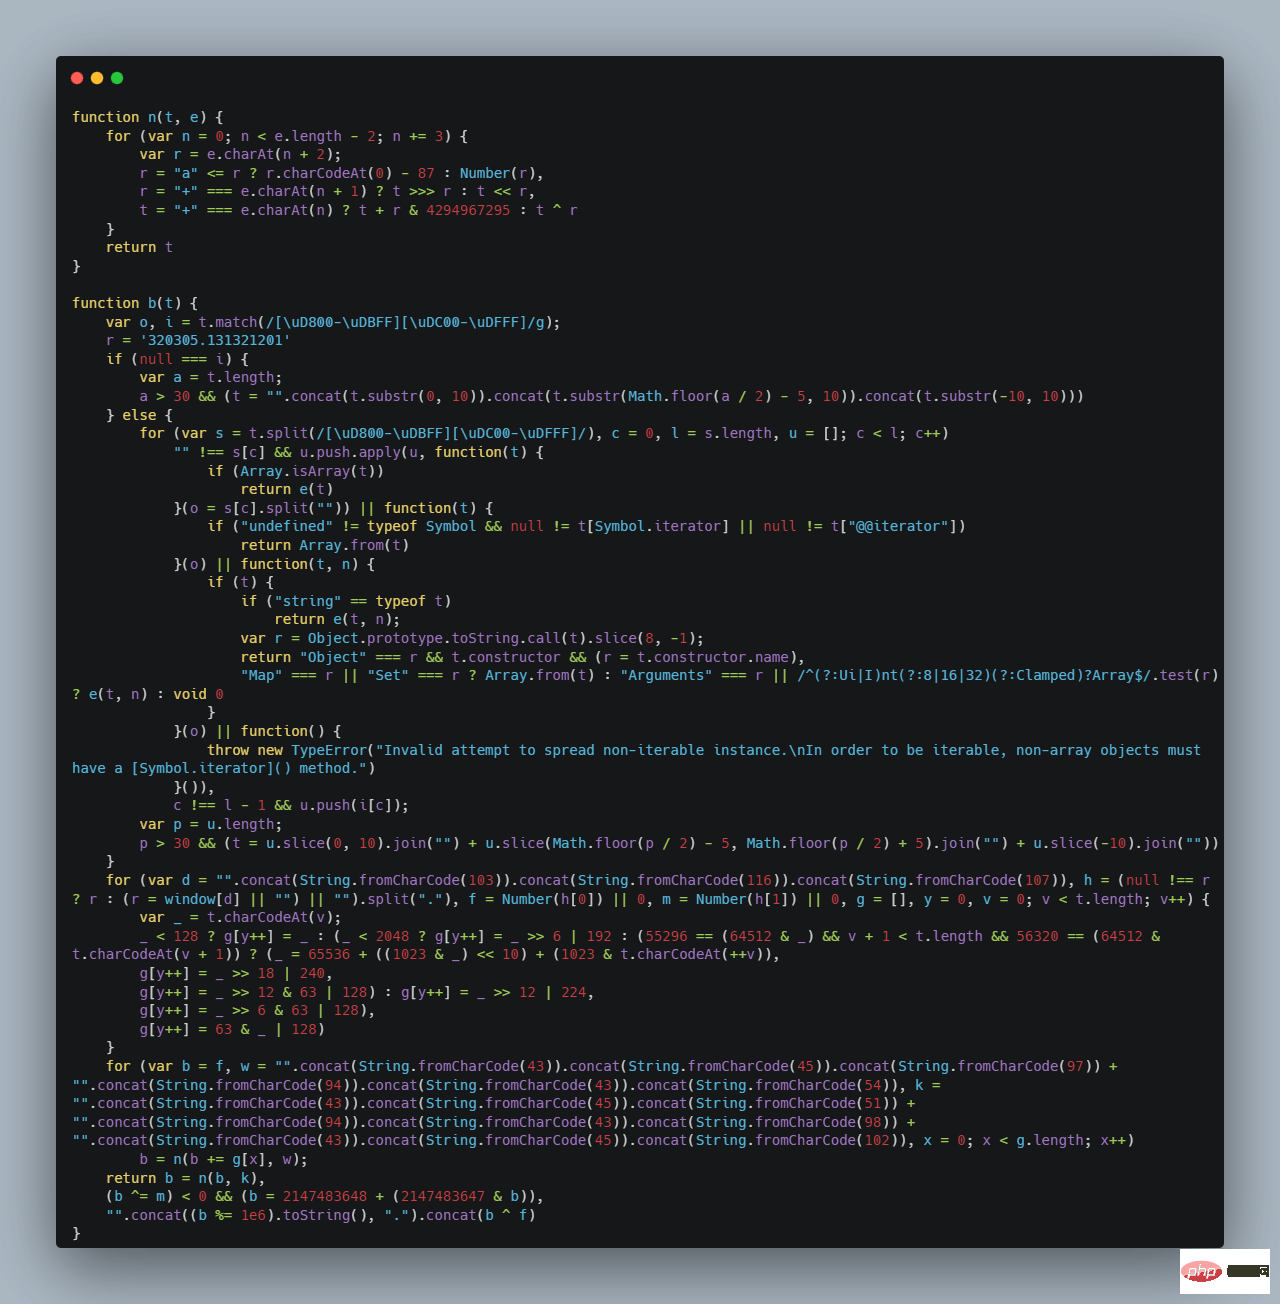
Through Baidu Translation’s js analysis, the key code for encryption is as follows:
Now that we have figured out the entire calling process, all parameters can be constructed by ourselves. This way you can write code.
Write the interface code
1. In order to prevent the request from failing, we need to imitate the browser request and add the request header to the request. We use the third-party library fake_useragent, Randomly generate different User-Agent. The key code is as follows:
from fake_useragent import UserAgent
headers = {'User-Agent': UserAgent().random}2. Generate sign parameters. Since we cannot understand the encrypted js code, we directly call the python The third-party library executes the js code. You need to install the execjs library before using it. Execute the following code:
pip3 install PyExecJS
The method of using this library is also very simple. For example, we have already mentioned above I have extracted Baidu’s encrypted js code, created a new js file, and copied the content into it. The key code is as follows:
    def generate_sign(self,query):
        try:
            if os.path.isfile("./baidu.js"):
                with open("./baidu.js", 'r', encoding="utf-8") as f:
                    baidu_js = f.read()
            ctx = execjs.compile(baidu_js)
            return ctx.call('b', query)
        except Exception as e:
print(e) First read the js file into the cache, and then call the object through execjs. Finally, the method in the js file is executed by calling the call method, where b is the method corresponding to js, and query is the parameter of the b method in js.
After the call is successful, the return is as follows:

3. Get the token value and observe the source code of the Baidu translation page and findtoken is stored in the page, so we can get token.
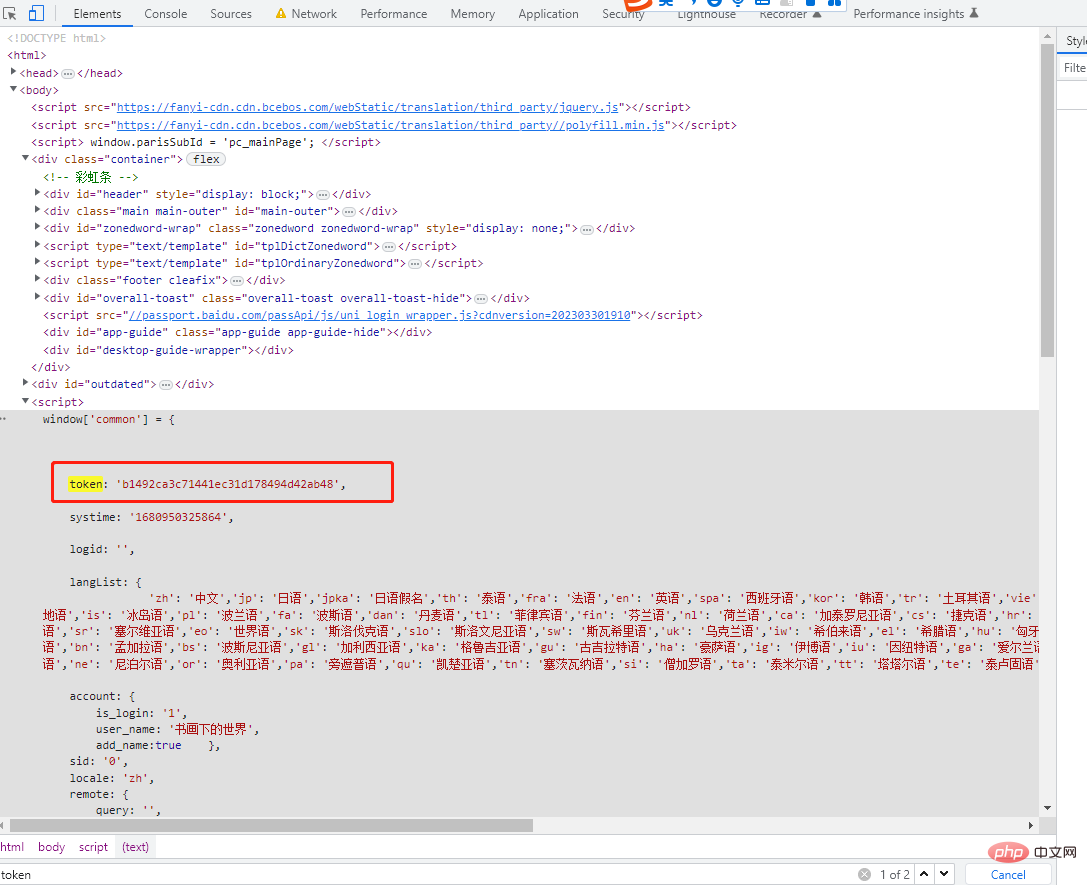
res = request.get("https://fanyi.baidu.com").content.decode()
token = re.findall(r"token: '(.*)',", res, re.M)[0]4. So far All the request parameters are now available, so we can start constructing the request. The core code is as follows:
    url = 'https://fanyi.baidu.com/v2transapi'
    sign = generate_sign("你好")
    data = {
        "from": "zh",
        "to": 'en',
        "query": "你好",
        "transtype": "translang",
        "simple_means_flag": "3",
        "sign": sign,
        "token": self.token,
        "domain": "common"
    }
    res = requests.post(
        url=url,
        params={"from": "zh", "to": 'en'},
        data=data,
        headers = {
            'User-Agent': UserAgent().random,
        }
    )

res.json().get("trans_result").get("data")[0].get("dst")After the request is successful, the following picture will be returned:

It is found through the actual call that not every request is successful, so it is necessary Make multiple requests, go through a loop operation, and jump out of the loop when it is clear and successful. The key code is as follows:
        tryTimes = 0
        try:
            while tryTimes < 100:
                res = self.session.post(
                    url=url,
                    params={"from": fromLan, "to": toLan},
                    data=data,
                )
                if "trans_result" in res.text:
                    break
                tryTimes += 1
return res.json().get("trans_result").get("data")[0].get("dst")In this way, we have completed using the Baidu translation interface to make our own translation interface call. You can use Flask or Fastapi to develop API interfaces according to your own needs. Below are all codes
import requests
import execjs
import os
import re
import json
from loguru import logger
from fake_useragent import UserAgent
class Baidu_translate:
def __init__(self):
self.session=request.Session()
self.session.headers={
'User-Agent': UserAgent( ).random,
"Host":"fanyi.baidu.com",
"X-Requested-With":"XMLHttpRequest",
"sec-ch-ua":'"Not?A_Brand";="8","Chromium";v="108","Microsoft Edge";V="108",
"sec-ch-ua-mobile":"?0",
"Sec-Fetch-Dest":"document",
"Sec-Fetch-Mode":"navigate",
"Sec-Fetch-Site": "same-origin",
"Sec-Fetch-User":"?1",
"Connection":"keep-alive",
}
self.session.get("https://fanyi.baidu.com" )
res = self.session.get("https://fanyi.baidu.com").content.decode( )
self.token = re.findall(r"token: '(.*)',",res,re.M)[0]
def generate_sign(self,query):
try:
if os.path.isfile("./baidu.js"):
with open("./baidu.js",'r',encoding="utf-8") as f:
baidu_js = f.read( )
ctx = execjs.compile(baidu_js)
return ctx.call('b',query)
except Exception as e:
print(e)
def lang_detect(self,src: str) -> str:
url = "https://fanyi.baidu.com/langdetect"
fromLan = self.session.post(url, data={"query": src}).json()["lan"]
return fromLan
def translate(self,query: str, tolan: str = "", fromLan: str = "") -> str:
if fromLan == "":
fromLan = self.lang_detect(query)
if toLan == "":
toLan = "zh" if fromLan != "zh" else "en"
url = 'https://fanyi.baidu.com/v2transapi'
sign = self.generate_sign(query)
data = {
"from" : fromLan,
"to": toLan,
"query": query,
"transtype":"translang",
"simple_means_flag":"3",
"sign" : sign,
"token": self.token,
"domain":"common"
}
tryTimes = 0
try:
while tryTimes < 100:
res = self.session.post(
url=url,
params={"from": fromLan,"to": toLan},
data=data,
)
if "trans_result" in res.text:
break
tryTimes +=1
return res.json().get("trans_result").get("data")[0].get("dst")
except Exception as e:
print(e)
def test():
url ='https://fanyi.baidu.com/v2transapi'
sign = generate_sign("你好")
data = {
"from":"zh",
"to":' en',
"query":"你好",
"transtype":"translang",
"simple_means_flag":"3",
"sign": sign,
"token": self.token,
"domain": "common"
}
res = requests.post(
url=url,
params={"from": "zh","to":'en'},
data=data,
headers = {
'User-Agent': UserAgent( ).random,
}
)
res .json()
if _name__ == "__main__":
baidu_tran = Baidu_Translate()
sign = baidu_tran.generate_sign("你好")The above is the detailed content of How to use request library to implement translation interface in Python. For more information, please follow other related articles on the PHP Chinese website!

Hot AI Tools

Undresser.AI Undress
AI-powered app for creating realistic nude photos

AI Clothes Remover
Online AI tool for removing clothes from photos.

Undress AI Tool
Undress images for free

Clothoff.io
AI clothes remover

Video Face Swap
Swap faces in any video effortlessly with our completely free AI face swap tool!

Hot Article
Hot Tools

Notepad++7.3.1
Easy-to-use and free code editor

SublimeText3 Chinese version
Chinese version, very easy to use

Zend Studio 13.0.1
Powerful PHP integrated development environment

Dreamweaver CS6
Visual web development tools

SublimeText3 Mac version
God-level code editing software (SublimeText3)
Hot Topics
 1390
1390
 52
52

 PHP and Python: Different Paradigms Explained
Apr 18, 2025 am 12:26 AM
PHP and Python: Different Paradigms Explained
Apr 18, 2025 am 12:26 AM
PHP is mainly procedural programming, but also supports object-oriented programming (OOP); Python supports a variety of paradigms, including OOP, functional and procedural programming. PHP is suitable for web development, and Python is suitable for a variety of applications such as data analysis and machine learning.
 Choosing Between PHP and Python: A Guide
Apr 18, 2025 am 12:24 AM
Choosing Between PHP and Python: A Guide
Apr 18, 2025 am 12:24 AM
PHP is suitable for web development and rapid prototyping, and Python is suitable for data science and machine learning. 1.PHP is used for dynamic web development, with simple syntax and suitable for rapid development. 2. Python has concise syntax, is suitable for multiple fields, and has a strong library ecosystem.
 Can vs code run in Windows 8
Apr 15, 2025 pm 07:24 PM
Can vs code run in Windows 8
Apr 15, 2025 pm 07:24 PM
VS Code can run on Windows 8, but the experience may not be great. First make sure the system has been updated to the latest patch, then download the VS Code installation package that matches the system architecture and install it as prompted. After installation, be aware that some extensions may be incompatible with Windows 8 and need to look for alternative extensions or use newer Windows systems in a virtual machine. Install the necessary extensions to check whether they work properly. Although VS Code is feasible on Windows 8, it is recommended to upgrade to a newer Windows system for a better development experience and security.
 Is the vscode extension malicious?
Apr 15, 2025 pm 07:57 PM
Is the vscode extension malicious?
Apr 15, 2025 pm 07:57 PM
VS Code extensions pose malicious risks, such as hiding malicious code, exploiting vulnerabilities, and masturbating as legitimate extensions. Methods to identify malicious extensions include: checking publishers, reading comments, checking code, and installing with caution. Security measures also include: security awareness, good habits, regular updates and antivirus software.
 How to run programs in terminal vscode
Apr 15, 2025 pm 06:42 PM
How to run programs in terminal vscode
Apr 15, 2025 pm 06:42 PM
In VS Code, you can run the program in the terminal through the following steps: Prepare the code and open the integrated terminal to ensure that the code directory is consistent with the terminal working directory. Select the run command according to the programming language (such as Python's python your_file_name.py) to check whether it runs successfully and resolve errors. Use the debugger to improve debugging efficiency.
 Can visual studio code be used in python
Apr 15, 2025 pm 08:18 PM
Can visual studio code be used in python
Apr 15, 2025 pm 08:18 PM
VS Code can be used to write Python and provides many features that make it an ideal tool for developing Python applications. It allows users to: install Python extensions to get functions such as code completion, syntax highlighting, and debugging. Use the debugger to track code step by step, find and fix errors. Integrate Git for version control. Use code formatting tools to maintain code consistency. Use the Linting tool to spot potential problems ahead of time.
 Can vscode be used for mac
Apr 15, 2025 pm 07:36 PM
Can vscode be used for mac
Apr 15, 2025 pm 07:36 PM
VS Code is available on Mac. It has powerful extensions, Git integration, terminal and debugger, and also offers a wealth of setup options. However, for particularly large projects or highly professional development, VS Code may have performance or functional limitations.
 Can vscode run ipynb
Apr 15, 2025 pm 07:30 PM
Can vscode run ipynb
Apr 15, 2025 pm 07:30 PM
The key to running Jupyter Notebook in VS Code is to ensure that the Python environment is properly configured, understand that the code execution order is consistent with the cell order, and be aware of large files or external libraries that may affect performance. The code completion and debugging functions provided by VS Code can greatly improve coding efficiency and reduce errors.
