
 Operation and Maintenance
Nginx
How Nginx solves the problem of WebApi cross-domain secondary requests and Vue single page
Operation and Maintenance
Nginx
How Nginx solves the problem of WebApi cross-domain secondary requests and Vue single page
How Nginx solves the problem of WebApi cross-domain secondary requests and Vue single page

1. Foreword
Since the project is separated from the front and back ends, the api interface and the web front end are deployed in different sites, so in the previous article, the webapi ajax cross-domain request solution (cors implementation ) use cross-domain processing instead of jsonp.
But after a period of time, I discovered a very strange problem. Every time the front end initiates a request, through the browser's developer tools, I can see that there are two requests for the same URL under the network. The first The method of one request is options, and the method of the second request is the real get or post. Moreover, the first request returns no data, and the second request returns normal data.
2. Reason
The first options request is triggered by the web server processing cross-domain access. Options is a preflight request. When the browser processes a cross-domain access request, if it determines that the request is a complex request, it will first send a preflight request to the server. Based on the content returned by the server, the browser determines whether the server allows access. the request. If the web server uses CORS to support cross-domain access, this preflight request is inevitable when processing complex requests.
Because our web server uses cors to solve the problem of cross-domain access, and at the same time adds custom parameters in the header and uses json format for data interaction, each of our requests is a complex request. As a result, two requests are sent for each request.
The reasons are as follows:
Use cors to solve cross-domain problems
3. Solution
3.1 nginx
3.1.1 Idea
Deploy the front-end project in nginx and solve the cross-domain request problem through proxy
3.1.2 Implementation
3.1.2.1 Install nginx
It is easiest to install nginx under windows, download the compressed package directly, and then After decompression
3.1.2.2 Configure nginx
has its own default configuration. If you want to deploy single-page applications such as vue and angular, package the index.html Put the file and dist directory into the release directory, copy the path, and use it to configure the nginx service to point to the
configuration file as follows:
server {
 listen 9461; # 监听端口号
 server_name localhost 192.168.88.22; # 访问地址
 location / {
 root 项目路径; # 例如:e:/publish/xxx/;
 index index.html;

 # 此处用于处理 vue、angular、react 使用h5 的 history时 重写的问题
 if (!-e $request_filename) {
 rewrite ^(.*) /index.html last;
 break;
 }
 }

 # 代理服务端接口
 location /api {
 proxy_pass http://localhost:9460/api;# 代理接口地址
 }
}3.1.2.3 nginx common commands
Start: start nginx
Reload the configuration: nginx -s reload
Reopen the log file: nginx -s reopen
Test whether the configuration file is correct: nginx -t [Optional: specify path]
Quick stop: nginx -s stop
Orderly stop: nginx -s quit
##3.1.3 nginx Single page application h5 history url rewriting
Support
vue, angular, reactReason
When implementing a single page, refreshing the page will cause the page not to be found, so you need to rewrite the url address to index.html.Notes
When using url rewriting in nginx, the following error is always reported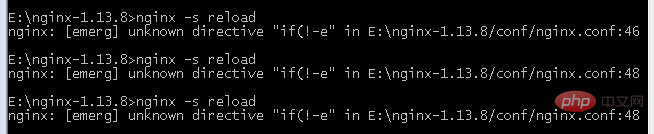
3.2 other
##3.2.1 IdeaSince we want Is it possible to reduce the number of preflight requests when sending preflight requests?
For example, you can set a validity period, and preflight will not be repeated during the validity period.
3.2.2 ImplementationYou can add an access-control-max-age request header after the preflight is completed on the server to solve this problem.
3.2.3 cors response field descriptionaccess-control-allow-methods
This field is required, its value is a comma-separated string indicating all cross-domain request methods supported by the server.
Note that all supported methods are returned, not just the method requested by the browser. This is to avoid multiple "preflight" requests.
access-control-allow-headers
The access-control-allow-headers field is required if the browser request includes the access-control-request-headers field.
It is also a comma-separated string indicating that the server supports All header information fields, not limited to the fields requested by the browser in "preflight".
access-control-allow-credentials
This field has the same meaning as in a simple request.
access-control-max-age
This field is optional and is used to specify the validity period of this preflight request in seconds. In the above result, the validity period is 20 days (1728000 seconds). That is, the response is allowed to be cached for 1,728,000 seconds (i.e. 20 days). During this period, there is no need to issue another preflight request.
access-control-allow-methods: get, post, put
access-control-allow-headers: x-custom-header
access-control-allow-credentials: true
access-control-max-age: 1728000
The above is the detailed content of How Nginx solves the problem of WebApi cross-domain secondary requests and Vue single page. For more information, please follow other related articles on the PHP Chinese website!

Hot AI Tools

Undresser.AI Undress
AI-powered app for creating realistic nude photos

AI Clothes Remover
Online AI tool for removing clothes from photos.

Undress AI Tool
Undress images for free

Clothoff.io
AI clothes remover

AI Hentai Generator
Generate AI Hentai for free.

Hot Article
Hot Tools

Notepad++7.3.1
Easy-to-use and free code editor

SublimeText3 Chinese version
Chinese version, very easy to use

Zend Studio 13.0.1
Powerful PHP integrated development environment

Dreamweaver CS6
Visual web development tools

SublimeText3 Mac version
God-level code editing software (SublimeText3)
Hot Topics
 1378
1378
 52
52

 How to start nginx in Linux
Apr 14, 2025 pm 12:51 PM
How to start nginx in Linux
Apr 14, 2025 pm 12:51 PM
Steps to start Nginx in Linux: Check whether Nginx is installed. Use systemctl start nginx to start the Nginx service. Use systemctl enable nginx to enable automatic startup of Nginx at system startup. Use systemctl status nginx to verify that the startup is successful. Visit http://localhost in a web browser to view the default welcome page.
 How to configure nginx in Windows
Apr 14, 2025 pm 12:57 PM
How to configure nginx in Windows
Apr 14, 2025 pm 12:57 PM
How to configure Nginx in Windows? Install Nginx and create a virtual host configuration. Modify the main configuration file and include the virtual host configuration. Start or reload Nginx. Test the configuration and view the website. Selectively enable SSL and configure SSL certificates. Selectively set the firewall to allow port 80 and 443 traffic.
 How to check whether nginx is started
Apr 14, 2025 pm 01:03 PM
How to check whether nginx is started
Apr 14, 2025 pm 01:03 PM
How to confirm whether Nginx is started: 1. Use the command line: systemctl status nginx (Linux/Unix), netstat -ano | findstr 80 (Windows); 2. Check whether port 80 is open; 3. Check the Nginx startup message in the system log; 4. Use third-party tools, such as Nagios, Zabbix, and Icinga.
 How to start nginx server
Apr 14, 2025 pm 12:27 PM
How to start nginx server
Apr 14, 2025 pm 12:27 PM
Starting an Nginx server requires different steps according to different operating systems: Linux/Unix system: Install the Nginx package (for example, using apt-get or yum). Use systemctl to start an Nginx service (for example, sudo systemctl start nginx). Windows system: Download and install Windows binary files. Start Nginx using the nginx.exe executable (for example, nginx.exe -c conf\nginx.conf). No matter which operating system you use, you can access the server IP
 How to solve nginx304 error
Apr 14, 2025 pm 12:45 PM
How to solve nginx304 error
Apr 14, 2025 pm 12:45 PM
Answer to the question: 304 Not Modified error indicates that the browser has cached the latest resource version of the client request. Solution: 1. Clear the browser cache; 2. Disable the browser cache; 3. Configure Nginx to allow client cache; 4. Check file permissions; 5. Check file hash; 6. Disable CDN or reverse proxy cache; 7. Restart Nginx.
 How to check whether nginx is started?
Apr 14, 2025 pm 12:48 PM
How to check whether nginx is started?
Apr 14, 2025 pm 12:48 PM
In Linux, use the following command to check whether Nginx is started: systemctl status nginx judges based on the command output: If "Active: active (running)" is displayed, Nginx is started. If "Active: inactive (dead)" is displayed, Nginx is stopped.
 How to solve nginx403 error
Apr 14, 2025 pm 12:54 PM
How to solve nginx403 error
Apr 14, 2025 pm 12:54 PM
The server does not have permission to access the requested resource, resulting in a nginx 403 error. Solutions include: Check file permissions. Check the .htaccess configuration. Check nginx configuration. Configure SELinux permissions. Check the firewall rules. Troubleshoot other causes such as browser problems, server failures, or other possible errors.
 How to solve nginx403
Apr 14, 2025 am 10:33 AM
How to solve nginx403
Apr 14, 2025 am 10:33 AM
How to fix Nginx 403 Forbidden error? Check file or directory permissions; 2. Check .htaccess file; 3. Check Nginx configuration file; 4. Restart Nginx. Other possible causes include firewall rules, SELinux settings, or application issues.
