
 Operation and Maintenance
Nginx
Nginx+Tomcat reverse proxy, load balancing, cluster deployment methods
Operation and Maintenance
Nginx
Nginx+Tomcat reverse proxy, load balancing, cluster deployment methods
Nginx+Tomcat reverse proxy, load balancing, cluster deployment methods

Performance comparison between nginx and other servers:
The tomcat server is oriented to the Java language and is a heavyweight server, while nginx is a lightweight server. The apache server is stable, open source, and cross-platform. However, the apache server does not support high concurrency. Nginx can support processing of millions of TCP connections and more than 100,000 concurrent connections, and is a good cross-platform server.
The main advantages of nginx are that it can achieve high concurrency, simple deployment, low memory consumption, low cost, etc. The main disadvantages are that the rewrite function is not powerful enough and there are not as many modules as apache.
This article mainly explains the deployment of nginx tomcat reverse proxy and load balancing, which is mainly popular and practical. There is not much relationship between each part of this article and can be studied separately according to your needs.
Let’s take a look at the nginx reverse proxy process:
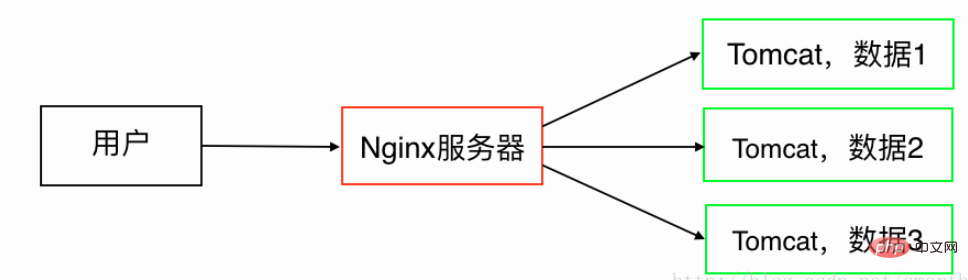
nginx load balancing process (will automatically select a server with less pressure for access):
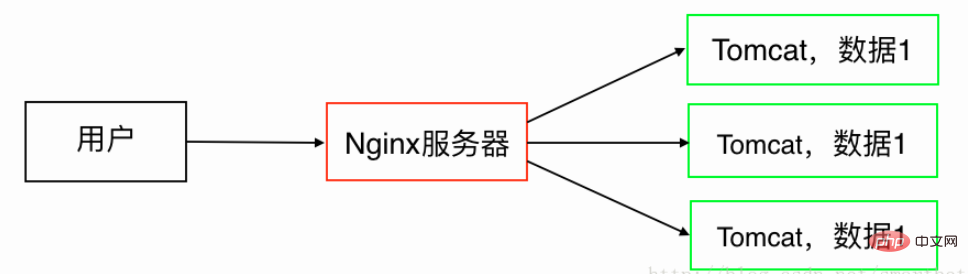
It can be seen that load balancing is achieved through the principle of reverse proxy, so it is also called reverse proxy load balancing. So we will deploy load balancing, and reverse proxy will also be available.
In general, there are two ways to implement load balancing: software implementation and hardware implementation. Hardware implementation is very efficient, but the corresponding cost is also very high. Software implementation is not as efficient as hardware, but the cost is relatively much lower. When using nginx server to achieve load balancing, load balancing is achieved through software, and nginx itself supports high concurrency, etc. Therefore, using nginx server to achieve load balancing can greatly save enterprises' costs, and because nginx is server software, its execution efficiency is also very high. The purpose of this article is to help you use nginx to achieve load balancing.
The core of load balancing is to establish a server cluster, and then the user first accesses the third-party proxy server (here we choose nginx), and then the proxy server selects a server in the cluster, and then introduces the request to the selected Server (here we choose tomcat).
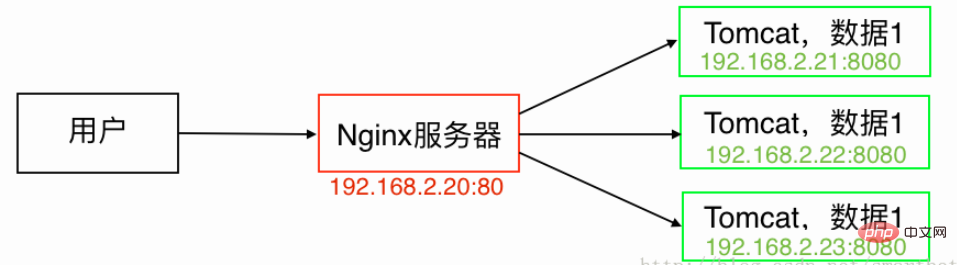
As shown below, we achieve the following load balancing through reverse proxy. Here we assume that four servers have public IP addresses, one is used as a proxy server, and three are used as servers under load balancing:
Okay, the overall architecture is basically clear, let’s implement it in detail:
Tip: In this article, we basically use ssh. For related operations, you can try to install putty under Windows, or directly use the terminal tool that comes with the system under Mac.
1. Build nginx server under linux
We set up nginx server on the server 192.168.2.20:
1) Download nginx
2) Upload the server nginx installation package
$ scp ~/downloads/nginx-1.10.2.tar.gz root@192.168.2.20:/usr/local
3) Install nginx
$ ssh root@192.168.2.20             //ssh连接
# yum -y install gcc gcc-c++ autoconf automake  //gcc、gcc-c++的库文件
# yum install -y pcre pcre-devel         //安装nginx依赖包
# yum install -y zlib zlib-devel
Note: -y means yes when encountered, autoconf means automatic configuration, automake means automatic compilation.
# cd /usr/local
# tar -zxvf nginx-1.10.2.tar.gz         //解压缩
# cd nginx-1.10.2                //切换到该目录下
# ./configure                  //配置
# make
# make install                 //安装
Check whether the installation is complete:
# cd /usr/local
# ls                      //如果存在nginx文件夹,则安装成功
After the above installation steps and directory settings, the startup program of nginx is /usr/local/nginx/sbin/nginx, and the default configuration file is /usr /local/nginx/conf/nginx.conf, but it is not recommended to edit nginx.conf directly. Generally, we choose to create a new configuration file, and then modify the port, reverse proxy path, etc. in the new configuration file.
2. Start, stop, and signal control of nginx
1) Start the nginx server (format: nginx executable file -c nginx configuration file):
# /usr/local/nginx/sbin/nginx -c /usr/local/nginx/conf/nginx.conf
2) Stop the nginx server:
To stop the nginx server, you must first query the main process number of nginx (master process). Assume that the query here gets 1060 (for convenience in the following demonstration):
# ps -ef|grep nginx
Let’s see how to stop the nginx server. There are three ways to stop nginx:
Easy stop:
# ps -ef|grep nginx  //查看nginx的主进程号(master process),假设此处查询得到1060
# kill -quit 1060
Quick stop:
# kill -term 1060
Forced stop:
# pkill -9 nginx
3) Restart the nginx server:
When we modify the nginx configuration file, we need to restart it to take effect. We also need to verify the correctness of the configuration file before restarting, and then perform the restart operation:
# /usr/local/nginx/sbin/nginx -t -c /usr/local/nginx/conf/nginx.conf   //验证
# /usr/local/nginx/sbin/nginx -s reload                  //重启
4) Smooth upgrade of nginx server
Smooth upgrade will not stop running processes. The process will continue to process requests, but will no longer accept new requests. These old processes will stop after processing the requests that are still being processed. During this smooth upgrade process, newly opened processes will be processed. This is a smooth upgrade.
# /usr/local/nginx/sbin/nginx -v //查看当前版本
The following is a smooth upgrade:
# cd /usr/local
# tar -zxvf nginx-1.11.6.tar.gz       //解压缩 新版本nginx
# cd nginx-1.11.6              //切换到该目录下
# ./configure                //配置
# make
# cd /usr/local/nginx/sbin          //打开 旧版本nginx可执行文件位置
# cp nginx nginx.old         //备份 旧版本nginx可执行文件,防止升级错误而无法恢复
# cp -rfp /usr/local/nginx-1.11.6/objs/nginx /usr/local/nginx/sbin   //复制新版本可执行文件到旧版本处
# rm -f /usr/local/nginx-1.11.6.tar.gz    //善后工作 删除压缩文件
# rm -rf /usr/local/nginx-1.11.6       //删除文件夹
At this point, the smooth upgrade of the nginx server is successful.
3. Implementation of load balancing in nginx
We still connect to ssh first, and then perform the following operations (it is generally not recommended to modify the default main configuration file nginx.conf, so We create a new load balancing configuration file fzjh.conf to ensure server security, as follows):
# cd /usr/local/nginx/conf
# touch fzjh.conf
# vi fzjh.conf  //用vi编辑器打开文件,然后按键盘的i
注意:vi编辑器中,键盘按 i 进入 insert 状态,按 esc 退出 insert 状态。
然后输入以下配置代码(注释部分按需开启):
#设置低权限用户,为了安全而设置的
user nobody;

#工作衍生进程数
worker_processes 4;

#设置错误文件存放路径
#error_log logs/error.log;
#error_log logs/error.log notice;
#error_log logs/error.log info;

#设置pid存放路径(pid是控制系统中重要文件)
#pid logs/nginx.pid;

#设置最大连接数
events{
  worker_connections 1024;
}

http{
  #主要是用于设置一组可以在proxy_pass和fastcgi_pass指令中使用额代理服务器,默认负载均衡方式为轮询
  upstream tomcat_client {
    #设置同一个cookie的两次/多次请求,请求的是同一台服务器
    ip_hash;
    #weight权重,默认1,权重越大访问概率越大,backup备用服务器,服务器全部崩溃后启动
    server 192.168.2.21:8080 weight=5;
    server 192.168.2.22:8080 weight=5;
    server 192.168.2.23:8080 weight=5 backup;
  }

  #开启gzip压缩,开启后,访问网页会自动压缩
  #gzip on;

  #指定服务器的名称和参数
  server {
    listen 80;
    server_name test.nginxtest.net;

    #设置字符
    #charset koi8-r;

    #location / 指用根目录做负载均衡
    location / {
      proxy_pass http://tomcat_client;
      proxy_redirect default;
      #设置代理
      proxy_set_header host $host;
      proxy_set_header x-real-ip $remote_addr;
    }
  }
}输入完成后按下esc,然后输入:
:wq!
就可以保存并退出负载均衡的配置文件了,下来我们加载我们的配置文件:
# /usr/local/nginx/sbin/nginx                      //启动nginx
# /usr/local/nginx/sbin/nginx -c /usr/local/nginx/conf/fzjh.conf    //加载配置文件
如果存在端口占用,可以使用如下命令kill掉nginx的程序:
# killall -9 nginx
至此,nginx服务器部署完毕。下面我们开始部署负载均衡下的那三台真实提供数据的服务器。
4.linux下安装jdk
我们在192.168.2.21、192.168.2.22、192.168.2.23这三台服务器安装jdk,以192.168.2.21为例:
1)下载jdk
2)上传服务器jdk安装包
$ scp ~/downloads/jdk-8u112-linux-x64.tar.gz root@192.168.2.21:/usr/local
3)安装jdk
$ ssh root@192.168.2.21         //ssh连接
# cd /usr/local
# tar -zxvf jdk-8u112-linux-x64.tar.gz //解压缩
# mv jdk1.8.0_112/ jdk         //将jdk1.8.0_112重命名为jdk
# vi /etc/profile            //用vi编辑器打开文件,然后按键盘的i
下来我们移动光标至最后面,两个回车换行,然后添加下面代码配置java的环境变量:
java_home="/usr/local/jdk"
class_path="$java_home/lib:$java_home/jre/lib"
path=".:$path:$java_home/bin"
catalina_home="/usr/local/tomcat"
export java_home catalina_home
输入完成后按下esc,然后输入:
:wq!
就可以保存并退出了。此时我们想让其立即生效,则需要继续输入命令:
# source /etc/profile
此时profile文件就更新了,此时环境变量就配置成功了。下面我们验证一下jdk是否安装配置成功:
# java -version
如果返回java版本号则安装成功。
5.linux下搭建tomcat服务器
我们在192.168.2.21、192.168.2.22、192.168.2.23这三台服务器搭建tomcat服务器,以192.168.2.21为例:
1)下载tomcat
2)上传服务器tomcat安装包
$ scp ~/downloads/apache-tomcat-8.5.9.tar.gz root@192.168.2.21:/usr/local
3)安装tomcat
$ ssh root@192.168.2.21         //ssh连接
# cd /usr/local
# tar -zxvf apache-tomcat-8.5.9.tar.gz //解压缩
# mv apache-tomcat-8.5.9/ tomcat    //将apache-tomcat-8.5.9重命名为tomcat
4)设置tomcat网页文件目录
tomcat默认网页文件的路径是 /usr/local/tomcat/webapps/root,但是一般我们不在这里存放,我们在linux根目录新建 data/wwwroot 目录:
# mkdir /data             //新建目录
# mkdir /data/www
# mkdir /data/www/root
# cd /usr/local/tomcat/conf
# vi server.xml            //用vi编辑器打开server.xml配置文件,打开后键盘按i
我们找到host节点下的appbase=”webapps”,修改为:appbase="/data/www"
输入完成后按下esc,然后输入:
:wq!
就可以保存并退出配置文件了,然后重启tomcat即可生效,此时tomcat的网页文件目录就变成了 /data/www/root 了。
配置tomcat环境变量,我们在配置jdk的时候已经配置好了,可以回头看一下。
6.tomcat的启动、停止
1)启动tomcat服务器
# /usr/local/tomcat/bin/startup.sh
2)停止tomcat服务器:
# /usr/local/tomcat/bin/shutdown.sh
到此,nginx + tomcat 负载均衡 集群 已经部署完毕了。不过有了服务器,肯定也少不了数据库,下面拓展一下linux下安装mysql数据库的方法。
7.linux下安装mysql数据库
我们重新找了 192.168.2.30 这台服务器上mysql数据库:
1)下载mysql数据库
2)上传mysql数据库安装包
$ scp ~/downloads/mysql-5.1.51.tar.gz root@192.168.2.30:/usr/local
3)安装mysql
$ ssh root@192.168.2.30         //ssh连接
# groupadd mysql            //建立mysql的组
# useradd mysql -g mysql        //增加用户mysql到mysql的组中

# yum list|grep ncurses
# yum -y install ncurses-devel
# yum install ncurses-devel

# cd /usr/local
# tar -zxvf mysql-5.1.51.tar.gz     //解压缩
# cd mysql-5.1.51

# ./configure --prefix=/usr/local/mysql --with-mysqld-ldflags=-all-static --with-client-ldflags=-all-static --with-readline --with-sll
//配置,设置安装路径,设置编译mysql不带共享库,设置编译client不带共享库,设置要以rmp的方式安装tar包,设置以rmp的方式安装opensll

# make
# make install             //安装,在make[4]的时候等待时间比较长,几分钟到十几分钟,都是正常现象

# /usr/local/mysql/bin/mysql_install_db --user    //对安装好的mysql进行初始化
# cp ./support-files/mysql.server /etc/init.d/mysql //将mysql启动服务复制到系统中并重命名为mysql
# cp ./support-files/my-medium.cnf /etc/my.cnf    //复制规则文件
# chmod 755 /etc/init.d/mysql            //更改文件权限

//文件权限由三个数字组成,第一位:文件拥有者的权限,第二位:文件拥有者同组的人的权限,第三位:文件拥有者非同组人的权限
//7:可读可写可执行,5:可读可执行

# cd /usr/local/mysql
# chown -r mysql .                  //将 /usr/local/mysql 的拥有者更改为mysql
# chgrp -r mysql .                  //将 /usr/local/mysql 归到mysql组中

# ps -ef|grep mysql
# kill -9 3632          //将mysql所有进程号依次杀死,这里假定是3632
# /usr/local/mysql/bin/mysql_install_db --user=mysql    //再次初始化
# service mysql start                   //启动mysql
# /usr/local/mysql/bin/mysqladmin -u root password '123456' //设置mysql密码
到此mysql就安装成功了,下来我们测试一下:
# /usr/local/mysql/bin/mysql -u root -p
如果输入密码后可以登进mysql,那么就测试成功。下面我们设置mysql允许开启远程连接:
# /usr/local/mysql/bin/mysql -u root -p

mysql> grant all privileges on *.* to 'root'@'%' identified by '123456' with grant option;
//创建用户用于远程连接(root:用户名,%:所有电脑都可以连接,也可以设置某个ip地址运行连接,123456:密码)

mysql> flush privileges;      //立即生效
下面我们查询一下数据库的用户:
mysql> select distinct concat('user: ''',user,'''@''',host,''';') as query from mysql.user;
mysql> \q              //登出
找一台电脑测试一下,使用navicat远程登录mysql,登进成功。
The above is the detailed content of Nginx+Tomcat reverse proxy, load balancing, cluster deployment methods. For more information, please follow other related articles on the PHP Chinese website!

Hot AI Tools

Undresser.AI Undress
AI-powered app for creating realistic nude photos

AI Clothes Remover
Online AI tool for removing clothes from photos.

Undress AI Tool
Undress images for free

Clothoff.io
AI clothes remover

AI Hentai Generator
Generate AI Hentai for free.

Hot Article
Hot Tools

Notepad++7.3.1
Easy-to-use and free code editor

SublimeText3 Chinese version
Chinese version, very easy to use

Zend Studio 13.0.1
Powerful PHP integrated development environment

Dreamweaver CS6
Visual web development tools

SublimeText3 Mac version
God-level code editing software (SublimeText3)
Hot Topics
 1386
1386
 52
52

 How to configure cloud server domain name in nginx
Apr 14, 2025 pm 12:18 PM
How to configure cloud server domain name in nginx
Apr 14, 2025 pm 12:18 PM
How to configure an Nginx domain name on a cloud server: Create an A record pointing to the public IP address of the cloud server. Add virtual host blocks in the Nginx configuration file, specifying the listening port, domain name, and website root directory. Restart Nginx to apply the changes. Access the domain name test configuration. Other notes: Install the SSL certificate to enable HTTPS, ensure that the firewall allows port 80 traffic, and wait for DNS resolution to take effect.
 How to check whether nginx is started
Apr 14, 2025 pm 01:03 PM
How to check whether nginx is started
Apr 14, 2025 pm 01:03 PM
How to confirm whether Nginx is started: 1. Use the command line: systemctl status nginx (Linux/Unix), netstat -ano | findstr 80 (Windows); 2. Check whether port 80 is open; 3. Check the Nginx startup message in the system log; 4. Use third-party tools, such as Nagios, Zabbix, and Icinga.
 How to check nginx version
Apr 14, 2025 am 11:57 AM
How to check nginx version
Apr 14, 2025 am 11:57 AM
The methods that can query the Nginx version are: use the nginx -v command; view the version directive in the nginx.conf file; open the Nginx error page and view the page title.
 How to create a mirror in docker
Apr 15, 2025 am 11:27 AM
How to create a mirror in docker
Apr 15, 2025 am 11:27 AM
Steps to create a Docker image: Write a Dockerfile that contains the build instructions. Build the image in the terminal, using the docker build command. Tag the image and assign names and tags using the docker tag command.
 How to start nginx server
Apr 14, 2025 pm 12:27 PM
How to start nginx server
Apr 14, 2025 pm 12:27 PM
Starting an Nginx server requires different steps according to different operating systems: Linux/Unix system: Install the Nginx package (for example, using apt-get or yum). Use systemctl to start an Nginx service (for example, sudo systemctl start nginx). Windows system: Download and install Windows binary files. Start Nginx using the nginx.exe executable (for example, nginx.exe -c conf\nginx.conf). No matter which operating system you use, you can access the server IP
 How to check whether nginx is started?
Apr 14, 2025 pm 12:48 PM
How to check whether nginx is started?
Apr 14, 2025 pm 12:48 PM
In Linux, use the following command to check whether Nginx is started: systemctl status nginx judges based on the command output: If "Active: active (running)" is displayed, Nginx is started. If "Active: inactive (dead)" is displayed, Nginx is stopped.
 How to start nginx in Linux
Apr 14, 2025 pm 12:51 PM
How to start nginx in Linux
Apr 14, 2025 pm 12:51 PM
Steps to start Nginx in Linux: Check whether Nginx is installed. Use systemctl start nginx to start the Nginx service. Use systemctl enable nginx to enable automatic startup of Nginx at system startup. Use systemctl status nginx to verify that the startup is successful. Visit http://localhost in a web browser to view the default welcome page.
 How to solve nginx403
Apr 14, 2025 am 10:33 AM
How to solve nginx403
Apr 14, 2025 am 10:33 AM
How to fix Nginx 403 Forbidden error? Check file or directory permissions; 2. Check .htaccess file; 3. Check Nginx configuration file; 4. Restart Nginx. Other possible causes include firewall rules, SELinux settings, or application issues.
