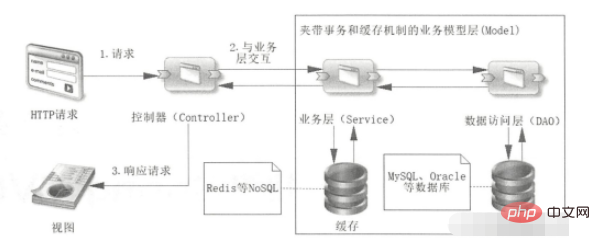
MVC is a common software design pattern used to separate different parts of an application to achieve loose coupling and high cohesion. The MVC pattern consists of three core components:
Model: represents the data and business logic of the application. The model processes the application's data and performs corresponding operations based on the controller's instructions.
View: Provides a user interface for model data. Views are typically templates, HTML pages, XML files, or other formats that present model data to the user.
Controller: handles user interaction and updates models and views. The controller is responsible for receiving user input from the view, performing corresponding operations on the model, and updating the view to reflect the changes.
The advantage of the MVC pattern is that it can separate the code into three independent components, making the application easier to maintain and extend. For example, if you want to change the appearance of a view, you can modify the view without affecting the model and controller; if you want to change the way data is stored, you can modify the model without affecting the view and controller. At the same time, the MVC pattern also helps reduce the coupling in the application, making each component more independent and reusable.
The process of processing a request in the MVC architecture under the Spring system is as follows:
The request is sent to the controller (controller), through the business model (model ) and return the response to the recognition layer after processing.

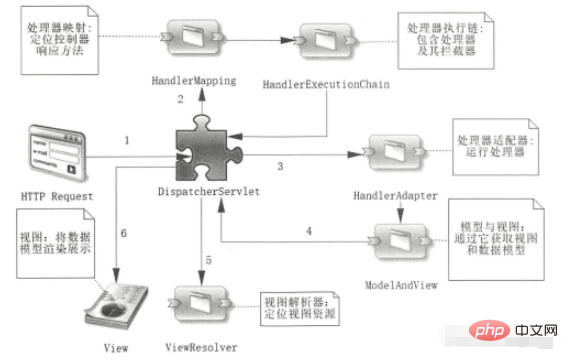
What does Spring MVC do in the entire process:
The core of the entire Spring MVC is DispatcherServlet, and around DispatcherServlet SpringMVC provides a set of components to complete with DispatcherServlet The entire workflow.
DispatcherServlet first receives the request and maps the request to the corresponding processor (controller). When mapped to the controller, the interceptor will be triggered; after the processor is processed, the data model is encapsulated and handed over to the view parser. The data model is parsed into corresponding views and returned to the front end.

Of course, sometimes the above process will not be completed. For example, when using @RestController or @ResponseBody, the response will be returned directly and the image will not be redirected, so there is no need to Know how to use the view parser.
Because of the existence of Spring Boot automatic assembly mechanism, generally speaking we do not need to configure Spring MVC. If you want to perform special customized configuration, Spring Boot also supports two ways of configuration: configuration files or writing code.
# Enable Spring MVC
spring.mvc.enabled=true# Configure static resource path
spring .mvc.static-path-pattern=/static/**
spring.resources.static-locations=classpath:/static/# Configuring the view resolver
spring.mvc.view. prefix=/WEB-INF/views/
spring.mvc.view.suffix=.jsp# Configure HTTP cache
spring.resources.cache.period=3600# Configuration file upload
spring.servlet.multipart.max-file-size=10MB
spring.servlet.multipart.max-request-size=10MB# Configure JSON serialization
spring.jackson.serialization.indent_output=true
spring.jackson.date-format=yyyy-MM-dd HH:mm:ss# Configure exception handling
server.error.whitelabel.enabled =false# Configure interceptor
spring.mvc.interceptor.exclude-path-patterns=/login,/logout
spring.mvc.interceptor.include-path-patterns=/admin/ **# Configure session management
server.session.timeout=1800
server.session.cookie.max-age=1800
@Configuration
public class MyWebMvcConfig implements WebMvcConfigurer {

    // 配置视图解析器
    @Override
    public void configureViewResolvers(ViewResolverRegistry registry) {
        InternalResourceViewResolver resolver = new InternalResourceViewResolver();
        resolver.setPrefix("/WEB-INF/views/");
        resolver.setSuffix(".jsp");
        registry.viewResolver(resolver);
    }

    // 配置静态资源
    @Override
    public void addResourceHandlers(ResourceHandlerRegistry registry) {
        registry.addResourceHandler("/static/**").addResourceLocations("/static/");
    }

    // 配置拦截器
    @Autowired
    private MyInterceptor myInterceptor;
    @Override
    public void addInterceptors(InterceptorRegistry registry) {
        registry.addInterceptor(myInterceptor).addPathPatterns("/**");
    }

    // 配置消息转换器
    @Override
    public void configureMessageConverters(List<HttpMessageConverter<?>> converters) {
        MappingJackson2HttpMessageConverter converter = new MappingJackson2HttpMessageConverter();
        List<MediaType> supportedMediaTypes = new ArrayList<MediaType>();
        supportedMediaTypes.add(MediaType.APPLICATION_JSON);
        converter.setSupportedMediaTypes(supportedMediaTypes);
        converters.add(converter);
    }

    // 配置异常处理器
    @ControllerAdvice
    public class GlobalExceptionHandler {
        @ExceptionHandler(value = Exception.class)
        public ModelAndView handleException(HttpServletRequest req, Exception e) {
            ModelAndView mav = new ModelAndView();
            mav.addObject("exception", e);
            mav.addObject("url", req.getRequestURL());
            mav.setViewName("error");
            return mav;
        }
    }

    // 配置跨域资源共享(CORS)
    @Override
    public void addCorsMappings(CorsRegistry registry) {
        registry.addMapping("/api/**").allowedOrigins("http://localhost:8080");
    }

    // 配置文件上传
    @Bean
    public MultipartResolver multipartResolver() {
        CommonsMultipartResolver resolver = new CommonsMultipartResolver();
        resolver.setMaxUploadSize(10485760);
        resolver.setMaxInMemorySize(4096);
        return resolver;
    }

    // 配置请求缓存
    @Bean
    public KeyGenerator keyGenerator() {
        return new DefaultKeyGenerator();
    }

    @Bean
    public RequestCache requestCache() {
        return new HttpSessionRequestCache();
    }

    // 配置视图控制器
    @Override
    public void addViewControllers(ViewControllerRegistry registry) {
        registry.addViewController("/").setViewName("index");
        registry.addViewController("/login").setViewName("login");
    }
}Only @RequestMapping is introduced here, @GETMapping is similar to @PostMapping.
@Target({ElementType.TYPE, ElementType.METHOD})
@Retention(RetentionPolicy.RUNTIME)
@Documented
@Mapping
public @interface RequestMapping {

    String name() default "";

    @AliasFor("path")
    String[] value() default {};

    @AliasFor("value")
    String[] path() default {};

    RequestMethod[] method() default {};

    String[] params() default {};

    String[] headers() default {};

    String[] consumes() default {};

    String[] produces() default {};
}The functions of each parameter are as follows:
value and path: used to specify the URL path of the request, you can use placeholders and regular expressions.
method: Specify the HTTP request method, which can be GET, POST, PUT, DELETE, etc.
params: Specify the conditions for request parameters, supporting expressions, multiple parameters and logical operations.
headers: Specify the conditions for request headers, supporting expressions, multiple headers and logical operations.
consumes: Specifies the requested MIME type, which is used to limit the request content type.
produces: Specifies the MIME type of the response, which is used to limit the response content type.
name: Specify the name of the request parameter, used to automatically bind parameter values.
defaultValue: Specifies the default value of the request parameter.
pathVariable: used to bind placeholders in URL paths.
required: Specifies whether the request parameters are required.
The value, method, params, headers, consumes and produces attributes all support array form and can match multiple conditions.
1. Match by parameter name
@Controller
@RequestMapping("/user")
public class UserController {

    @RequestMapping("/info")
    public String getUserInfo(Integer userId, Model model) {
        // 根据用户ID查询用户信息并返回
        User user = userService.getUserById(userId);
        model.addAttribute("user", user);
        return "user_info";
    }
}URL:
ip:port/info?userId=1
2.@RequestParam
通过@RequestParam注解可以指定匹配的参数.
@Controller
@RequestMapping("/user")
public class UserController {

    @RequestMapping(value = "/search", method = RequestMethod.GET, params = "keyword")
    public String searchUser(@RequestParam("keyword") String keyword, Model model) {
        // 根据关键词查询用户信息并返回
        List<User> userList = userService.searchUser(keyword);
        model.addAttribute("userList", userList);
        return "user_list";
    }
}3.传数组
@RequestMapping("/delete")
public String deleteUsers(int[] userIds, Model model) {
    // 根据用户ID数组删除多个用户,并返回用户列表页面
    userService.deleteUsers(userIds);
    List<User> userList = userService.getUserList();
    model.addAttribute("userList", userList);
    return "user_list";
}4.传JSON
传JSON只能用POST方法,使用@ResponseBody注解参数列表中的参数,就可以用来接收JSON,如果被注解的参数是个对象那么会将JSON自动转化为改对象。
@RequestMapping(value = "/save", method = RequestMethod.POST)
@ResponseBody
public Map<String, Object> saveUser(@RequestBody User user) {
    // 保存用户信息,并返回成功的响应
    userService.saveUser(user);
    return Collections.singletonMap("success", true);
}注意传参的时候要将设置好contentType: "application/json"
5.Restful
@Controller
@RequestMapping("/user")
public class UserController {

    @RequestMapping("/info/{id}")
    public String getUserInfo(@PathVariable("id") Integer userId, Model model) {
        // 根据用户ID查询用户信息并返回
        User user = userService.getUserById(userId);
        model.addAttribute("user", user);
        return "user_info";
    }
}前端URL为:
ip:port/info/1
当后端接口的参数列表是对象类型时,Spring MVC会自动按照参数名完成参数的转换和填充,当然这种转化规则也可以由我们自己定义,Spring MVC为我们准备了转换接口,以下是一个完整示例:
实体对象:
public class User {
    private Long id;
    private String name;
    private Integer age;
    private String email;
    // 省略 getter 和 setter 方法
}参数转换器:
public class UserConverter implements Converter<String, User> {

    @Override
    public User convert(String source) {
        // 将请求参数解析为User对象
        String[] values = source.split(",");
        User user = new User();
        user.setId(Long.parseLong(values[0]));
        user.setName(values[1]);
        user.setAge(Integer.parseInt(values[2]));
        user.setEmail(values[3]);
        return user;
    }
}注册参数转换器:
@Configuration
public class WebConfig implements WebMvcConfigurer {

    @Override
    public void addFormatters(FormatterRegistry registry) {
        registry.addConverter(new UserConverter());
    }
}以后再传对应类型的参数时,会用我们自定义的转换规则来进行转换:
@RequestMapping(value = "/save", method = RequestMethod.POST)
@ResponseBody
public Map<String, Object> saveUser(User user) {
    // 保存用户信息,并返回成功的响应
    userService.saveUser(user);
    return Collections.singletonMap("success", true);
}有时候我们希望前端传过来的参数是满足一定格式的,Spring MVC也考虑到了这一点,为我们提供了基于注解的参数校验功能。
public class User {
    @NotNull(message = "id不能为空")
    private Long id;

    @NotBlank(message = "name不能为空")
    private String name;

    @Min(value = 0, message = "age不能小于0")
    @Max(value = 150, message = "age不能大于150")
    private Integer age;

    @Email(message = "email格式不正确")
    private String email;

    // 省略 getter 和 setter 方法
}只是使用了注解,校验并不会生效,还需要在想要进行校验的地方配上@Validated开启校验:
public class User {
    @NotNull(message = "id不能为空")
    private Long id;

    @NotBlank(message = "name不能为空")
    private String name;

    @Min(value = 0, message = "age不能小于0")
    @Max(value = 150, message = "age不能大于150")
    private Integer age;

    @Email(message = "email格式不正确")
    private String email;

    // 省略 getter 和 setter 方法
}Spring MVC 中的数据模型用于在处理器方法(Controller)和视图之间传递数,有三种:
Model
ModelMap
ModelAndView
Model:
只能承载参数
@GetMapping("/hello")
public String hello(Model model) {
    model.addAttribute("message", "Hello, world!");
    return "hello";
}ModelMap:
和Model功能相似。
@GetMapping("/hello")
public String hello(ModelMap model) {
    model.put("message", "Hello, world!");
    return "hello";
}ModelAndView:
既能承载参数也能承载视图名。
@GetMapping("/hello")
public ModelAndView hello() {
    ModelAndView mav = new ModelAndView("hello");
    mav.addObject("message", "Hello, world!");
    return mav;
}1.视图
Spring MVC的视图可以理解为最终返给前端的东西,分为两类:
逻辑视图
非逻辑视图
逻辑视图:
逻辑视图是指一个字符串,它代表了一个视图的逻辑名称,与实际的视图实现解耦合,而是通过视图解析器将其映射为实际的视图。在 Spring MVC 中,处理器方法可以返回逻辑视图名,由 DispatcherServlet 根据视图解析器的配置,将其映射为实际的视图。
常用的逻辑视图包括:
JSP 视图:使用 InternalResourceViewResolver 视图解析器,将逻辑视图名映射为 JSP 文件名。
Velocity 视图:使用 VelocityViewResolver 视图解析器,将逻辑视图名映射为 Velocity 模板文件名。
Thymeleaf 视图:使用 ThymeleafViewResolver 视图解析器,将逻辑视图名映射为 Thymeleaf 模板文件名。
非逻辑视图:
非逻辑视图是指一个具体的视图实现,通常是一个视图类或者一个 RESTful Web Service。在处理器方法中,可以直接返回一个非逻辑视图,它会被直接渲染,而不需要通过视图解析器进行转换。
常用的非逻辑视图包括:
JSON 视图:使用 MappingJackson2JsonView 视图实现,将模型数据转换为 JSON 格式返回给客户端。
XML 视图:使用 MappingJackson2XmlView 视图实现,将模型数据转换为 XML 格式返回给客户端。
PDF 视图:使用 iText PDF 库和 AbstractPdfView 视图实现,将模型数据转换为 PDF 格式返回给客户端。
需要注意的是,非逻辑视图通常需要进行额外的配置和处理,比如 JSON 视图需要添加 Jackson 依赖库,并在 Spring 配置文件中配置 MappingJackson2JsonView 视图解析器。
2.视图解析器
视图解析器决定@Controller的return具体映射到什么类型的视图上,默认是使用InternalResourceViewResolver视图解析器,也就是JSP视图解析器,当我们配置好前缀、后缀后,它会自动将@Controller的return映射到对应的jsp上去。
spring.mvc.view.prefix=/WEB-INF/views/
spring.mvc.view.suffix=.jsp
当然在Spring Boot中也支持我们切换视图解析器,以下是切换为JSON视图解析器的示例,切换为JSON视图解析器后return会直接返回JSON给前端:
@Configuration
@EnableWebMvc
public class AppConfig implements WebMvcConfigurer {

    @Bean
    public ViewResolver viewResolver() {
        InternalResourceViewResolver resolver = new InternalResourceViewResolver();
        resolver.setPrefix("/WEB-INF/views/");
        resolver.setSuffix(".jsp");
        return resolver;
    }
}Spring Boot中使用自定义Spring MVC拦截器链的代码如下:
@Configuration
public class WebConfig implements WebMvcConfigurer {

    @Override
    public void addInterceptors(InterceptorRegistry registry) {
        registry.addInterceptor(new FirstInterceptor());
        registry.addInterceptor(new SecondInterceptor());
    }
}

public class FirstInterceptor implements HandlerInterceptor {

    @Override
    public boolean preHandle(HttpServletRequest request, HttpServletResponse response, Object handler)
            throws Exception {
        // 在处理器处理请求之前执行
        return true;
    }

    @Override
    public void postHandle(HttpServletRequest request, HttpServletResponse response, Object handler,
            ModelAndView modelAndView) throws Exception {
        // 在处理器处理请求之后,渲染视图之前执行
    }

    @Override
    public void afterCompletion(HttpServletRequest request, HttpServletResponse response, Object handler,
            Exception ex) throws Exception {
        // 在渲染视图之后执行
    }
}

public class SecondInterceptor implements HandlerInterceptor {

    @Override
    public boolean preHandle(HttpServletRequest request, HttpServletResponse response, Object handler)
            throws Exception {
        // 在处理器处理请求之前执行
        return true;
    }

    @Override
    public void postHandle(HttpServletRequest request, HttpServletResponse response, Object handler,
            ModelAndView modelAndView) throws Exception {
        // 在处理器处理请求之后,渲染视图之前执行
    }

    @Override
    public void afterCompletion(HttpServletRequest request, HttpServletResponse response, Object handler,
            Exception ex) throws Exception {
        // 在渲染视图之后执行
    }
}The above is the detailed content of How to use Spring MVC in Spring Boot. For more information, please follow other related articles on the PHP Chinese website!
 SpringBoot project building steps
 What is the difference between j2ee and springboot
 Full-width symbol input tutorial
 How to import easygui in vscode
 What are the four big data analysis tools?
 matlab colormap function usage
 Why does win10 activation fail?
 What are the website building functions?
 oracle nvl


