

How to build springboot project in idea

Spring Boot is a new framework provided by the Pivotal team. It is designed to simplify the initial construction and development process of new Spring applications. What it mainly advocates is 'eliminating configuration' and achieving zero configuration.
So, how to create a springboot project in idea?
1. Create Module under the project you created and select Spring initializr to create it.
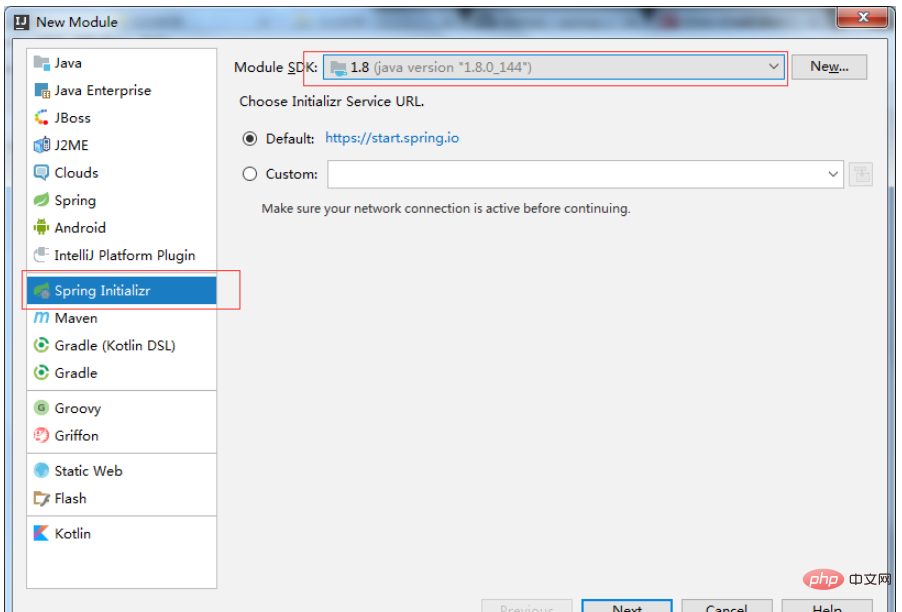
2. Select at Type: Maven Project (project build tool)

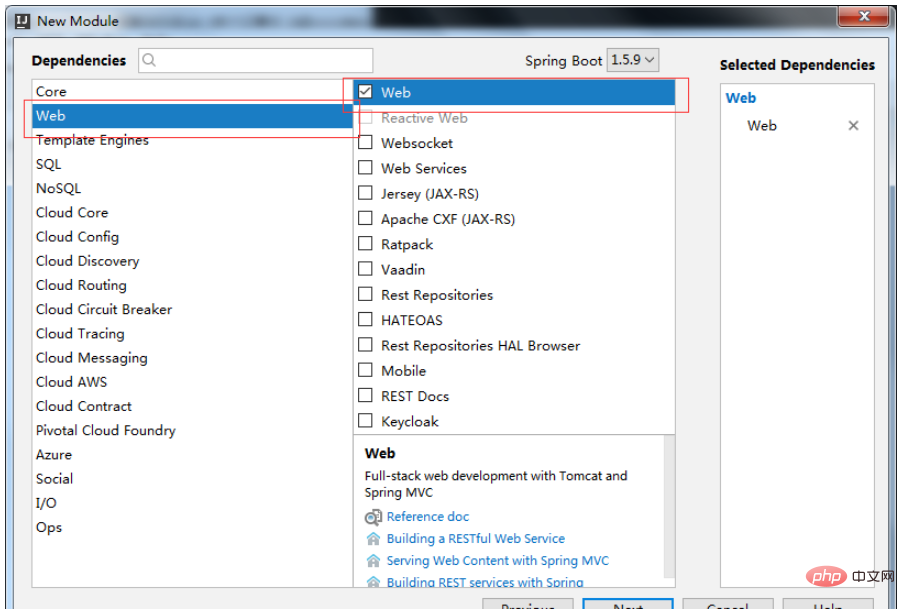
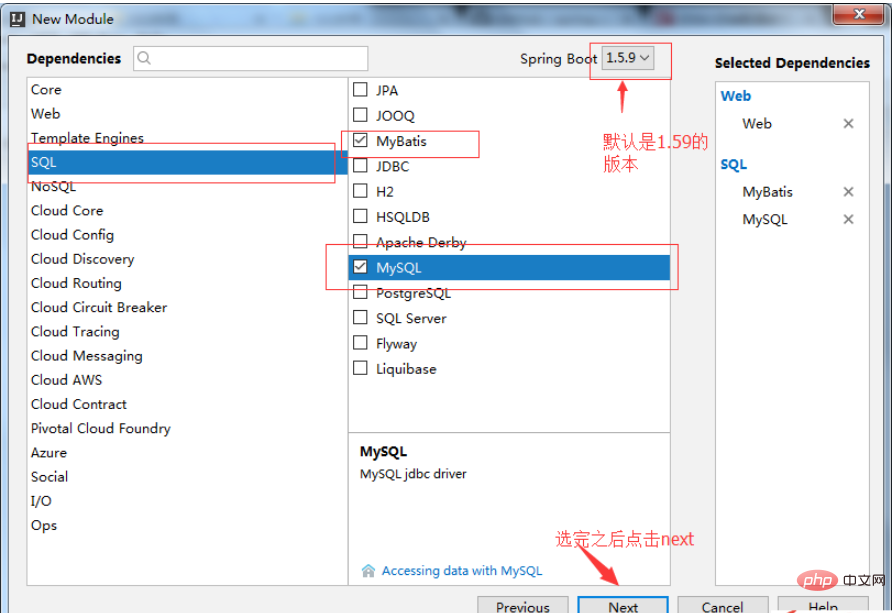
3. When creating dependencies, check web, mybatis, mysql (this depends on your personal needs, you can choose independently)
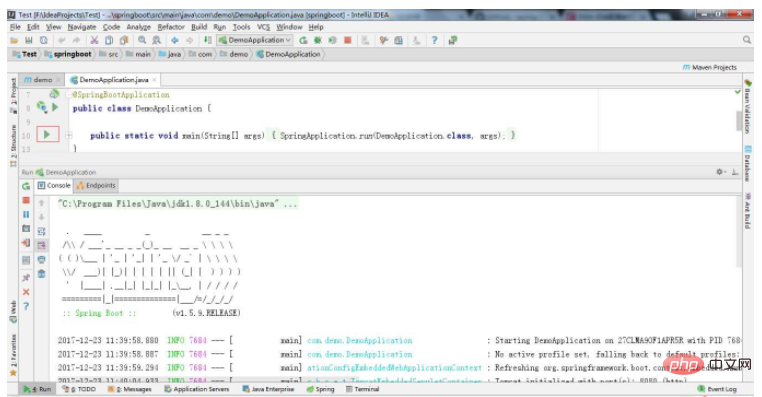
The established project structure is as follows:

The corresponding pom.xml file
<?xml  version="1.0" encoding="UTF-8"?>
<project>
  <modelversion>4.0.0</modelversion>
  <groupid>com</groupid>
  <artifactid>demo</artifactid>
  <version>0.0.1-SNAPSHOT</version>
  <packaging>jar</packaging>
  <name>demo</name>
  <description>Demo project for Spring Boot</description>
  <parent>
    <groupid>org.springframework.boot</groupid>
    <artifactid>spring-boot-starter-parent</artifactid>
    <version>1.5.9.RELEASE</version>
    <relativepath></relativepath> <!-- lookup parent from repository -->
  </parent>
  <properties>
    <project.build.sourceencoding>UTF-8</project.build.sourceencoding>
    <project.reporting.outputencoding>UTF-8</project.reporting.outputencoding>
    <java.version>1.8</java.version>
  </properties>
  <dependencies>
    <dependency>
      <groupid>org.mybatis.spring.boot</groupid>
      <artifactid>mybatis-spring-boot-starter</artifactid>
      <version>1.3.1</version>
    </dependency>
    <dependency>
      <groupid>org.springframework.boot</groupid>
      <artifactid>spring-boot-starter-web</artifactid>
    </dependency>
    <dependency>
      <groupid>mysql</groupid>
      <artifactid>mysql-connector-java</artifactid>
      <scope>runtime</scope>
    </dependency>
    <dependency>
      <groupid>org.springframework.boot</groupid>
      <artifactid>spring-boot-starter-test</artifactid>
      <scope>test</scope>
    </dependency>
    <!--c3p0 这是我手动引入的 因为我需要连接数据库-->
    <dependency>
      <groupid>com.mchange</groupid>
      <artifactid>c3p0</artifactid>
      <version>0.9.5.2</version>
    </dependency>
  </dependencies>
  <build>
    <plugins>
      <plugin>
        <groupid>org.springframework.boot</groupid>
        <artifactid>spring-boot-maven-plugin</artifactid>
      </plugin>
    </plugins>
  </build>

</project>
application.yml (the suffix of this application file was not called yml when the project was built. It is officially recommended to change the suffix to yml. The advantage is that the code has prompts)
mybatis:
 mapper-locations: classpath:mapper/*.xml
 type-aliases-package: com.demo.pojo
#数据库连接池
spring: datasource: username: root password: sasa url: jdbc:mysql://localhost:3306/ssm driver-class-name: com.mysql.jdbc.Driver
Start
The above is the detailed content of How to build springboot project in idea. For more information, please follow other related articles on the PHP Chinese website!

Hot AI Tools

Undresser.AI Undress
AI-powered app for creating realistic nude photos

AI Clothes Remover
Online AI tool for removing clothes from photos.

Undress AI Tool
Undress images for free

Clothoff.io
AI clothes remover

Video Face Swap
Swap faces in any video effortlessly with our completely free AI face swap tool!

Hot Article
Hot Tools

Notepad++7.3.1
Easy-to-use and free code editor

SublimeText3 Chinese version
Chinese version, very easy to use

Zend Studio 13.0.1
Powerful PHP integrated development environment

Dreamweaver CS6
Visual web development tools

SublimeText3 Mac version
God-level code editing software (SublimeText3)
Hot Topics


 The difference between idea community version and professional version
Nov 07, 2023 pm 05:23 PM
The difference between idea community version and professional version
Nov 07, 2023 pm 05:23 PM
The differences between IDEA Community Edition and Professional Edition include authorization methods, functions, support and updates, plug-in support, cloud services and team collaboration, mobile development support, education and learning, integration and scalability, error handling and debugging, security and privacy protection. etc. Detailed introduction: 1. Authorization method. The community version is free and suitable for all developers, no matter what operating system is used. The community version supports open source projects and commercial projects. The professional version is paid and suitable for commercial development. The professional version has 30 There is a trial period of three days, after which you need to purchase a license to continue using it, etc.
 Five IntelliJ IDEA plug-ins to write code efficiently
Jul 16, 2023 am 08:03 AM
Five IntelliJ IDEA plug-ins to write code efficiently
Jul 16, 2023 am 08:03 AM
Artificial intelligence AI is currently a widely recognized future trend and development direction. Although some people worry that AI may replace all jobs, in fact it will only replace jobs that are highly repetitive and low-output. Therefore, we should learn to work smarter rather than harder. This article introduces 5 AI-driven Intellij plug-ins. These plug-ins can help you improve productivity, reduce tedious repetitive work, and make your work more efficient and convenient. 1GithubCopilotGithubCopilot is an artificial intelligence code assistance tool jointly developed by OpenAI and GitHub. It uses OpenAI’s GPT model to analyze code context, predict and generate new code
 How to use Redis to implement distributed locks in SpringBoot
Jun 03, 2023 am 08:16 AM
How to use Redis to implement distributed locks in SpringBoot
Jun 03, 2023 am 08:16 AM
1. Redis implements distributed lock principle and why distributed locks are needed. Before talking about distributed locks, it is necessary to explain why distributed locks are needed. The opposite of distributed locks is stand-alone locks. When we write multi-threaded programs, we avoid data problems caused by operating a shared variable at the same time. We usually use a lock to mutually exclude the shared variables to ensure the correctness of the shared variables. Its scope of use is in the same process. If there are multiple processes that need to operate a shared resource at the same time, how can they be mutually exclusive? Today's business applications are usually microservice architecture, which also means that one application will deploy multiple processes. If multiple processes need to modify the same row of records in MySQL, in order to avoid dirty data caused by out-of-order operations, distribution needs to be introduced at this time. The style is locked. Want to achieve points
 How to solve the problem that springboot cannot access the file after reading it into a jar package
Jun 03, 2023 pm 04:38 PM
How to solve the problem that springboot cannot access the file after reading it into a jar package
Jun 03, 2023 pm 04:38 PM
Springboot reads the file, but cannot access the latest development after packaging it into a jar package. There is a situation where springboot cannot read the file after packaging it into a jar package. The reason is that after packaging, the virtual path of the file is invalid and can only be accessed through the stream. Read. The file is under resources publicvoidtest(){Listnames=newArrayList();InputStreamReaderread=null;try{ClassPathResourceresource=newClassPathResource("name.txt");Input
 Comparison and difference analysis between SpringBoot and SpringMVC
Dec 29, 2023 am 11:02 AM
Comparison and difference analysis between SpringBoot and SpringMVC
Dec 29, 2023 am 11:02 AM
SpringBoot and SpringMVC are both commonly used frameworks in Java development, but there are some obvious differences between them. This article will explore the features and uses of these two frameworks and compare their differences. First, let's learn about SpringBoot. SpringBoot was developed by the Pivotal team to simplify the creation and deployment of applications based on the Spring framework. It provides a fast, lightweight way to build stand-alone, executable
 How SpringBoot customizes Redis to implement cache serialization
Jun 03, 2023 am 11:32 AM
How SpringBoot customizes Redis to implement cache serialization
Jun 03, 2023 am 11:32 AM
1. Customize RedisTemplate1.1, RedisAPI default serialization mechanism. The API-based Redis cache implementation uses the RedisTemplate template for data caching operations. Here, open the RedisTemplate class and view the source code information of the class. publicclassRedisTemplateextendsRedisAccessorimplementsRedisOperations, BeanClassLoaderAware{//Declare key, Various serialization methods of value, the initial value is empty @NullableprivateRedisSe
 SpringBoot+Dubbo+Nacos development practical tutorial
Aug 15, 2023 pm 04:49 PM
SpringBoot+Dubbo+Nacos development practical tutorial
Aug 15, 2023 pm 04:49 PM
This article will write a detailed example to talk about the actual development of dubbo+nacos+Spring Boot. This article will not cover too much theoretical knowledge, but will write the simplest example to illustrate how dubbo can be integrated with nacos to quickly build a development environment.
 How to get the value in application.yml in springboot
Jun 03, 2023 pm 06:43 PM
How to get the value in application.yml in springboot
Jun 03, 2023 pm 06:43 PM
In projects, some configuration information is often needed. This information may have different configurations in the test environment and the production environment, and may need to be modified later based on actual business conditions. We cannot hard-code these configurations in the code. It is best to write them in the configuration file. For example, you can write this information in the application.yml file. So, how to get or use this address in the code? There are 2 methods. Method 1: We can get the value corresponding to the key in the configuration file (application.yml) through the ${key} annotated with @Value. This method is suitable for situations where there are relatively few microservices. Method 2: In actual projects, When business is complicated, logic
