

How to set up browser negotiation cache based on nginx

The difference between strong cache and negotiated cache
Strong cache: The browser directly accesses the browser cache without negotiating with the server
Negotiated cache: The browser will first Confirm the validity of the resource with the server before deciding whether to fetch the resource from the cache or re-obtain the resource
Negotiate the operating principle of the cache
Now there is a business scenario like this: The static resources on the back end will be updated from time to time, and because the browser uses strong caching by default, outdated resources will be fetched from the browser cache by default.
Now we hope that the browser will confirm with the backend whether the resource has been updated every time it obtains the resource. We need to set the browser to use negotiation cache
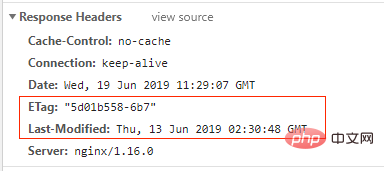
So how does the backend determine whether the resource has been updated? ? At this time, the etag and last-modified response headers will be used.
Every time a request for a static resource is received, the backend will put the last modified time (last-modified) of the resource and the etag calculated based on the resource content in the response header to the frontend.
After receiving the response, the front end caches these two items, and then puts the contents of these two items into the if-modified-since and if-none-match requests the next time it requests the same resource. Head.
After the server receives these two items, it will compare it with the etag and last-modified currently generated by the resource. If both are consistent, it means that the resource has not been updated, and the server will return a 304 empty response; otherwise, Indicates that the resource has been updated, and the server will return the complete resource content to
implementation
So how to implement such a complex process? It's actually very simple. Just use nginx as the server for static resources and add cache-control:no-cache to the response header.
Let’s implement it step by step
1. Use nginx as the server for static resources
In the configuration of nginx, the request for static resources is mapped to the disk of the resource On the path
http {
  server {
  listen 80;
  ...
  location /picture/ {
    alias d:/luozixi/tcp_test/picture/;
    # alias是重定义路径
    # 比如访问127.0.0.1/picture/1_new.gif,则会映射为访问d:/luozixi/tcp_test/picture/1_new.gif
    # web应用根本不会收到请求,picture的请求都被nginx处理了
    # alias是替换,root是拼接
    autoindex on;
    # 访问127.0.0.1/picture/,会得到目录的索引界面
    }
  }
}2. Reload the nginx configuration
nginx -s reload
3. At this time, when requesting static resources, nginx will automatically add etag and last-modified to the response header
4. But then I found that if cache-contrl: no-cache is not configured, the browser will not send the request to the backend the next time it requests this resource, but Get resources directly from the cache
5. Configure
location /picture/ {
  add_header cache-control no-cache;
  alias d:/luozixi/tcp_test/picture/;
}in nginx 6. After clearing the browser cache and making the first request, you will get a normal 200 response, and the response header There is already cache-control: no-cache, which means using negotiated cache
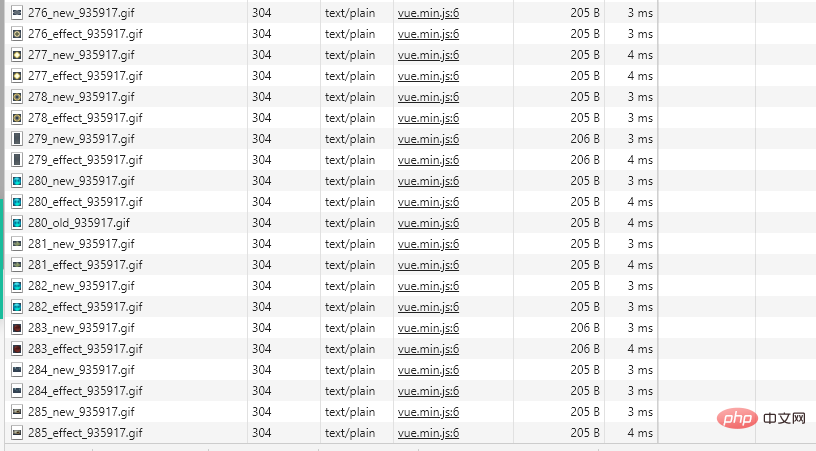
7. After making the request again, you will find that the request header has included if-modified-since and if-none-match.

8. After receiving these two items, the server (nginx) will compare it with the etag and last-modified currently generated by the resource. If both are consistent, it means If the resource is not updated, the server will return a 304 empty response; otherwise, it means that the resource has been updated, and the server will return the complete resource content
. In addition, the way the server verifies if-modified-since is just a simple string In comparison, even if the last-modified of the resource is earlier than if-modified-since, the server still thinks that the resource is updated
9. After the browser receives the 304 response, it will fetch the resource from the browser cache. Therefore, the speed is very fast
The difference between no-cache and no-store
No-cache means not to cache expired resources. The resource will be processed after confirming the effective processing to the server
, and no-store is the real non-caching.
The above is the detailed content of How to set up browser negotiation cache based on nginx. For more information, please follow other related articles on the PHP Chinese website!

Hot AI Tools

Undresser.AI Undress
AI-powered app for creating realistic nude photos

AI Clothes Remover
Online AI tool for removing clothes from photos.

Undress AI Tool
Undress images for free

Clothoff.io
AI clothes remover

Video Face Swap
Swap faces in any video effortlessly with our completely free AI face swap tool!

Hot Article
Hot Tools

Notepad++7.3.1
Easy-to-use and free code editor

SublimeText3 Chinese version
Chinese version, very easy to use

Zend Studio 13.0.1
Powerful PHP integrated development environment

Dreamweaver CS6
Visual web development tools

SublimeText3 Mac version
God-level code editing software (SublimeText3)
Hot Topics
 1386
1386
 52
52

 How to configure cloud server domain name in nginx
Apr 14, 2025 pm 12:18 PM
How to configure cloud server domain name in nginx
Apr 14, 2025 pm 12:18 PM
How to configure an Nginx domain name on a cloud server: Create an A record pointing to the public IP address of the cloud server. Add virtual host blocks in the Nginx configuration file, specifying the listening port, domain name, and website root directory. Restart Nginx to apply the changes. Access the domain name test configuration. Other notes: Install the SSL certificate to enable HTTPS, ensure that the firewall allows port 80 traffic, and wait for DNS resolution to take effect.
 How to check whether nginx is started
Apr 14, 2025 pm 01:03 PM
How to check whether nginx is started
Apr 14, 2025 pm 01:03 PM
How to confirm whether Nginx is started: 1. Use the command line: systemctl status nginx (Linux/Unix), netstat -ano | findstr 80 (Windows); 2. Check whether port 80 is open; 3. Check the Nginx startup message in the system log; 4. Use third-party tools, such as Nagios, Zabbix, and Icinga.
 How to check nginx version
Apr 14, 2025 am 11:57 AM
How to check nginx version
Apr 14, 2025 am 11:57 AM
The methods that can query the Nginx version are: use the nginx -v command; view the version directive in the nginx.conf file; open the Nginx error page and view the page title.
 How to create a mirror in docker
Apr 15, 2025 am 11:27 AM
How to create a mirror in docker
Apr 15, 2025 am 11:27 AM
Steps to create a Docker image: Write a Dockerfile that contains the build instructions. Build the image in the terminal, using the docker build command. Tag the image and assign names and tags using the docker tag command.
 How to start nginx server
Apr 14, 2025 pm 12:27 PM
How to start nginx server
Apr 14, 2025 pm 12:27 PM
Starting an Nginx server requires different steps according to different operating systems: Linux/Unix system: Install the Nginx package (for example, using apt-get or yum). Use systemctl to start an Nginx service (for example, sudo systemctl start nginx). Windows system: Download and install Windows binary files. Start Nginx using the nginx.exe executable (for example, nginx.exe -c conf\nginx.conf). No matter which operating system you use, you can access the server IP
 How to check whether nginx is started?
Apr 14, 2025 pm 12:48 PM
How to check whether nginx is started?
Apr 14, 2025 pm 12:48 PM
In Linux, use the following command to check whether Nginx is started: systemctl status nginx judges based on the command output: If "Active: active (running)" is displayed, Nginx is started. If "Active: inactive (dead)" is displayed, Nginx is stopped.
 How to start nginx in Linux
Apr 14, 2025 pm 12:51 PM
How to start nginx in Linux
Apr 14, 2025 pm 12:51 PM
Steps to start Nginx in Linux: Check whether Nginx is installed. Use systemctl start nginx to start the Nginx service. Use systemctl enable nginx to enable automatic startup of Nginx at system startup. Use systemctl status nginx to verify that the startup is successful. Visit http://localhost in a web browser to view the default welcome page.
 How to run nginx apache
Apr 14, 2025 pm 12:33 PM
How to run nginx apache
Apr 14, 2025 pm 12:33 PM
To get Nginx to run Apache, you need to: 1. Install Nginx and Apache; 2. Configure the Nginx agent; 3. Start Nginx and Apache; 4. Test the configuration to ensure that you can see Apache content after accessing the domain name. In addition, you need to pay attention to other matters such as port number matching, virtual host configuration, and SSL/TLS settings.
