

How to make an SSD the primary drive in Windows 11

Why make SSD the primary drive in Windows 11? Advantage Description
The difference between HDD and SSD is not a matter of degree, but a matter of kind. HDDs have many moving parts—spindles, spinning disks, read/write arms, etc.—and damage to any of them can cause the disk to fail. Therefore, durability is not HDD’s strong point. They also can't match the speeds offered by SSDs.
HDD uses mechanical components, while SSD uses flash memory to save and access data. Since they have no moving parts, they are durable and less susceptible to damage from drops, which also makes them faster and more power-efficient.
In most cases, SSDs will also last longer than their traditional counterparts. If you frequently introduce new files to your SSD, your SSD will degrade over time. However, if you do this infrequently and keep your SSD used only for hosting Windows and other commonly used files, they can last a long time. On the other hand, as mentioned earlier, a single failure of one of the moving parts of the hard drive can render it unusable.
Sure, SSDs are also four times more expensive (per GB) than HDDs, but their cost decreases over time and will only get cheaper as demand grows.
How to make the most of SSD and HDD?
Because SSD performance degrades with frequent writes, it's best to use them for specific tasks. If longevity is your goal, they're best used to host Windows, resource-hungry applications like games and editing tools, and files you need to access frequently. For everything else - storing large files, saving and deleting files, and basic computing - use an HDD.
Using an SSD and HDD together will give you the best of both worlds while minimizing their disadvantages, such as the higher price of SSDs and the slower speeds of HDDs.
How to Make an SSD Your Primary Drive in Windows 11
Now that you know why you want to use an SSD as your primary drive, let’s look at a few methods you can use.
Method 1: After installing Windows (using BIOS key at boot)
If you have a new SSD and want to set it as the primary boot device before installing Windows, you can Follow these steps:
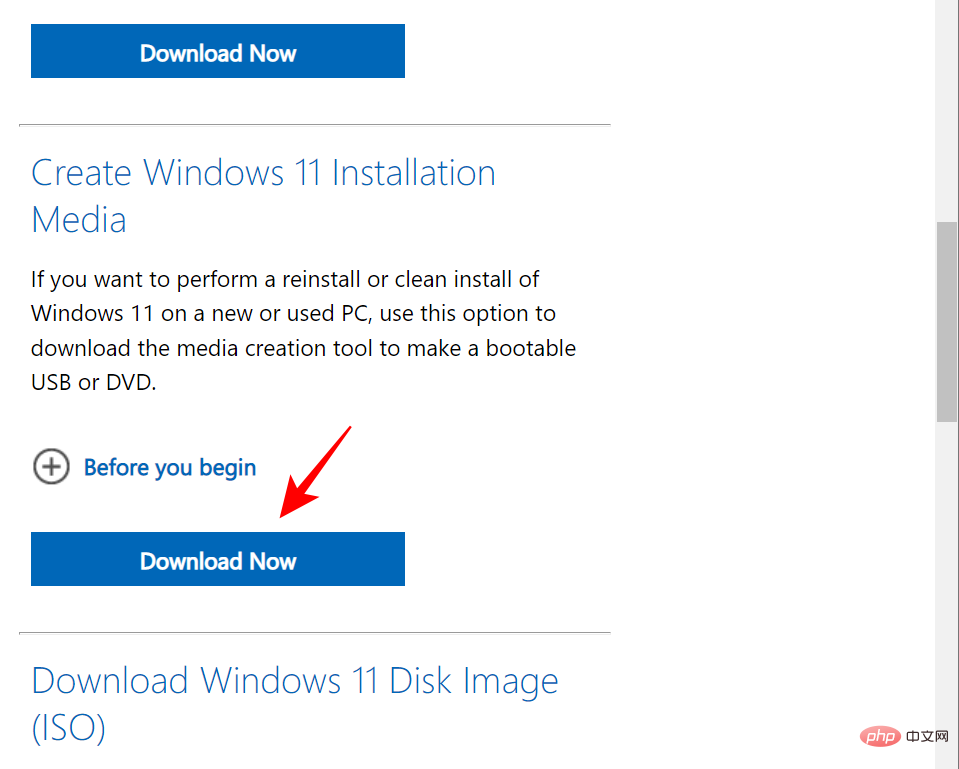
Of course, if you want to install Windows, you first need Windows installation media in the form of a bootable USB. You can download the media creation tool using the following link:
Download: Windows 11
Select the "Create Windows 11 installation media" option.
Download and run the media creation tool and make it bootable using the USB option.
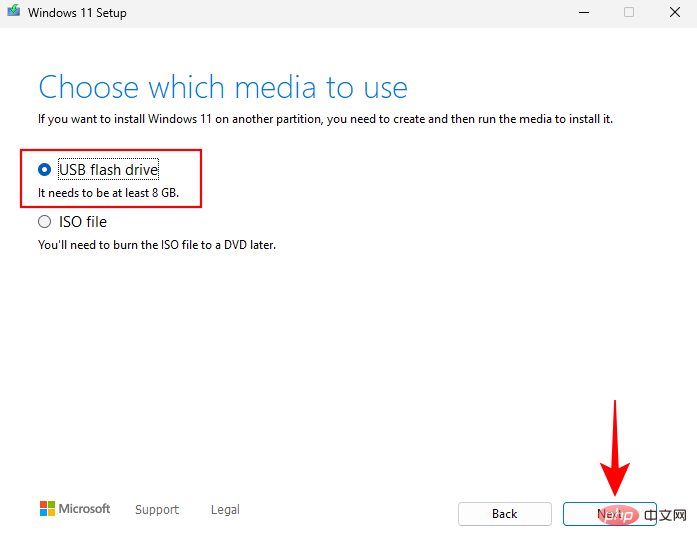
#Then follow the on-screen prompts to make your USB bootable.
Prepare your SSD
Now, it’s time to prepare your SSD. Power off the PC and unscrew the side panel. Then plug the SSD into the SATA connector and power cable, tighten the side panel, and power on the system.
After booting, right-click on the Start menu and select "Disk Management".
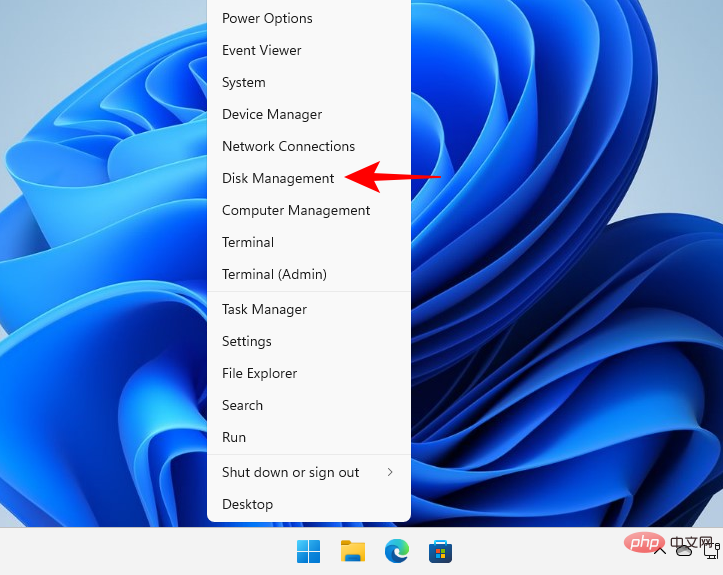
#Device Manager will automatically detect the SSD and take you to the initialization window. If not, right-click the disk and select Initialize.
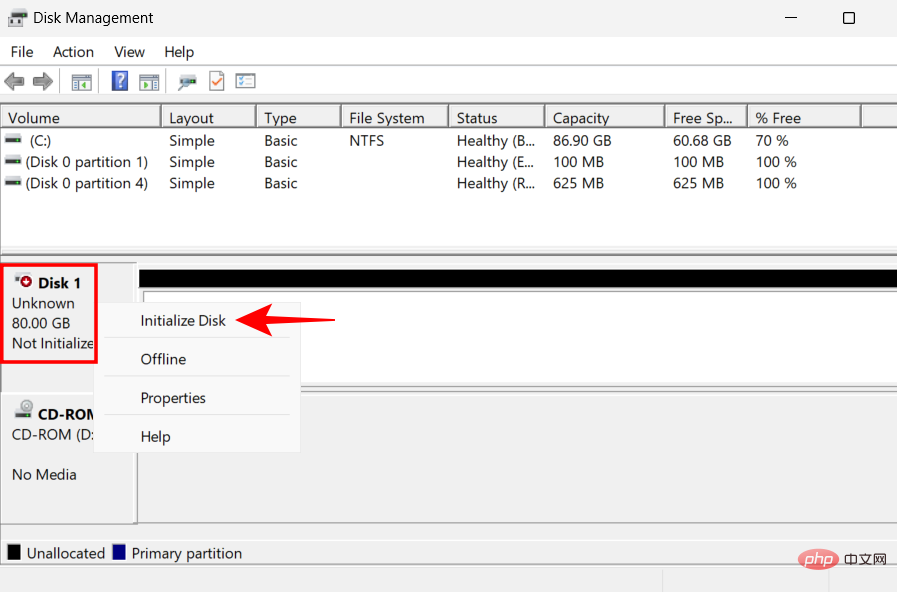
Then select GPT (for better Windows 11 compatibility) and click OK.
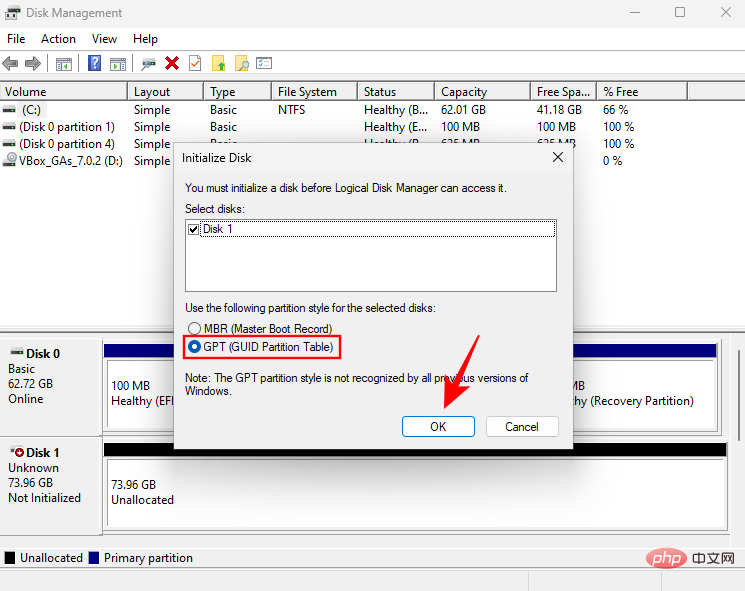
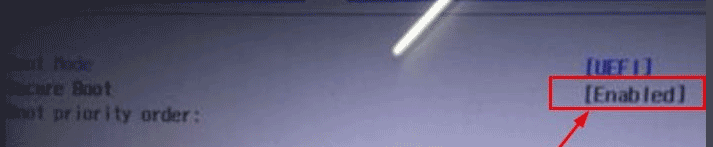
Note: If you want to use the MBR format, you must ensure that the boot mode is set to Legacy in the BIOS. To learn more about accessing the boot sequence from the BIOS, see the section on accessing the BIOS below.
Installing Windows on SSD
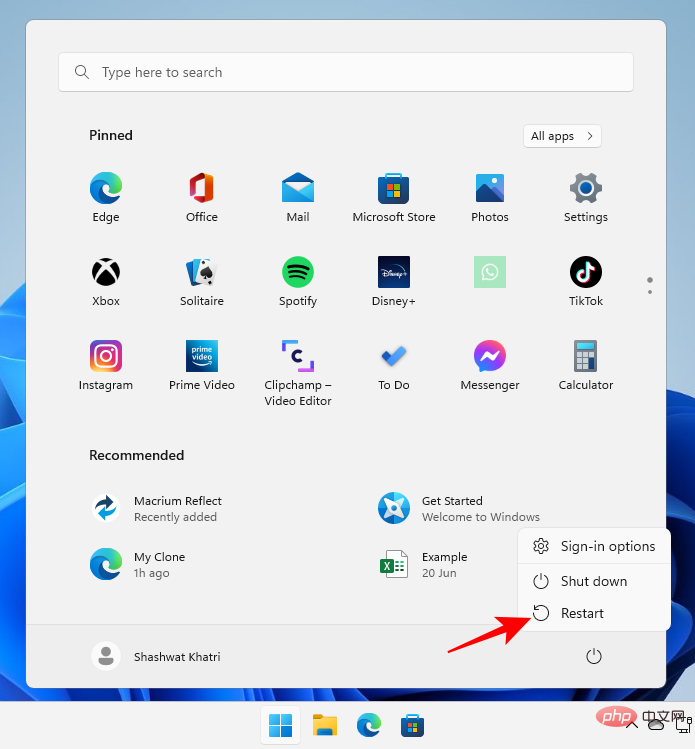
Now, insert the USB drive used for Windows installation. Then press Start and click the "Power" button.

Hold down the Shift key and click Restart.
Your computer will now boot in the Windows Recovery Environment. Click Use Device.
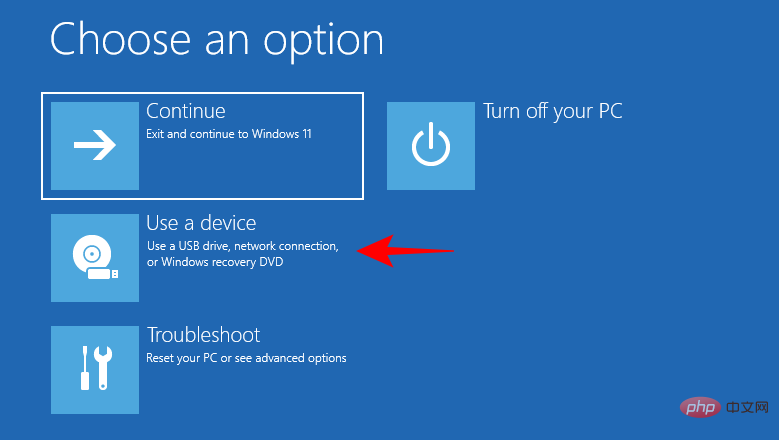
Select your bootable USB drive.

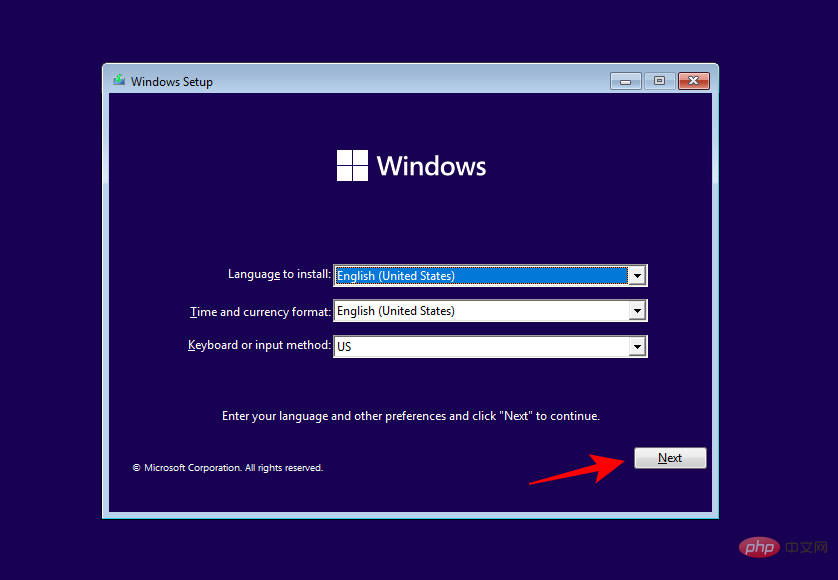
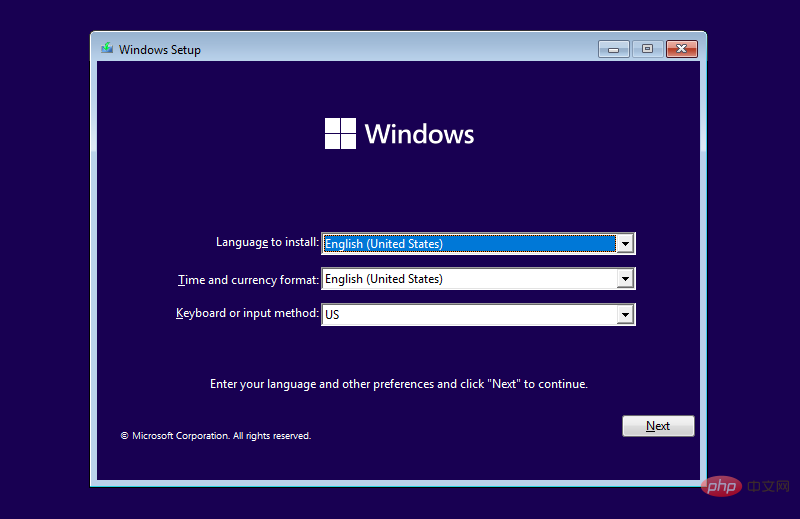
#Wait for the system to restart and boot into Windows Setup. Then click "Next".
Click Install now.

If you have a product key, enter your product key and click Next.
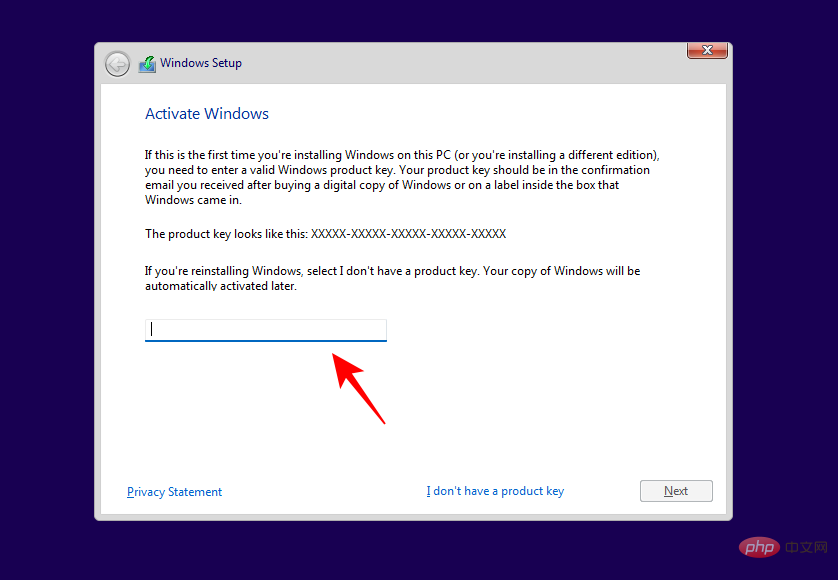
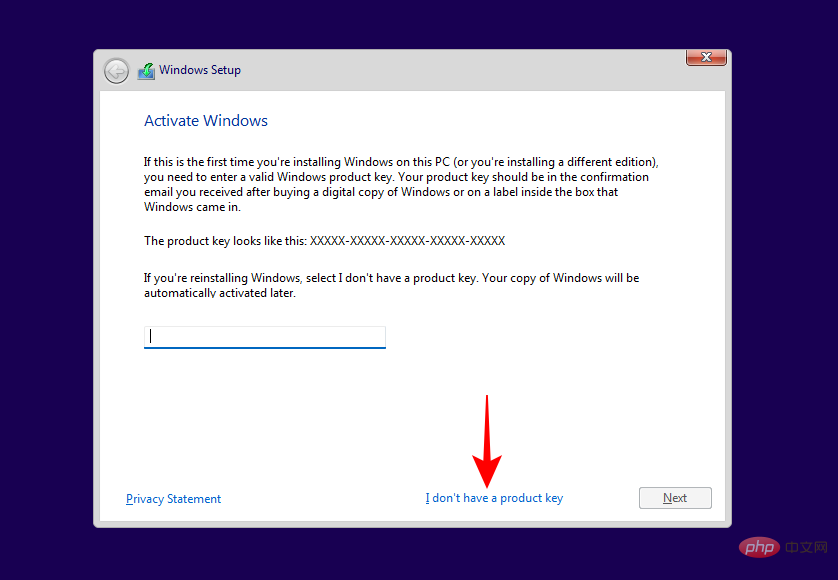
Next.
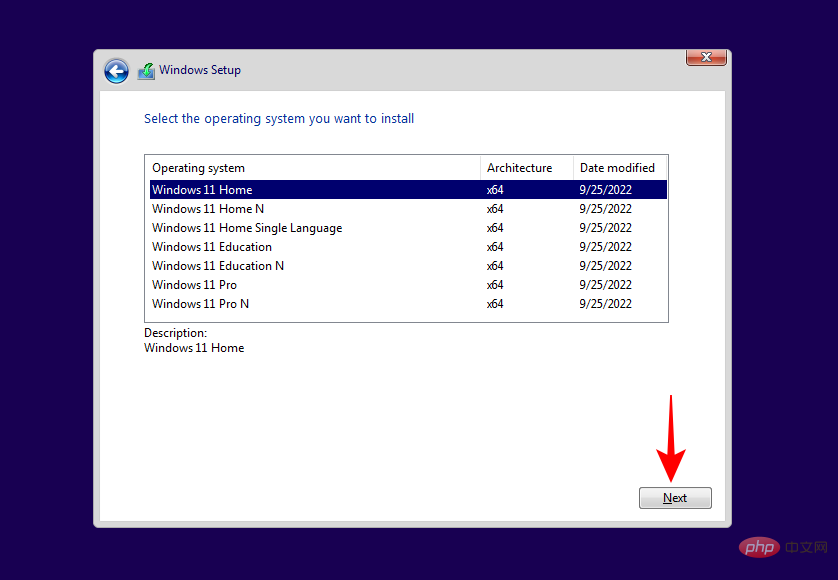
Next.
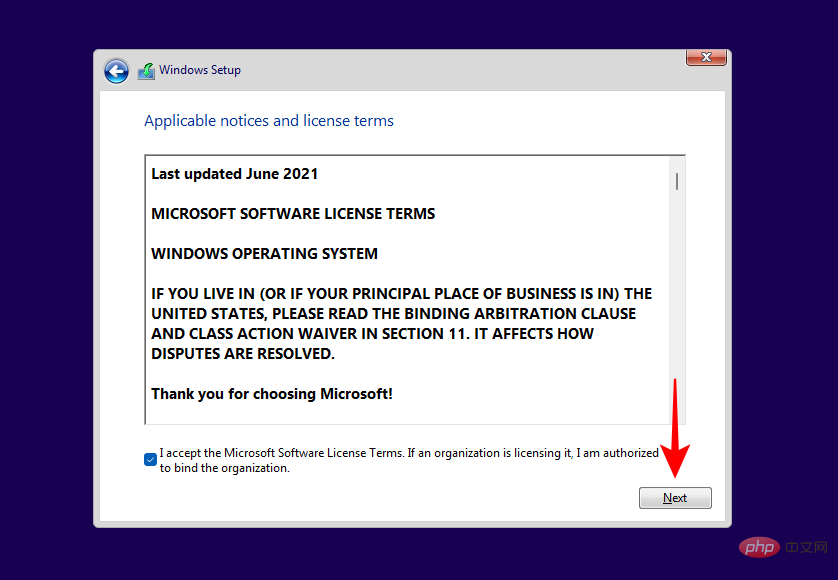
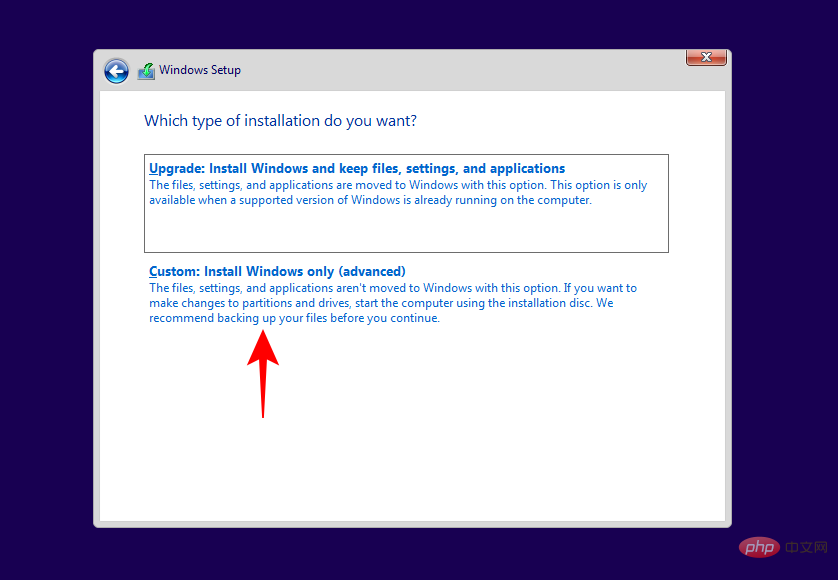
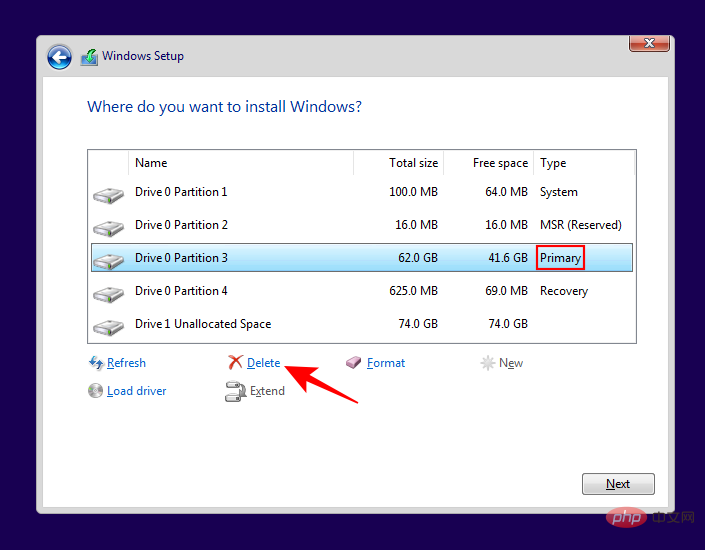
Custom Installation. This is an important point because the next screen will let you delete the previous partition and select the new SSD for the Windows installation (which will later be set as the primary drive).
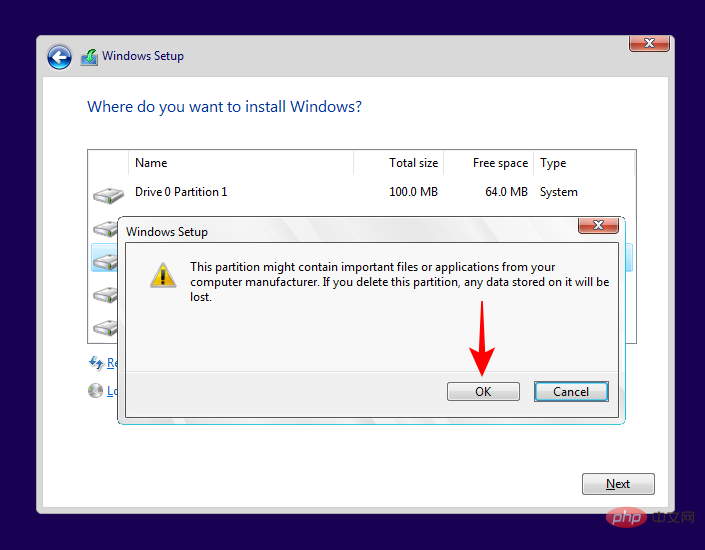
Remove.
Yes.
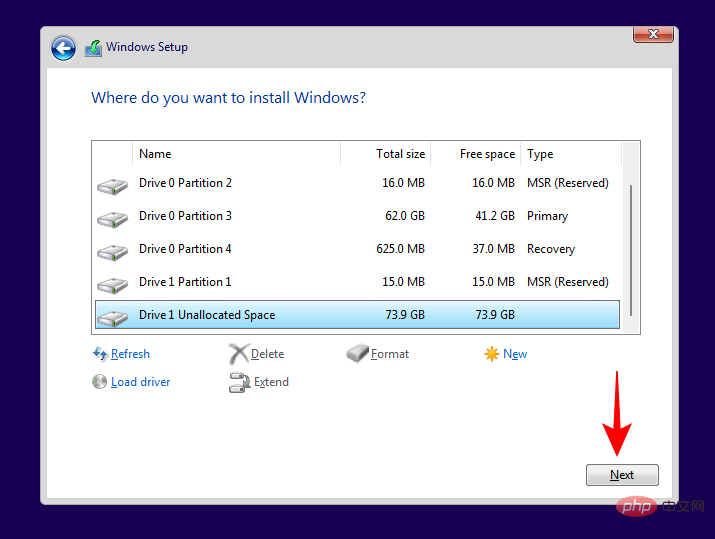
Next" to install Windows.
Note: The original Windows had a lower volume number, the new volume number on the SSD is higher).
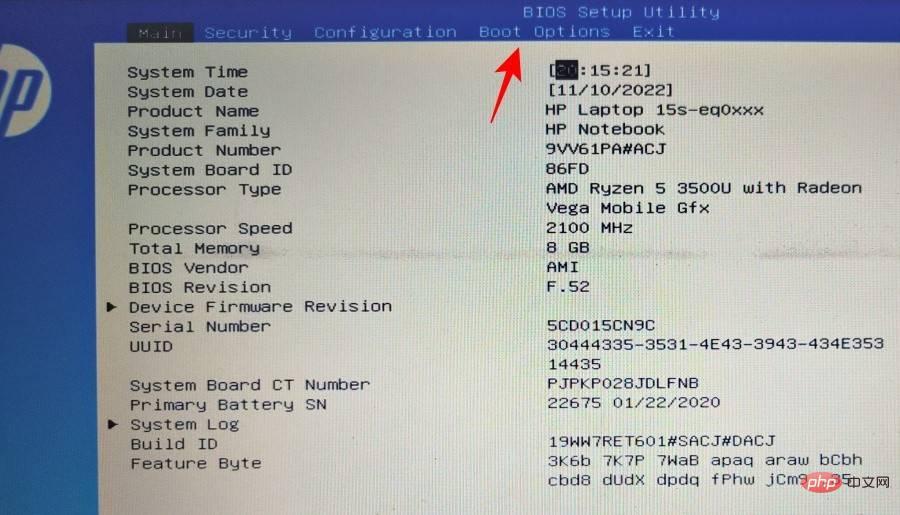
Access the BIOS and make the SSD the primary driveIf you deleted the previous version of Windows on your hard drive, the new installation on the SSD will automatically become the primary drive. However, if you install it with an existing Windows on the HDD, you must access the BIOS to make it the primary drive. There are several ways to access the BIOS, depending on your manufacturer and whether you are using legacy or UEFI boot mode. The first method involves accessing the BIOS the traditional way, by pressingF2, F8, F10, or while the system is booting Del key (the key will vary depending on your PC manufacturer. For more information, see the later section on accessing the BIOS).
But in short, you will use the arrow keys in the BIOS menu to get to the Boot Options tab, select your operating system boot manager and select your SSD to make it your primary boot drive.Quick Tip: If you want to change the boot mode between Legacy and UEFI, you can also do this from the Boot Options menu, depending on which one you selected respectively. MBR mode or GPT mode.
Method 2: After installing Windows (changing default Windows from WinRE)
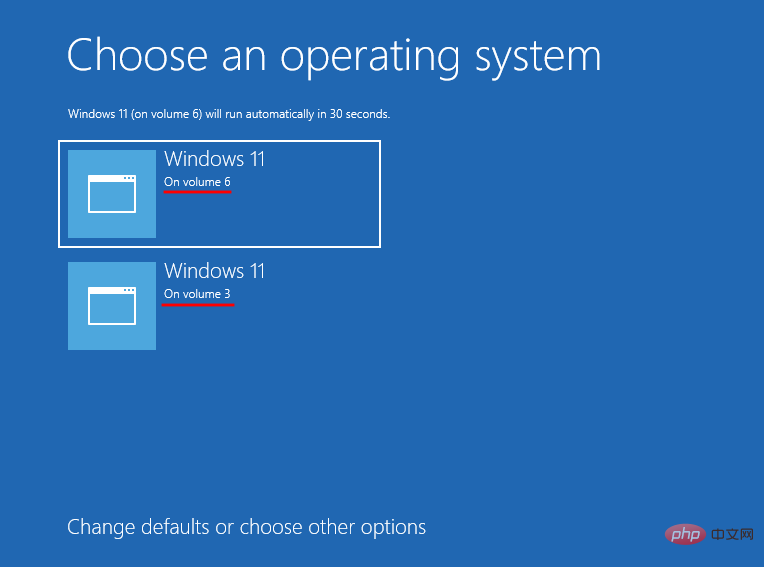
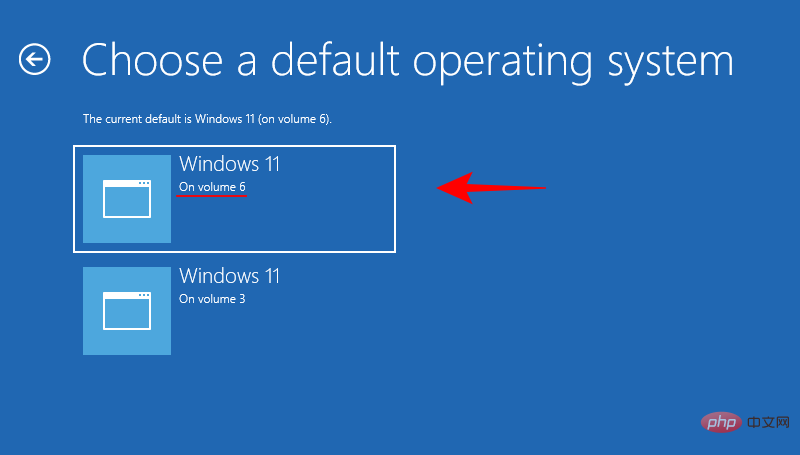
If you have two Windows installations (one on HDD and one on SSD), you can Make the SSD the primary drive after installing Windows by letting the computer restart, and then on the Windows selection page, click Change defaults or select a different option.
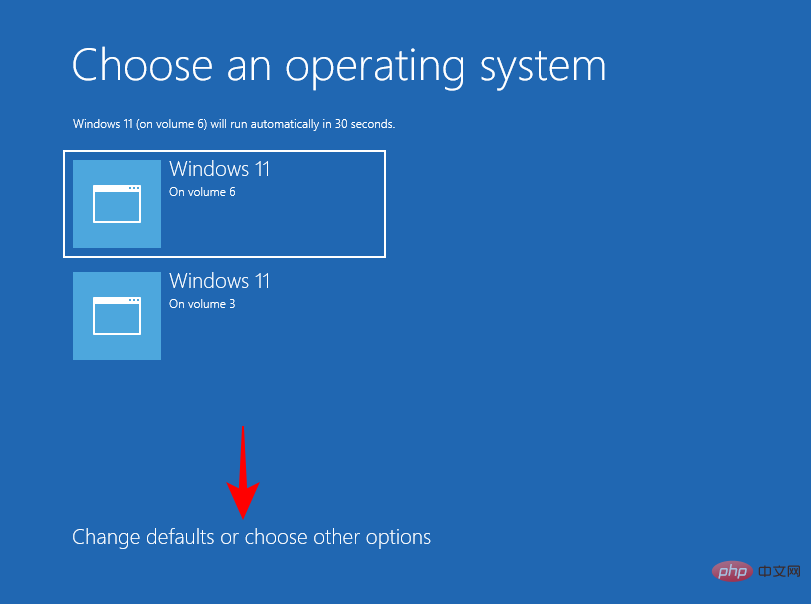
Click to select the default operating system .

Here you will see Windows installed on your system just like on the first screen. But this time you can set it as default permanently. Choose the one with the larger volume number (that is, the SSD introduced later).
Alternatively, click Choose other options on the Windows selection page.
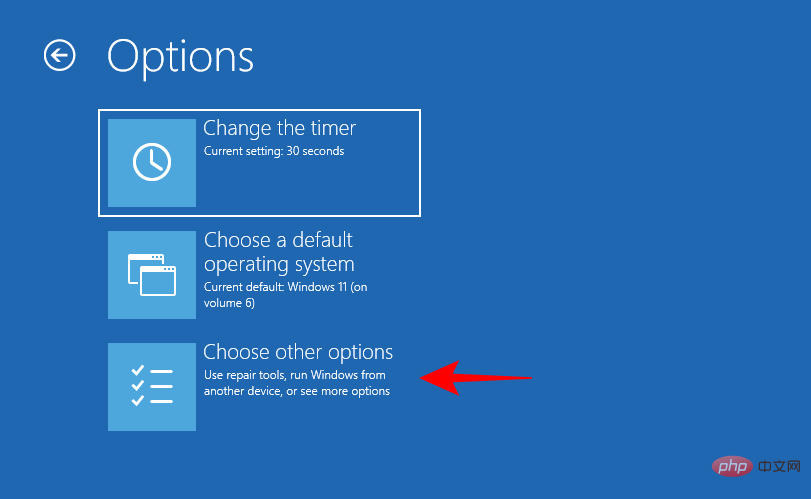
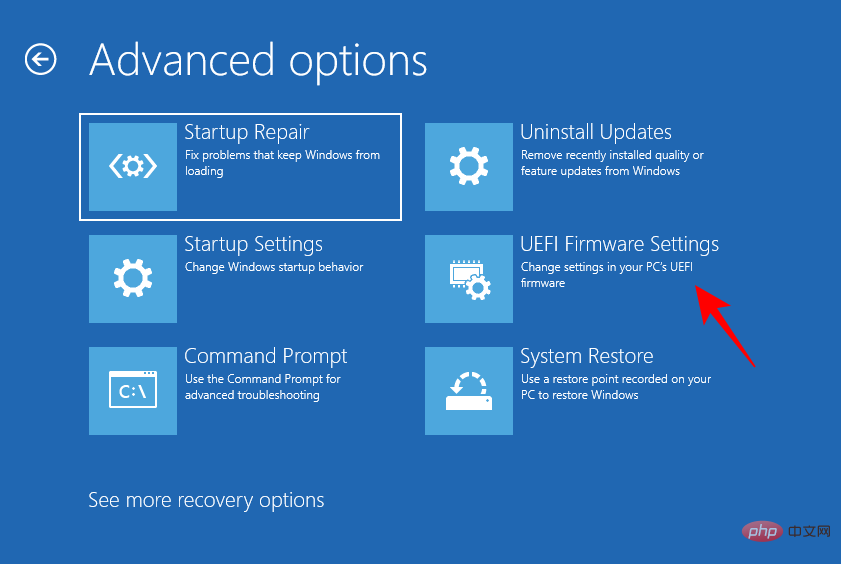
Click Troubleshooter.
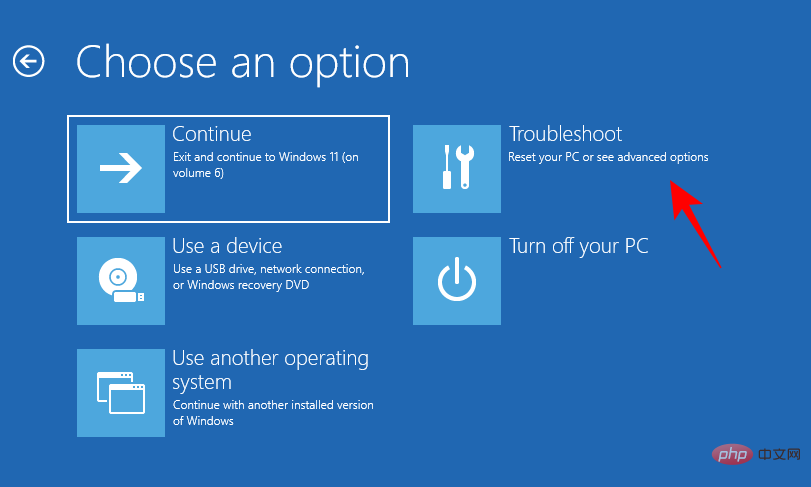
Now click on Advanced Options.
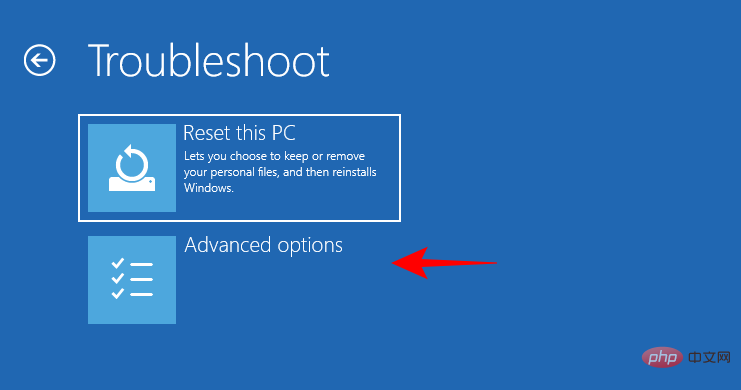
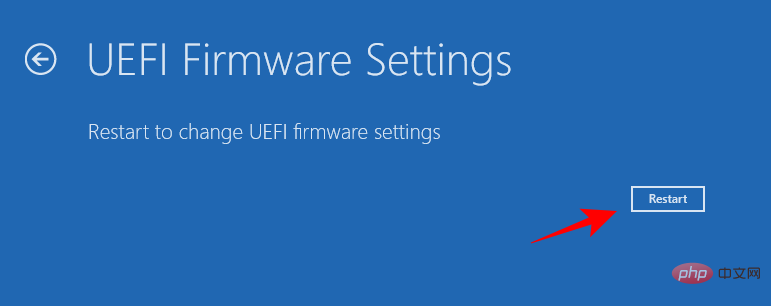
Click UEFI Firmware Settings.
Click Restart.
Now you will see entering the BIOS/UEFI setup page. Use the arrow keys to enter Boot Manager.
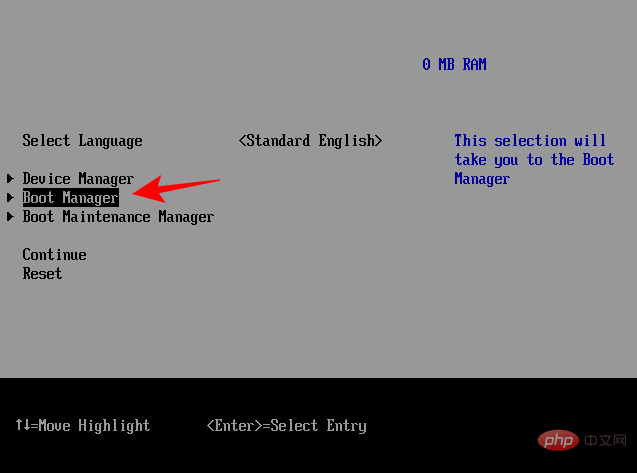
#Then go to your SSD and select it to make it boot priority.
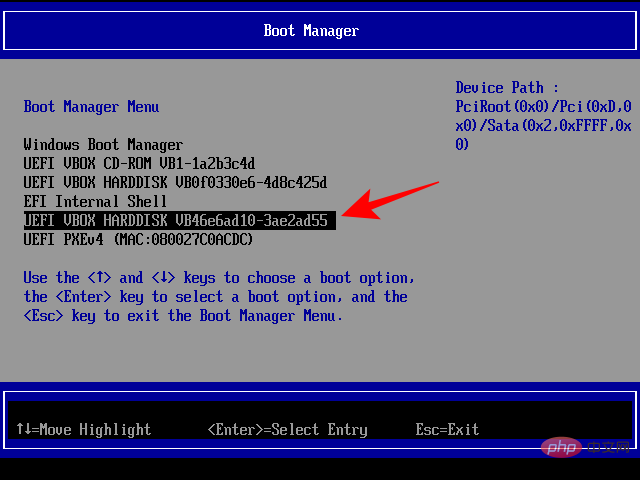
#Note: Your BIOS may differ from the one shown above. However, the options are more or less the same.
After booting into Windows 11, you can remove other Windows from your hard drive by formatting the drive. Alternatively, you can delete the partition (and all its contents) by deleting the drive during Windows installation, as shown in the first method.
Method 3: After cloning Windows 11 to SSD
After cloning Windows from HDD to SSD, you may also want to change the boot order to ensure that the latter is used as the primary drive.
To learn how to clone Windows 11 to an SSD, see our tutorial "How to clone Windows 11 to an SSD".
Then, as before, to make the SSD the primary boot drive, press F8 on boot to enter the boot manager and select your SSD.
How to set up an SSD as the BIOS master boot drive for different PC manufacturers
Now, since each manufacturer has a different boot key and a different BIOS layout, let’s see how Set up the SSD as the primary boot drive from some popular manufacturers.
turn on computer. Then, while the screen is still blank, press the F10 key repeatedly to enter the BIOS menu options. Make sure you do this before you see the Windows logo. If you miss your window of opportunity and Windows starts to boot, shut down your system and try again.
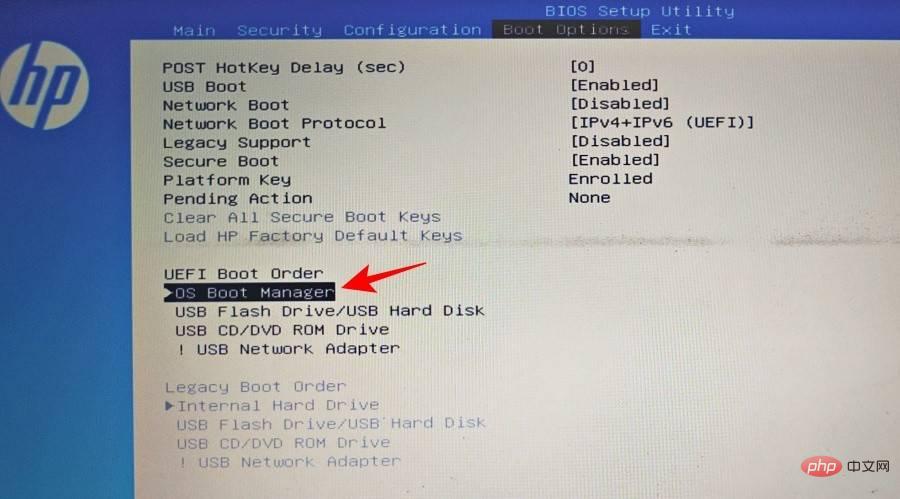
With the BIOS menu open, use the arrow keys to get to the Boot Options tab (on a desktop computer, you must go to the System Configuration tab and select Boot Options from there).
Here, select OS Boot Manager under Boot order and press Enter.
Select your SSD and press Enter.
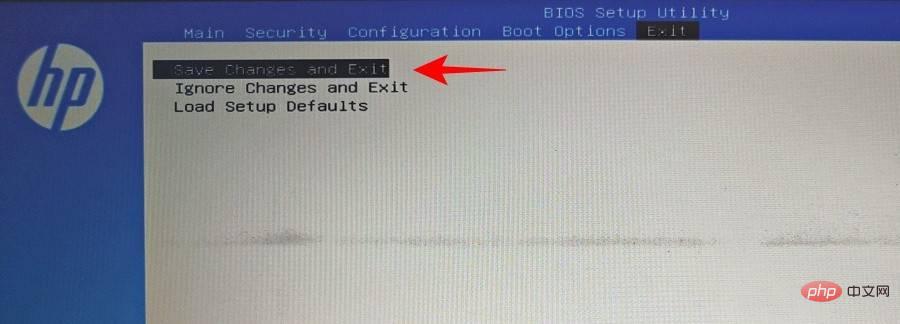
Then use the arrow keys to go to the Exit tab and select Exit to save changes.
ASUS
Here's how to access the BIOS on an ASUS system and set the SSD as the primary boot drive:
- Reset Start your PC and press F2 key (or delete) on the first screen.
- Click under Boot Priority to access boot options.
- Now use mouse drag or keyboard to select your SSD.
- Alternatively, you can press the F7 key in the BIOS to enter "Advanced Mode".
- If you are in Advanced Mode, click the Startup tab.
- Then go to "Boot Option Priority" at the bottom and select your SSD.
- Now just click the "Exit" button and when prompted, select "Save changes and exit" .
GIGABYTE
Here's how to access the BIOS on a Gigabyte motherboard and set the SSD as the primary boot drive:
- Restart your PC and then Press the Del key on a screen.
- If you are in Easy Mode, click on the Boot Order section in the lower left corner of the screen.
- Then use your mouse to drag the SSD to the top of the list.
- Then click "Esc" at the bottom.
- Then in the lower right corner, click Save and Exit (or press F10).
- Click Yes when prompted.
If you are in Advanced Mode, press F2 to enter Simple Mode and continue with the above steps, or navigate to the Boot tab to make changes.
Dell
Here's how to access the BIOS on a Dell system and set the SSD as the primary boot drive:
- Restart the PC and press F2 repeatedly key.
- Navigate to Settings and select Boot Order.
- On the right side you will see the boot options. Make sure there is a check mark next to SSD.
- Then, select the SSD in the list on the right and click the up arrow to place it at the top of the boot order.
- Click " Apply" and then click "OK" when prompted.
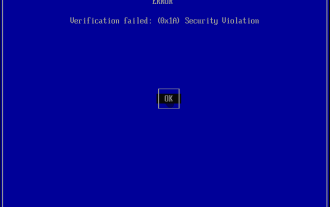
FIX: Clone SSD won't boot
If you've cloned Windows 11 to an SSD and found that it won't boot, something may have gone wrong.
First, you must ensure that Windows 11 is cloned correctly without any interruptions. See our tutorial on how to clone Windows 11 to an SSD.
Second, make sure the SSD is indeed the primary boot drive. You can do this by referring to the method given above in this tutorial.
Third, you may run into problems if the BIOS boot mode is not compatible with your SSD. This may occur if your boot disk is MBR (Legacy BIOS) instead of GPT (UEFI Boot Mode). If so, you'll have to set the SSD to GPT or make the partition active if you want to stick with MBR.
Please note that after converting from MBR to GPT, you must clean the disk and reinstall Windows on it.
To convert a disk from MBR to GPT, follow these steps:
Boot to the Windows Setup screen using the Windows installation disk (USB).
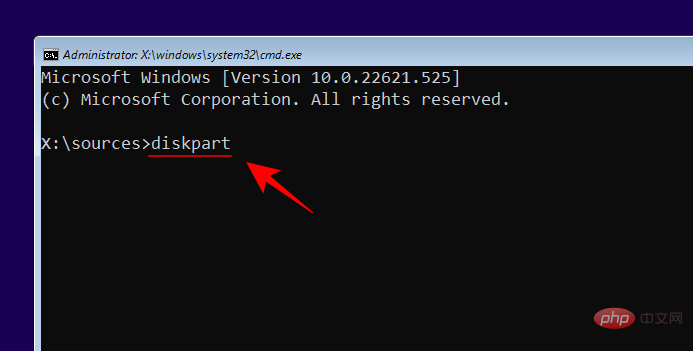
On the settings screen, press Shift F10 to open the command prompt.
Now type the following command:
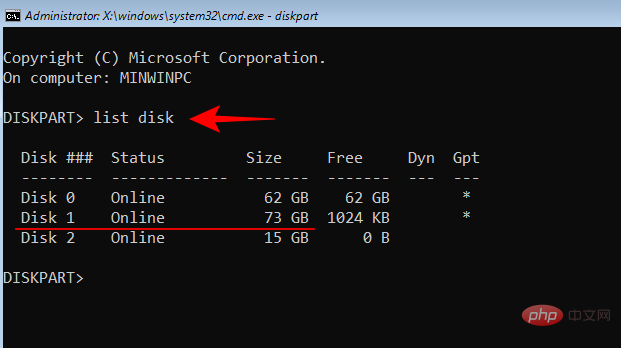
diskpart
Press Enter. Then type the following:
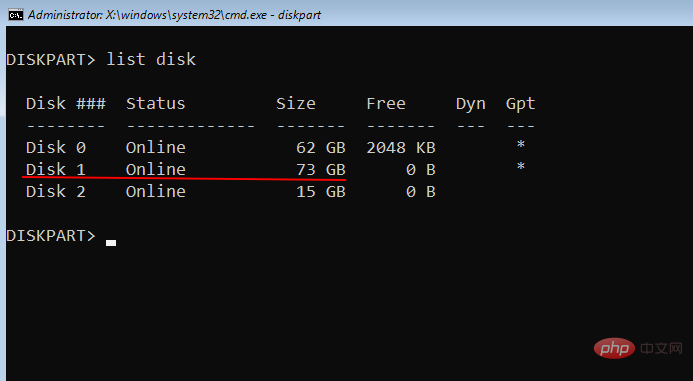
list disk
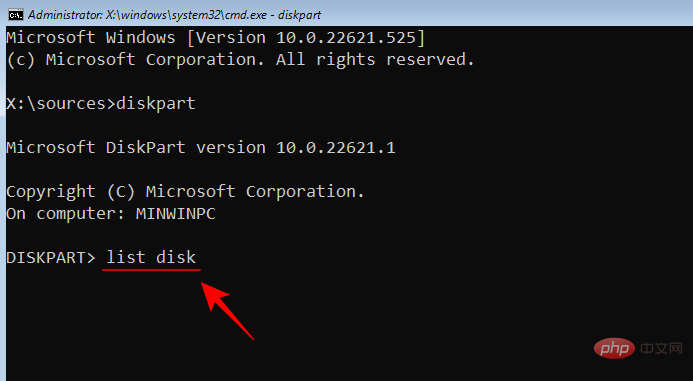
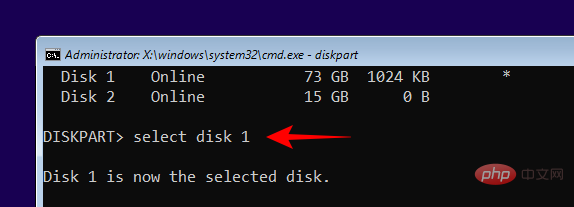
Press Enter. Note the SSD disk number.
Then type the following command:
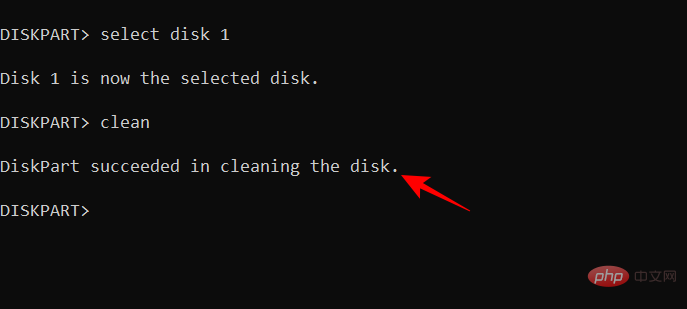
select disk (disk number)
Make sure to change with the actual disk number "(disk number)".
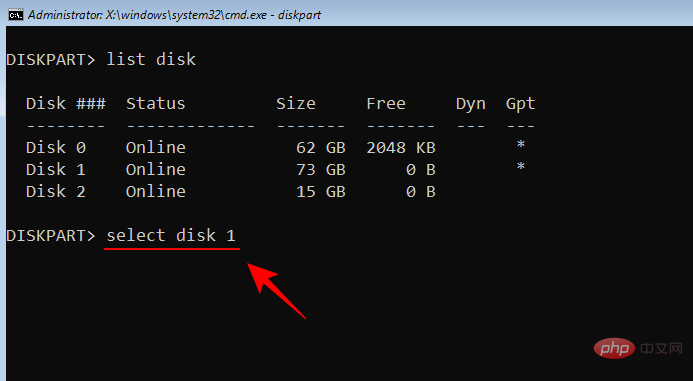
Then press Enter.
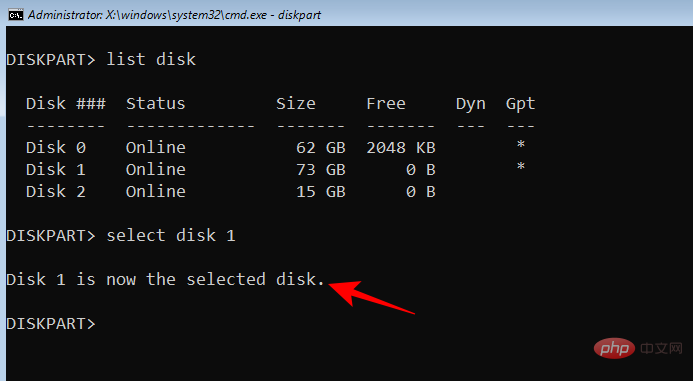
After selecting the desired disk, type the following:
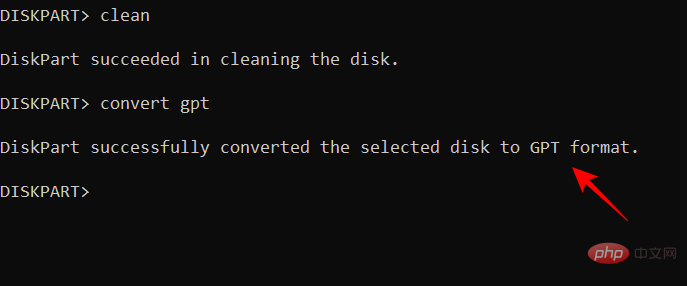
clean
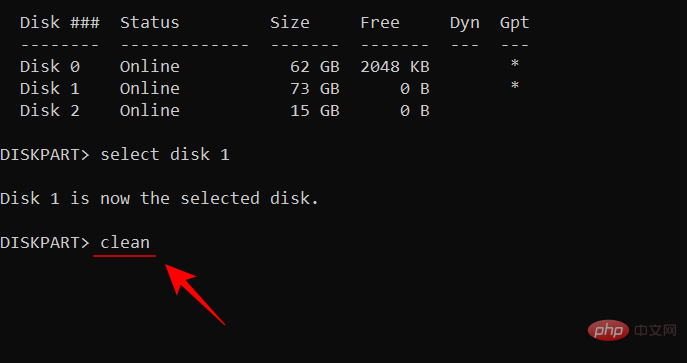
Press the Enter key. This command is important because Command Prompt can only convert empty disks.
Now enter:
convert gpt
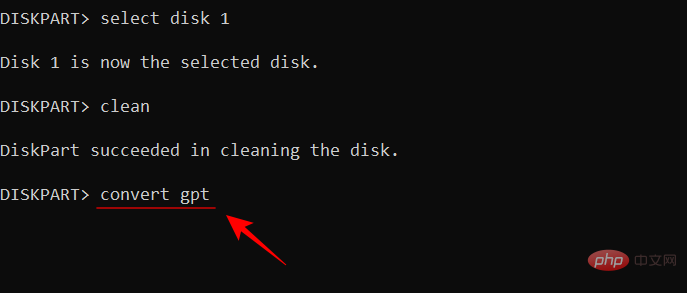
Press Enter key.
Now close the command prompt and reinstall Windows.
If you want to stick with legacy BIOS (MBR), you must activate this partition. To do this, follow these steps:
On the Windows Settings screen, press Shift F10 to open the Command Prompt.
Now type the following command:
diskpart
Press Enter.
Now type the following:
list disk
Press Enter. You will get a list of disks on your system. Note the disk number associated with your SSD.
Now enter:
select disk (disk number)
Replace "(disk number)" Enter the actual disk number associated with your SSD and press Enter.
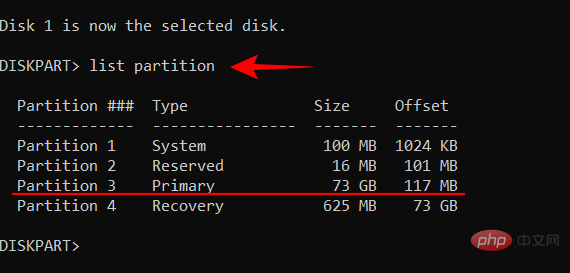
Now enter:
list partition
Press Enter. Make a note of the partition number you want to activate.
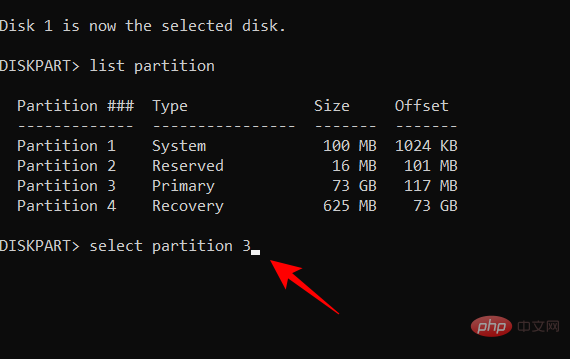
Then enter:
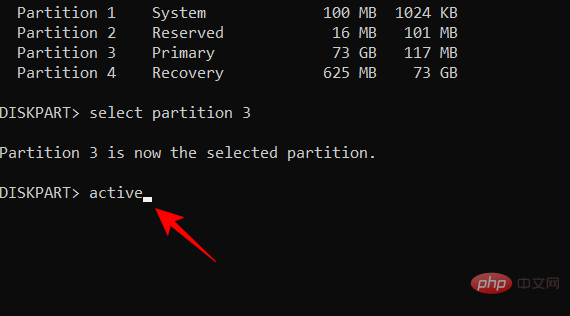
select partition (number)
Replace "(number)" with the Active partition number and press Enter.
Now enter:
active
Press Enter.
You have now made the MBR partition type SSD active and should now be able to boot from your SSD.
The above is the detailed content of How to make an SSD the primary drive in Windows 11. For more information, please follow other related articles on the PHP Chinese website!

Hot AI Tools

Undresser.AI Undress
AI-powered app for creating realistic nude photos

AI Clothes Remover
Online AI tool for removing clothes from photos.

Undress AI Tool
Undress images for free

Clothoff.io
AI clothes remover

AI Hentai Generator
Generate AI Hentai for free.

Hot Article
Hot Tools

Notepad++7.3.1
Easy-to-use and free code editor

SublimeText3 Chinese version
Chinese version, very easy to use

Zend Studio 13.0.1
Powerful PHP integrated development environment

Dreamweaver CS6
Visual web development tools

SublimeText3 Mac version
God-level code editing software (SublimeText3)
Hot Topics


 Ventoy secure boot settingsSecure Boot
Jun 18, 2024 pm 09:00 PM
Ventoy secure boot settingsSecure Boot
Jun 18, 2024 pm 09:00 PM
Ventoy is a USB boot tool that can directly boot ISO/WIM/IMG/VHD(x)/EFI and other types of files in the USB flash drive. It is very easy to use. Laptops have secure boot turned on by default. If they are not turned off or cannot be turned off, they cannot be booted from a USB device. Ventoy also supports secure boot. The principle is to inject a GRUB installation certificate into the current computer. As long as your computer After being injected once, any USB disk PE booted based on grub can pass. The official description of Ventoy is a GIF image. The playback speed is too fast and you may not be able to remember it. The editor has divided the GIF image to make it easier to understand. Ventoy secure boot has EnrollKey and Enro
 Acer laptop disables secure boot and removes password in Bios
Jun 19, 2024 am 06:49 AM
Acer laptop disables secure boot and removes password in Bios
Jun 19, 2024 am 06:49 AM
I repaired an Acer laptop and had to turn off secure boot when entering PE. I recorded how to turn off secure boot and remove the password from Bios. Turn on the computer and when the screen is not on, keep pressing the F2 key to enter the BIOS. On Acer laptops, turn off Secure Boot and press the arrow keys to switch to Boot. If SecureBoot is gray and unclickable, switch to the Security page, select SetSupervisorPassword and press Enter to set the password. Then switch to Boot, SecureBoot can be selected as Disabled, and press F10 to save. Modify and clear the BIOS password on your Acer notebook. Switch to the Security menu and select SetSupervisorPasswo.
 Samsung to launch PM1753 data center-grade SSD: 14.8 GB/s sequential read, 3.4 million IOPS random read
Aug 08, 2024 pm 04:40 PM
Samsung to launch PM1753 data center-grade SSD: 14.8 GB/s sequential read, 3.4 million IOPS random read
Aug 08, 2024 pm 04:40 PM
According to news from this site on August 8, Samsung demonstrated a variety of new SSD products at the 2024 Flash Memory Summit (FMS) - PM1753, BM1743, PM9D3a, PM9E1, and also tested the ninth generation QLCV-NAND, TLCV-NAND and CMM-D –DRAM, CMM-HTM, CMM-HPM, and CMM-BCXL technologies were introduced. BM1743 uses QLC flash memory with a capacity of up to 128TB, a continuous read speed of 7.5GB/s, a write speed of 3.5GB/s, a random read of 1.6 million IOPS, and a write of 45,000 IOPS. It adopts a 2.5-inch form factor and a U.2 interface, and is idle Power consumption is reduced to 4W, and after subsequent OTA updates, only
 The system has posted in safe mode ASUS motherboard
Jun 19, 2024 am 07:35 AM
The system has posted in safe mode ASUS motherboard
Jun 19, 2024 am 07:35 AM
After the computer is turned on, it prompts The system has posted in safe mode. You can set it in the BIOS to ignore the F1 error. Although it does not prompt, it directly enters the BIOS when it is turned on. Sometimes F1 is useless every time it is turned on. Then you need to restart the BIOS, and then exit the BIOS to enter the system. . thesystemhaspostedinsafemode=The system is in safe mode. This problem is relatively common on ASUS motherboards. As long as you turn off the XMP of the memory and adjust the memory frequency back to normal, you can boot normally without the thesystemhaspostedinsafemode error. Updating the latest motherboard BIOS should be OK.
 ASUS releases BIOS update for Z790 motherboards to alleviate instability issues with Intel's 13th/14th generation Core processors
Aug 09, 2024 am 12:47 AM
ASUS releases BIOS update for Z790 motherboards to alleviate instability issues with Intel's 13th/14th generation Core processors
Aug 09, 2024 am 12:47 AM
According to news from this website on August 8, MSI and ASUS today launched a beta version of BIOS containing the 0x129 microcode update for some Z790 motherboards in response to the instability issues in Intel Core 13th and 14th generation desktop processors. ASUS's first batch of motherboards to provide BIOS updates include: ROGMAXIMUSZ790HEROBetaBios2503ROGMAXIMUSZ790DARKHEROBetaBios1503ROGMAXIMUSZ790HEROBTFBetaBios1503ROGMAXIMUSZ790HEROEVA-02 joint version BetaBios2503ROGMAXIMUSZ790A
 Esidak launches MB204MP-B four-bay M.2 solid-state drive box: supports PCIe 5.0, 2399 yuan
Jul 22, 2024 am 11:55 AM
Esidak launches MB204MP-B four-bay M.2 solid-state drive box: supports PCIe 5.0, 2399 yuan
Jul 22, 2024 am 11:55 AM
This website reported on July 22 that ICEDOCK launched the ExpressSlotMB204MP-B four-bay M.2 solid-state drive extraction box on the 19th of this month. The extraction box adopts the shape of a PCIeAIC add-on card, requires PCIe6Pin auxiliary power supply, has a three-dimensional dimension of 204.5×21.59×126.9 (mm), supports the PCIe5.0 protocol, and can provide 16GB/s PCIe5.0×4 full-speed bandwidth for each solid-state drive. . Esidak ExpressSlotMB204MP-B SSD extraction box is compatible with M.22230/2242/2260/2280 SSDs. However, the thickness of each side of these SSDs must not exceed 1.5mm.
 Phison comprehensively showcases Pascari enterprise-class SSD products, including 100DWPD ultra-high endurance model
Aug 07, 2024 pm 06:58 PM
Phison comprehensively showcases Pascari enterprise-class SSD products, including 100DWPD ultra-high endurance model
Aug 07, 2024 pm 06:58 PM
According to news from this site on August 7, Phison fully demonstrated its Pascari enterprise-class solid-state drive product line at the FMS2024 Summit. This product line covers 5 major categories and is targeted at various enterprise-level and data center applications. Here is a brief introduction on this site: X Series - Best Performance Phison's X Series enterprise-class SSDs are "designed for extreme writing requirements." In addition to the first X200 family, Phison also launched two PCIe 4.0 products, X100P and X100E, respectively 1DWPD and 3DWPD, with maximum capacities of 32TB Note 1. Both X100P and
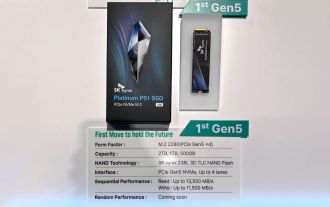 SK Hynix demonstrates Platinum P51 SSD: sequential read peak 13500 MB/s
Mar 20, 2024 pm 02:36 PM
SK Hynix demonstrates Platinum P51 SSD: sequential read peak 13500 MB/s
Mar 20, 2024 pm 02:36 PM
According to news from this website on March 20, SK Hynix recently attended the NVIDIA GTC2024 conference and demonstrated the first Gen5NVMe solid-state drive series for the consumer market-Platinum P51M.22280NVMeSSD. PlatinumP51 is similar to GoldP31 and PlatinumP41. It uses a self-designed SSD master control, but the main highlight is the use of PCIeGen5 and 238-layer TLCNAND flash memory. Note from this site: Hynix acquired SSD master control manufacturer LAMD in 2012, giving it the ability to design its own master control. SK Hynix said at the booth that Platinum P51 will be launched in 500GB, 1TB and 2