

6 Ways to Disable Windows Security Antivirus in Windows 11

- Click to enter:ChatGPT tool plug-in navigation
When should you turn off the Windows security antivirus software in Windows 11?
The most common reason for turning off Windows Security is that it starts marking certain files as threats and blocking access to them. If you know the files are safe and want to stop the antivirus from getting there, temporarily disabling it is the only way to go.
Windows security antivirus software is also very resource-intensive, and on older systems, your system is bound to feel the crunch while running in the background. Windows Security also becomes redundant when a third-party antivirus suite is also installed.
Case 1: Temporarily turn off Windows Security (2 ways)
Disabling real-time protection will temporarily turn off antivirus when you don't want to get rid of Windows Security Center permanently, but just want to let it quiet for a while software. Here’s how:
Method #1: Press Start from Windows Security
, type windows security, and then press Enter.

Then click Virus & Threat Protection in the left pane.

Scroll down and click Manage settings under Virus & threat protection settings.
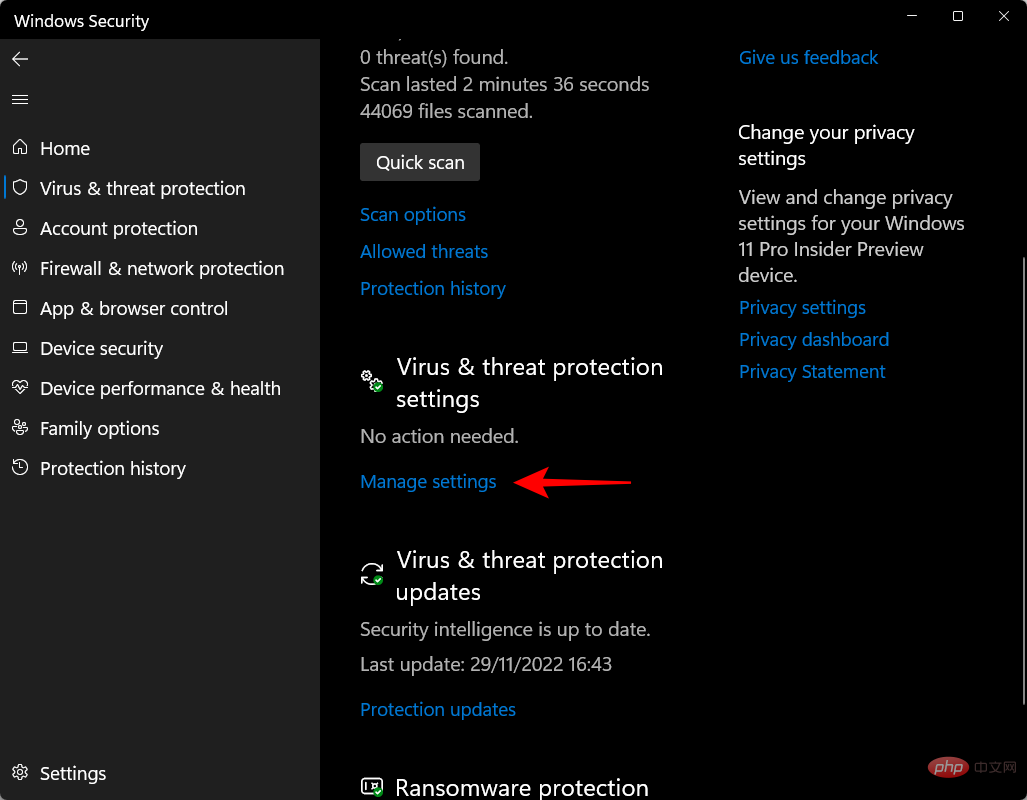
Now switch the switch under Real-time protection to Off.

Your Windows antivirus software is now turned off.
Method #2: From Settings
Another way to get real-time protection settings is from the Settings app. Here's how to get there:
Press Win I to open Settings. Then click Privacy & Security in the left pane.

Click Windows Security.
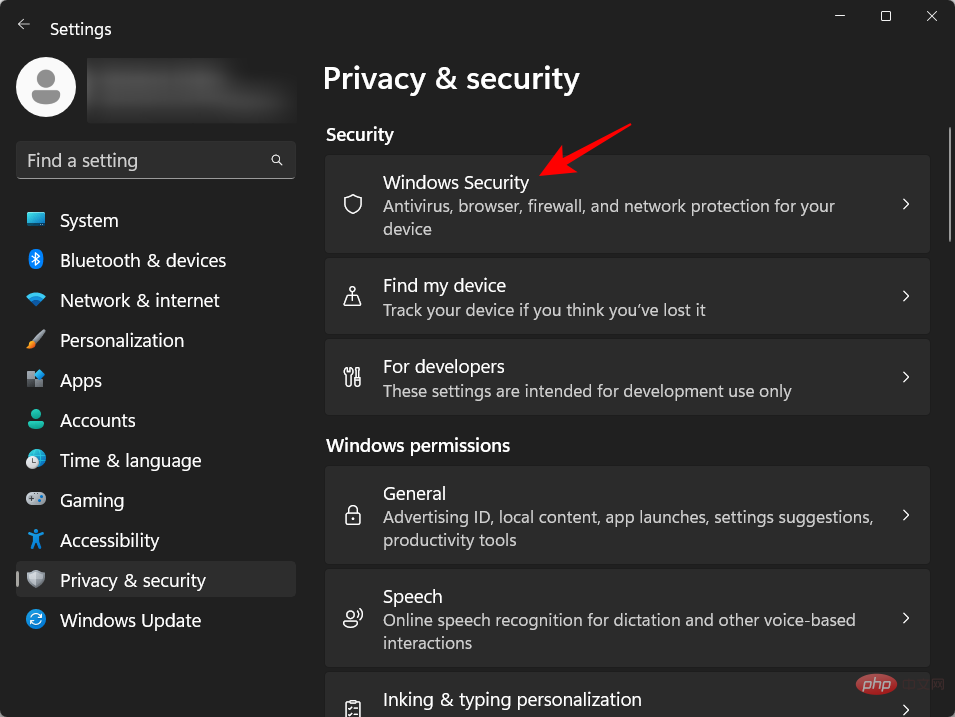
Then click Virus & Threat Protection.
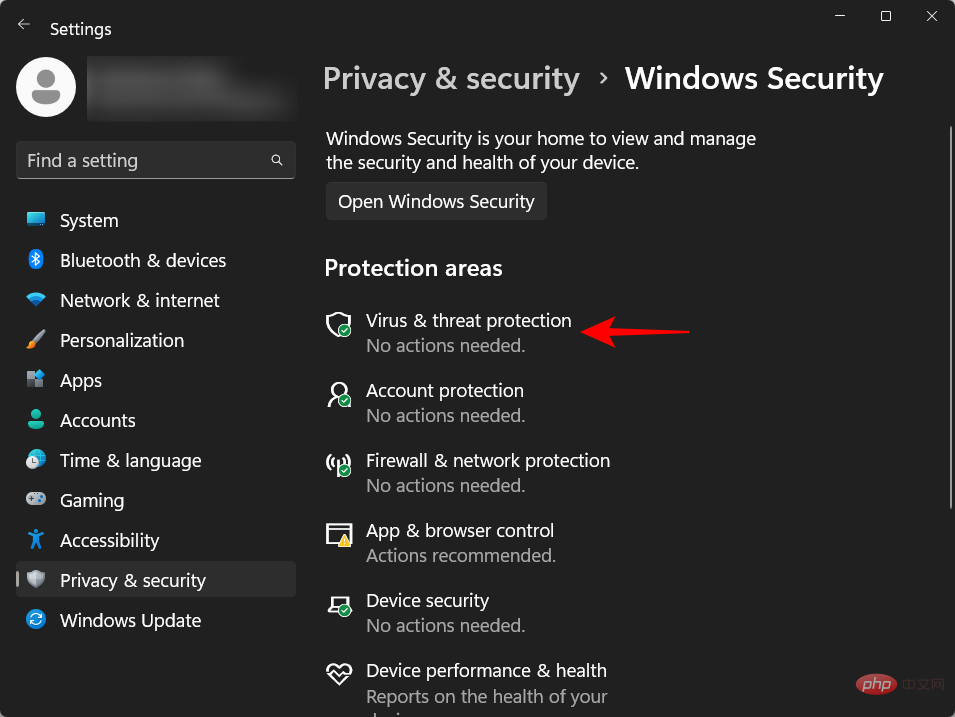
This will open the Windows Security application. Now, as before, click Manage settings under Virus & threat protection settings and turn off real-time protection.
Your antivirus software will remain off until the next startup.
Case 2: Turn off Windows Security permanently (4 ways)
The above method is a good temporary solution to turn off Windows Antivirus. However, if you are looking for a more permanent solution, you will have to disable some additional settings. Here are some step-by-step tutorials to disable antivirus software on Windows:
Method #1: Using Registry
Follow the steps given below to modify the registry and turn off Windows antivirus permanently,
Step 1: Disable real-time protection in Windows Security Center
As shown before, open Windows Security from the Start menu.
Then click Virus & Threat Protection in the left pane.
Click Manage Settings under Virus & Threat Protection Settings.
Then turn off real-time protection.
##
Step 2: Disable Tamper Protection
Windows Security has a security feature called Tamper Protection that prevents unauthorized changes to the antivirus software. Therefore, before changing the registry key to permanently disable the antivirus software, we must first disable tamper protection. Here's how to do it:
On the same Virus & Threat Protection Settings page in the Windows Security app, scroll down and find Tamper Protection and switch it to Off .

Step 3: Change the ownership of the Windows Defender folder in the registry
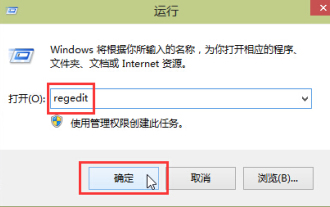
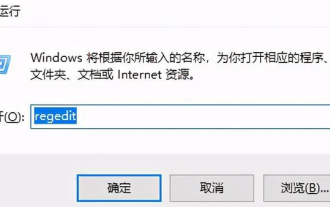
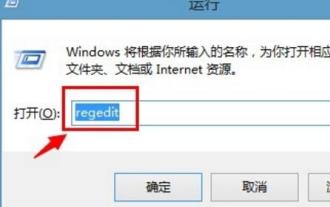
Now, press Start and enter regedit, Then press Enter.

Navigate to the following location:
HKEY_LOCAL_MACHINE\SOFTWARE\Microsoft\Windows Defender
Alternatively, copy the above content and paste it into the address bar of Registry Editor.
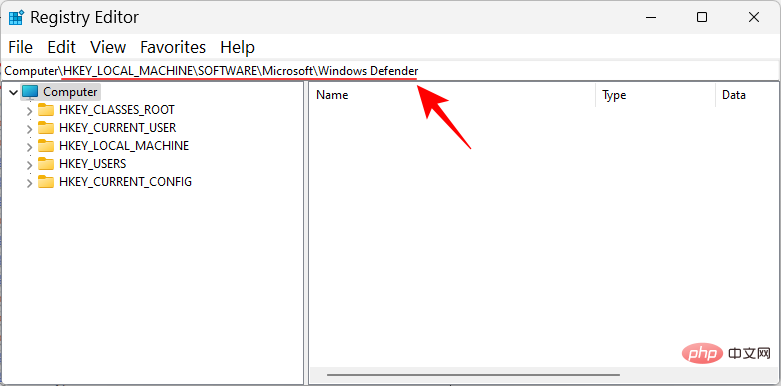
Then press Enter.
We now have to change the ownership permissions of the "Windows Defender" folder here in order to change its subordinate keys. To do this, right-click the Windows Defender folder in the left pane and select Permissions.
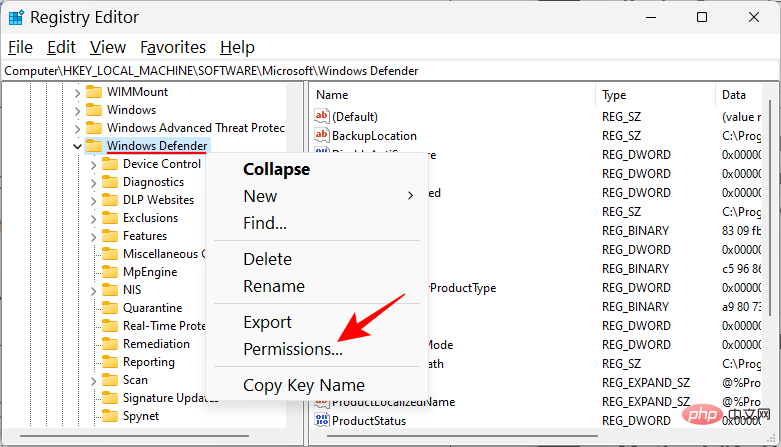
Click Advanced.
Now click Change in the Owner field.

Click Advanced.
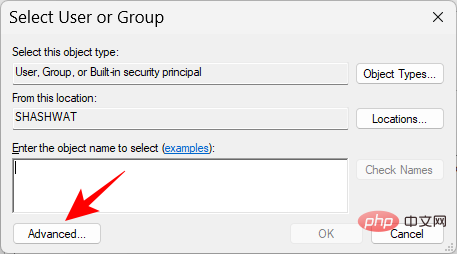
Click to find now.
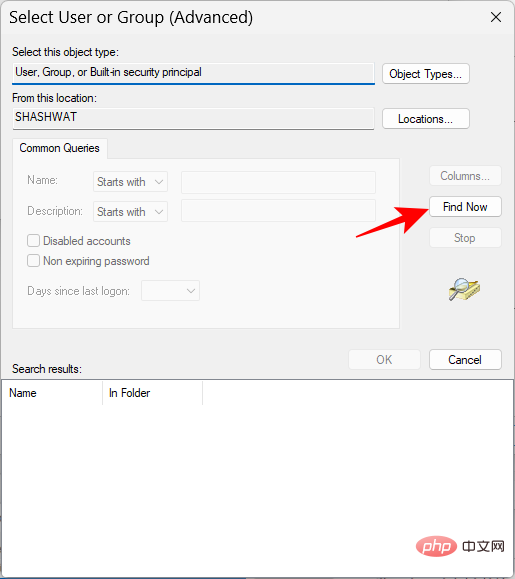
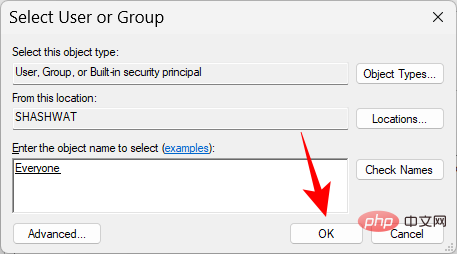
Scroll down and select Everyone, then click OK.
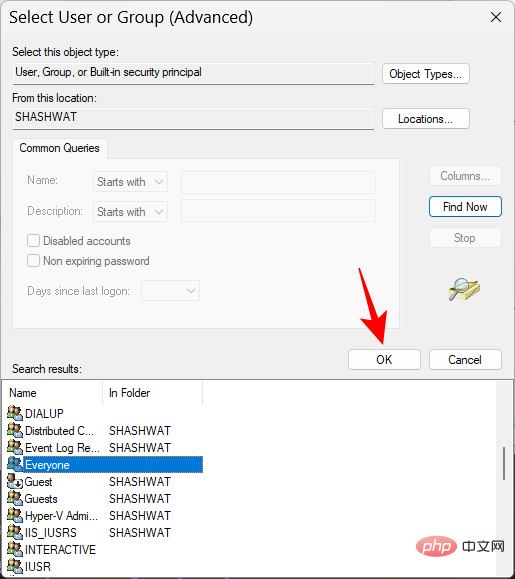
Click OK.
Now click on the box next to Replace owners of subcontainers and objects and check it there.
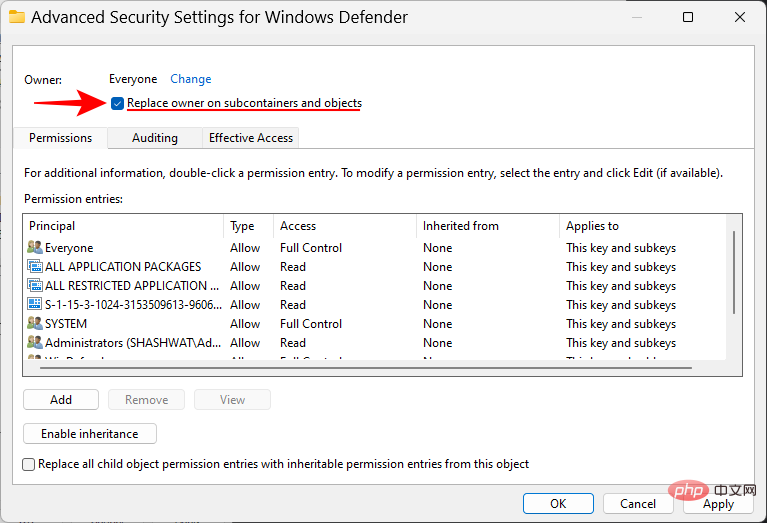
Click Apply.

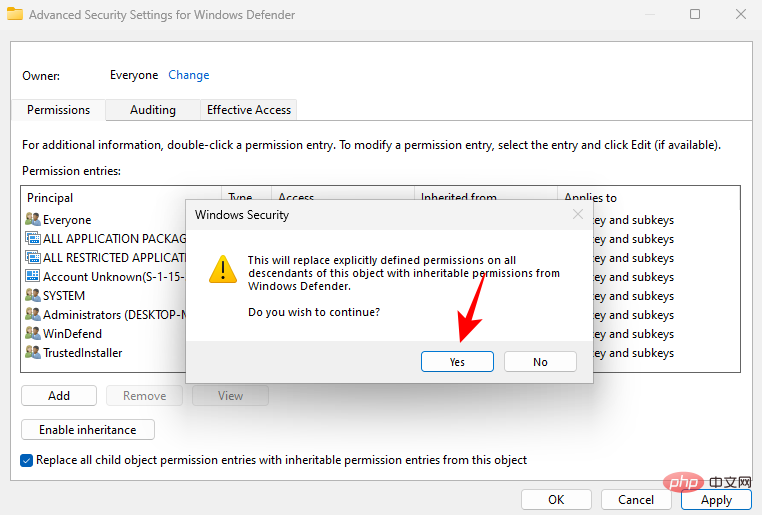
Then check the Replace all sub-object permission entries at the bottom... . Then click Apply.
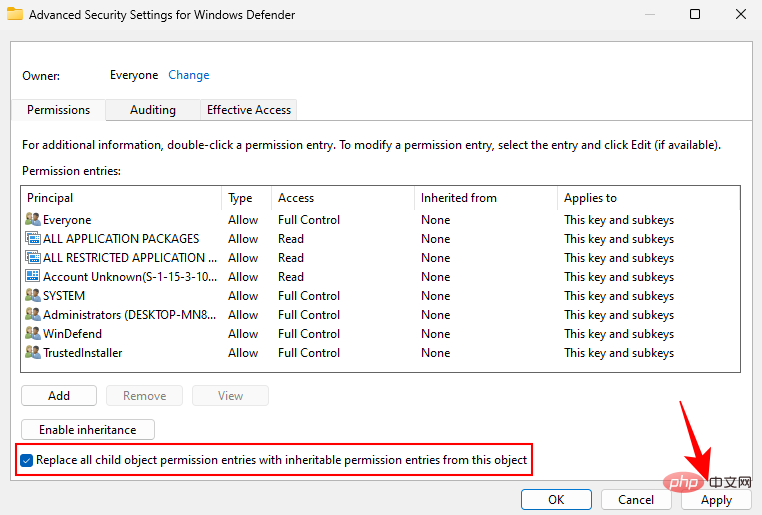
When prompted, click Yes.
Click OK.
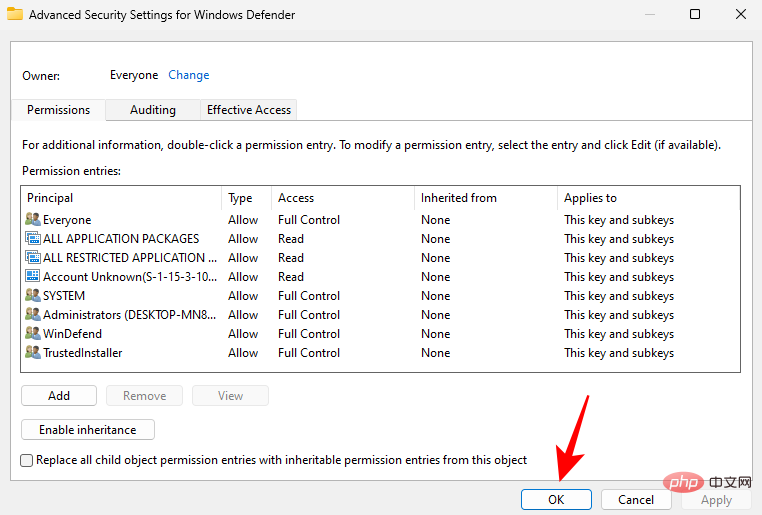
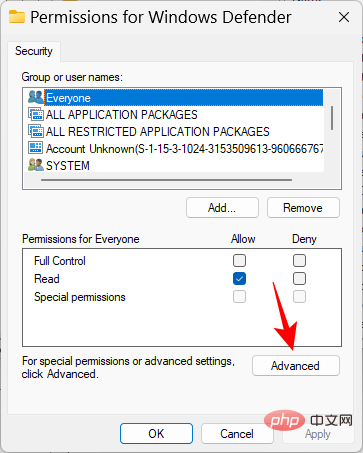
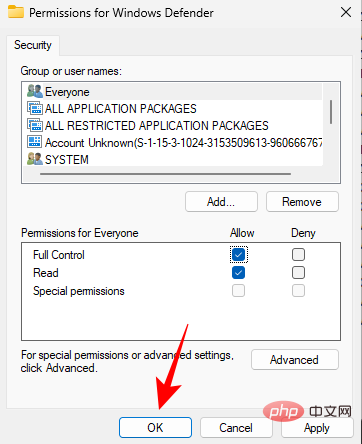
Now, in the Permissions window, check the Allow box next to Full Control .

Then click "OK".
NOTE: If you are unable to gain permission and receive an "Access Denied" error message, you must boot into Safe Mode and repeat the same steps.
Step 4: Create and modify new registry values
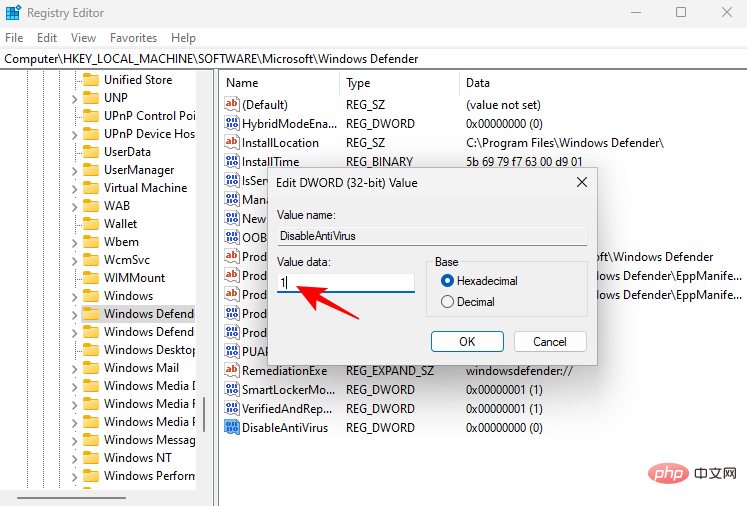
Now, right-click on the empty space on the right, select New, and click DWORD (32-bit) Value.

Name this key as DisableAntiVirus.

Double-click it and change its value to 1. Then click "OK".
Similarly, create two more DWORD (32-bit) values and name them DisableAntiSpyware and ServiceStartStates and name them The value is changed to 1.
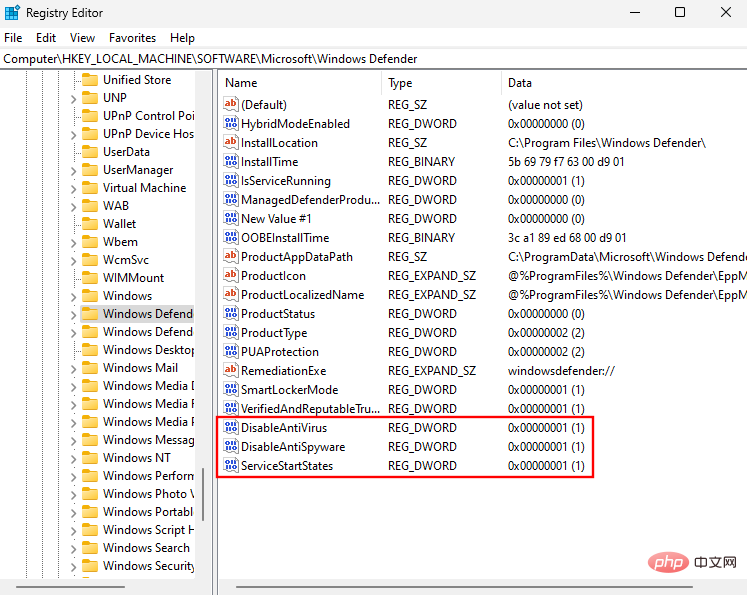
After completion, restart the system normally. Your Windows Security antivirus software will now be permanently disabled.
Method #2: Use the Group Policy Editor
The Group Policy Editor can also be used to permanently disable Windows antivirus software. Here’s how:
Step 1: Disable real-time protection in Windows Security Center
First, disable real-time protection in Windows Security Center. Open Windows Security from the Start menu.
Then click Virus & Threat Protection in the left pane.
Scroll down and click Manage Settings.
Turn off real-time protection.
Step 2: Disable Tamper Protection
Next, to ensure that real-time protection does not automatically turn on on the next boot, we also need to disable tamper protection .
In the same Windows Settings window, scroll down and turn off Tamper Protection.
Step 3: Completely disable Windows Defender from the Group Policy Editor
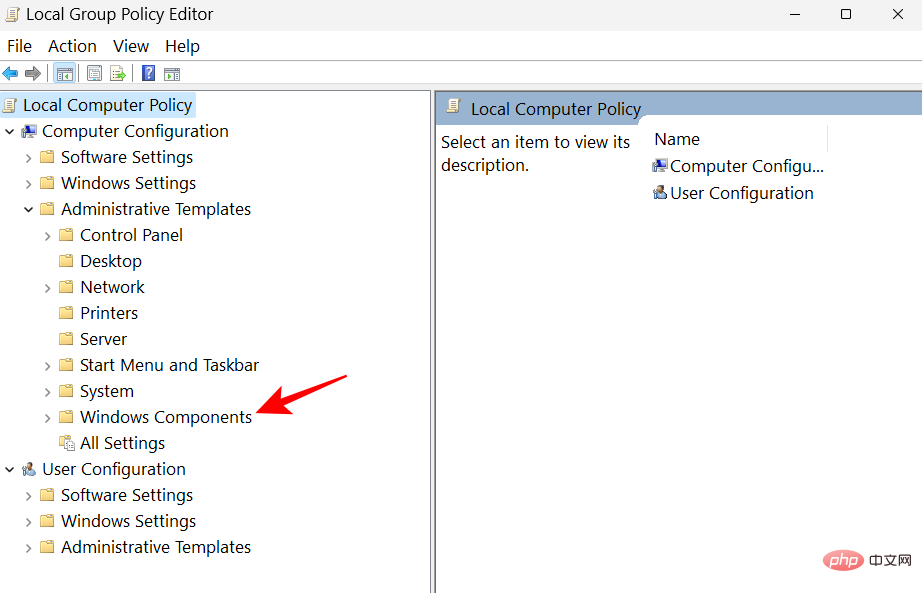
Now, press Start and type gpedit , and then click "Edit Group Policy".

After opening Group Policy, expand Administrative Templates.

Then expand Windows Components.
Then click Microsoft Defender Antivirus.

Then, double-click on the right Turn off Microsoft Defender antivirus software.
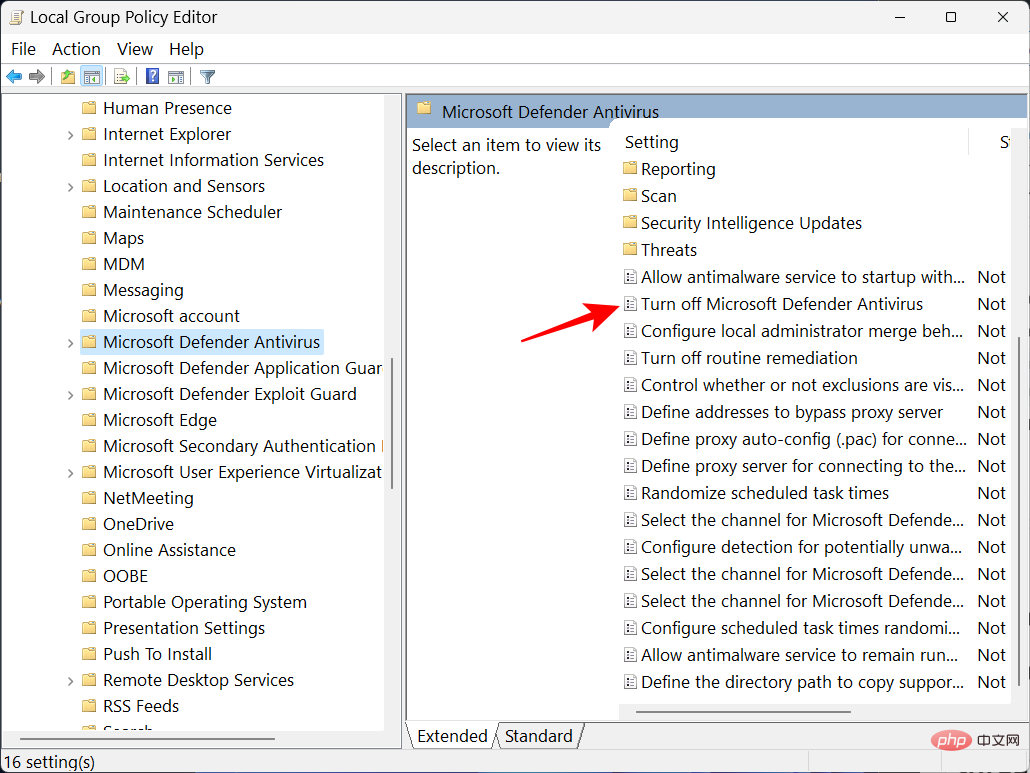
Click Enabled.

Then click "OK".

Step 4: Disable Defender Service from Task Scheduler
The last thing to do now is to disable Force Defender to restart on startup Started service. Here's how to do it:
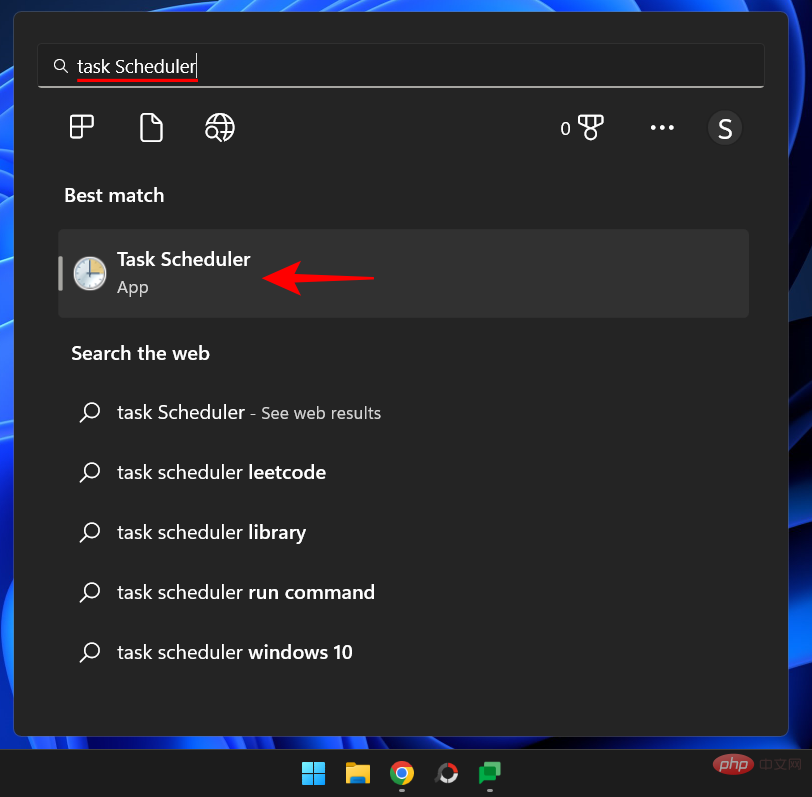
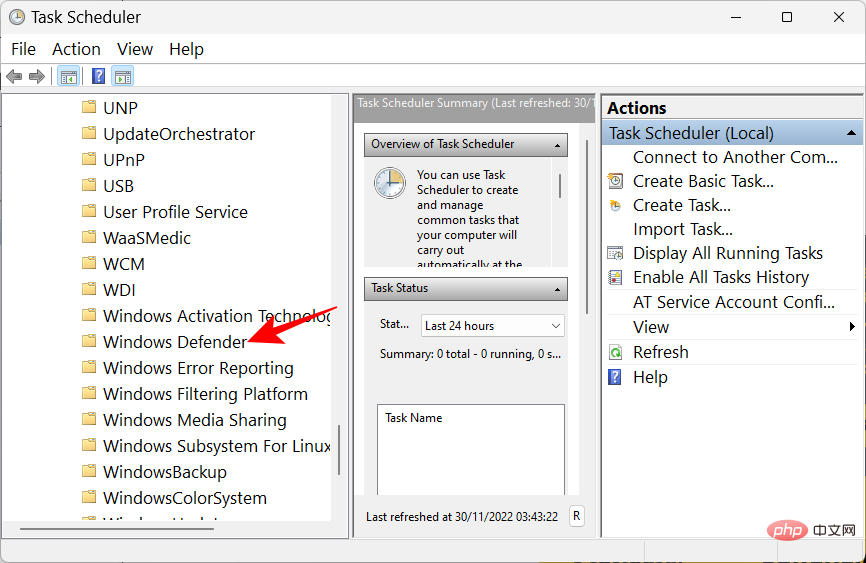
Press Start, type Task Scheduler, and then press Enter.
Then expand the Task Scheduler Library branch on the left.
Expand Microsoft.

And then Windows.

Then scroll down and click Windows Defender.
On the right, you will see the following four tasks:
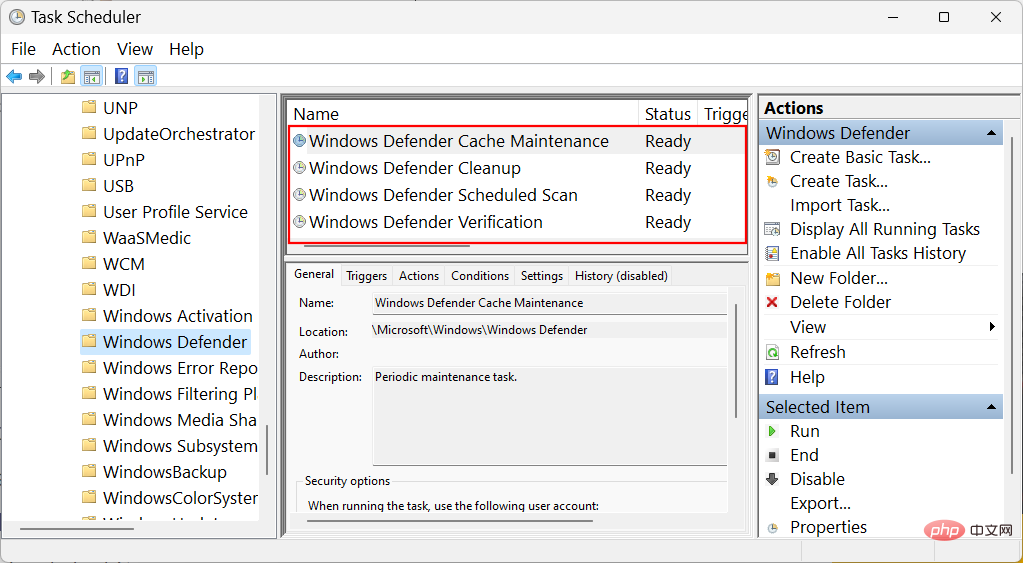
- Windows Defender Cache Maintenance
- Windows Defender Cleanup
- Windows Defender Scheduled Scan
- Windows Defender Verification
Right-click them one by one and select Disable .
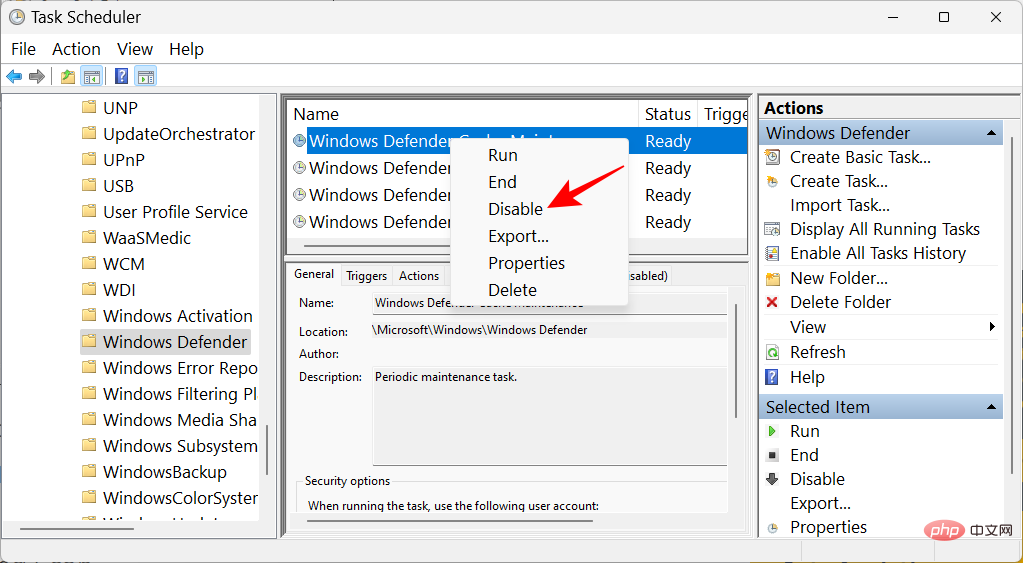
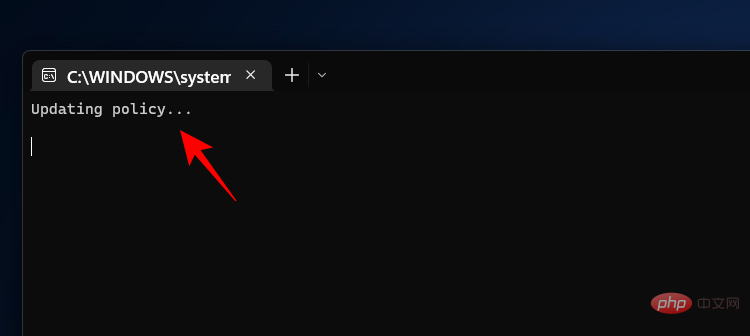
Do this for all four missions. Then close Task Scheduler. Now, to update the policy, press Win R and open the RUN dialog box. Enter the following:
gpupdate /force

Press Enter. Wait for policy update.
Then restart the system just in case. Windows Security's antivirus software will now be permanently disabled.
Method #3: Use the Autoruns for Windows utility
Autoruns is a downloadable Windows utility from Microsoft that disables the service responsible for restarting Windows Defender at startup. Here's how to use it:
First, as mentioned before, disable real-time protection and tamper protection from the Windows Security app.
Then follow the link below to download the Autoruns utility.
Autorun | Download link
Click to download Autoruns and Autorunsc.

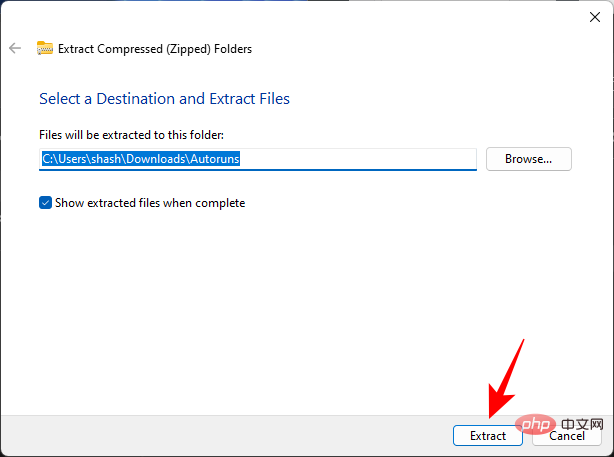
After downloading, right-click on the file and select Extract all.
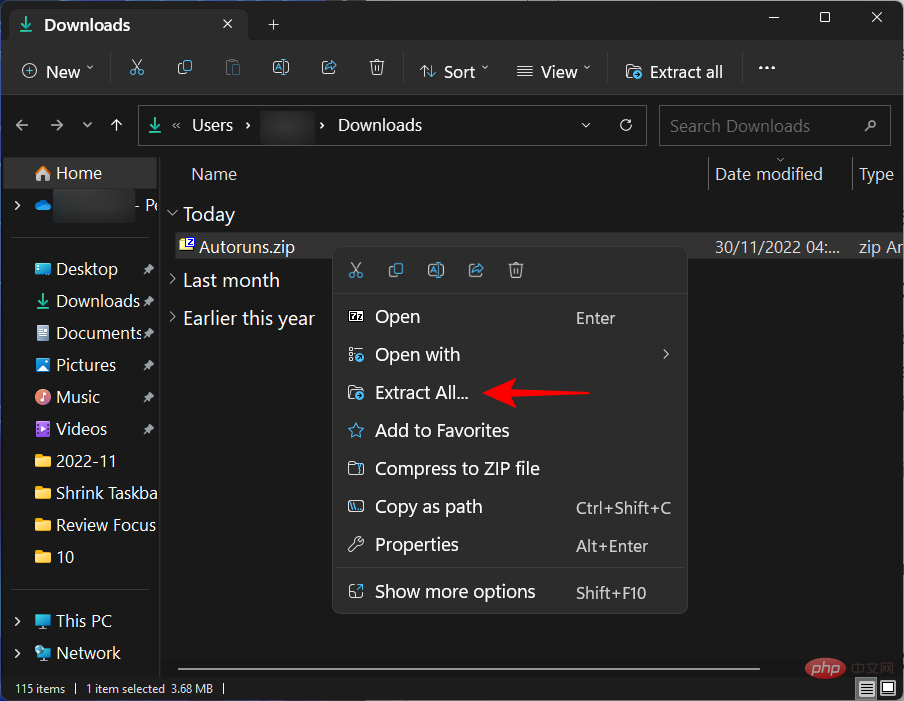
In the extraction wizard, click Extract.
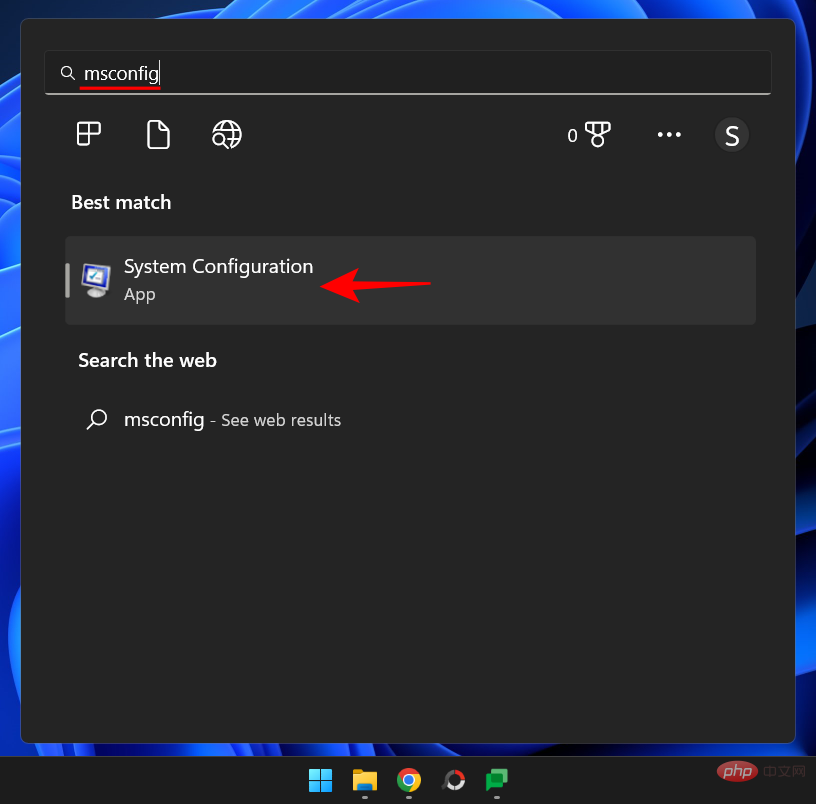
Once completed, it’s time to boot into Safe Mode. To do this, press Start, type msconfig, and then press Enter.
Click on the "Boot " tab to switch to it.
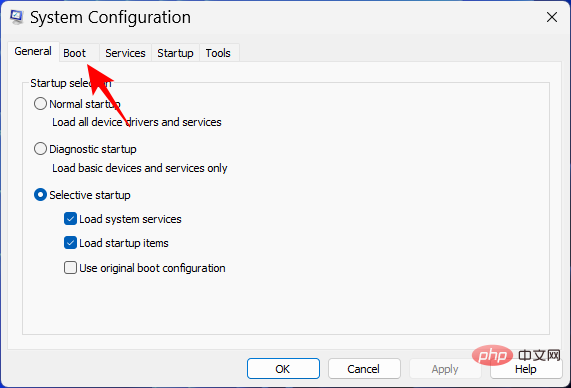
Then select Safe Boot under "Startup Options" and make sure the "Minimal Startup" option is selected.

Then click "OK".

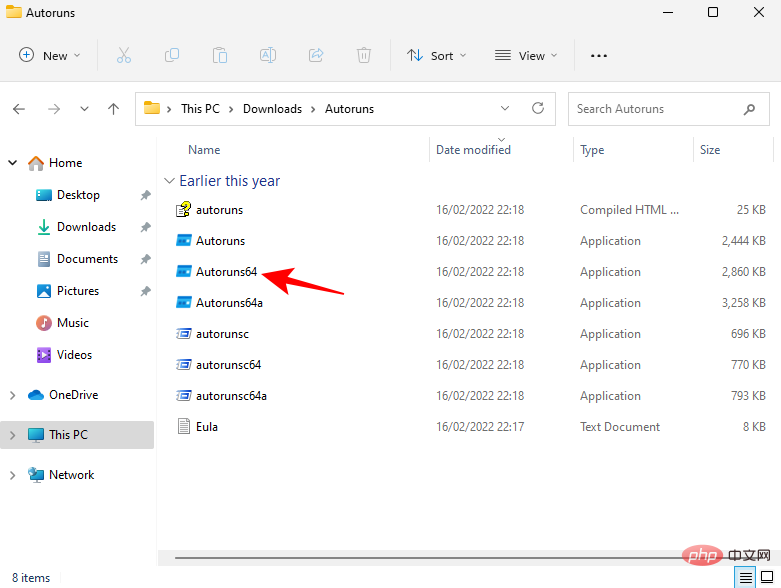
Now restart your computer and you will boot directly into Safe Mode. Open the folder where the Autoruns were extracted. Then double-click Autoruns64.exe.
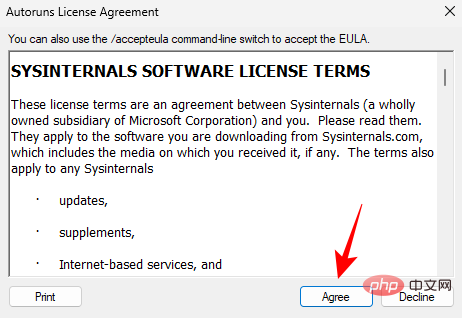
Click Agree.
After Autoruns opens, click the "Services " tab.
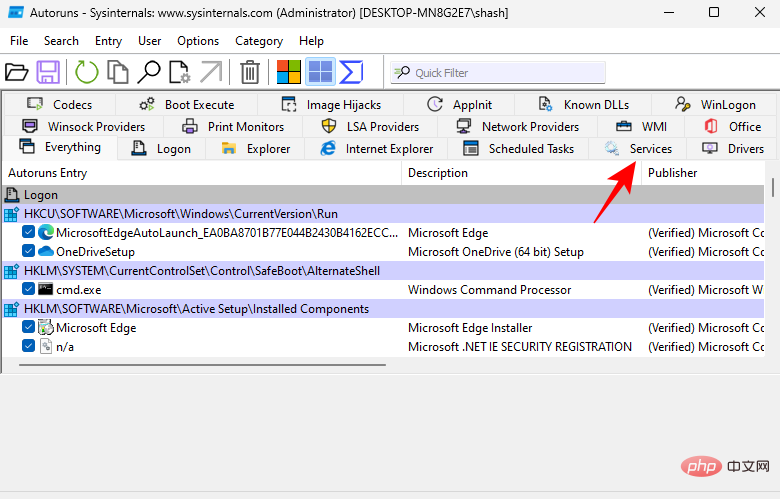
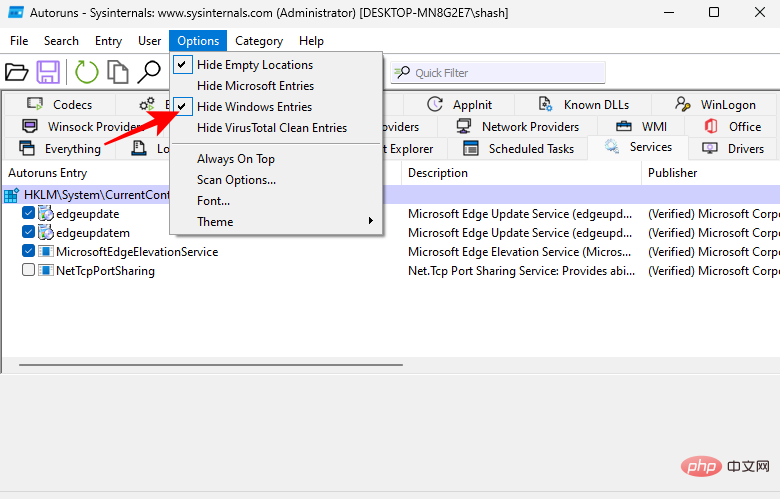
By default, Windows services are hidden. To view them, click Options.
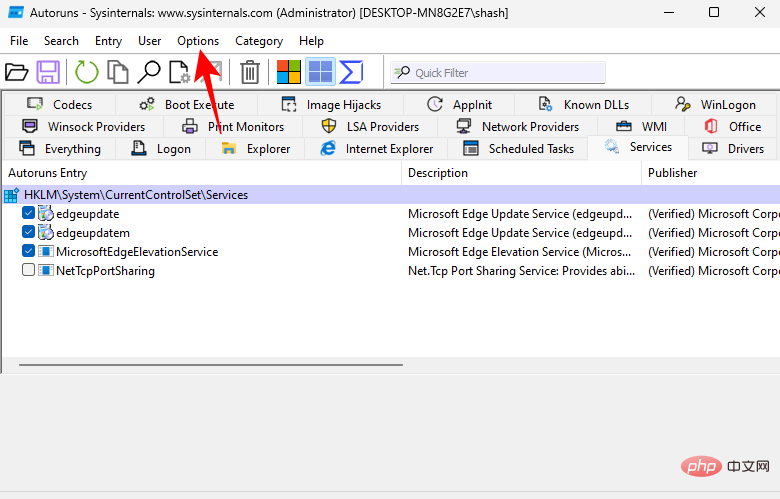
Then uncheck Hide Windows Entries.
Now scroll down and uncheck WinDefend.

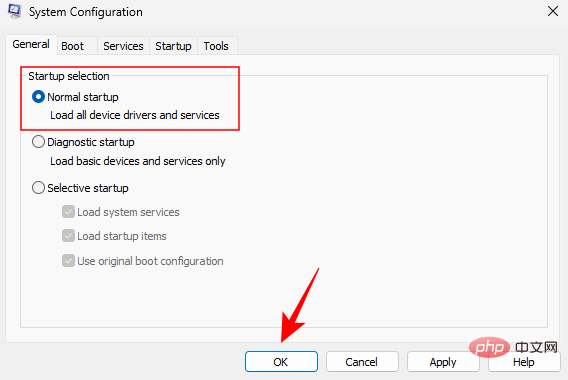
Close Autoruns and open the System Configuration application again (search for msconfig in Start). Then select Start normally and click OK.
Restart the system.
After launching, you can check to confirm whether the changes are effective. Open the Windows Security application. You should see "Unknown" under "Virus & threat protection" on the Security at a Glance page.

Do not click it as it will update the information and run the service again, undoing everything you have done so far.
Method #4: By installing a third-party antivirus application
Windows Defender antivirus software is an integral part of computer security and therefore cannot be uninstalled. However, Windows Defender turns itself off when you install third-party antivirus software. So, go ahead and install your favorite antivirus program to disable Windows’ antivirus software.
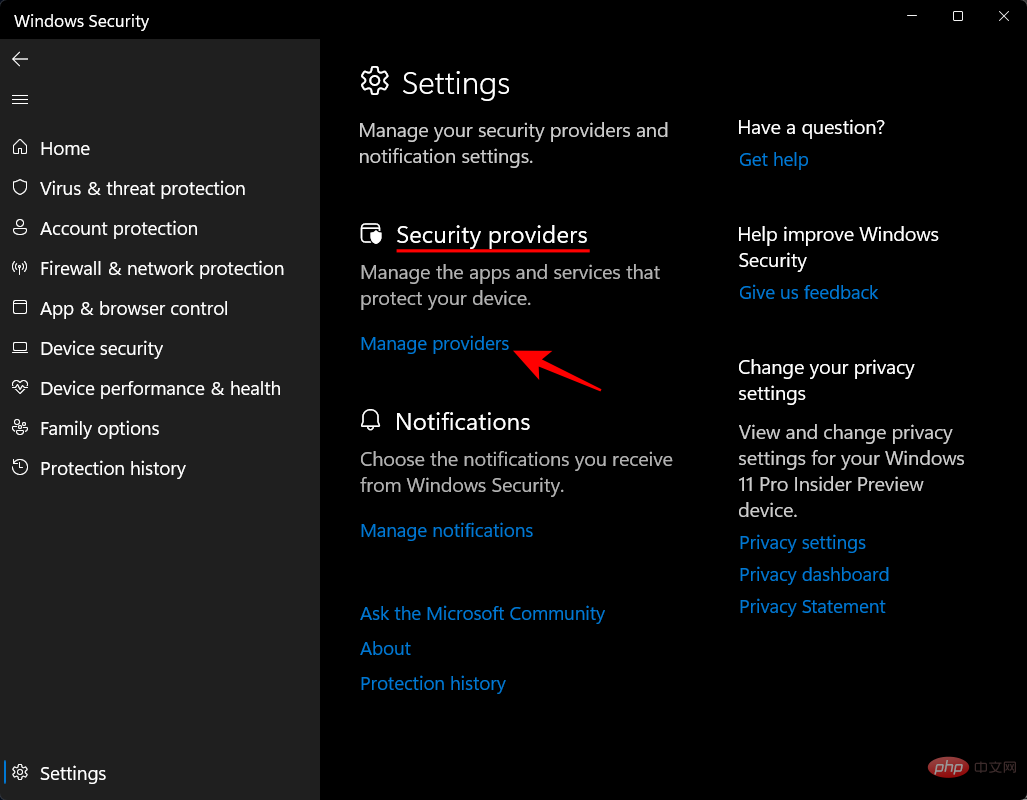
After installation, you can check whether Windows Defender is turned off. To do this, open Windows Security and click Settings in the lower left corner.

Manage Providers under Security Providers.
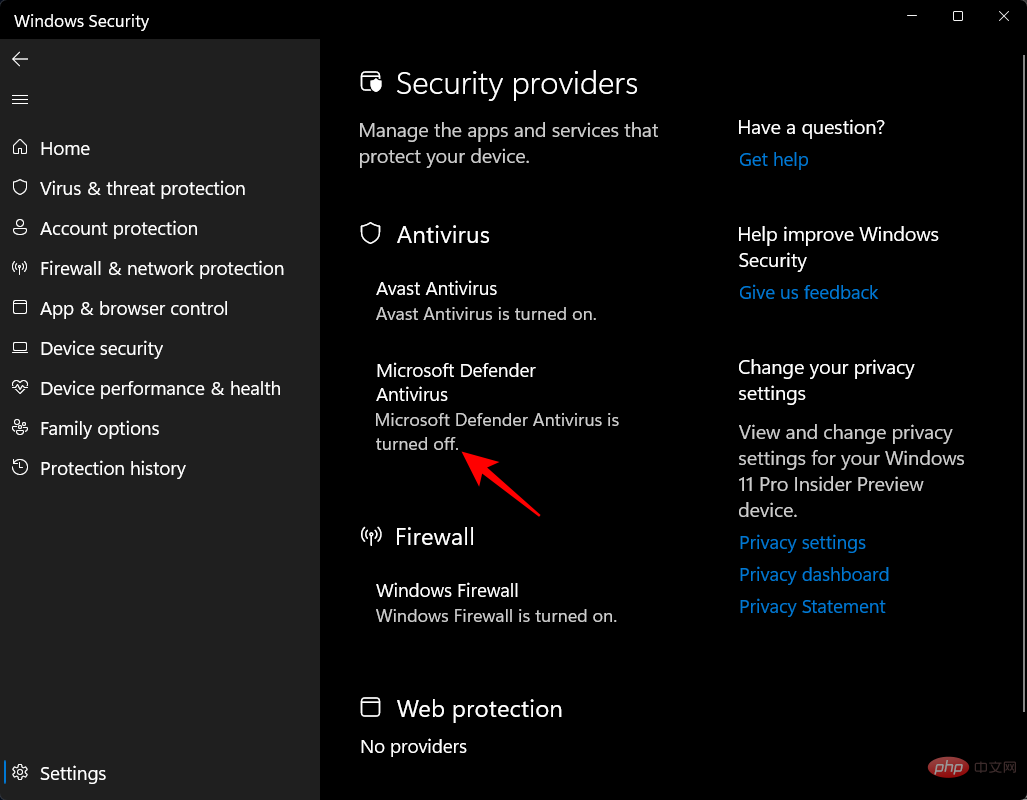
Virus & Threat Protection.
Here you will see the message "Antivirus is on". Below it, click the Microsoft Defender Antivirus option.
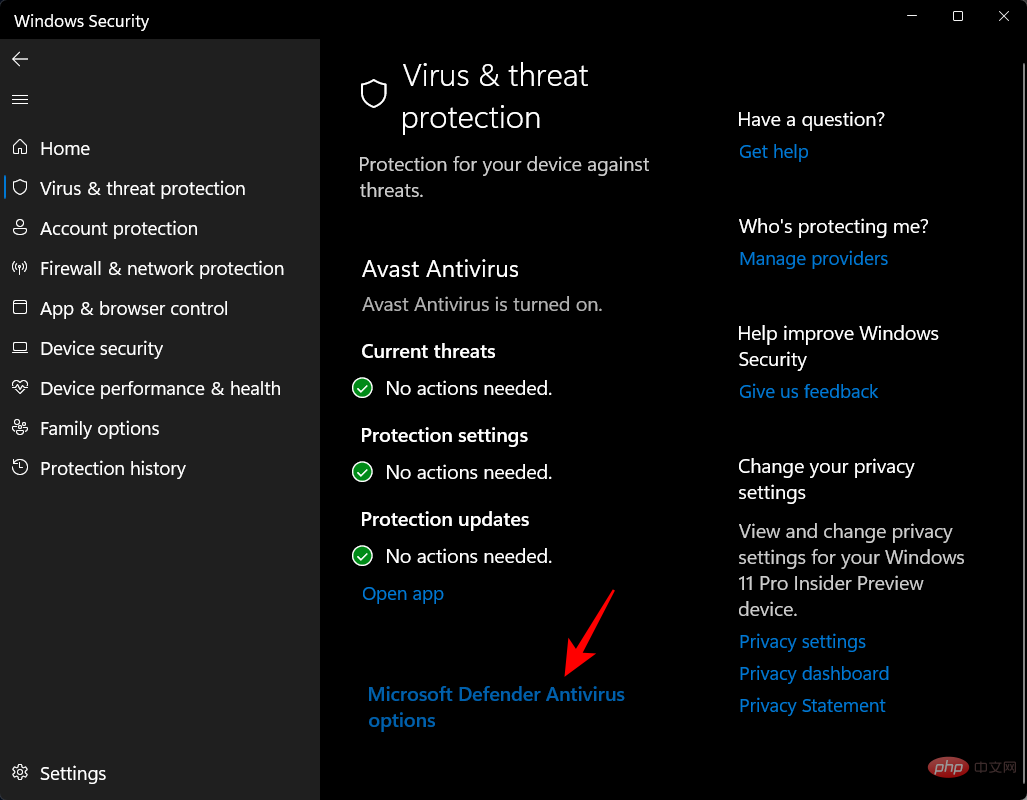
Then turn on Periodic scan.

How to reset Windows Defender
If you have made the changes you want to make, your best option is to reset Windows Defender.
Here's how to do it:
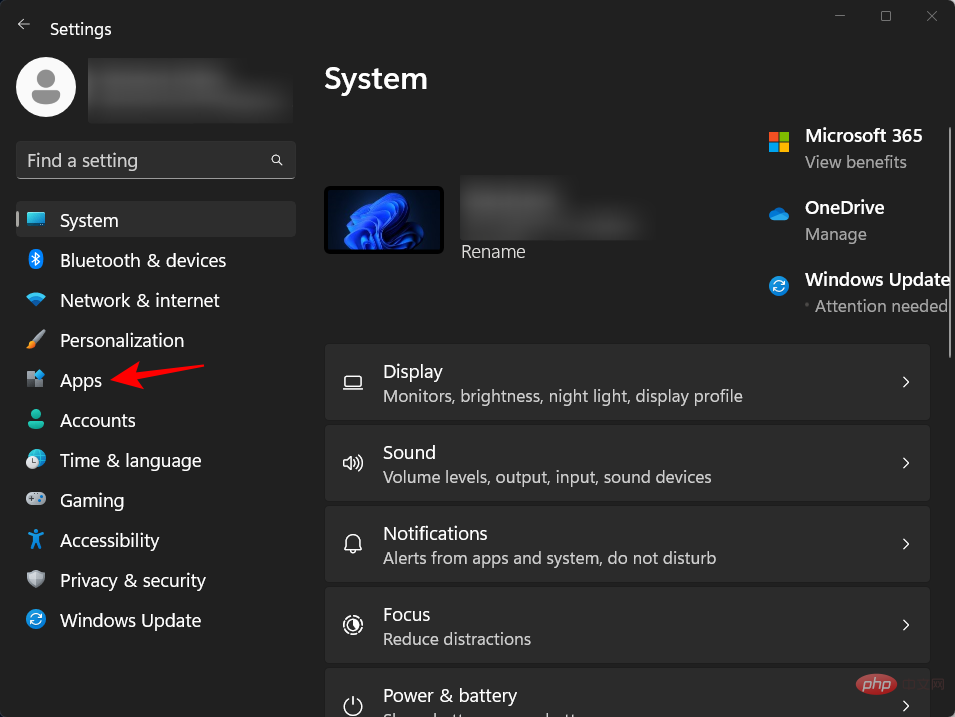
Press Win I to open settings. Then click Apps in the left pane.
Click Installed Applications.

Then search for Windows Security in the search bar above. Click the three-dot menu next to Windows Security.
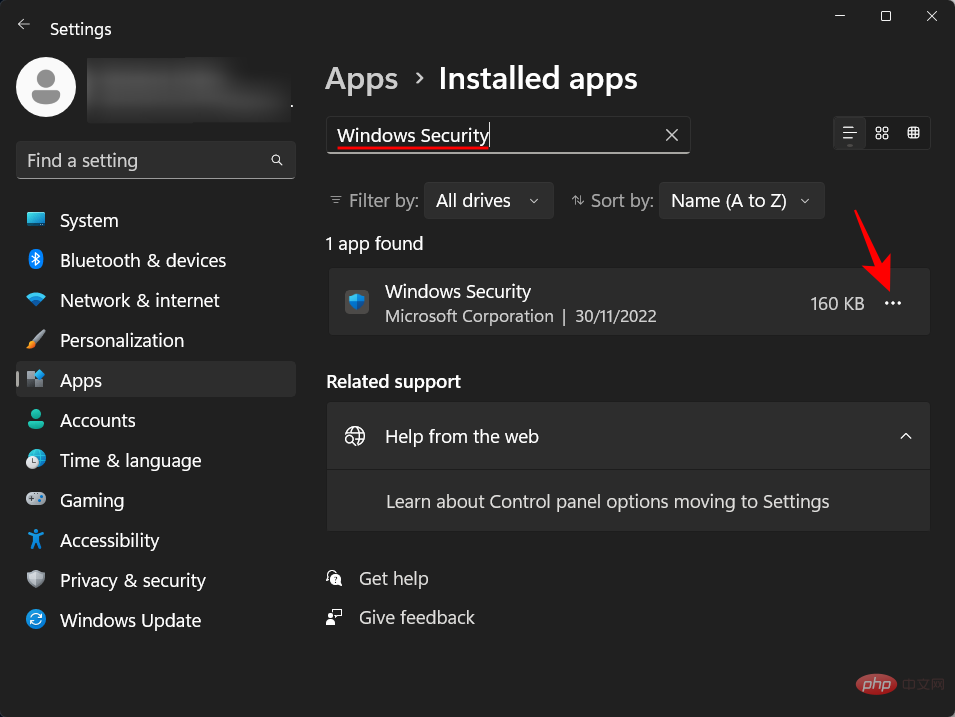
Click Advanced Options.

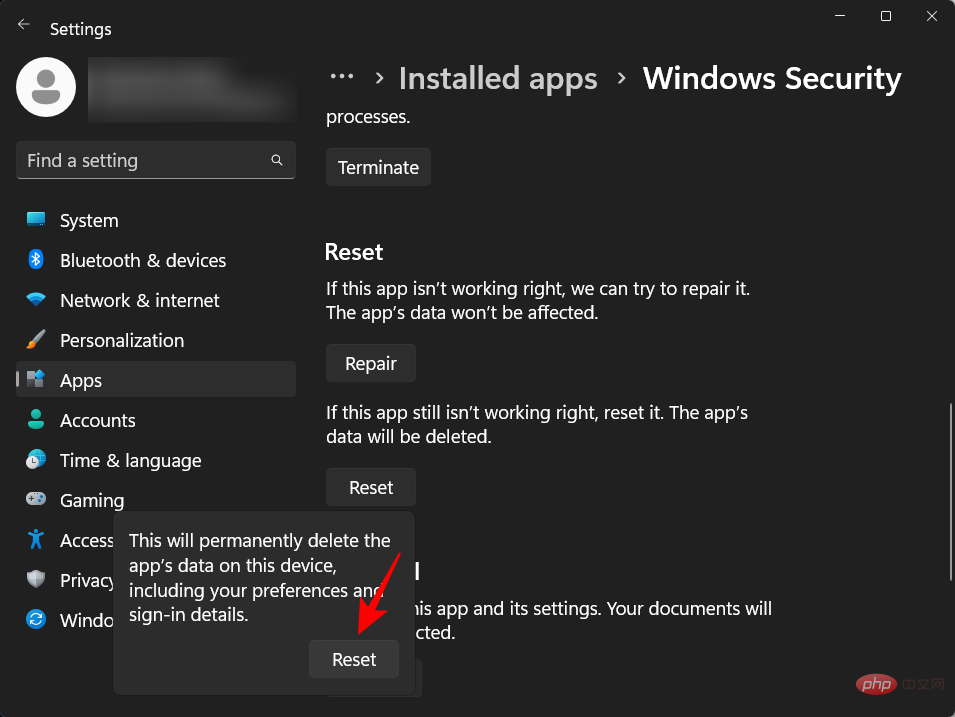
Now scroll down and click Reset.

Click Reset again to confirm.
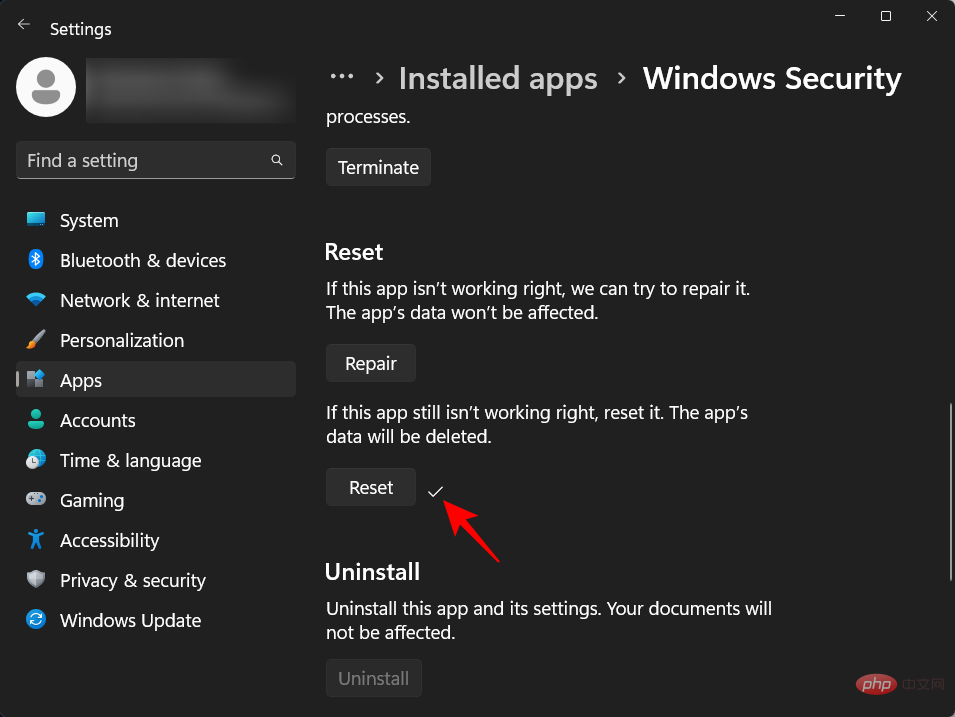
Once completed, you will see a checkmark next to the Reset option.
The above is the detailed content of 6 Ways to Disable Windows Security Antivirus in Windows 11. For more information, please follow other related articles on the PHP Chinese website!

Hot AI Tools

Undresser.AI Undress
AI-powered app for creating realistic nude photos

AI Clothes Remover
Online AI tool for removing clothes from photos.

Undress AI Tool
Undress images for free

Clothoff.io
AI clothes remover

AI Hentai Generator
Generate AI Hentai for free.

Hot Article
Hot Tools

Notepad++7.3.1
Easy-to-use and free code editor

SublimeText3 Chinese version
Chinese version, very easy to use

Zend Studio 13.0.1
Powerful PHP integrated development environment

Dreamweaver CS6
Visual web development tools

SublimeText3 Mac version
God-level code editing software (SublimeText3)
Hot Topics


 What to do if WPS Office cannot open the PPT file - What to do if WPS Office cannot open the PPT file
Mar 04, 2024 am 11:40 AM
What to do if WPS Office cannot open the PPT file - What to do if WPS Office cannot open the PPT file
Mar 04, 2024 am 11:40 AM
Recently, many friends have asked me what to do if WPSOffice cannot open PPT files. Next, let us learn how to solve the problem of WPSOffice not being able to open PPT files. I hope it can help everyone. 1. First open WPSOffice and enter the homepage, as shown in the figure below. 2. Then enter the keyword "document repair" in the search bar above, and then click to open the document repair tool, as shown in the figure below. 3. Then import the PPT file for repair, as shown in the figure below.
 What software is crystaldiskmark? -How to use crystaldiskmark?
Mar 18, 2024 pm 02:58 PM
What software is crystaldiskmark? -How to use crystaldiskmark?
Mar 18, 2024 pm 02:58 PM
CrystalDiskMark is a small HDD benchmark tool for hard drives that quickly measures sequential and random read/write speeds. Next, let the editor introduce CrystalDiskMark to you and how to use crystaldiskmark~ 1. Introduction to CrystalDiskMark CrystalDiskMark is a widely used disk performance testing tool used to evaluate the read and write speed and performance of mechanical hard drives and solid-state drives (SSD). Random I/O performance. It is a free Windows application and provides a user-friendly interface and various test modes to evaluate different aspects of hard drive performance and is widely used in hardware reviews
 How to improve computer startup speed by modifying Windows 10 registry
Apr 19, 2024 am 08:01 AM
How to improve computer startup speed by modifying Windows 10 registry
Apr 19, 2024 am 08:01 AM
In the process of using the Windows 10 operating system, many users find that it takes a long time to start up their computers, which affects the user experience. In order to optimize the boot speed, some people have suggested that the purpose can be achieved by modifying the system registry. In response to this demand, this article will provide an in-depth analysis of how to effectively improve computer startup speed by properly adjusting Windows 10 registry settings. Let’s take a look below. Operation method 1. Use the "win+R" shortcut key to start running, enter "regedit", and click "OK" to open. 2. After entering the Registry Editor, click "HKEY_CURRENT_USERSoftwareMicrosoftWindowsCurren" in the left column
 CrystalDiskinfo usage tutorial-What software is CrystalDiskinfo?
Mar 18, 2024 pm 04:50 PM
CrystalDiskinfo usage tutorial-What software is CrystalDiskinfo?
Mar 18, 2024 pm 04:50 PM
CrystalDiskInfo is a software used to check computer hardware devices. In this software, we can check our own computer hardware, such as reading speed, transmission mode, interface, etc.! So in addition to these functions, how to use CrystalDiskInfo and what exactly is CrystalDiskInfo? Let me sort it out for you! 1. The Origin of CrystalDiskInfo As one of the three major components of a computer host, a solid-state drive is the storage medium of a computer and is responsible for computer data storage. A good solid-state drive can speed up file reading and affect consumer experience. When consumers receive new devices, they can use third-party software or other SSDs to
 How to set the keyboard increment in Adobe Illustrator CS6 - How to set the keyboard increment in Adobe Illustrator CS6
Mar 04, 2024 pm 06:04 PM
How to set the keyboard increment in Adobe Illustrator CS6 - How to set the keyboard increment in Adobe Illustrator CS6
Mar 04, 2024 pm 06:04 PM
Many users are using the Adobe Illustrator CS6 software in their offices, so do you know how to set the keyboard increment in Adobe Illustrator CS6? Then, the editor will bring you the method of setting the keyboard increment in Adobe Illustrator CS6. Interested users can take a look below. Step 1: Start Adobe Illustrator CS6 software, as shown in the figure below. Step 2: In the menu bar, click the [Edit] → [Preferences] → [General] command in sequence. Step 3: The [Keyboard Increment] dialog box pops up, enter the required number in the [Keyboard Increment] text box, and finally click the [OK] button. Step 4: Use the shortcut key [Ctrl]
 How to resolve an incompatible software attempt to load with Edge?
Mar 15, 2024 pm 01:34 PM
How to resolve an incompatible software attempt to load with Edge?
Mar 15, 2024 pm 01:34 PM
When we use the Edge browser, sometimes incompatible software attempts to be loaded together, so what is going on? Let this site carefully introduce to users how to solve the problem of trying to load incompatible software with Edge. How to solve an incompatible software trying to load with Edge Solution 1: Search IE in the start menu and access it directly with IE. Solution 2: Note: Modifying the registry may cause system failure, so operate with caution. Modify registry parameters. 1. Enter regedit during operation. 2. Find the path\HKEY_LOCAL_MACHINE\SOFTWARE\Policies\Micros
 What software is photoshopcs5? -photoshopcs5 usage tutorial
Mar 19, 2024 am 09:04 AM
What software is photoshopcs5? -photoshopcs5 usage tutorial
Mar 19, 2024 am 09:04 AM
PhotoshopCS is the abbreviation of Photoshop Creative Suite. It is a software produced by Adobe and is widely used in graphic design and image processing. As a novice learning PS, let me explain to you today what software photoshopcs5 is and how to use photoshopcs5. 1. What software is photoshop cs5? Adobe Photoshop CS5 Extended is ideal for professionals in film, video and multimedia fields, graphic and web designers who use 3D and animation, and professionals in engineering and scientific fields. Render a 3D image and merge it into a 2D composite image. Edit videos easily
 How to delete recently opened files in Adobe Reader XI - How to delete recently opened files in Adobe Reader XI
Mar 04, 2024 am 11:13 AM
How to delete recently opened files in Adobe Reader XI - How to delete recently opened files in Adobe Reader XI
Mar 04, 2024 am 11:13 AM
Recently, many friends have asked me how to delete recently opened files in Adobe Reader XI. Next, let us learn how to delete recently opened files in Adobe Reader XI. I hope it can help everyone. Step 1: First, use the "win+R" shortcut key to open the run, enter "regedit", and press Enter to open it, as shown in the picture. Step 2: After entering the new interface, click "HKEY_CURRENT_USERSoftwareAdobeAcrobatReader11.0AVGeneralcRecentFiles" on the left, select "c1", right-click and select the "Delete" option, as shown in the figure. Step 3: Then pop up