How to fix Avast service high CPU usage on Windows 10, 11
Avast is one of the most popular antivirus software that protects your system from viruses, trojans, and malware. However, some Avast users have reported issues with very high CPU usage of the Avast service on their computers. According to them, this anomaly caused very high CPU usage, rendering the system inoperable. Therefore, your system may stop responding unless you resolve this issue.
Comments –
All antivirus (even Windows Security Center) software tends to consume a lot of CPU and disk resources, even when running in the background. It runs in the background of your system and will scan all your files even if you have not authorized the scan. So, if
Fix 1 – Uninstall Avast Clean
Avast antivirus installs many components alongside the core functionality. Avast cleaning may cause this issue. So, follow the steps below –
1. Launch the Avast Antivirus application.
2. Then, when the app loads, look for the three-column menu at the top. When you click this button, a drop-down menu will appear.
3. Here, click on "Settings" to open Avast settings.

#4. There are many parts and sections to a setting. Now, select the “General” section in the left pane.
5. Then, click "Troubleshooting".
6. Here, just scroll down to find the threshold problem area. Here, click on the “Add/Modify Component” option.
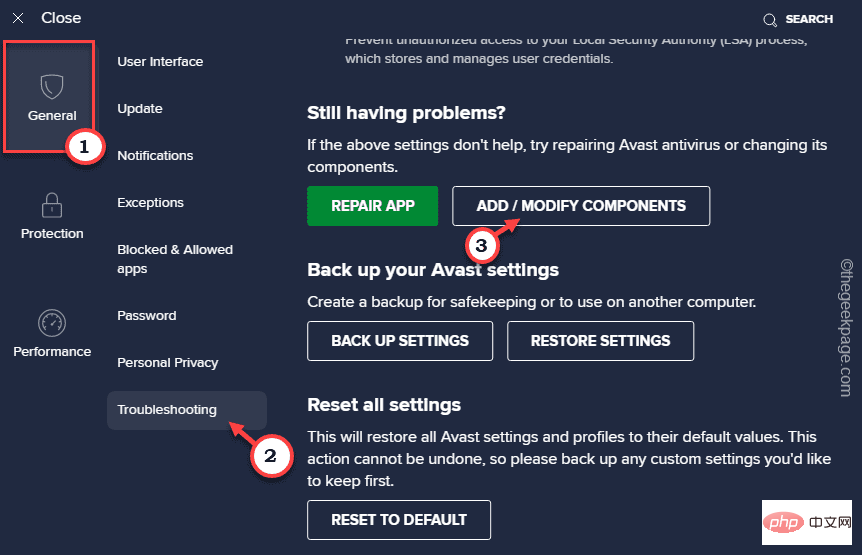
#7. Avast will now load the complete list of components for you.
8. Here, just uncheck the "Clean" tool to remove it from the system.
9. Then, click "Change" to save changes.
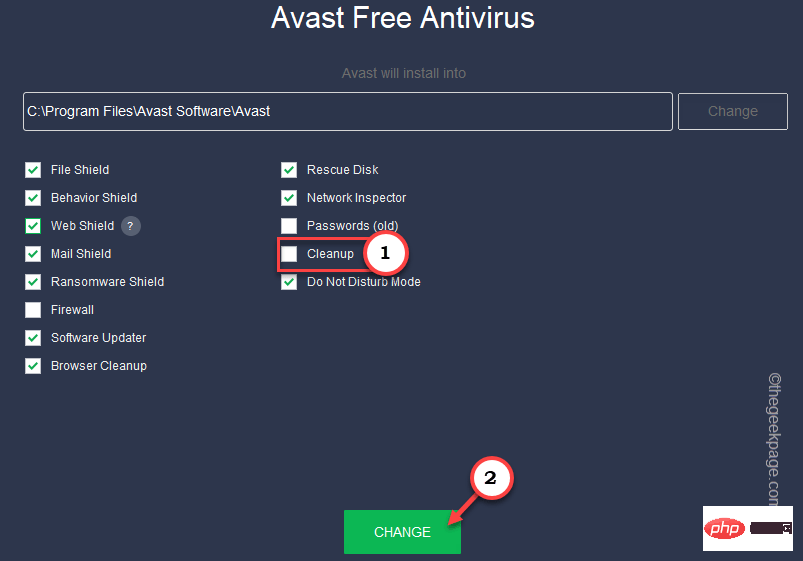
#Avast will now uninstall this cleaning tool from your computer. You must close Avast antivirus software from your computer and restart your system.
Now, work on your system for some time and track the CPU, disk usage of Avast. It should drop significantly.
Fix 2 – Update Avast Antivirus
Avast updates antivirus software regularly. They also update virus definitions at steady intervals.
1. Start Avast antivirus software.
2. When opening, click the Three columns button, and then click "Settings" to open it.

3. On the "Settings" page, go to the "General" area.
4. Now, select the “Update” component here.

#5. In the right pane, you will see two different update types. One is Virus Definitions and the other is Avast Antivirus Updates.
6. So, click on "Check for Updates" to check for virus definition updates.
It will check for newer virus definitions. It will automatically download and install virus definitions.
7. Next, click on the other "Check for updates" to updateAvast antivirus software.
This one will look for application updates.
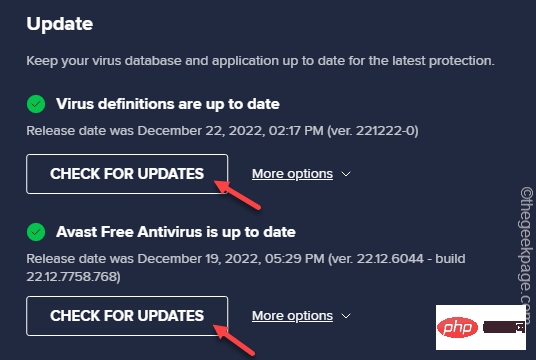
If the updater can detect the newer version, it will automatically download and install it on your system. Restart Avast and test.
Fix 3 - Fix avast
It is possible that Avast is corrupted on your system.
1. Open Aveste Antiphorius.
2. After opening, click the Three columns button, and then click "Settings" to open it.

3. On the "Settings" page, go to the "General" area.
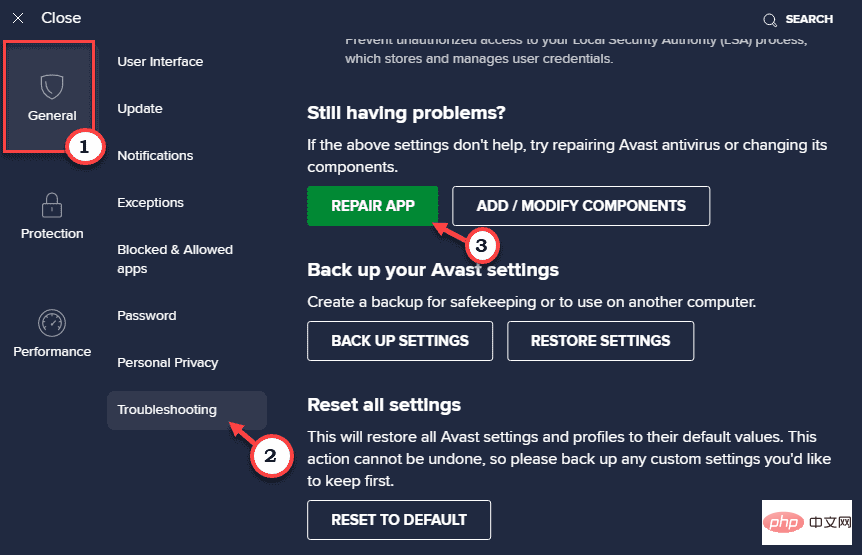
4. Now, go to the "Troubleshooting" section.
5. In the right pane, click "Repair Applications" to repair applications on your computer.
Fix 4 – Edit Avast Configuration File
There is an Avast initialization file named Avast5.ini in the ProgramData folder. Editing it properly should help.
1. Open File Explorer.
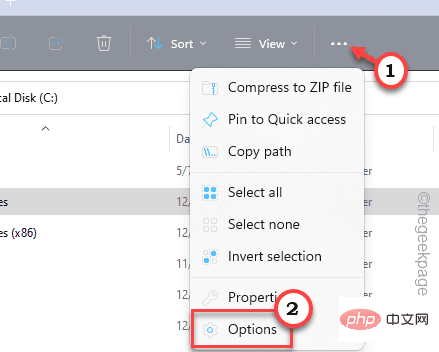
2. There, on the menu bar, click the three-dot button and then click "Options" to open the folder Options.
[If you are using Windows 10, you can directly open the Run box and use it to open Folder Options.
control folders
]
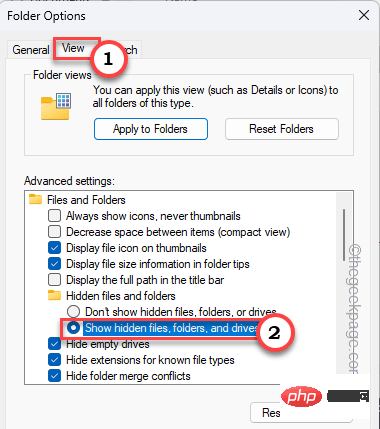
3. Once opened, navigate to the "View" section.
4. Here, just switch the hidden files and folders setting to "Show hidden files, folders and drivers".
5. Finally, click "Apply" and "OK" to save the changes.
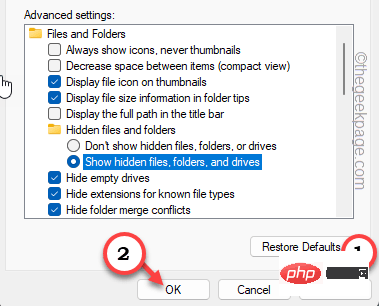
6. This will take you back to the File Explorer page.
7. From here, go to this location –
C:\ProgramData\AvastSoftware\Avast
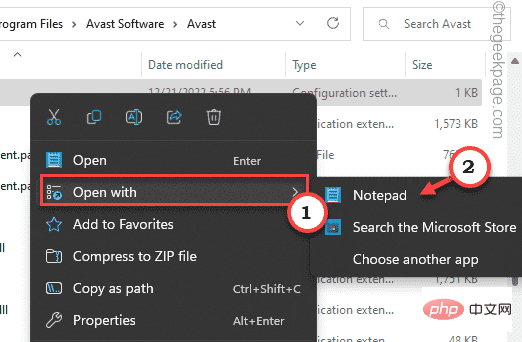
8. Here, look for an initialization file called “Avast5.ini”.
9. Now, right-click on the file and click on "Open with" and select "Notepad" from the list.
#10. Once the file is open, scroll down to the last line.
11. There, Enter this line and press Ctrl S together to save the changes.
[GrimeFighter] : ScanFrequency=999
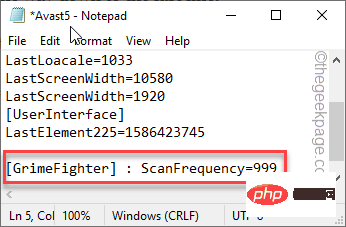
After saving this change, close everything and restart the system.
Fix 5 – Turn off Mail Shield
Some users pointed out that Mail Shield is the culprit of high CPU usage.
1. Open Avast antivirus software.
2. Then, click the three-column menu and click "Settings".

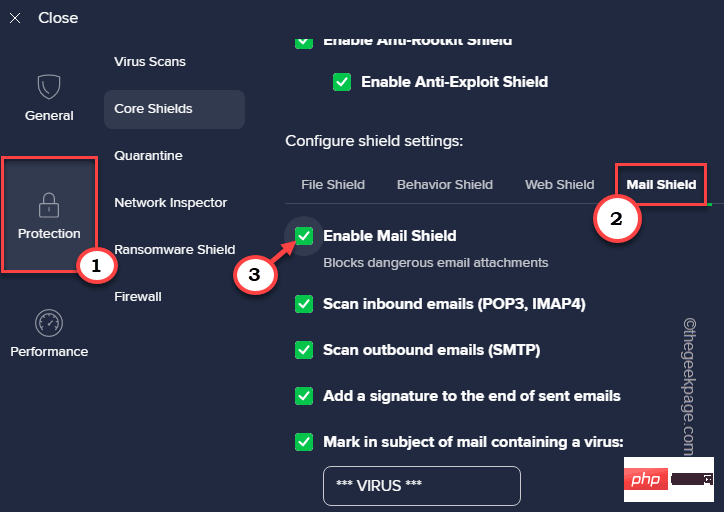
3. Now, this time, you have to go to the “Protect” tab.
4. Scroll down to the Configure protection settings: page and open the Mail Protection section.
5. Just uncheck the "Enable Mail Shield" box.
6. After clicking the box, a page will open containing "How long should Mail Shield be turned off?
7. Select "Until I open it again".

8. Now, finally, click "OK, Stop ” to complete this step.

9. You will be returned to the Avast settings page again.
10. Now, uncheck all boxes.
Scan inbound emails (POP3, IMAP)Scan outbound emails (SMTP)Add a signature to the end of sent emailsMark in subject of mail containing a virus:Scan attachment when attaching (MS Outlook only)
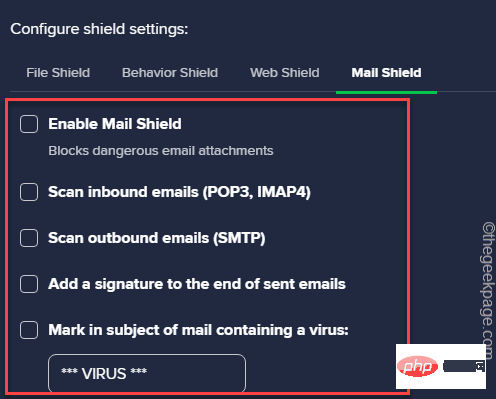
Once you have done this, close Avast and go to Task Manager. There, note the current resource consumption. You You’ll notice a significant drop in these numbers.
Fix 6 – Remove Avast Add-ons
Avast has many additional features that may not be entirely useful to you. However, with all of this Welfare continues to provide their work and it can become a bottleneck of resources. So if you don’t need these add-ons, you should get rid of these add-ons.
1. You can easily Do this. So, launch it.
2. Now, look at the top of the screen, where you can see the three-column button. Click on it and then tap on "Settings" to open it.

3. Next, click on the "General" area.
4.然后,单击“疑难解答”部分。
5.在这里,您可以看到各种故障排除选项。现在,点击“添加/修改组件”将其打开。

6.现在,逐个取消选中所有这些框,然后单击“更改”以卸载所有这些组件。
File ShieldBehavior Shield Web ShieldMail Shield
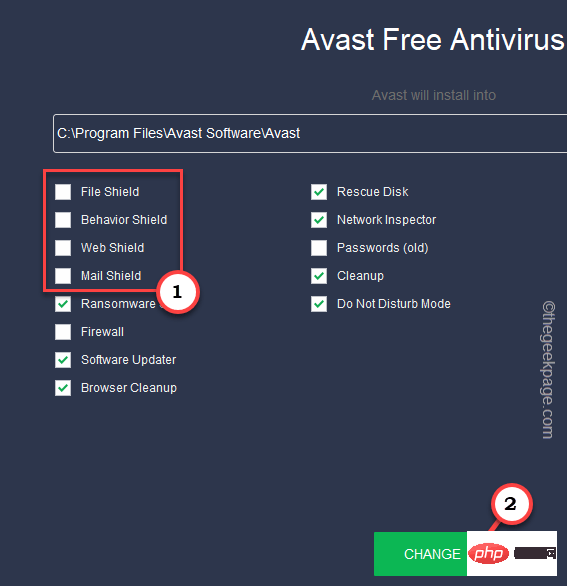
之后,等待Avast从系统中卸载所有这些组件。重新启动计算机。
修复7 –重置avast
如果到目前为止没有任何效果,则应将Avast重置为默认设置。这样,Avast将像新的一样好,并且消耗更少的资源。
1. 从系统托盘打开 Avast。
2.然后,单击三栏并打开“设置”。

3.之后,从左侧窗格中选择“常规”。
4.然后,点击“疑难解答”。
5.之后,转到重置所有设置页面。在那里,点击“重置为默认值”选项。
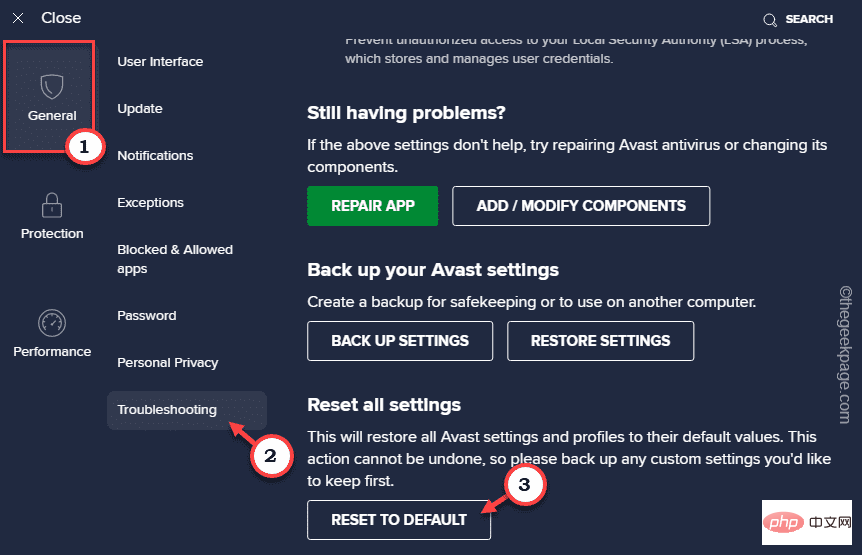
将防病毒软件重置为基本后,检查它是否影响系统资源。
修复8 –卸载Avast(适用于Avast免费用户)
我们的最后一个建议是,如果您使用的是Avast免费防病毒软件,则实际上可以从计算机上卸载该应用程序。Windows 安全中心是 Windows 计算机上的默认防病毒软件。它还提供实时保护和增强的云交付保护。反恶意软件服务可执行文件不会消耗大量资源。您可以尝试几天作为 Avast 的替代品。
The above is the detailed content of How to fix Avast service high CPU usage on Windows 10, 11. For more information, please follow other related articles on the PHP Chinese website!

Hot AI Tools

Undresser.AI Undress
AI-powered app for creating realistic nude photos

AI Clothes Remover
Online AI tool for removing clothes from photos.

Undress AI Tool
Undress images for free

Clothoff.io
AI clothes remover

AI Hentai Generator
Generate AI Hentai for free.

Hot Article

Hot Tools

Notepad++7.3.1
Easy-to-use and free code editor

SublimeText3 Chinese version
Chinese version, very easy to use

Zend Studio 13.0.1
Powerful PHP integrated development environment

Dreamweaver CS6
Visual web development tools

SublimeText3 Mac version
God-level code editing software (SublimeText3)

Hot Topics
 1384
1384
 52
52
 What software is bonjour and can it be uninstalled?
Feb 20, 2024 am 09:33 AM
Title: Explore the Bonjour software and how to uninstall it Abstract: This article will introduce the functions, scope of use and how to uninstall the Bonjour software. At the same time, it will also be explained how to use other tools to replace Bonjour to meet the needs of users. Introduction: Bonjour is a common software in the field of computer and network technology. Although this may be unfamiliar to some users, it can be very useful in some specific situations. If you happen to have Bonjour software installed but now want to uninstall it, then
 What to do if WPS Office cannot open the PPT file - What to do if WPS Office cannot open the PPT file
Mar 04, 2024 am 11:40 AM
Recently, many friends have asked me what to do if WPSOffice cannot open PPT files. Next, let us learn how to solve the problem of WPSOffice not being able to open PPT files. I hope it can help everyone. 1. First open WPSOffice and enter the homepage, as shown in the figure below. 2. Then enter the keyword "document repair" in the search bar above, and then click to open the document repair tool, as shown in the figure below. 3. Then import the PPT file for repair, as shown in the figure below.
 What software is crystaldiskmark? -How to use crystaldiskmark?
Mar 18, 2024 pm 02:58 PM
CrystalDiskMark is a small HDD benchmark tool for hard drives that quickly measures sequential and random read/write speeds. Next, let the editor introduce CrystalDiskMark to you and how to use crystaldiskmark~ 1. Introduction to CrystalDiskMark CrystalDiskMark is a widely used disk performance testing tool used to evaluate the read and write speed and performance of mechanical hard drives and solid-state drives (SSD). Random I/O performance. It is a free Windows application and provides a user-friendly interface and various test modes to evaluate different aspects of hard drive performance and is widely used in hardware reviews
![Corsair iCUE software not detecting RAM [Fixed]](https://img.php.cn/upload/article/000/465/014/170831448976874.png?x-oss-process=image/resize,m_fill,h_207,w_330) Corsair iCUE software not detecting RAM [Fixed]
Feb 19, 2024 am 11:48 AM
Corsair iCUE software not detecting RAM [Fixed]
Feb 19, 2024 am 11:48 AM
This article will explore what users can do when the CorsairiCUE software does not recognize the RAM in a Windows system. Although the CorsairiCUE software is designed to let users control their computer's RGB lighting, some users have found that the software does not function properly, resulting in an inability to detect RAM modules. Why doesn't ICUE pick up my memory? The main reason why ICUE cannot correctly identify RAM is usually related to background software conflicts. In addition, incorrect SPD write settings may also cause this problem. Fixed issue with CorsairIcue software not detecting RAM If CorsairIcue software is not detecting RAM on your Windows computer, please use the following suggestions.
 CrystalDiskinfo usage tutorial-What software is CrystalDiskinfo?
Mar 18, 2024 pm 04:50 PM
CrystalDiskInfo is a software used to check computer hardware devices. In this software, we can check our own computer hardware, such as reading speed, transmission mode, interface, etc.! So in addition to these functions, how to use CrystalDiskInfo and what exactly is CrystalDiskInfo? Let me sort it out for you! 1. The Origin of CrystalDiskInfo As one of the three major components of a computer host, a solid-state drive is the storage medium of a computer and is responsible for computer data storage. A good solid-state drive can speed up file reading and affect consumer experience. When consumers receive new devices, they can use third-party software or other SSDs to
 How to set the keyboard increment in Adobe Illustrator CS6 - How to set the keyboard increment in Adobe Illustrator CS6
Mar 04, 2024 pm 06:04 PM
Many users are using the Adobe Illustrator CS6 software in their offices, so do you know how to set the keyboard increment in Adobe Illustrator CS6? Then, the editor will bring you the method of setting the keyboard increment in Adobe Illustrator CS6. Interested users can take a look below. Step 1: Start Adobe Illustrator CS6 software, as shown in the figure below. Step 2: In the menu bar, click the [Edit] → [Preferences] → [General] command in sequence. Step 3: The [Keyboard Increment] dialog box pops up, enter the required number in the [Keyboard Increment] text box, and finally click the [OK] button. Step 4: Use the shortcut key [Ctrl]
 What kind of software is bonjour? Is it useful?
Feb 22, 2024 pm 08:39 PM
Bonjour is a network protocol and software launched by Apple for discovering and configuring network services within a local area network. Its main role is to automatically discover and communicate between devices connected in the same network. Bonjour was first introduced in the MacOSX10.2 version in 2002, and is now installed and enabled by default in Apple's operating system. Since then, Apple has opened up Bonjour's technology to other manufacturers, so many other operating systems and devices can also support Bonjour.
 How to resolve an incompatible software attempt to load with Edge?
Mar 15, 2024 pm 01:34 PM
When we use the Edge browser, sometimes incompatible software attempts to be loaded together, so what is going on? Let this site carefully introduce to users how to solve the problem of trying to load incompatible software with Edge. How to solve an incompatible software trying to load with Edge Solution 1: Search IE in the start menu and access it directly with IE. Solution 2: Note: Modifying the registry may cause system failure, so operate with caution. Modify registry parameters. 1. Enter regedit during operation. 2. Find the path\HKEY_LOCAL_MACHINE\SOFTWARE\Policies\Micros


