
import '@/utils/websocket' // 全局引入 WebSocket 通讯组件

How to use WebSocket+SpringBoot+Vue to build a simple web chat room

1. Database setup
A very simple user table, add two users admin and wskh

2. Backend setup
2.1 Introducing key dependencies
<dependency>
    <groupId>org.springframework.boot</groupId>
    <artifactId>spring-boot-starter-websocket</artifactId>
</dependency>2.2 WebSocket configuration class
The function of WebSocketConfig is to enable WebSocket monitoring
import org.springframework.context.annotation.Bean;
import org.springframework.context.annotation.Configuration;
import org.springframework.web.socket.server.standard.ServerEndpointExporter;

/**
* @Author:WSKH
* @ClassName:WebSocketConfig
* @ClassType:配置类
* @Description:WebSocket配置类
* @Date:2022/1/25/12:21
* @Email:1187560563@qq.com
* @Blog:https://blog.csdn.net/weixin_51545953?type=blog
*/

@Configuration
public class WebSocketConfig {
    /** * 开启webSocket * @return */
    @Bean
    public ServerEndpointExporter serverEndpointExporter() {
        return new ServerEndpointExporter();
    }
}WebSocketServer writes some events, such as sending message events , establishing connection events, closing connection events, etc.
import com.wskh.chatroom.util.FastJsonUtils;
import org.slf4j.Logger;
import org.slf4j.LoggerFactory;
import org.springframework.stereotype.Component;

import javax.websocket.*;
import javax.websocket.server.PathParam;
import javax.websocket.server.ServerEndpoint;
import java.io.EOFException;
import java.io.IOException;
import java.util.concurrent.ConcurrentHashMap;

@ServerEndpoint("/websocket/{sid}")
@Component
public class WebSocketServer {
    private static final Logger log = LoggerFactory.getLogger(WebSocketServer.class);

    private static int onlineCount = 0;

    private static ConcurrentHashMap<String,WebSocketServer> webSocketServerMap = new ConcurrentHashMap<>();

    private Session session;

    private String sid;


    @OnOpen
    public void onOpen(Session session, @PathParam("sid") String sid) {
        this.sid = sid;
        this.session = session;
        webSocketServerMap.put(sid, this);
        addOnlineCount();
        log.info("有新窗口开始监听:"+sid+",当前在线人数为" + getOnlineCount());
        try {
            sendInfo("openSuccess:"+webSocketServerMap.keySet());
        } catch (IOException e) {
            e.printStackTrace();
        }
    }

    @OnClose
    public void onClose() {
        webSocketServerMap.remove(sid);
        subOnlineCount();
        log.info("有一连接关闭!当前在线人数为" + getOnlineCount());
        try {
            sendInfo("openSuccess:"+webSocketServerMap.keySet());
        } catch (IOException e) {
            e.printStackTrace();
        }
    }

    @OnMessage
    public void onMessage(String message) throws IOException {
        if("ping".equals(message)) {
            sendInfo(sid, "pong");
        }
        if(message.contains(":")) {
            String[] split = message.split(":");
            sendInfo(split[0], "receivedMessage:"+sid+":"+split[1]);
        }
    }

    @OnError
    public void onError(Session session, Throwable error) {
        if(error instanceof EOFException) {
            return;
        }
        if(error instanceof IOException && error.getMessage().contains("已建立的连接")) {
            return;
        }
        log.error("发生错误", error);
    }

    /**
     * 实现服务器主动推送
     */
    public void sendMessage(String message) throws IOException {
        synchronized (session) {
            this.session.getBasicRemote().sendText(message);
        }
    }

    public static void sendObject(Object obj) throws IOException {
        sendInfo(FastJsonUtils.convertObjectToJSON(obj));
    }

    public static void sendInfo(String sid,String message) throws IOException {
        WebSocketServer socketServer = webSocketServerMap.get(sid);
        if(socketServer != null) {
            socketServer.sendMessage(message);
        }
    }

    public static void sendInfo(String message) throws IOException {
        for(String sid : webSocketServerMap.keySet()) {
            webSocketServerMap.get(sid).sendMessage(message);
        }
    }

    public static void sendInfoByUserId(Long userId,Object message) throws IOException {
        for(String sid : webSocketServerMap.keySet()) {
            String[] sids =  sid.split("id");
            if(sids.length == 2) {
                String id = sids[1];
                if(userId.equals(Long.parseLong(id))) {
                    webSocketServerMap.get(sid).sendMessage(FastJsonUtils.convertObjectToJSON(message));
                }
            }
        }
    }

    public static Session getWebSocketSession(String sid) {
        if(webSocketServerMap.containsKey(sid)) {
            return webSocketServerMap.get(sid).session;
        }
        return null;
    }

    public static synchronized void addOnlineCount() {
        onlineCount++;
    }

    public static synchronized void subOnlineCount() {
        onlineCount--;
    }

    public static synchronized int getOnlineCount() {
        return onlineCount;
    }
}2.3 Configuring cross-domain
import org.springframework.context.annotation.Configuration;
import org.springframework.web.servlet.config.annotation.CorsRegistry;
import org.springframework.web.servlet.config.annotation.WebMvcConfigurerAdapter;

@Configuration
public class WebMvcConfig extends WebMvcConfigurerAdapter {

    @Override
    // 跨域配置
    public void addCorsMappings(CorsRegistry registry) {
        registry.addMapping("/**")
                .allowedOrigins("*")
                .allowedMethods("POST", "GET", "PUT", "OPTIONS", "DELETE")
                .maxAge(3600)
                .allowCredentials(true);
    }

}2.4 Control class for sending messages
/**
 * @Author:WSKH
 * @ClassName:MsgController
 * @ClassType:控制类
 * @Description:信息控制类
 * @Date:2022/1/25/12:47
 * @Email:1187560563@qq.com
 * @Blog:https://blog.csdn.net/weixin_51545953?type=blog
 */
@ApiModel("信息控制类")
@RestController
@RequestMapping("/chatroom/msg")
public class MsgController {
    @ApiOperation("发送信息方法")
    @PostMapping("/sendMsg")
    public R sendMsg(String msg) throws IOException {
        WebSocketServer.sendInfo(msg);
        return R.ok().message("发送成功");
    }
}At this point, the back-end part is generally configured.
3. Front-end construction
This article uses the vue-admin-template-master template to build the front-end of the chat room
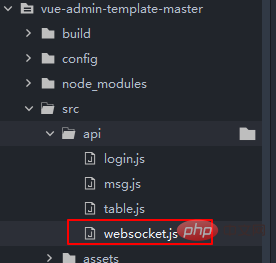
3.1 Custom file websocket.js
Place the following files in the api folder
 ##
##
//websocket.js
import Vue from 'vue'

// 1、用于保存WebSocket 实例对象
export const WebSocketHandle = undefined

// 2、外部根据具体登录地址实例化WebSocket 然后回传保存WebSocket
export const WebsocketINI = function(websocketinstance) {
  this.WebSocketHandle = websocketinstance
  this.WebSocketHandle.onmessage = OnMessage
}

// 3、为实例化的WebSocket绑定消息接收事件:同时用于回调外部各个vue页面绑定的消息事件
// 主要使用WebSocket.WebSocketOnMsgEvent_CallBack才能访问  this.WebSocketOnMsgEvent_CallBack 无法访问很诡异
const OnMessage = function(msg) {
  // 1、消息打印
  // console.log('收到消息:', msg)

  // 2、如果外部回调函数未绑定 结束操作
  if (!WebSocket.WebSocketOnMsgEvent_CallBack) {
    console.log(WebSocket.WebSocketOnMsgEvent_CallBack)
    return
  }

  // 3、调用外部函数
  WebSocket.WebSocketOnMsgEvent_CallBack(msg)
}

// 4、全局存放外部页面绑定onmessage消息回调函数:注意使用的是var
export const WebSocketOnMsgEvent_CallBack = undefined

// 5、外部通过此绑定方法 来传入的onmessage消息回调函数
export const WebSocketBandMsgReceivedEvent = function(receiveevent) {
  WebSocket.WebSocketOnMsgEvent_CallBack = receiveevent
}

// 6、封装一个直接发送消息的方法:
export const Send = function(msg) {
  if (!this.WebSocketHandle || this.WebSocketHandle.readyState !== 1) {
    // 未创建连接 或者连接断开 无法发送消息
    return
  }
  this.WebSocketHandle.send(msg)// 发送消息
}

// 7、导出配置
const WebSocket = {
  WebSocketHandle,
  WebsocketINI,
  WebSocketBandMsgReceivedEvent,
  Send,
  WebSocketOnMsgEvent_CallBack
}

// 8、全局绑定WebSocket
Vue.prototype.$WebSocket = WebSocketimport '@/utils/websocket' // 全局引入 WebSocket 通讯组件
Copy after login
3.3 Declare the websocket object in App.vueApp.vueimport '@/utils/websocket' // 全局引入 WebSocket 通讯组件
<template>
<div id="app">
<router-view />
</div>
</template>
<script>
import {getInfo} from './api/login.js';
import {getToken} from './utils/auth.js'
export default {
name: 'App',
mounted() {
// 每3秒检测一次websocket连接状态 未连接 则尝试连接 尽量保证网站启动的时候 WebSocket都能正常长连接
setInterval(this.WebSocket_StatusCheck, 3000)
// 绑定消息回调事件
this.$WebSocket.WebSocketBandMsgReceivedEvent(this.WebSocket_OnMesage)
// 初始化当前用户信息
this.token = getToken()
getInfo(this.token).then((rep)=>{
console.log(rep)
this.userName = rep.data.name
}).catch((error)=>{
console.log(error)
})
},
data(){
return{
}
},
methods: {
// 实际消息回调事件
WebSocket_OnMesage(msg) {
console.log('收到服务器消息:', msg.data)
console.log(msg)
let chatDiv = document.getElementById("chatDiv")
let newH3 = document.createElement("div")
if(msg.data.indexOf('openSuccess')>=0){
// 忽略连接成功消息提示
}else{
if(msg.data.indexOf(this.userName)==0){
// 说明是自己发的消息,应该靠右边悬浮
newH3.innerHTML = "<div style='width:100%;text-align: right;'><h4 id="msg-data">"+msg.data+"</h4></div>"
}else{
newH3.innerHTML = "<div style='width:100%;text-align: left;'><h4 id="msg-data">"+msg.data+"</h4></div>"
}
}
chatDiv.appendChild(newH3)
},
// 1、WebSocket连接状态检测:
WebSocket_StatusCheck() {
if (!this.$WebSocket.WebSocketHandle || this.$WebSocket.WebSocketHandle.readyState !== 1) {
console.log('Websocket连接中断,尝试重新连接:')
this.WebSocketINI()
}
},
// 2、WebSocket初始化:
async WebSocketINI() {
// 1、浏览器是否支持WebSocket检测
if (!('WebSocket' in window)) {
console.log('您的浏览器不支持WebSocket!')
return
}
let DEFAULT_URL = "ws://" + '127.0.0.1:8002' + '/websocket/' + new Date().getTime()
// 3、创建Websocket连接
const tmpWebsocket = new WebSocket(DEFAULT_URL)
// 4、全局保存WebSocket操作句柄:main.js 全局引用
this.$WebSocket.WebsocketINI(tmpWebsocket)
// 5、WebSocket连接成功提示
tmpWebsocket.onopen = function(e) {
console.log('webcoket连接成功')
}
//6、连接失败提示
tmpWebsocket.onclose = function(e) {
console.log('webcoket连接关闭:', e)
}
}
}
}
</script><template>
<div>
<div >聊天内容:</div>
<div id="chatDiv">
</div>
<div >聊天输入框:</div>
<el-input v-model="text">
</el-input>
<el-button @click="sendMsg">点击发送</el-button>
</div>
</template>
<script>
import {getInfo} from '../../api/login.js';
import {getToken} from '../../utils/auth.js'
import msgApi from '../../api/msg.js'
export default {
mounted() {
//
this.token = getToken()
getInfo(this.token).then((rep)=>{
console.log(rep)
this.userName = rep.data.name
}).catch((error)=>{
console.log(error)
})
},
data() {
return {
text: "",
token:"",
userName:"",
}
},
methods: {
sendMsg(){
let msg = this.userName+":"+this.text
msgApi.sendMsg(msg).then((rep)=>{
}).catch((error)=>{
})
this.text = ""
}
}
}
</script>
<style scoped="true">
.selfMsg{
float: right;
}
</style>Copy after login3.5 Final effectUse two different browsers to log in to the admin account and Chat test with wskh account, the effect is as follows (admin is on the left):
<template>
<div>
<div >聊天内容:</div>
<div id="chatDiv">
</div>
<div >聊天输入框:</div>
<el-input v-model="text">
</el-input>
<el-button @click="sendMsg">点击发送</el-button>
</div>
</template>
<script>
import {getInfo} from '../../api/login.js';
import {getToken} from '../../utils/auth.js'
import msgApi from '../../api/msg.js'
export default {
mounted() {
//
this.token = getToken()
getInfo(this.token).then((rep)=>{
console.log(rep)
this.userName = rep.data.name
}).catch((error)=>{
console.log(error)
})
},
data() {
return {
text: "",
token:"",
userName:"",
}
},
methods: {
sendMsg(){
let msg = this.userName+":"+this.text
msgApi.sendMsg(msg).then((rep)=>{
}).catch((error)=>{
})
this.text = ""
}
}
}
</script>
<style scoped="true">
.selfMsg{
float: right;
}
</style>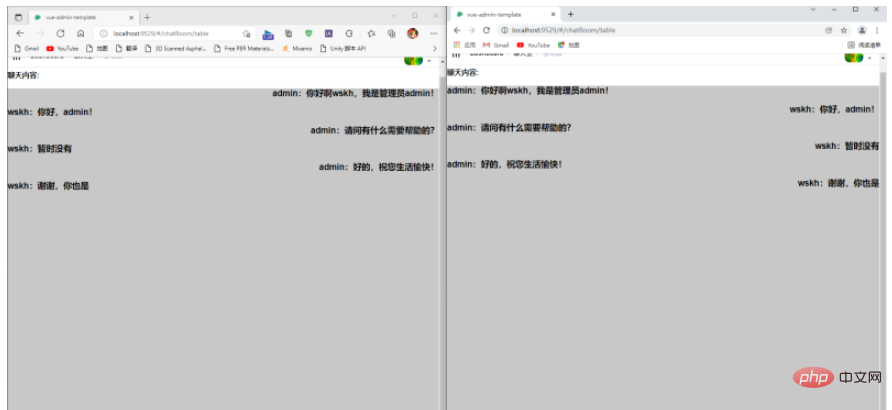
The above is the detailed content of How to use WebSocket+SpringBoot+Vue to build a simple web chat room. For more information, please follow other related articles on the PHP Chinese website!

Hot AI Tools

Undresser.AI Undress
AI-powered app for creating realistic nude photos

AI Clothes Remover
Online AI tool for removing clothes from photos.

Undress AI Tool
Undress images for free

Clothoff.io
AI clothes remover

AI Hentai Generator
Generate AI Hentai for free.

Hot Article
Hot Tools

Notepad++7.3.1
Easy-to-use and free code editor

SublimeText3 Chinese version
Chinese version, very easy to use

Zend Studio 13.0.1
Powerful PHP integrated development environment

Dreamweaver CS6
Visual web development tools

SublimeText3 Mac version
God-level code editing software (SublimeText3)
Hot Topics


 How to use echarts in vue
May 09, 2024 pm 04:24 PM
How to use echarts in vue
May 09, 2024 pm 04:24 PM
Using ECharts in Vue makes it easy to add data visualization capabilities to your application. Specific steps include: installing ECharts and Vue ECharts packages, introducing ECharts, creating chart components, configuring options, using chart components, making charts responsive to Vue data, adding interactive features, and using advanced usage.
 The role of export default in vue
May 09, 2024 pm 06:48 PM
The role of export default in vue
May 09, 2024 pm 06:48 PM
Question: What is the role of export default in Vue? Detailed description: export default defines the default export of the component. When importing, components are automatically imported. Simplify the import process, improve clarity and prevent conflicts. Commonly used for exporting individual components, using both named and default exports, and registering global components.
 How to use map function in vue
May 09, 2024 pm 06:54 PM
How to use map function in vue
May 09, 2024 pm 06:54 PM
The Vue.js map function is a built-in higher-order function that creates a new array where each element is the transformed result of each element in the original array. The syntax is map(callbackFn), where callbackFn receives each element in the array as the first argument, optionally the index as the second argument, and returns a value. The map function does not change the original array.
 The difference between event and $event in vue
May 08, 2024 pm 04:42 PM
The difference between event and $event in vue
May 08, 2024 pm 04:42 PM
In Vue.js, event is a native JavaScript event triggered by the browser, while $event is a Vue-specific abstract event object used in Vue components. It is generally more convenient to use $event because it is formatted and enhanced to support data binding. Use event when you need to access specific functionality of the native event object.
 The difference between export and export default in vue
May 08, 2024 pm 05:27 PM
The difference between export and export default in vue
May 08, 2024 pm 05:27 PM
There are two ways to export modules in Vue.js: export and export default. export is used to export named entities and requires the use of curly braces; export default is used to export default entities and does not require curly braces. When importing, entities exported by export need to use their names, while entities exported by export default can be used implicitly. It is recommended to use export default for modules that need to be imported multiple times, and use export for modules that are only exported once.
 The role of onmounted in vue
May 09, 2024 pm 02:51 PM
The role of onmounted in vue
May 09, 2024 pm 02:51 PM
onMounted is a component mounting life cycle hook in Vue. Its function is to perform initialization operations after the component is mounted to the DOM, such as obtaining references to DOM elements, setting data, sending HTTP requests, registering event listeners, etc. It is only called once when the component is mounted. If you need to perform operations after the component is updated or before it is destroyed, you can use other lifecycle hooks.
 What are hooks in vue
May 09, 2024 pm 06:33 PM
What are hooks in vue
May 09, 2024 pm 06:33 PM
Vue hooks are callback functions that perform actions on specific events or lifecycle stages. They include life cycle hooks (such as beforeCreate, mounted, beforeDestroy), event handling hooks (such as click, input, keydown) and custom hooks. Hooks enhance component control, respond to component life cycles, handle user interactions and improve component reusability. To use hooks, just define the hook function, execute the logic and return an optional value.
 What scenarios can event modifiers in vue be used for?
May 09, 2024 pm 02:33 PM
What scenarios can event modifiers in vue be used for?
May 09, 2024 pm 02:33 PM
Vue.js event modifiers are used to add specific behaviors, including: preventing default behavior (.prevent) stopping event bubbling (.stop) one-time event (.once) capturing event (.capture) passive event listening (.passive) Adaptive modifier (.self)Key modifier (.key)
