

How to configure nginx to support https

1. Introduction
Hypertext Transfer Protocol http protocol is used to transfer information between web browsers and website servers. The http protocol sends content in clear text and does not provide any If the attacker intercepts the transmission message between the web browser and the website server, he can directly read the information.
Therefore, the http protocol is not suitable for transmitting some sensitive information, such as : Credit card number, password and other payment information,
In order to solve this defect of the http protocol, another protocol needs to be used: Secure Sockets Layer Hypertext Transfer Protocol https. For the security of data transmission, https is used in The SSL protocol is added to HTTP. SSL relies on certificates to verify the identity of the server and encrypt the communication between the browser and the server.
2. Advantages of https
Although https is not absolutely safe, institutions that master the root certificate and organizations that master encryption algorithms can also carry out man-in-the-middle attacks, but https It is still the most secure solution under the current architecture and has the following main benefits:
(1) Using the https protocol can authenticate users and servers to ensure that data is sent to the correct client and server;
(2) The https protocol is a network protocol built from the ssl http protocol that can perform encrypted transmission and identity authentication. It is safer than the http protocol and can prevent data from being stolen or changed during the transmission process to ensure the integrity of the data. .
(3) https is the most secure solution under the current architecture. Although it is not absolutely safe, it greatly increases the cost of man-in-the-middle attacks.
(4) Google adjusted its search engine algorithm in August 2014 and stated that "compared to equivalent http websites, websites using https encryption will rank higher in search results."
3. Disadvantages of https
Although https has great advantages, relatively speaking, it still has shortcomings:
(1) The https protocol handshake phase is time-consuming, which will extend the page loading time by nearly 50% and increase power consumption by 10% to 20%;
(2) https connection caching is not as efficient as http, which will increase Data overhead and power consumption, and even existing security measures will be affected by this;
(3) SSL certificates cost money. The more powerful the certificate, the higher the cost. There is no need for personal websites and small websites. Won't use it.
(4) SSL certificates usually need to be bound to IP, and multiple domain names cannot be bound to the same IP. IPv4 resources cannot support this consumption.
(5) The encryption scope of the https protocol is also relatively limited, and it has little effect on hacker attacks, denial of service attacks, server hijacking, etc. The most critical thing is that the credit chain system of the SSL certificate is not secure, especially when some countries can control the CA root certificate, man-in-the-middle attacks are also feasible.
4. Download certbot
Use git to download. If you haven’t installed git yet, check how to switch.

Directory
cd /usr/local
Clone git repository
git clone https: // github.com/certbot/certbot.git
After cloning is completed, the certbot directory will appear in /usr/loca/
5. View certbot
Switch to the certbot directory
cd /usr/local/certbot
If the directory is like this, the installation is successful
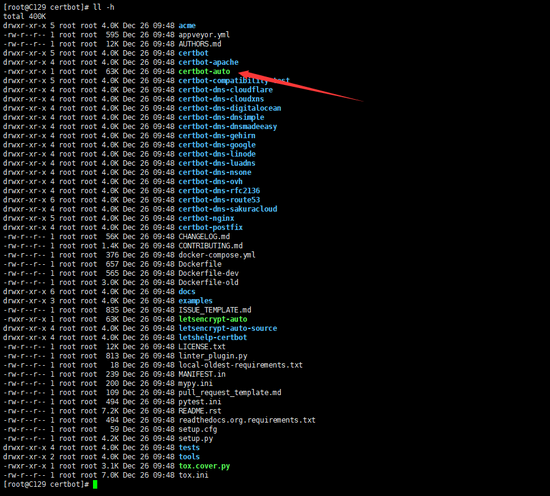
certbot common commands
6, Install nginx
7. Apply for https certificate
View the current certificate
./certbot-auto certificates
The first execution will install some dependencies. There is a confirmation inquiry in the middle, enter y to start applying for the certificate (the certificate is valid for 3 months, and it needs to be re-applied when it expires). Method 1: Use the dns method to verify. This method requires you to configure the domain name. I personally like it. This way./certbot-auto --server https://acme-v02.api.letsencrypt.org/directory -d Your domain name --manual --preferred-challenges dns-01 certonly For example:
Configure generic domain name
Copy code The code is as follows:
./certbot-auto --server https: // acme-v02.api.letsencrypt.org/directory -d *.nl166. com --manual --preferred-challenges dns-01 certonly
Configure the specified domain name
Copy code The code is as follows:
./certbot-auto --server https: / /acme-v02.api.letsencrypt.org/directory -d api.nl166.com --manual --preferred-challenges dns-01 certonly
Configure the second-level generic domain name
Copy code The code is as follows:
./certbot-auto --server https: // acme-v02.api.letsencrypt.org/directory -d *.api.nl166.com --manual --preferred-challenges dns -01 certonly
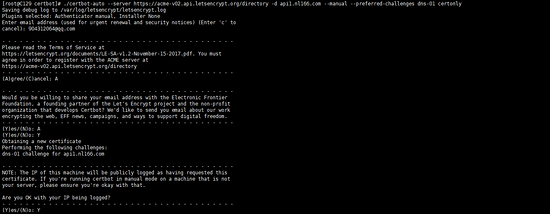 #As shown in the picture above, you will be asked to enter an email address for the first time. Just enter it as required. An email will be sent to you when the time comes. Click to confirm the email address, so be sure to fill in the real email address, and then confirm as required. If you don’t confirm, the execution will not proceed.
接下来会让你验证域名,按要求解析个txt类型的记录
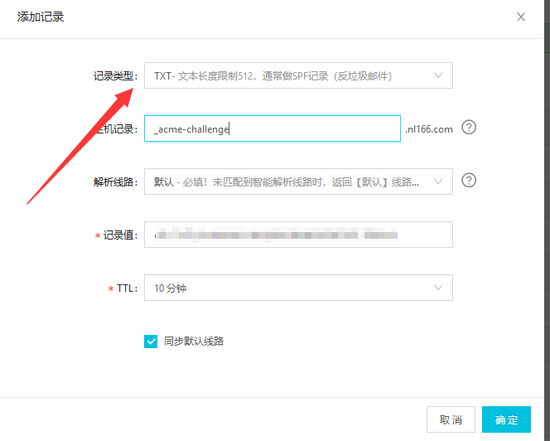
保存确认以后再回到服务器中确认
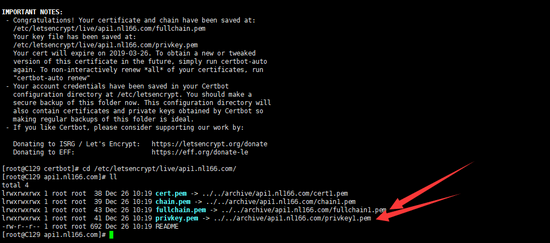
上面这两个文件就是配置https用到的证书了
方式二:使用插件方式
我们先看看官方怎么说的

这里我使用的是nginx(申请完会自动帮你重启nginx) 这种方式配置不了泛域名,只能一个一个添加
./certbot-auto --nginx -d api2.nl166.com


解决上述报错,请注意,/usr/local/nginx 请替换为你的nginx实际安装位置安装lnmp
ln -s /usr/local/nginx/sbin/nginx /usr/bin/nginx

ln -s /usr/local/nginx/conf/ /etc/nginx
再次执行申请
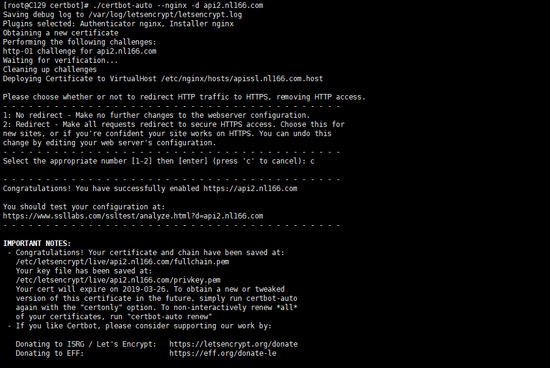
中途会询问你请选择是否将http流量重定向到https,删除http访问。可根据自己的需求选择,我这里是c取消选择(实际上这一步可以直接不理,经测试,这一步没有选择前,访问网址https已经可以访问了。)
如果想省略询问这一步,可以添加certonly 该种方式只会生成证书,不做其余操作,证书配置需要自己手动添加 如下:
./certbot-auto certonly --nginx -d api2.nl166.com
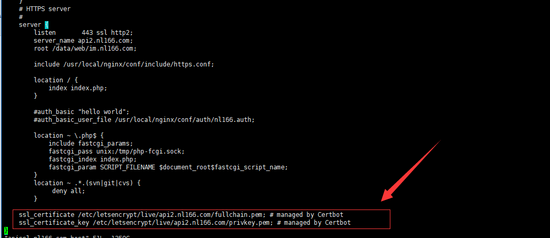
如上图所示,如果你配置了监听443端口的server,他会帮你自动找到对应域名的配置文件,并添加下面两行,还把我格式打乱了,}号与上面{的缩进不对应了,不过不影响功能,这里不知道会不会根据nginx的版本选择是否添加ssl on;
因为我这个nginx版本是不需要这个的,较低版本需要添加ssl on;才能开启https访问。
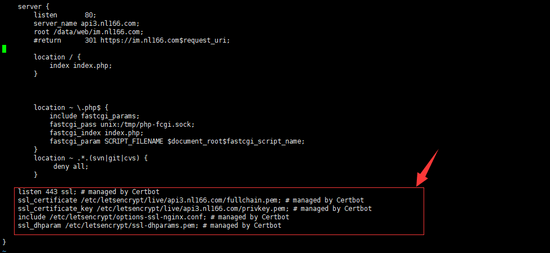
如没有监听该域名的443端口,则会在如下位置添加信息
其他方式请自行摸索
8、配置nginx支持https
# https server
 #
 server {
 listen 443 ssl;
 server_name api2.nl166.com;
 root /data/web/im.nl166.com;

 location / {
 index index.php;
 }

 #auth_basic "hello world";
 #auth_basic_user_file /usr/local/nginx/conf/auth/nl166.auth;

 location ~ \.php$ {
 include fastcgi_params;
 fastcgi_pass unix:/tmp/php-fcgi.sock;
 fastcgi_index index.php;
 fastcgi_param script_filename $document_root$fastcgi_script_name;
 }
 location ~ .*.(svn|git|cvs) {
 deny all;
 }

 ssl_certificate /etc/letsencrypt/live/api2.nl166.com/fullchain.pem; # managed by certbot
 ssl_certificate_key /etc/letsencrypt/live/api2.nl166.com/privkey.pem; # managed by certbot
}较低版本需要增加ssl on;才能开启https访问。
9、使用shell脚本与定时任务定时续期证书
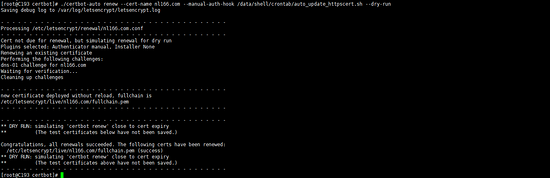
注意:为避免遇到操作次数的限制,加入 --dry-run 参数,可以避免操作限制,等执行无误后,再去掉进行真实的renew 操作。 方式一的续期
其中域名为/etc/letsencrypt/renewal/目录下的****.conf ,****就是你要填写的域名,比如我生成的时候是*.nl166.com,但是在实际生成的时候是没有*号的
/home/certbot-sh/au.sh 替换成你自己更新dns的脚本
如下:
复制代码 代码如下:
./certbot-auto renew --cert-name nl166.com --manual-auth-hook /data/shell/crontab/auto_update_httpscert. sh --dry-run
把更新命令放到一个文件,我这里是放在了/data/shell/crontab/auto_update_httpscert.sh 内容如下 ,原来的auto_update_httpscert.sh 更改到/data/shell/cnl_update_httpscert.sh

增加系统定时任务
crontab -e
#每个星期天凌晨5点执行更新https证书操作
0 5 * * 0 sh /data/shell/crontab/auto_update_httpscert.sh
方式二的续期 如下:
./certbot-auto certonly --renew-by-default --nginx -d api2.nl166.com --dry-run

增加系统定时任务操作参考方式一
The above is the detailed content of How to configure nginx to support https. For more information, please follow other related articles on the PHP Chinese website!

Hot AI Tools

Undresser.AI Undress
AI-powered app for creating realistic nude photos

AI Clothes Remover
Online AI tool for removing clothes from photos.

Undress AI Tool
Undress images for free

Clothoff.io
AI clothes remover

Video Face Swap
Swap faces in any video effortlessly with our completely free AI face swap tool!

Hot Article
Hot Tools

Notepad++7.3.1
Easy-to-use and free code editor

SublimeText3 Chinese version
Chinese version, very easy to use

Zend Studio 13.0.1
Powerful PHP integrated development environment

Dreamweaver CS6
Visual web development tools

SublimeText3 Mac version
God-level code editing software (SublimeText3)
Hot Topics
 1386
1386
 52
52

 How to configure cloud server domain name in nginx
Apr 14, 2025 pm 12:18 PM
How to configure cloud server domain name in nginx
Apr 14, 2025 pm 12:18 PM
How to configure an Nginx domain name on a cloud server: Create an A record pointing to the public IP address of the cloud server. Add virtual host blocks in the Nginx configuration file, specifying the listening port, domain name, and website root directory. Restart Nginx to apply the changes. Access the domain name test configuration. Other notes: Install the SSL certificate to enable HTTPS, ensure that the firewall allows port 80 traffic, and wait for DNS resolution to take effect.
 How to check nginx version
Apr 14, 2025 am 11:57 AM
How to check nginx version
Apr 14, 2025 am 11:57 AM
The methods that can query the Nginx version are: use the nginx -v command; view the version directive in the nginx.conf file; open the Nginx error page and view the page title.
 How to check the name of the docker container
Apr 15, 2025 pm 12:21 PM
How to check the name of the docker container
Apr 15, 2025 pm 12:21 PM
You can query the Docker container name by following the steps: List all containers (docker ps). Filter the container list (using the grep command). Gets the container name (located in the "NAMES" column).
 How to check whether nginx is started
Apr 14, 2025 pm 01:03 PM
How to check whether nginx is started
Apr 14, 2025 pm 01:03 PM
How to confirm whether Nginx is started: 1. Use the command line: systemctl status nginx (Linux/Unix), netstat -ano | findstr 80 (Windows); 2. Check whether port 80 is open; 3. Check the Nginx startup message in the system log; 4. Use third-party tools, such as Nagios, Zabbix, and Icinga.
 How to start nginx server
Apr 14, 2025 pm 12:27 PM
How to start nginx server
Apr 14, 2025 pm 12:27 PM
Starting an Nginx server requires different steps according to different operating systems: Linux/Unix system: Install the Nginx package (for example, using apt-get or yum). Use systemctl to start an Nginx service (for example, sudo systemctl start nginx). Windows system: Download and install Windows binary files. Start Nginx using the nginx.exe executable (for example, nginx.exe -c conf\nginx.conf). No matter which operating system you use, you can access the server IP
 How to run nginx apache
Apr 14, 2025 pm 12:33 PM
How to run nginx apache
Apr 14, 2025 pm 12:33 PM
To get Nginx to run Apache, you need to: 1. Install Nginx and Apache; 2. Configure the Nginx agent; 3. Start Nginx and Apache; 4. Test the configuration to ensure that you can see Apache content after accessing the domain name. In addition, you need to pay attention to other matters such as port number matching, virtual host configuration, and SSL/TLS settings.
 How to create a mirror in docker
Apr 15, 2025 am 11:27 AM
How to create a mirror in docker
Apr 15, 2025 am 11:27 AM
Steps to create a Docker image: Write a Dockerfile that contains the build instructions. Build the image in the terminal, using the docker build command. Tag the image and assign names and tags using the docker tag command.
 How to start containers by docker
Apr 15, 2025 pm 12:27 PM
How to start containers by docker
Apr 15, 2025 pm 12:27 PM
Docker container startup steps: Pull the container image: Run "docker pull [mirror name]". Create a container: Use "docker create [options] [mirror name] [commands and parameters]". Start the container: Execute "docker start [Container name or ID]". Check container status: Verify that the container is running with "docker ps".
