

How to install and configure FastDFS to integrate Nginx-1.13.3

1: Download fastdfs
We need three files in total
1.fastdfs Distributed file storage system
2.libfastcommon fastdfs function Library
3.fastdfs-nginx-module Connect nginx function module
Please note when downloading that the format downloaded here is .zip and not tar.gz. The reason for this is that an error will occur when using the fastdfs-nginx-module module to integrate nginx. The reason is that the fastdfs version must be >= 5.11. Otherwise, an error will be reported when compiling nginx. You can look at the install file of the module for instructions. Since the version released by fastdfs is only up to 5.10, the author has not updated the version to 5.11. However, the code on github has been updated, so you can download it directly. Here is the author's github address
Note: To decompress files in zip format, the system needs to have unzip software installed. If not, you can use the command to install: yum install zip unzip
For the convenience of installation, you can switch to root permissions during the operation
After the download is completed, download the file Upload the folder to the server

Remind me again that all files here are in zip format. Use the command unzip filename to decompress each zip file one by one. For example: unzip fastdfs-master
The following is the situation after decompression. Because I don’t like the suffix with master, I deleted it after decompression. You can use the command operation mv oldfilename newfilename
For example: mv fastdfs-master fastdfs
<img src="/static/imghw/default1.png" data-src="https://img.php.cn/upload/article/000/887/227/168422662134669.png" class="lazy" alt="How to install and configure FastDFS to integrate Nginx-1.13.3">
Two: Install fastdfs
1. Install the fastdfs function library
After decompression, first enter the libfastcommon directory cd libfastcommon
Compile file ./make.sh
Installation: ./make.sh install
After the installation is completed , enter fastdfs cd fastdfs and libfastcommon the same installation method
Compile file ./make.sh
Installation: ./make.sh install
After the installation is completed, you can see two directories, which will be used later

3: Configuration
1. Configuration instructions
Please configure the configuration file differently according to the server. In this article, the tracker server and storage server are both installed on one server.
2. Configuration file directory
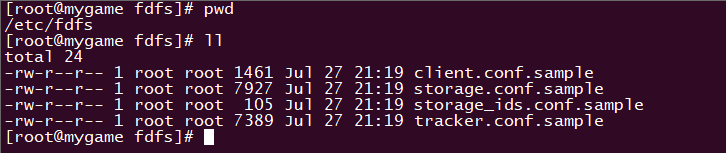
After the installation is completed, an fdfs folder will be generated under /etc and enter the fast configuration file directory cd /etc/fdfs/ . You can see sample files ending with .sample.
For convenience, use the command to delete all the above files rm -f * , and then copy all the files in the /fastdfs/conf directory to /etc/fdfs Under contents.
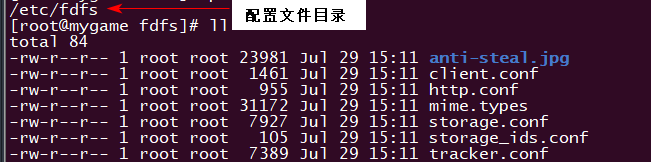
Note: /fastdfs/conf is the decompressed fastdfs directory
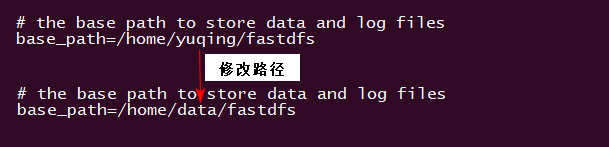
3. Configure and start the tracker server
Open tracker.conf file vim ./tracker.conf , modify the base_path path to your own directory, do not modify it if the port or the like is not occupied
After the modification is completed, try to start tracker /usr/bin/fdfs_trackerd /etc/fdfs/tracker.conf start
Note: The base_path path needs to be created in advance, otherwise Error report: error info: no such file or directory
After executing the command, it is found that there is no response. Then use the command netstat -unltp|grep fdfs to check whether it is started

You can see that the tracker server is already listening on port 22122
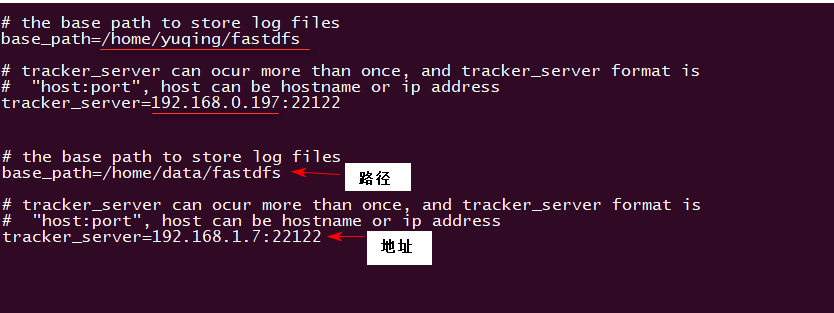
4. Configure and start the storage server
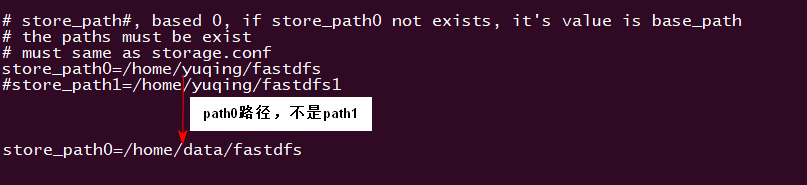
Next modify the storage.conf configuration file vim storage.conf , after opening the file, modify the base_path path in the same way, and modify the tracker server address and store_path at the same time. The port address and group name remain unchanged.
tracker server address:

store_path address:

Note : For the above tracker server address, please set it to the corresponding address of the server. If the port is not modified, keep it as default.
If the store_path path is not modified, the storage server service will not be started. There will be no prompt. You can open the stored.log file in the /fastdfs/logs folder to view the error message.
OK, after the modification is completed, start storage, /usr/bin/fdfs_storaged /etc/fdfs/storage.conf start , but there is also no response. Then use the command netstat -unltp|grep fdfs to see if it is started

If the above picture appears, it means that the tracker server and storage server have been started successfully.
5. Test the upload service
Next open the client.conf configuration file vim client.conf . You only need to modify the base_path and tracker_server.
After the modification is completed, try to upload the file. There happens to be a picture in the directory

Use the command to Image upload
/usr/bin/fdfs_test /etc/fdfs/client.conf upload ./anti-steal.jpg
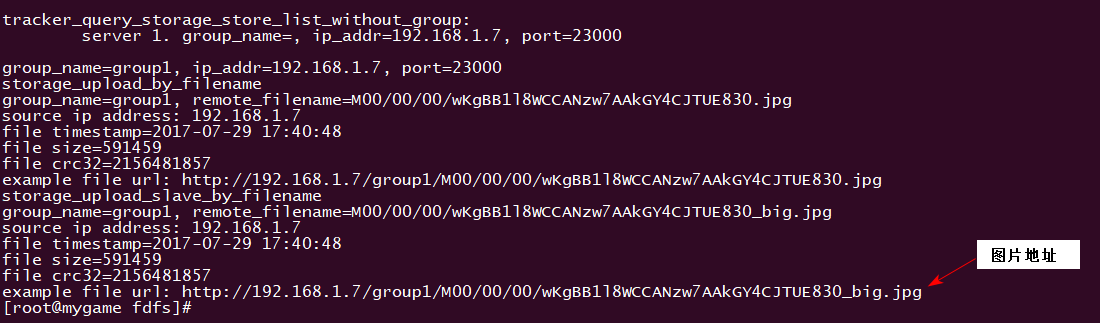
When you see the long string of characters above, ok the upload was successful. And successfully returned the image address. Check the storage directory and find a few more pictures. One of the pictures has the same address suffix as the product picture, then the file has been stored locally.

Although the image address is returned, current fastdfs no longer supports the http protocol. http support has been removed in version 4.0.5, so it cannot be accessed directly through the image address. All we integrate nginx through the fastdfs module to provide http services.
4. Integrate nginx and fastdfs
1. Integrate module
It is assumed here that you have installed nginx and its dependent packages, if not yet To install nginx, you can read my other article: Centos7 Installing nginx
Integrating nginx does not require installing the fastdfs module. Just add the fastdfs-nginx-module module when configuring nginx. Let's start configuring nginx first, enter the configuration file
./configure
--prefix=/opt/nginx
--with-pcre=/home/mgame/soft/pcre-8.41
--with-openssl=/home/mgame/soft/openssl-1.1.0f
--with-zlib=/home/mgame/soft/zlib-1.2.11
--add-module=/home/mgame/soft/fastdfs-nginx-module/src
in the nginx directory Compile make
Install make install
If the following error occurs during the installation process, please check the module install file, the requirements for the fastdfs version (the beginning of this article has stated that the fastdfs version of this article must be >= 5.11).
error: 'fdfshttpparams' has no member named 'support_multi_range'(pcontext->range_count > 1 && !g_http_params.support_multi_range))

After the module is added to nginx and installed, go to the nginx installation directory/opt/nginx/conf and open the nginx.conf configuration file.
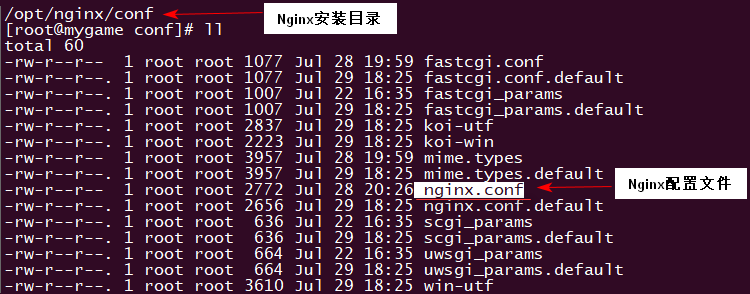
Note: The nginx directory here is set when configuring nginx. Please open the file according to your respective settings.
Add the following configuration to the file, leaving other port settings unchanged.
location /group1/m00 {
  ngx_fastdfs_module;
}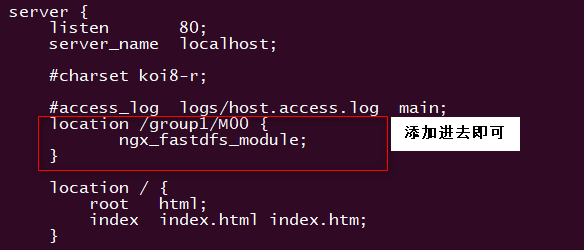
Note: There must be a slash in front of /group, otherwise when accessing, the root path will be the nginx installation directory.
2. Configure module parameters
After the settings are completed, if you start nginx directly now, you will find that you still cannot access the image address that was successfully uploaded before. When I was puzzled, I thought that nginx had a logs folder to record details such as login and error messages.
Then open the error.log file and take a look. ok Found the problem

There are two obvious errors. The first line explains the cause of the error: file /etc/fdfs/mod_fastdfs.conf not exist The mod_fastdfs.conf file does not exist in the /etc/fdfs/ directory. The file is in the src directory of the module fastdfs-nginx-module
Now that the file location is found, go to the /fastdfs-nginx-module/src directory and copy the file mod_fastdfs.conf Copy to the /etc/fdfs/ directory Command: cp mod_fastdfs.conf /etc/fdfs/
After the operation is completed, open the mod_fastdfs.conf configuration you just copied File vim mod_fastdfs.conf, parameters for the three attributes tracker_server, url_have_group_name, and store_path0 respectively
Tracker_server:


/opt/nginx/sbin directory and restart nginx. /nginx -s reload , and then visit the image address returned after the previous upload was successful.
The above is the detailed content of How to install and configure FastDFS to integrate Nginx-1.13.3. For more information, please follow other related articles on the PHP Chinese website!

Hot AI Tools

Undresser.AI Undress
AI-powered app for creating realistic nude photos

AI Clothes Remover
Online AI tool for removing clothes from photos.

Undress AI Tool
Undress images for free

Clothoff.io
AI clothes remover

AI Hentai Generator
Generate AI Hentai for free.

Hot Article
Hot Tools

Notepad++7.3.1
Easy-to-use and free code editor

SublimeText3 Chinese version
Chinese version, very easy to use

Zend Studio 13.0.1
Powerful PHP integrated development environment

Dreamweaver CS6
Visual web development tools

SublimeText3 Mac version
God-level code editing software (SublimeText3)
Hot Topics
 1378
1378
 52
52

 How to solve nginx403
Apr 14, 2025 am 10:33 AM
How to solve nginx403
Apr 14, 2025 am 10:33 AM
How to fix Nginx 403 Forbidden error? Check file or directory permissions; 2. Check .htaccess file; 3. Check Nginx configuration file; 4. Restart Nginx. Other possible causes include firewall rules, SELinux settings, or application issues.
 How to solve nginx403 error
Apr 14, 2025 pm 12:54 PM
How to solve nginx403 error
Apr 14, 2025 pm 12:54 PM
The server does not have permission to access the requested resource, resulting in a nginx 403 error. Solutions include: Check file permissions. Check the .htaccess configuration. Check nginx configuration. Configure SELinux permissions. Check the firewall rules. Troubleshoot other causes such as browser problems, server failures, or other possible errors.
 How to check whether nginx is started
Apr 14, 2025 pm 01:03 PM
How to check whether nginx is started
Apr 14, 2025 pm 01:03 PM
How to confirm whether Nginx is started: 1. Use the command line: systemctl status nginx (Linux/Unix), netstat -ano | findstr 80 (Windows); 2. Check whether port 80 is open; 3. Check the Nginx startup message in the system log; 4. Use third-party tools, such as Nagios, Zabbix, and Icinga.
 How to start nginx in Linux
Apr 14, 2025 pm 12:51 PM
How to start nginx in Linux
Apr 14, 2025 pm 12:51 PM
Steps to start Nginx in Linux: Check whether Nginx is installed. Use systemctl start nginx to start the Nginx service. Use systemctl enable nginx to enable automatic startup of Nginx at system startup. Use systemctl status nginx to verify that the startup is successful. Visit http://localhost in a web browser to view the default welcome page.
 How to solve nginx304 error
Apr 14, 2025 pm 12:45 PM
How to solve nginx304 error
Apr 14, 2025 pm 12:45 PM
Answer to the question: 304 Not Modified error indicates that the browser has cached the latest resource version of the client request. Solution: 1. Clear the browser cache; 2. Disable the browser cache; 3. Configure Nginx to allow client cache; 4. Check file permissions; 5. Check file hash; 6. Disable CDN or reverse proxy cache; 7. Restart Nginx.
 How to configure nginx in Windows
Apr 14, 2025 pm 12:57 PM
How to configure nginx in Windows
Apr 14, 2025 pm 12:57 PM
How to configure Nginx in Windows? Install Nginx and create a virtual host configuration. Modify the main configuration file and include the virtual host configuration. Start or reload Nginx. Test the configuration and view the website. Selectively enable SSL and configure SSL certificates. Selectively set the firewall to allow port 80 and 443 traffic.
 How to solve the problem of nginx cross-domain
Apr 14, 2025 am 10:15 AM
How to solve the problem of nginx cross-domain
Apr 14, 2025 am 10:15 AM
There are two ways to solve the Nginx cross-domain problem: modify the cross-domain response header: add directives to allow cross-domain requests, specify allowed methods and headers, and set cache time. Use CORS modules: Enable modules and configure CORS rules that allow cross-domain requests, methods, headers, and cache times.
 How to check whether nginx is started?
Apr 14, 2025 pm 12:48 PM
How to check whether nginx is started?
Apr 14, 2025 pm 12:48 PM
In Linux, use the following command to check whether Nginx is started: systemctl status nginx judges based on the command output: If "Active: active (running)" is displayed, Nginx is started. If "Active: inactive (dead)" is displayed, Nginx is stopped.
