Before we officially start, let me first show you the effect we are going to complete today.
For the sake of simplicity, I did not introduce concepts such as users and roles here. All the places involving users are entered manually. In subsequent articles, I will continue to combine Spring Security to show you the situation after introducing users. .
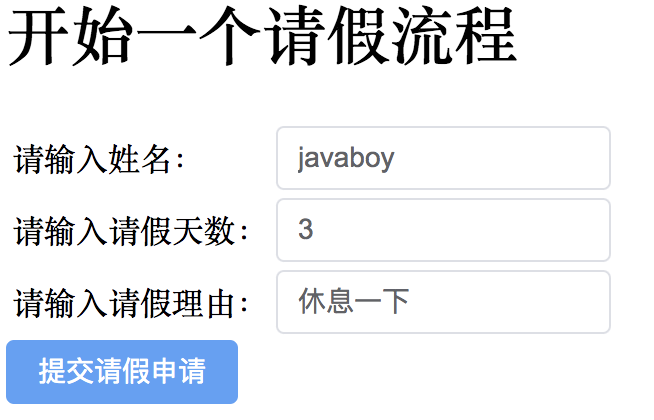
Let’s take a look at the leave page first:

#Employees can enter their name, number of days of leave, reason for leave, etc. on this page, and then click the button to submit a leave request Apply.
When an employee submits a leave application, the leave application will be processed by the manager by default. After the manager logs in, he can see the request submitted by the employee:

The manager can choose to approve or reject at this time. Whether it is approval or rejection, employees can be informed via text message or email.
For employees, they can also check the final status of their leave process on one page:

Me Let’s just show my friends how to use flowable in Spring Boot.
First we create a Spring Boot project. When creating, just introduce the Web and MySQL driver dependencies. After the project is successfully created, introduce the flowable dependencies. The final dependency files are as follows:
<dependency>
    <groupId>org.springframework.boot</groupId>
    <artifactId>spring-boot-starter-web</artifactId>
</dependency>
<dependency>
    <groupId>org.flowable</groupId>
    <artifactId>flowable-spring-boot-starter</artifactId>
    <version>6.7.2</version>
</dependency>
<dependency>
    <groupId>mysql</groupId>
    <artifactId>mysql-connector-java</artifactId>
    <scope>runtime</scope>
</dependency>Project After the creation is successful, we first need to configure the database connection information in application.properties, as follows:
spring.datasource.username=root
spring.datasource.password=123
spring.datasource.url=jdbc:mysql:///flowable02?serverTimezone=Asia/Shanghai&useSSL=false&nullCatalogMeansCurrent=true
Once the configuration is completed, the relevant tables and required data will be automatically created when the Spring Boot project is run for the first time.
At the same time, the Spring Boot project will also automatically create and expose beans such as ProcessEngine, CmmnEngine, DmnEngine, FormEngine, ContentEngine and IdmEngine in Flowable.
All Flowable services can be called as Spring Beans. For example, RuntimeService, TaskService, HistoryService and other services can be directly injected and used when we need to use them.
At the same time:
Any BPMN 2.0 process definition in the resources/processes directory will be automatically deployed, so in the Spring Boot project, we only need to add our own process Just put the file in the right place and the rest will be done automatically. Any CMMN 1.1 cases in the
cases directory will be automatically deployed.
Any Form definitions in the forms directory will be automatically deployed.
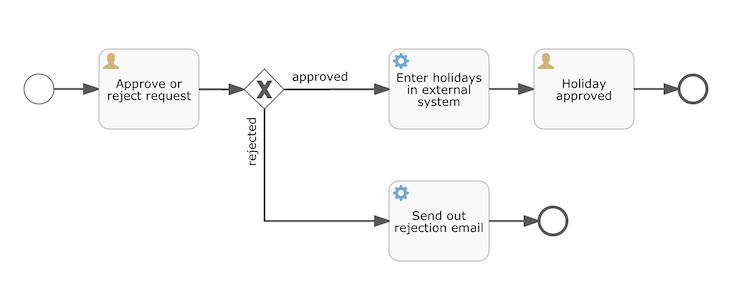
Today’s example is relatively simple, it is a leave application process. I will not talk about drawing a flow chart with my friends for the time being. Let’s directly use a ready-made leave request flow chart from the official website:

Let’s briefly analyze this picture:
The far left The circle on the side is called the start event, which represents the starting point of a process instance.
After a process is started, it first reaches the first rectangle with a user icon. This rectangle is called a User Task. In this User Task, the manager can choose to approve or reject. .
The next step of the UserTask is a diamond, called the Exclusive Gateway, which will route the request to different places.
Let’s talk about approval first. If the manager chooses to approve in the first rectangle, then he will enter a rectangle with a gear icon. In this rectangle we can Do some additional things, and then call a UserTask to finally complete the entire process.
If the manager chooses to refuse, he will enter the email rectangle below, where we can send a notification to the employee to inform him that the leave request has not been approved.
When the system reaches the rightmost circle, it means that the execution of this process is over.
The XML file corresponding to this flow chart is located at src/main/resources/processes/holiday-request.bpmn20.xml. Its content is as follows:
<?xml version="1.0" encoding="UTF-8"?>
<definitions xmlns="http://www.omg.org/spec/BPMN/20100524/MODEL" xmlns:xsi="http://www.w3.org/2001/XMLSchema-instance"
             xmlns:flowable="http://flowable.org/bpmn"
             typeLanguage="http://www.w3.org/2001/XMLSchema" expressionLanguage="http://www.w3.org/1999/XPath"
             targetNamespace="http://www.flowable.org/processdef">
    <process id="holidayRequest" name="Holiday Request" isExecutable="true">

        <startEvent id="startEvent"/>
        <sequenceFlow sourceRef="startEvent" targetRef="approveTask"/>

        <userTask id="approveTask" name="Approve or reject request" flowable:candidateGroups="managers"/>
        <sequenceFlow sourceRef="approveTask" targetRef="decision"/>

        <exclusiveGateway id="decision"/>
        <sequenceFlow sourceRef="decision" targetRef="externalSystemCall">
            <conditionExpression xsi:type="tFormalExpression">
                <![CDATA[
          ${approved}
        ]]>
            </conditionExpression>
        </sequenceFlow>
        <sequenceFlow  sourceRef="decision" targetRef="rejectLeave">
            <conditionExpression xsi:type="tFormalExpression">
                <![CDATA[
          ${!approved}
        ]]>
            </conditionExpression>
        </sequenceFlow>

        <serviceTask id="externalSystemCall" name="Enter holidays in external system"
                     flowable:class="org.javaboy.flowable02.flowable.Approve"/>
        <sequenceFlow sourceRef="externalSystemCall" targetRef="holidayApprovedTask"/>

        <userTask id="holidayApprovedTask" flowable:assignee="${employee}" name="Holiday approved"/>
        <sequenceFlow sourceRef="holidayApprovedTask" targetRef="approveEnd"/>

        <serviceTask id="rejectLeave" name="Send out rejection email"
                     flowable:class="org.javaboy.flowable02.flowable.Reject"/>
        <sequenceFlow sourceRef="rejectLeave" targetRef="rejectEnd"/>

        <endEvent id="approveEnd"/>

        <endEvent id="rejectEnd"/>

    </process>
</definitions>Many thoughts Friends who are learning process engines will be discouraged by this XML file, but! ! !
If you are willing to calm down and read this XML file carefully, you will find that the process engine is so simple!
Let’s look at each node here one by one:
process: This represents a process. For example, the request for leave shared with you in this article is a process.
startEvent: This indicates the beginning of the process. This is a start event.
userTask: This is a specific process node. The flowable:candidateGroups attribute indicates which user group should handle this node.
sequenceFlow:这就是连接各个流程节点之间的线条,这个里边一般有两个属性,sourceRef 和 targetRef,前者表示线条的起点,后者表示线条的终点。
exclusiveGateway:表示一个排他性网关,也就是那个菱形选择框。
从排他性网关出来的线条有两个,大家注意看上面的代码,这两个线条中都涉及到一个变量 approved,如果这个变量为 true,则 targeRef 就是 externalSystemCall;如果这个变量为 false,则 targetRef 就是 rejectLeave。
serviceTask:这就是我们定义的一个具体的外部服务,如果在整个流程执行的过程中,你有一些需要自己完成的事情,那么可以通过 serviceTask 来实现,这个节点会有一个 flowable:class 属性,这个属性的值就是一个自定义类。
另外,上文中部分节点中还涉及到变量 ${},这个变量是在流程执行的过程中传入进来的。
总而言之,只要小伙伴们静下心来认真阅读一下上面的 XML,你会发现 So Easy!
好了,接下来我们就来看一个具体的请假申请。由于请假流程只要放对位置,就会自动加载,所以我们并不需要手动加载请假流程,直接开始一个请假申请流程即可。
首先我们需要一个实体类来接受前端传来的请假参数:用户名、请假天数以及请假理由:
public class AskForLeaveVO {
    private String name;
    private Integer days;
    private String reason;
    // 省略 getter/setter
}再拿出祖传的 RespBean,以便响应数据方便一些:
public class RespBean {
    private Integer status;
    private String msg;
    private Object data;

    public static RespBean ok(String msg, Object data) {
        return new RespBean(200, msg, data);
    }


    public static RespBean ok(String msg) {
        return new RespBean(200, msg, null);
    }


    public static RespBean error(String msg, Object data) {
        return new RespBean(500, msg, data);
    }


    public static RespBean error(String msg) {
        return new RespBean(500, msg, null);
    }

    private RespBean() {
    }

    private RespBean(Integer status, String msg, Object data) {
        this.status = status;
        this.msg = msg;
        this.data = data;
    }
    // 省略 getter/setter
}接下来我们提供一个处理请假申请的接口:
@RestController
public class AskForLeaveController {

    @Autowired
    AskForLeaveService askForLeaveService;

    @PostMapping("/ask_for_leave")
    public RespBean askForLeave(@RequestBody AskForLeaveVO askForLeaveVO) {
        return askForLeaveService.askForLeave(askForLeaveVO);
    }
}核心逻辑在 AskForLeaveService 中,来继续看:
@Service
public class AskForLeaveService {

    @Autowired
    RuntimeService runtimeService;

    @Transactional
    public RespBean askForLeave(AskForLeaveVO askForLeaveVO) {
        Map<String, Object> variables = new HashMap<>();
        variables.put("name", askForLeaveVO.getName());
        variables.put("days", askForLeaveVO.getDays());
        variables.put("reason", askForLeaveVO.getReason());
        try {
            runtimeService.startProcessInstanceByKey("holidayRequest", askForLeaveVO.getName(), variables);
            return RespBean.ok("已提交请假申请");
        } catch (Exception e) {
            e.printStackTrace();
        }
        return RespBean.error("提交申请失败");
    }
}小伙伴们看一下,在提交请假申请的时候,分别传入了 name、days 以及 reason 三个参数,我们将这三个参数放入到一个 Map 中,然后通过 RuntimeService#startProcessInstanceByKey 方法来开启一个流程,开启流程的时候一共传入了三个参数:
第一个参数表示流程引擎的名字,这就是我们刚才在流程的 XML 文件中定义的名字。
第二个参数表示当前这个流程的 key,我用了申请人的名字,将来我们可以通过申请人的名字查询这个人曾经提交的所有申请流程。
第三个参数就是我们的变量了。
好了,这服务端就写好了。
接下来我们来开发前端页面。
前端我使用 Vue+ElementUI+Axios,咱们这个案例比较简单,就没有必要搭建单页面了,直接用普通的 HTML 就行了。另外,Vue 我是用了 Vue3:
<!DOCTYPE html>
<html lang="en">
<head>
<meta charset="UTF-8">
<title>Title</title>
<script src="https://unpkg.com/axios/dist/axios.min.js"></script>
<!-- Import style -->
<link rel="stylesheet" href="//unpkg.com/element-plus/dist/index.css" rel="external nofollow" rel="external nofollow" rel="external nofollow" />
<script src="https://unpkg.com/vue@3"></script>
<!-- Import component library -->
<script src="//unpkg.com/element-plus"></script>
</head>
<body>
<div id="app">
<h2>开始一个请假流程</h2>
<table>
<tr>
<td>请输入姓名:</td>
<td>
<el-input type="text" v-model="afl.name"/>
</td>
</tr>
<tr>
<td>请输入请假天数:</td>
<td>
<el-input type="text" v-model="afl.days"/>
</td>
</tr>
<tr>
<td>请输入请假理由:</td>
<td>
<el-input type="text" v-model="afl.reason"/>
</td>
</tr>
</table>
<el-button type="primary" @click="submit">提交请假申请</el-button>
</div>
<script>
Vue.createApp(
{
data() {
return {
afl: {
name: 'javaboy',
days: 3,
reason: '休息一下'
}
}
},
methods: {
submit() {
let _this = this;
axios.post('/ask_for_leave', this.afl)
.then(function (response) {
if (response.data.status == 200) {
//提交成功
_this.$message.success(response.data.msg);
} else {
//提交失败
_this.$message.error(response.data.msg);
}
})
.catch(function (error) {
console.log(error);
});
}
}
}
).use(ElementPlus).mount('#app')
</script>
</body>
</html>这个页面有几个需要注意的点:
通过 Vue.createApp 来创建一个 Vue 实例,这跟以前 Vue2 中直接 new 一个 Vue 实例不一样。
使用 use 方法来配置 ElementPlus 插件,这一点与 Vue2 不同。在 Vue2 中,使用 ElementUI 只需要在HTML页面中进行简单的引用即可,不需要额外的步骤。
剩下的东西就比较简单了,上面先引入 Vue3、Axios 以及 ElementPlus,然后三个输入框,点击按钮提交请求,参数就是三个输入框中的数据,提交成功或者失败,分别弹个框出来提示一下就行了。
好啦,这就写好了。
然而,提交完成后,没有一个直观的展示,虽然前端提示说提交成功了,但是究竟成功没,还得眼见为实。
好了,接下来我们要做的事情就是把用户提交的流程展示出来。
按理说,比如经理登录成功之后,系统页面就自动展示出来经理需要审批的流程,但是我们当前这个例子为了简单,就没有登录这个操作了,需要需要用户将来在网页上选一下自己的身份,接下来就会展示出这个身份所对应的需要操作的流程。
我们来看任务接口:
@GetMapping("/list")
public RespBean leaveList(String identity) {
    return askForLeaveService.leaveList(identity);
}这个请求参数 identity 就表示当前用户的身份(本来应该是登录后自动获取,但是因为我们目前没有登录,所以这个参数是由前端传递过来)。来继续看 askForLeaveService 中的方法:
@Service
public class AskForLeaveService {

    @Autowired
    TaskService taskService;

    public RespBean leaveList(String identity) {
        List<Task> tasks = taskService.createTaskQuery().taskCandidateGroup(identity).list();
        List<Map<String, Object>> list = new ArrayList<>();
        for (int i = 0; i < tasks.size(); i++) {
            Task task = tasks.get(i);
            Map<String, Object> variables = taskService.getVariables(task.getId());
            variables.put("id", task.getId());
            list.add(variables);
        }
        return RespBean.ok("加载成功", list);
    }
}Task 就是流程中要做的每一件事情,我们首先通过 TaskService,查询出来这个用户需要处理的任务,例如前端前传来的是 managers,那么这里就是查询所有需要由 managers 用户组处理的任务。
这段代码要结合流程图一起来理解,小伙伴们回顾下我们流程图中有如下一句:
<userTask id="approveTask" name="Approve or reject request" flowable:candidateGroups="managers"/>
这意思就是说这个 userTask 是由 managers 这个组中的用户来处理,所以上面 Java 代码中的查询就是查询 managers 这个组中的用户需要审批的任务。
我们将所有需要审批的任务查询出来后,通过 taskId 可以进一步查询到这个任务中当时传入的各种变量,我们将这些数据封装成一个对象,并最终返回到前端。
最后,我们再来看下前端页面:
<!DOCTYPE html>
<html lang="en">
<head>
<meta charset="UTF-8">
<title>Title</title>
<script src="https://unpkg.com/axios/dist/axios.min.js"></script>
<!-- Import style -->
<link rel="stylesheet" href="//unpkg.com/element-plus/dist/index.css" rel="external nofollow" rel="external nofollow" rel="external nofollow" />
<script src="https://unpkg.com/vue@3"></script>
<!-- Import component library -->
<script src="//unpkg.com/element-plus"></script>
</head>
<body>
<div id="app">
<div>
<div>请选择你的身份:</div>
<div>
<el-select name="" id="" v-model="identity" @change="initTasks">
<el-option :value="iden" v-for="(iden,index) in identities" :key="index" :label="iden"></el-option>
</el-select>
<el-button type="primary" @click="initTasks">刷新一下</el-button>
</div>
</div>
<el-table border strip :data="tasks">
<el-table-column prop="name" label="姓名"></el-table-column>
<el-table-column prop="days" label="请假天数"></el-table-column>
<el-table-column prop="reason" label="请假原因"></el-table-column>
<el-table-column lable="操作">
<template #default="scope">
<el-button type="primary" @click="approveOrReject(scope.row.id,true,scope.row.name)">批准</el-button>
<el-button type="danger" @click="approveOrReject(scope.row.id,false,scope.row.name)">拒绝</el-button>
</template>
</el-table-column>
</el-table>
</div>
<script>
Vue.createApp(
{
data() {
return {
tasks: [],
identities: [
'managers'
],
identity: ''
}
},
methods: {
initTasks() {
let _this = this;
axios.get('/list?identity=' + this.identity)
.then(function (response) {
_this.tasks = response.data.data;
})
.catch(function (error) {
console.log(error);
});
}
}
}
).use(ElementPlus).mount('#app')
</script>
</body>
</html>我们先选择一个用户身份,具体说就是在下拉菜单中选择。在完成选择后,调用 initTasks 方法,发起网络请求并渲染其结果。
最终效果如下:

当然用户也可以点击刷新按钮,刷新列表。
这样,当第五小节中,员工提交了一个请假审批之后,我们在这个列表中就可以查看到员工提交的请假审批了(在流程图中,我们直接设置了用户的请假审批固定提交给 managers,在后续的文章中,松哥会教大家如何把这个提交的目标用户变成一个动态的)。
接下来经理就可以选择批准或者是拒绝这请假了。
首先我们封装一个实体类用来接受前端传来的请求:
public class ApproveRejectVO {
    private String taskId;
    private Boolean approve;
    private String name;
    // 省略 getter/setter
}参数都好理解,approve 为 true 表示申请通过,false 表示申请被拒绝。
接下来我们来看接口:
@PostMapping("/handler")
public RespBean askForLeaveHandler(@RequestBody ApproveRejectVO approveRejectVO) {
    return askForLeaveService.askForLeaveHandler(approveRejectVO);
}看具体的 askForLeaveHandler 方法:
@Service
public class AskForLeaveService {

    @Autowired
    TaskService taskService;

    public RespBean askForLeaveHandler(ApproveRejectVO approveRejectVO) {
        try {
            boolean approved = approveRejectVO.getApprove();
            Map<String, Object> variables = new HashMap<String, Object>();
            variables.put("approved", approved);
            variables.put("employee", approveRejectVO.getName());
            Task task = taskService.createTaskQuery().taskId(approveRejectVO.getTaskId()).singleResult();
            taskService.complete(task.getId(), variables);
            if (approved) {
                //如果是同意,还需要继续走一步
                Task t = taskService.createTaskQuery().processInstanceId(task.getProcessInstanceId()).singleResult();
                taskService.complete(t.getId());
            }
            return RespBean.ok("操作成功");
        } catch (Exception e) {
            e.printStackTrace();
        }
        return RespBean.error("操作失败");
    }
}大家注意这个审批流程:
审批时需要两个参数,approved 和 employee,approved 为 true,就会自动进入到审批通过的流程中,approved 为 false 则会自动进入到拒绝流程中。
通过 taskService,结合 taskId,从流程中查询出对应的 task,然后调用 taskService.complete 方法传入 taskId 和 变量,以使流程向下走。
小伙伴们再回顾一下我们前面的流程图,如果请求被批准备了,那么在执行完自定义的 Approve 逻辑后,就会进入到 Holiday approved 这个 userTask 中,注意此时并不会继续向下走了(还差一步到结束事件);如果是请求拒绝,则在执行完自定义的 Reject 逻辑后,就进入到结束事件了,这个流程就结束了。
针对第三条,所以代码中我们还需要额外再加一步,如果是 approved 为 true,那么就再从当前流程中查询出来需要执行的 task,再调用 complete 继续走一步,此时就到了结束事件了,这个流程就结束了。注意这次的查询是根据当前流程的 ID 查询的,一个流程就是一条线,这条线上有很多 Task,我们可以从 Task 中获取到流程的 ID。
好啦,接口就写好了。
当然,这里还涉及到两个自定义的逻辑,就是批准或者拒绝之后的自定义逻辑,这个其实很好写,如下:
public class Approve implements JavaDelegate {
    @Override
    public void execute(DelegateExecution execution) {
        System.out.println("申请通过:"+execution.getVariables());
    }
}我们自定义类实现 JavaDelegate 接口即可,然后我们在 execute 方法中做自己想要做的事情即可,execution 中有这个流程中的所有变量。我们可以在这里发邮件、发短信等等。Reject 的定义方式也是类似的。一旦完成这些自定义类的编写,它们就可以被配置到流程图中(请参考上文提供的流程图)。
最后再来看看前端提交方法就简单了(页面源码上文已经列出):
approveOrReject(taskId, approve,name) {
    let _this = this;
    axios.post('/handler', {taskId: taskId, approve: approve,name:name})
        .then(function (response) {
            _this.initTasks();
        })
        .catch(function (error) {
            console.log(error);
        });
}这就一个普通的 Ajax 请求,批准的话第二个参数就为 true,拒绝的话第二个参数就为 false。
最后,每个用户都可以查看自己曾经的申请记录。本来这个登录之后就可以展示了,但是因为我们没有登录,所以这里也是需要手动输入查询的用户,然后根据用户名查询这个用户的历史记录,我们先来看查询接口:
@GetMapping("/search")
public RespBean searchResult(String name) {
    return askForLeaveService.searchResult(name);
}参数就是要查询的用户名。具体的查询流程如下:
public RespBean searchResult(String name) {
    List<HistoryInfo> historyInfos = new ArrayList<>();
    List<HistoricProcessInstance> historicProcessInstances = historyService.createHistoricProcessInstanceQuery().processInstanceBusinessKey(name).finished().orderByProcessInstanceEndTime().desc().list();
    for (HistoricProcessInstance historicProcessInstance : historicProcessInstances) {
        HistoryInfo historyInfo = new HistoryInfo();
        Date startTime = historicProcessInstance.getStartTime();
        Date endTime = historicProcessInstance.getEndTime();
        List<HistoricVariableInstance> historicVariableInstances = historyService.createHistoricVariableInstanceQuery()
                .processInstanceId(historicProcessInstance.getId())
                .list();
        for (HistoricVariableInstance historicVariableInstance : historicVariableInstances) {
            String variableName = historicVariableInstance.getVariableName();
            Object value = historicVariableInstance.getValue();
            if ("reason".equals(variableName)) {
                historyInfo.setReason((String) value);
            } else if ("days".equals(variableName)) {
                historyInfo.setDays(Integer.parseInt(value.toString()));
            } else if ("approved".equals(variableName)) {
                historyInfo.setStatus((Boolean) value);
            } else if ("name".equals(variableName)) {
                historyInfo.setName((String) value);
            }
        }
        historyInfo.setStartTime(startTime);
        historyInfo.setEndTime(endTime);
        historyInfos.add(historyInfo);
    }
    return RespBean.ok("ok", historyInfos);
}我们当时在开启流程的时候,传入了一个参数 key,这里就是再次通过这个 key,也就是用户名去查询历史流程,查询的时候还加上了 finished 方法,这个表示要查询的流程必须是执行完毕的流程,对于没有执行完毕的流程,这里不查询,查完之后,按照流程最后的处理时间进行排序。
遍历第一步的查询结果,从 HistoricProcessInstance 中提取出每一个流程的详细信息,并存入到集合中,并最终返回。
这里涉及到两个历史数据查询,createHistoricProcessInstanceQuery 用来查询历史流程,而 createHistoricVariableInstanceQuery 则主要是用来查询流程变量的。
最后,前端通过表格展示这个数据即可:
<!DOCTYPE html>
<html lang="en">
<head>
<meta charset="UTF-8">
<title>Title</title>
<script src="https://unpkg.com/axios/dist/axios.min.js"></script>
<!-- Import style -->
<link rel="stylesheet" href="//unpkg.com/element-plus/dist/index.css" rel="external nofollow" rel="external nofollow" rel="external nofollow" />
<script src="https://unpkg.com/vue@3"></script>
<!-- Import component library -->
<script src="//unpkg.com/element-plus"></script>
</head>
<body>
<div id="app">
<div >
<el-input v-model="name" placeholder="请输入用户名"></el-input>
<el-button type="primary" @click="search">查询</el-button>
</div>
<div>
<el-table border strip :data="historyInfos">
<el-table-column prop="name" label="姓名"></el-table-column>
<el-table-column prop="startTime" label="提交时间"></el-table-column>
<el-table-column prop="endTime" label="审批时间"></el-table-column>
<el-table-column prop="reason" label="事由"></el-table-column>
<el-table-column prop="days" label="天数"></el-table-column>
<el-table-column label="状态">
<template #default="scope">
<el-tag type="success" v-if="scope.row.status">已通过</el-tag>
<el-tag type="danger" v-else>已拒绝</el-tag>
</template>
</el-table-column>
</el-table>
</div>
</div>
<script>
Vue.createApp(
{
data() {
return {
historyInfos: [],
name: 'zhangsan'
}
},
methods: {
search() {
let _this = this;
axios.get('/search?name=' + this.name)
.then(function (response) {
if (response.data.status == 200) {
_this.historyInfos=response.data.data;
} else {
_this.$message.error(response.data.msg);
}
})
.catch(function (error) {
console.log(error);
});
}
}
).use(ElementPlus).mount('#app')
</script>
</body>
</html>这个都是一些常规操作,我就不多说了,最终展示效果如下:

The above is the detailed content of How to use SpringBoot+Vue+Flowable to simulate the leave approval process. For more information, please follow other related articles on the PHP Chinese website!


