

How to Fix Windows Stuck in Dark Mode [Solved]

Most Windows users find it comfortable to use dark mode themes while operating Windows systems. It's a coincidence that they might want to switch the system to light mode while they're using it during the day.
Recently, it has been noticed that many users are unable to change dark mode on their systems, Windows is very stuck in dark mode and cannot change to light or other themes.
This problem is frustrating for users. Reasons for this may include automatic dark mode settings, Windows Explorer hangs, registry file modifications, etc.
We researched the potential causes of this issue and came up with a set of fixes that are sure to fix it. Please continue reading this article to learn more.
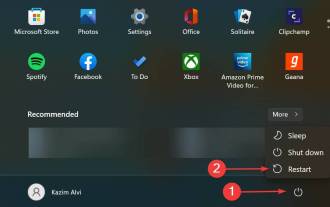
Fix 1 – Restart Windows Explorer
Due to possible system lags in Windows Explorer, sometimes the theme cannot be applied. Restarting Windows Explorer may resolve this issue.
Step 1: Fully press the Ctrl Shift Esc keys on your keyboard to open the Task Manager application.
Step 2: Once it appears, go to the "Processes" tab.
Step 3: Then under Windows Processes you will find the Windows Explorer application.
Step 4: Just right-click on WindowsExplorer and select the Restart option from its context menu as shown in the screen below As shown in the screenshot.
![如何修复 Windows 卡在暗模式 [已解决]](https://img.php.cn/upload/article/000/887/227/168423945540374.png)
#Step 5: Don’t worry if the screen flickers for a moment, it will come back.
Step 6: Once completed, close the Task Manager window.
Fix 2 – Disable Third-Party Applications
Usually, many users download various applications to change the appearance of the desktop or system settings. Among the many applications, there are some designed to change or set the theme of your system.
These third-party apps for changing themes also include different features. One of these features is called Auto Dark Mode, and when enabled, it always ensures that the system's theme is always set to dark, and users won't be able to change it through the system's Settings app.
So we need users to open these apps and then disable a feature called Auto Dark Mode. If the problem persists, we recommend that you uninstall that particular application and try changing the theme after restarting your system.
Fix 3 – Check your local Group Policy settings
Often organizations change Group Policy settings on corporate laptops. Please follow the steps explained below to make changes, assuming you have enabled the setting called "Prevent theme changes."
Step 1: Open the Run Console on your system by pressing the Windows R keys simultaneously.
Step 2: Then enter gpedit.msc in the text box and press Enter.
![如何修复 Windows 卡在暗模式 [已解决]](https://img.php.cn/upload/article/000/887/227/168423945592316.png)
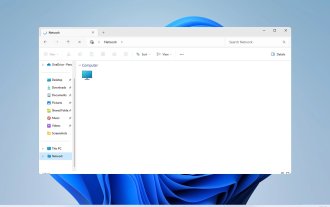
Step 3: This will open the Local Group Policy Editor on the system.
Step 4: Navigate to the Personalization folder using the path given below.
用户配置 > 管理模板 > 控制面板 > 个性化
Step 5: Now after selecting the Personalization folder on the left side of the Group Policy Editor, double click on Prevent changing theme settings on the right side to open its configuration window.
![如何修复 Windows 卡在暗模式 [已解决]](https://img.php.cn/upload/article/000/887/227/168423945549921.png)
Not Configured option and click Apply and OK .
![如何修复 Windows 卡在暗模式 [已解决]](https://img.php.cn/upload/article/000/887/227/168423945559325.png)
- Prevent changes to color schemes
- Prevent changes to colors and appearance
- Localize specific themes
- Force a specific visual style file or force Windows Classic
Windows U keys simultaneously to open the Accessibility page on the system.
Step 2: On the Accessibility page, click on theContrast theme option at the bottom as shown below.
![如何修复 Windows 卡在暗模式 [已解决]](https://img.php.cn/upload/article/000/887/227/168423945579565.png)
第 3 步:现在单击对比度主题的下拉选项。
第 4 步:从下拉菜单中选择无选项,如下面的屏幕截图所示。
第 5 步:完成后,单击应用并关闭对比度主题页面。
![如何修复 Windows 卡在暗模式 [已解决]](https://img.php.cn/upload/article/000/887/227/168423945637471.png)
第 6 步:现在重新启动系统一次,看看是否有帮助。
修复 5 – 使用注册表编辑器编辑注册表文件
在我们继续之前,我们要求我们的用户将注册表文件导出到他们的系统上,以便将来在编辑注册表文件时出现问题时将其恢复。这份文件非常重要,并且对系统的正常运行至关重要,任何错误都必须避免。
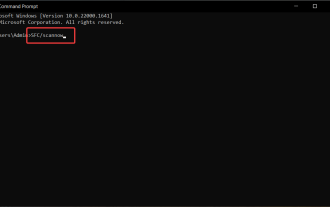
步骤 1:同时按Windows + R键打开运行控制台。
步骤 2:在运行中键入regedit ,然后按Enter。
![如何修复 Windows 卡在暗模式 [已解决]](https://img.php.cn/upload/article/000/887/227/168423945675297.png)
第 3 步:通过单击是接受 UAC 提示以继续。
第 4 步:现在清除地址栏并在其中键入以下路径,然后按Enter键。
HKEY_CURRENT_USER\Software\Microsoft\Windows\CurrentVersion\Themes\Personalize
第 5 步:到达注册表项Personalize 后,在右侧您会发现许多 DWORD 值。
第 6步:双击AppsUseLightTheme DWORD 值以打开其编辑窗口。
![如何修复 Windows 卡在暗模式 [已解决]](https://img.php.cn/upload/article/000/887/227/168423945697407.png)
第 7 步:在数值数据文本框中输入0 ,然后单击确定。
![如何修复 Windows 卡在暗模式 [已解决]](https://img.php.cn/upload/article/000/887/227/168423945688176.png)
第 8 步:现在对ColorPrevalence、EnableTransparency和SystemUsesLightTheme DWORD 值执行相同操作,将其值更改为 0。
第 9 步:完成后,关闭编辑器并重新启动系统。
The above is the detailed content of How to Fix Windows Stuck in Dark Mode [Solved]. For more information, please follow other related articles on the PHP Chinese website!

Hot AI Tools

Undresser.AI Undress
AI-powered app for creating realistic nude photos

AI Clothes Remover
Online AI tool for removing clothes from photos.

Undress AI Tool
Undress images for free

Clothoff.io
AI clothes remover

AI Hentai Generator
Generate AI Hentai for free.

Hot Article
Hot Tools

Notepad++7.3.1
Easy-to-use and free code editor

SublimeText3 Chinese version
Chinese version, very easy to use

Zend Studio 13.0.1
Powerful PHP integrated development environment

Dreamweaver CS6
Visual web development tools

SublimeText3 Mac version
God-level code editing software (SublimeText3)
Hot Topics
 1371
1371
 52
52

 How to disable driver signature enforcement in Windows 11
May 20, 2023 pm 02:17 PM
How to disable driver signature enforcement in Windows 11
May 20, 2023 pm 02:17 PM
Microsoft has built several security features into Windows to ensure your PC remains secure. One of them is driver signature enforcement in Windows 11. When this feature is enabled, it ensures that only drivers digitally signed by Microsoft can be installed on the system. This helps most of the users to a great extent as it protects them. But there is a downside to enabling driver signature enforcement. Suppose you find a driver that works for your device, but it is not signed by Microsoft, although it is completely safe. But you won't be able to install it. Therefore, you must know how to disable driver signing in Windows 11
 How to fix Windows 11 activation error 0xc004c060
May 17, 2023 pm 08:47 PM
How to fix Windows 11 activation error 0xc004c060
May 17, 2023 pm 08:47 PM
Why am I encountering Windows 11 activation error 0xc004c060? First make sure you are using genuine Windows and that the license key is valid. Also, check if it was obtained from an official source and if the key is suitable for the installed OS version. If there is an issue with any of these, you may encounter Windows 11 activation error 0xc004c060. So be sure to verify these and if you find everything is in order, move on to the next section. If you obtained the key through unreliable means or believe that the installed copy is a pirated version, you will need to purchase a valid key from Microsoft. In addition to this, misconfigured settings, missing
 How to disable display scaling for high DPI settings in Windows 11 or 10
May 22, 2023 pm 10:11 PM
How to disable display scaling for high DPI settings in Windows 11 or 10
May 22, 2023 pm 10:11 PM
The default display scaling feature on Windows 10 or later is a core component of the Windows operating system. But sometimes, this feature of certain apps can cause compatibility issues, unreadable text, blurry logos, and ultimately, app crashes. This can be a huge headache if you're dealing with 2160p or higher resolutions. There are many ways to disable the default display scaling feature on high DPI settings. We've selected the best ones and detailed step-by-step instructions for each process. How to Disable Display Scaling on High DPI Settings There is a way, all you have to do is disable high DPI scaling for a single application, and there is a way to do it for the entire Window
 Fix: WD My Cloud doesn't show up on the network in Windows 11
Oct 02, 2023 pm 11:21 PM
Fix: WD My Cloud doesn't show up on the network in Windows 11
Oct 02, 2023 pm 11:21 PM
If WDMyCloud is not showing up on the network in Windows 11, this can be a big problem, especially if you store backups or other important files in it. This can be a big problem for users who frequently need to access network storage, so in today's guide, we'll show you how to fix this problem permanently. Why doesn't WDMyCloud show up on Windows 11 network? Your MyCloud device, network adapter, or internet connection is not configured correctly. The SMB function is not installed on the computer. A temporary glitch in Winsock can sometimes cause this problem. What should I do if my cloud doesn't show up on the network? Before we start fixing the problem, you can perform some preliminary checks:
 Tiny10 makes Windows 10 durable on (very old) PCs
May 22, 2023 pm 04:02 PM
Tiny10 makes Windows 10 durable on (very old) PCs
May 22, 2023 pm 04:02 PM
Tiny10 is one developer's attempt to make Microsoft's Windows 10 operating system usable on both older PC systems and modern systems. When Microsoft released Windows 10 in 2015, it ensured that the operating system had the same system requirements as previous versions of Windows. That changes with the release of Windows 11 in 2021. Still, Windows 10 felt noticeably heavier than previous Windows versions, and users began looking for ways to improve the usability of the operating system. Faster hard drive, more memory, faster and more powerful CP
 NET HELPMSG 3774: How to fix this error in 5 steps
May 17, 2023 pm 09:27 PM
NET HELPMSG 3774: How to fix this error in 5 steps
May 17, 2023 pm 09:27 PM
Many of our readers have encountered error code NETHELPMSG3774 when trying to create a new user account through the command prompt. The error states that the user was successfully created but could not be added to the USERS local group. Why do I receive the NETHELPMSG3774 error code? If you receive error code NETHELPMSG3774 when trying to create a user account on your Windows PC, it may be due to one or more of the following reasons. Incomplete Windows Installation – If Windows was not installed correctly, or the installation process was interrupted, the NETHELPMSG3774 error may occur during user account creation. Corrupted user profile – if
![Event ID 157: Disk has been removed unexpectedly [Fixed]](https://img.php.cn/upload/article/000/887/227/168576249277516.jpg?x-oss-process=image/resize,m_fill,h_207,w_330) Event ID 157: Disk has been removed unexpectedly [Fixed]
Jun 03, 2023 am 11:21 AM
Event ID 157: Disk has been removed unexpectedly [Fixed]
Jun 03, 2023 am 11:21 AM
Disk has been accidentally deleted is an error in the system event log on Windows devices. This is an unusual issue on the virtual disk that all XBOX Live PC and Microsoft PC installations rely on. Typically, this problem occurs when something disrupts the system's communication with the disk. Event ID157 in Event Viewer The disk has been accidentally deleted, preventing the user from installing the game using the specified virtual drive. This virtual drive will not be visible in File Explorer like other drives. You may also encounter VMWare issues where the disk has been accidentally deleted. The solution below will fix the problem, but you must make changes directly in VMWare's emulated operating system. Depend on
 0x80070246 Windows Update Error: 6 Fixes
May 20, 2023 pm 06:28 PM
0x80070246 Windows Update Error: 6 Fixes
May 20, 2023 pm 06:28 PM
According to several Windows 10 and Windows 11 users, they encountered error 0x80070246 while trying to install Windows updates. This error prevents them from upgrading their PC and enjoying the latest features. Thankfully, in this guide, we have listed some of the best solutions to help you fix Windows update installation error 80070246x11 on Windows0PC. We'll also discuss what might be causing the problem in the first place. Let's jump right into it. Why am I getting Windows Update installation error 0x80070246? There may be multiple reasons why you are receiving Windows 11 installation error 0x80070246 on your PC.