How to use springboot+chatgpt+chatUI Pro to develop intelligent chat tools
1. Technical introduction
ChatGPT-Java is an OpenAI Java SDK that supports out-of-the-box use. Currently, it supports all APIs on the official website. We favor using the latest versions of GPT-3.5-Turbo and whisper-1 models.
2. Spring Boot is a new framework provided by the Pivotal team. It is designed to simplify the initial construction and development process of new Spring applications. This framework adopts a specific configuration method and does not require developers to define general configurations. In this way, Spring Boot strives to become a leader in the booming field of rapid application development.
3.ChatUI Pro is an out-of-the-box framework that can quickly build an intelligent conversational robot based on the basic components of ChatUI and combined with the best practices of Alibaba and Xiaomi. It is simple and easy to use, and you can build a conversation robot through simple configuration; at the same time, it is powerful and easy to expand, and can meet various customized needs through rich interfaces and custom cards.
2. Project Introduction
This project uses the GPT-3.5-Turb model as the basis, and implements a simple artificial intelligence robot through springboot combined with redis, chat-java and chatUI Pro. Because accessing openAI's API returns results slowly, after the front-end in the project sends the problem request to the back-end, the back-end will generate a UUID and return it to the front-end. At the same time, the back-end will also reopen a thread to access openAI. When openAI returns After the result, the backend uses the UUID as the key, and the result returned by openAI is stored in redis as the value. The front-end will request the back-end answer interface every 5 seconds based on the UUID in the result of the first request from the back-end. The answer interface will query whether redis has a value based on the UUID. Until the back-end answer interface returns the result, the front-end will output the result to User
3. Project construction
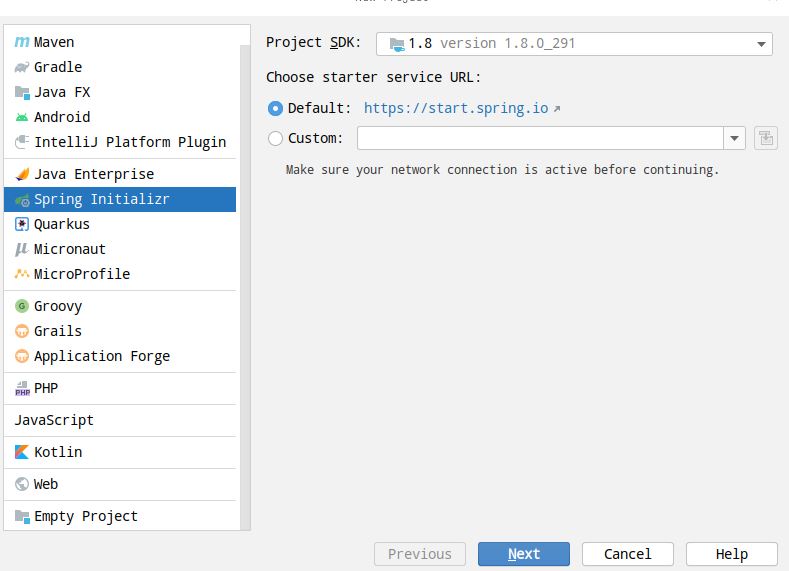
1. Create a springboot project and name the project mychatgpt.

2. Import the dependencies of the project pom
<?xml version="1.0" encoding="UTF-8"?>
<project xmlns="http://maven.apache.org/POM/4.0.0" xmlns:xsi="http://www.w3.org/2001/XMLSchema-instance"
         xsi:schemaLocation="http://maven.apache.org/POM/4.0.0 https://maven.apache.org/xsd/maven-4.0.0.xsd">
    <modelVersion>4.0.0</modelVersion>
    <parent>
        <groupId>org.springframework.boot</groupId>
        <artifactId>spring-boot-starter-parent</artifactId>
        <version>2.5.12</version>
        <relativePath/> <!-- lookup parent from repository -->
    </parent>
    <groupId>com.xyh</groupId>
    <artifactId>mychatgpt</artifactId>
    <version>0.0.1-SNAPSHOT</version>
    <name>mychatgpt</name>
    <description>Demo project for Spring Boot</description>
    <properties>
        <java.version>8</java.version>
    </properties>
    <dependencies>
        <dependency>
            <groupId>org.springframework.boot</groupId>
            <artifactId>spring-boot-starter-data-redis</artifactId>
        </dependency>
        <dependency>
            <groupId>org.springframework.boot</groupId>
            <artifactId>spring-boot-starter-web</artifactId>
        </dependency>
        <dependency>
            <groupId>org.springframework.boot</groupId>
            <artifactId>spring-boot-starter-aop</artifactId>
        </dependency>
        <dependency>
            <groupId>org.springframework.boot</groupId>
            <artifactId>spring-boot-starter-test</artifactId>
            <exclusions>
                <exclusion>
                    <groupId>org.apache.logging.log4j</groupId>
                    <artifactId>log4j-api</artifactId>
                </exclusion>
                <exclusion>
                    <groupId>org.apache.logging.log4j</groupId>
                    <artifactId>log4j-to-slf4j</artifactId>
                </exclusion>
            </exclusions>
            <scope>test</scope>
        </dependency>
        <dependency>
            <groupId>org.projectlombok</groupId>
            <artifactId>lombok</artifactId>
            <optional>true</optional>
        </dependency>
        <dependency>
            <groupId>org.apache.httpcomponents</groupId>
            <artifactId>httpcore</artifactId>
        </dependency>
        <dependency>
            <groupId>com.theokanning.openai-gpt3-java</groupId>
            <artifactId>api</artifactId>
            <version>0.10.0</version>
        </dependency>
        <dependency>
            <groupId>com.theokanning.openai-gpt3-java</groupId>
            <artifactId>service</artifactId>
            <version>0.10.0</version>
        </dependency>
        <dependency>
            <groupId>com.theokanning.openai-gpt3-java</groupId>
            <artifactId>client</artifactId>
            <version>0.10.0</version>
        </dependency>
        <dependency>
            <groupId>cn.hutool</groupId>
            <artifactId>hutool-all</artifactId>
            <version>5.8.12</version>
        </dependency>
        <dependency>
            <groupId>com.unfbx</groupId>
            <artifactId>chatgpt-java</artifactId>
            <version>1.0.5</version>
        </dependency>
        <dependency>
            <groupId>mysql</groupId>
            <artifactId>mysql-connector-java</artifactId>
            <version>8.0.17</version>
        </dependency>
        <dependency>
            <groupId>com.alibaba</groupId>
            <artifactId>druid-spring-boot-starter</artifactId>
            <version>1.2.8</version>
        </dependency>
        <dependency>
            <groupId>com.baomidou</groupId>
            <artifactId>mybatis-plus-boot-starter</artifactId>
            <version>3.5.2</version>
            <exclusions>
                <exclusion>
                    <groupId>com.baomidou</groupId>
                    <artifactId>mybatis-plus-generator</artifactId>
                </exclusion>
            </exclusions>
        </dependency>
        <dependency>
            <groupId>com.github.yulichang</groupId>
            <artifactId>mybatis-plus-join</artifactId>
            <version>1.4.2</version>
        </dependency>
        <!--集成随机生成数据包 -->
        <dependency>
            <groupId>com.apifan.common</groupId>
            <artifactId>common-random</artifactId>
            <version>1.0.19</version>
        </dependency>
        <!--集成随机生成数据包 -->
        <dependency>
            <groupId>junit</groupId>
            <artifactId>junit</artifactId>
            <scope>test</scope>
        </dependency>
    </dependencies>
    <build>
        <plugins>
            <plugin>
                <groupId>org.springframework.boot</groupId>
                <artifactId>spring-boot-maven-plugin</artifactId>
                <configuration>
                    <excludes>
                        <exclude>
                            <groupId>org.projectlombok</groupId>
                            <artifactId>lombok</artifactId>
                        </exclude>
                    </excludes>
                </configuration>
            </plugin>
        </plugins>
    </build>
</project>3. Write the chatGPT implementation tool class
package com.xyh.mychatgpt.utils;
import com.unfbx.chatgpt.OpenAiClient;
import com.unfbx.chatgpt.entity.chat.ChatChoice;
import com.unfbx.chatgpt.entity.chat.ChatCompletion;
import com.unfbx.chatgpt.entity.chat.Message;
import com.unfbx.chatgpt.entity.common.Choice;
import com.unfbx.chatgpt.entity.completions.Completion;
import org.springframework.beans.factory.annotation.Autowired;
import org.springframework.beans.factory.annotation.Value;
import org.springframework.stereotype.Component;
import java.util.Arrays;
import java.util.List;
/**
 * @author xiangyuanhong
 * @description: TODO
 * @date 2023/3/21上午9:28
 */
@Component
public class ChatGPTUtils {
    @Value("${xyh.openai.key}")
    private  String token;
    @Autowired
    private RedisUtils redisUtils;
    public void ask(String model,String question,String uuid){
        StringBuffer result=new StringBuffer();
        try {
            OpenAiClient openAiClient = new OpenAiClient(token, 3000, 300, 300, null);
            if("GPT-3.5-Turb".equals(model)){
            // GPT-3.5-Turb模型
            Message message=Message.builder().role(Message.Role.USER).content(question).build();
            ChatCompletion chatCompletion = ChatCompletion.builder().messages(Arrays.asList(message)).build();
            List<ChatChoice> resultList = openAiClient.chatCompletion(chatCompletion).getChoices();
            for (int i = 0; i < resultList.size(); i++) {
                result.append(resultList.get(i).getMessage().getContent());
            }
            }else{
                //text-davinci-003/text-ada-003
                Completion completion = Completion.builder()
                        .prompt(question)
                        .model(model)
                        .maxTokens(2000)
                        .temperature(0)
                        .echo(false)
                        .build();
                Choice[] resultList = openAiClient.completions(completion).getChoices();
                for (Choice choice : resultList) {
                    result.append(choice.getText());
                }
            }
        }catch (Exception e) {
            System.out.println(e.getMessage());
            result.append("小爱还不太懂,回去一定努力学习补充知识");
        }
        redisUtils.set(uuid,result.toString());
    }
}4. Develop the project Controller class, Used to interact with the front end
package com.xyh.mychatgpt.controller;
import cn.hutool.core.thread.ThreadUtil;
import cn.hutool.core.util.IdUtil;
import cn.hutool.core.util.StrUtil;
import com.xyh.mychatgpt.utils.ChatGPTUtils;
import com.xyh.mychatgpt.utils.R;
import com.xyh.mychatgpt.utils.RedisUtils;
import org.springframework.beans.factory.annotation.Autowired;
import org.springframework.web.bind.annotation.GetMapping;
import org.springframework.web.bind.annotation.RestController;
import javax.servlet.http.HttpServletRequest;
/**
 * @author xiangyuanhong
 * @description: TODO
 * @date 2023/2/28下午4:57
 */
@RestController
public class IndexController {
    @Autowired
    private RedisUtils redisUtils;
    @Autowired
    private ChatGPTUtils chatGPTUtils;
    @GetMapping("/ask")
    public R ask(String question,HttpServletRequest request) {
        String uuid=IdUtil.simpleUUID();
        if (StrUtil.isBlank(question)) {
            question = "今天天气怎么样?";
        }
        String finalQuestion = question;
        ThreadUtil.execAsync(()->{
            chatGPTUtils.ask("GPT-3.5-Turb", finalQuestion,uuid);
        });
        return R.ok().put("data",uuid);
    }
    @GetMapping("/answer")
    public R answer(String uuid){
        String result=redisUtils.get(uuid);
          return R.ok().put("data",result);
    }
}5. Front-end page development, create the index.html page in the project templates directory, and introduce chatUI pro related files
<!DOCTYPE html>
<html lang="zh-CN">
<head>
    <meta name="renderer" content="webkit" />
    <meta name="force-rendering" content="webkit" />
    <meta http-equiv="X-UA-Compatible" content="IE=edge,chrome=1" />
    <meta charset="UTF-8" />
    <meta name="viewport" content="width=device-width, initial-scale=1.0, user-scalable=0, minimum-scale=1.0, maximum-scale=1.0, viewport-fit=cover" />
    <title>滴答小爱</title>
    <link rel="stylesheet" href="//g.alicdn.com/chatui/sdk-v2/0.2.4/sdk.css" rel="external nofollow" >
</head>
<body>
<div id="root"></div>
<script src="//g.alicdn.com/chatui/sdk-v2/0.2.4/sdk.js"></script>
<script src="//g.alicdn.com/chatui/extensions/0.0.7/isv-parser.js"></script>
<script src="js/setup.js"></script>
<script src="js/jquery-3.6.3.min.js"></script>
<script src="//g.alicdn.com/chatui/icons/0.3.0/index.js" async></script>
</body>
</html>6. Create setup.js to implement chatUI Pro communicates with the backend.
var bot = new ChatSDK({
    config: {
        // navbar: {
        //     title: '滴答小爱'
        // },
        robot: {
            avatar: 'images/chat.png'
        },
        // 用户头像
        user: {
            avatar: 'images/user.png',
        },
        // 首屏消息
        messages: [
            {
                type: 'text',
                content: {
                    text: '您好,小爱为您服务,请问有什么可以帮您的?'
                }
            }
        ],
        // 快捷短语
        // quickReplies: [
        //     { name: '健康码颜色',isHighlight:true },
        //     { name: '入浙通行申报' },
        //     { name: '健康码是否可截图使用' },
        //     { name: '健康通行码适用范围' },
        // ],
        // 输入框占位符
        placeholder: '输入任何您想询问的问题',
    },
    requests: {
        send: function (msg) {
            if (msg.type === 'text') {
                return {
                    url: '/ask',
                    data: {
                        question: msg.content.text
                    }
                };
            }
        }
    },
    handlers: {
        /**
         *
         * 解析请求返回的数据
         * @param {object} res - 请求返回的数据
         * @param {object} requestType - 请求类型
         * @return {array}
         */
        parseResponse: function (res, requestType) {
            // 根据 requestType 处理数据
            if (requestType === 'send' && res.code==0) {
                // 用 isv 消息解析器处理数据
                $.ajaxSettings.async=false;
                var answer="";
                var isOK=false;
                while(!isOK){
                    $.get("/answer",{uuid:res.data},function(result){
                        console.log(result.data)
                        if(null != result.data){
                            isOK=true;
                            answer=result.data;
                        }
                    },"json");
                    if(!isOK){
                        sleep(5000);
                    }
                }
                $.ajaxSettings.async=true;
                return [{"_id":res.data,type:"text",content:{text:answer},position:"left"}];
            }
        },
    },
});
function sleep(n) { //n表示的毫秒数
    var start = new Date().getTime();
    while (true) {
        if (new Date().getTime() - start > n) {
            break;
        }
    }
}
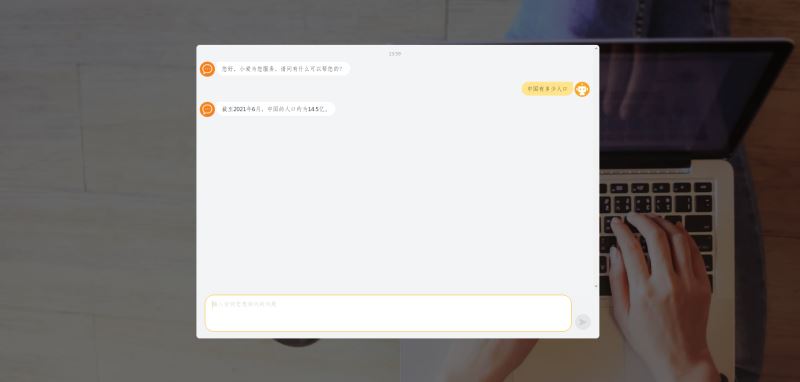
bot.run();Once the project is completed, start the Spring Boot project and access http://ip:port. The final effect of the project: http://hyrun.vip/
4. Project display

The above is the detailed content of How to use springboot+chatgpt+chatUI Pro to develop intelligent chat tools. For more information, please follow other related articles on the PHP Chinese website!

Hot AI Tools

Undresser.AI Undress
AI-powered app for creating realistic nude photos

AI Clothes Remover
Online AI tool for removing clothes from photos.

Undress AI Tool
Undress images for free

Clothoff.io
AI clothes remover

Video Face Swap
Swap faces in any video effortlessly with our completely free AI face swap tool!

Hot Article

Hot Tools

Notepad++7.3.1
Easy-to-use and free code editor

SublimeText3 Chinese version
Chinese version, very easy to use

Zend Studio 13.0.1
Powerful PHP integrated development environment

Dreamweaver CS6
Visual web development tools

SublimeText3 Mac version
God-level code editing software (SublimeText3)

Hot Topics
 1389
1389
 52
52
 ChatGPT now allows free users to generate images by using DALL-E 3 with a daily limit
Aug 09, 2024 pm 09:37 PM
DALL-E 3 was officially introduced in September of 2023 as a vastly improved model than its predecessor. It is considered one of the best AI image generators to date, capable of creating images with intricate detail. However, at launch, it was exclus
 The perfect combination of ChatGPT and Python: creating an intelligent customer service chatbot
Oct 27, 2023 pm 06:00 PM
The perfect combination of ChatGPT and Python: Creating an Intelligent Customer Service Chatbot Introduction: In today’s information age, intelligent customer service systems have become an important communication tool between enterprises and customers. In order to provide a better customer service experience, many companies have begun to turn to chatbots to complete tasks such as customer consultation and question answering. In this article, we will introduce how to use OpenAI’s powerful model ChatGPT and Python language to create an intelligent customer service chatbot to improve
 How to install chatgpt on mobile phone
Mar 05, 2024 pm 02:31 PM
Installation steps: 1. Download the ChatGTP software from the ChatGTP official website or mobile store; 2. After opening it, in the settings interface, select the language as Chinese; 3. In the game interface, select human-machine game and set the Chinese spectrum; 4 . After starting, enter commands in the chat window to interact with the software.
 Comparison and difference analysis between SpringBoot and SpringMVC
Dec 29, 2023 am 11:02 AM
SpringBoot and SpringMVC are both commonly used frameworks in Java development, but there are some obvious differences between them. This article will explore the features and uses of these two frameworks and compare their differences. First, let's learn about SpringBoot. SpringBoot was developed by the Pivotal team to simplify the creation and deployment of applications based on the Spring framework. It provides a fast, lightweight way to build stand-alone, executable
 How to develop an intelligent chatbot using ChatGPT and Java
Oct 28, 2023 am 08:54 AM
In this article, we will introduce how to develop intelligent chatbots using ChatGPT and Java, and provide some specific code examples. ChatGPT is the latest version of the Generative Pre-training Transformer developed by OpenAI, a neural network-based artificial intelligence technology that can understand natural language and generate human-like text. Using ChatGPT we can easily create adaptive chats
 How to build an intelligent customer service robot using ChatGPT PHP
Oct 28, 2023 am 09:34 AM
How to use ChatGPTPHP to build an intelligent customer service robot Introduction: With the development of artificial intelligence technology, robots are increasingly used in the field of customer service. Using ChatGPTPHP to build an intelligent customer service robot can help companies provide more efficient and personalized customer services. This article will introduce how to use ChatGPTPHP to build an intelligent customer service robot and provide specific code examples. 1. Install ChatGPTPHP and use ChatGPTPHP to build an intelligent customer service robot.
 Can chatgpt be used in China?
Mar 05, 2024 pm 03:05 PM
chatgpt can be used in China, but cannot be registered, nor in Hong Kong and Macao. If users want to register, they can use a foreign mobile phone number to register. Note that during the registration process, the network environment must be switched to a foreign IP.
 How to use ChatGPT and Python to implement user intent recognition function
Oct 27, 2023 am 09:04 AM
How to use ChatGPT and Python to implement user intent recognition function Introduction: In today's digital era, artificial intelligence technology has gradually become an indispensable part in various fields. Among them, the development of natural language processing (Natural Language Processing, NLP) technology enables machines to understand and process human language. ChatGPT (Chat-GeneratingPretrainedTransformer) is a kind of


