

What are the three ways to store and access Python images?

Preface
ImageNet is a well-known public image database used to train models for tasks such as object classification, detection, and segmentation. It contains more than 14 million images.
When processing image data in Python, for example, applying algorithms such as convolutional neural networks (also called CNN) can process a large number of image data sets. Here you need to learn how to store and read data in the simplest way. .
There should be a quantitative comparison method for image data processing, how long it takes to read and write files, and how much disk memory will be used.
Use different ways to process and solve the problems of image storage and performance optimization.
Data preparation
A playable data set
The image data set CIFAR-10 we are familiar with consists of 60,000 32x32 pixel color images. These images belong to different object categories, such as dogs, cats, and airplanes. CIFAR is not a very large dataset relatively speaking, but using the full TinyImages dataset would require approximately 400GB of free disk space.
The code in the article is applied to the data set download address CIFAR-10 data set.
This data is serialized and saved in batches using cPickle. The pickle module can serialize any object in Python without requiring additional code or conversion. However, processing large amounts of data may pose security risks that cannot be assessed.
Load images into NumPy arrays
import numpy as np
import pickle
from pathlib import Path

# 文件路径
data_dir = Path("data/cifar-10-batches-py/")

# 解码功能
def unpickle(file):
    with open(file, "rb") as fo:
        dict = pickle.load(fo, encoding="bytes")
    return dict

images, labels = [], []
for batch in data_dir.glob("data_batch_*"):
    batch_data = unpickle(batch)
    for i, flat_im in enumerate(batch_data[b"data"]):
        im_channels = []
        # 每个图像都是扁平化的,通道按 R, G, B 的顺序排列
        for j in range(3):
            im_channels.append(
                flat_im[j * 1024 : (j + 1) * 1024].reshape((32, 32))
            )
        # 重建原始图像
        images.append(np.dstack((im_channels)))
        # 保存标签
        labels.append(batch_data[b"labels"][i])

print("加载 CIFAR-10 训练集:")
print(f" - np.shape(images)     {np.shape(images)}")
print(f" - np.shape(labels) {np.shape(labels)}")Settings for image storage
Install the third-party library Pillow for image processing.
pip install Pillow
LMDB
"Lightning Memory Mapped Database" (LMDB) is also known as "Lightning Database" because of its speed and use of memory mapped files. It is a key-value store, not a relational database.
Install the third-party library lmdb for image processing.
pip install lmdb
HDF5
HDF5 stands for Hierarchical Data Format, a file format known as HDF4 or HDF5. This portable, compact scientific data format comes from the National Center for Supercomputing Applications.
Install the third-party library h6py for image processing.
pip install h6py
Single image storage
3 different ways to read data
from pathlib import Path

disk_dir = Path("data/disk/")
lmdb_dir = Path("data/lmdb/")
hdf5_dir = Path("data/hdf5/")Data loaded at the same time can be saved in separate folders
disk_dir.mkdir(parents=True, exist_ok=True)
lmdb_dir.mkdir(parents=True, exist_ok=True)
hdf5_dir.mkdir(parents=True, exist_ok=True)
Store to disk
Using Pillow The input is a single image image, stored in memory as a NumPy array, and named with the unique image ID image_id.
Single image saved to disk
from PIL import Image
import csv

def store_single_disk(image, image_id, label):
    """ 将单个图像作为 .png 文件存储在磁盘上。
        参数:
        ---------------
        image       图像数组, (32, 32, 3) 格式
        image_id    图像的整数唯一 ID
        label       图像标签
    """
    Image.fromarray(image).save(disk_dir / f"{image_id}.png")

    with open(disk_dir / f"{image_id}.csv", "wt") as csvfile:
        writer = csv.writer(
            csvfile, delimiter=" ", quotechar="|", quoting=csv.QUOTE_MINIMAL
        )
writer.writerow([label])Stored to LMDB
LMDB is a key-value pair storage system where each entry is saved as a byte array and the key is is a unique identifier for each image and the value will be the image itself.
Both keys and values should be strings. A common usage is to serialize the value to a string and then deserialize it when reading it back.
The image size used for reconstruction. Some data sets may contain images of different sizes and this method will be used.
class CIFAR_Image:
    def __init__(self, image, label):
        self.channels = image.shape[2]
        self.size = image.shape[:2]

        self.image = image.tobytes()
        self.label = label

    def get_image(self):
        """ 将图像作为 numpy 数组返回 """
        image = np.frombuffer(self.image, dtype=np.uint8)
return image.reshape(*self.size, self.channels)Single image saved to LMDB
import lmdb
import pickle

def store_single_lmdb(image, image_id, label):
    """ 将单个图像存储到 LMDB
        参数:
        ---------------
        image       图像数组, (32, 32, 3) 格式
        image_id    图像的整数唯一 ID
        label       图像标签
    """
    map_size = image.nbytes * 10

    # Create a new LMDB environment
    env = lmdb.open(str(lmdb_dir / f"single_lmdb"), map_size=map_size)

    # Start a new write transaction
    with env.begin(write=True) as txn:
        # All key-value pairs need to be strings
        value = CIFAR_Image(image, label)
        key = f"{image_id:08}"
        txn.put(key.encode("ascii"), pickle.dumps(value))
env.close()Storage HDF5
One HDF5 file can contain multiple datasets. Two datasets can be created, one for images and one for metadata.
import h6py

def store_single_hdf5(image, image_id, label):
    """ 将单个图像存储到 HDF5 文件
        参数:
        ---------------
        image       图像数组, (32, 32, 3) 格式
        image_id    图像的整数唯一 ID
        label       图像标签
    """
    # 创建一个新的 HDF5 文件
    file = h6py.File(hdf5_dir / f"{image_id}.h6", "w")

    # 在文件中创建数据集
    dataset = file.create_dataset(
        "image", np.shape(image), h6py.h6t.STD_U8BE, data=image
    )
    meta_set = file.create_dataset(
        "meta", np.shape(label), h6py.h6t.STD_U8BE, data=label
    )
file.close()Storage comparison
Put all three functions that save a single image into a dictionary.
_store_single_funcs = dict(
    disk=store_single_disk,
    lmdb=store_single_lmdb,
    hdf5=store_single_hdf5
)Store the first image in CIFAR and its corresponding tags in three different ways.
from timeit import timeit

store_single_timings = dict()

for method in ("disk", "lmdb", "hdf5"):
    t = timeit(
        "_store_single_funcs[method](image, 0, label)",
        setup="image=images[0]; label=labels[0]",
        number=1,
        globals=globals(),
    )
    store_single_timings[method] = t
print(f"存储方法: {method}, 使用耗时: {t}")Let’s take a look at the comparison.
| Storage method | Storage time consumption | Using memory |
|---|---|---|
| Disk | 2.1 ms | 8 K |
| LMDB | 1.7 ms | 32 K |
| HDF5 | 8.1 ms | 8 K |
Storage of multiple images
Same as a single image The storage method is similar, modify the code to store multiple image data.
Multiple image adjustment code
Saving multiple images as .png files can be viewed as calling the store_single_method() method multiple times. This approach is not possible with LMDB or HDF5 because each image exists in a different database file.
Store a group of images to disk
 store_many_disk(images, labels):
    """ 参数:
        ---------------
        images       图像数组 (N, 32, 32, 3) 格式
        labels       标签数组 (N,1) 格式
    """
    num_images = len(images)

    # 一张一张保存所有图片
    for i, image in enumerate(images):
        Image.fromarray(image).save(disk_dir / f"{i}.png")

    # 将所有标签保存到 csv 文件
    with open(disk_dir / f"{num_images}.csv", "w") as csvfile:
        writer = csv.writer(
            csvfile, delimiter=" ", quotechar="|", quoting=csv.QUOTE_MINIMAL
        )
        for label in labels:
writer.writerow([label])Store a group of images to LMDB
def store_many_lmdb(images, labels):
    """ 参数:
        ---------------
        images       图像数组 (N, 32, 32, 3) 格式
        labels       标签数组 (N,1) 格式
    """
    num_images = len(images)

    map_size = num_images * images[0].nbytes * 10

    # 为所有图像创建一个新的 LMDB 数据库
    env = lmdb.open(str(lmdb_dir / f"{num_images}_lmdb"), map_size=map_size)

    # 在一个事务中写入所有图像
    with env.begin(write=True) as txn:
        for i in range(num_images):
            # 所有键值对都必须是字符串
            value = CIFAR_Image(images[i], labels[i])
            key = f"{i:08}"
            txn.put(key.encode("ascii"), pickle.dumps(value))
env.close()Store a group of images to HDF5
def store_many_hdf5(images, labels):
    """ 参数:
        ---------------
        images       图像数组 (N, 32, 32, 3) 格式
        labels       标签数组 (N,1) 格式
    """
    num_images = len(images)

    # 创建一个新的 HDF5 文件
    file = h6py.File(hdf5_dir / f"{num_images}_many.h6", "w")

    # 在文件中创建数据集
    dataset = file.create_dataset(
        "images", np.shape(images), h6py.h6t.STD_U8BE, data=images
    )
    meta_set = file.create_dataset(
        "meta", np.shape(labels), h6py.h6t.STD_U8BE, data=labels
    )
file.close()Prepare dataset comparison
Test using 100000 images
cutoffs = [10, 100, 1000, 10000, 100000]

images = np.concatenate((images, images), axis=0)
labels = np.concatenate((labels, labels), axis=0)

# 确保有 100,000 个图像和标签
print(np.shape(images))
print(np.shape(labels))
Create a calculation for comparison
_store_many_funcs = dict(
    disk=store_many_disk, lmdb=store_many_lmdb, hdf5=store_many_hdf5
)

from timeit import timeit

store_many_timings = {"disk": [], "lmdb": [], "hdf5": []}

for cutoff in cutoffs:
    for method in ("disk", "lmdb", "hdf5"):
        t = timeit(
            "_store_many_funcs[method](images_, labels_)",
            setup="images_=images[:cutoff]; labels_=labels[:cutoff]",
            number=1,
            globals=globals(),
        )
        store_many_timings[method].append(t)

        # 打印出方法、截止时间和使用时间
print(f"Method: {method}, Time usage: {t}")PLOT Displays a single plot with multiple datasets and matching legends
import matplotlib.pyplot as plt
def plot_with_legend(
x_range, y_data, legend_labels, x_label, y_label, title, log=False
):
""" 参数:
--------------
x_range 包含 x 数据的列表
y_data 包含 y 值的列表
legend_labels 字符串图例标签列表
x_label x 轴标签
y_label y 轴标签
"""
plt.style.use("seaborn-whitegrid")
plt.figure(figsize=(10, 7))
if len(y_data) != len(legend_labels):
raise TypeError(
"数据集的数量与标签的数量不匹配"
)
all_plots = []
for data, label in zip(y_data, legend_labels):
if log:
temp, = plt.loglog(x_range, data, label=label)
else:
temp, = plt.plot(x_range, data, label=label)
all_plots.append(temp)
plt.title(title)
plt.xlabel(x_label)
plt.ylabel(y_label)
plt.legend(handles=all_plots)
plt.show()
# Getting the store timings data to display
disk_x = store_many_timings["disk"]
lmdb_x = store_many_timings["lmdb"]
hdf5_x = store_many_timings["hdf5"]
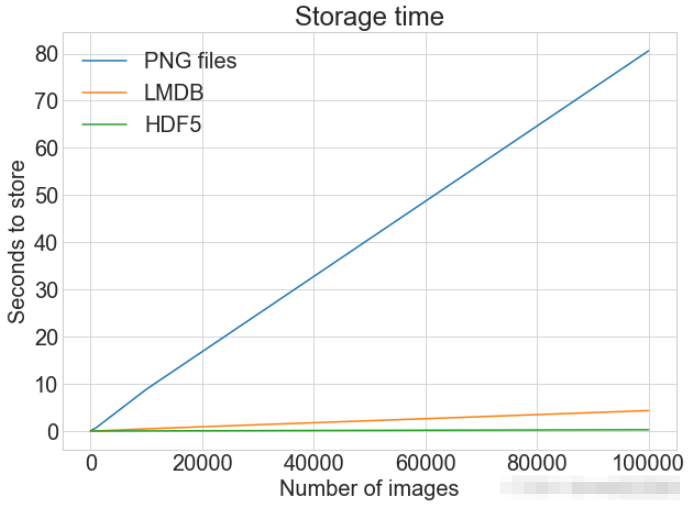
plot_with_legend(
cutoffs,
[disk_x, lmdb_x, hdf5_x],
["PNG files", "LMDB", "HDF5"],
"Number of images",
"Seconds to store",
"Storage time",
log=False,
)
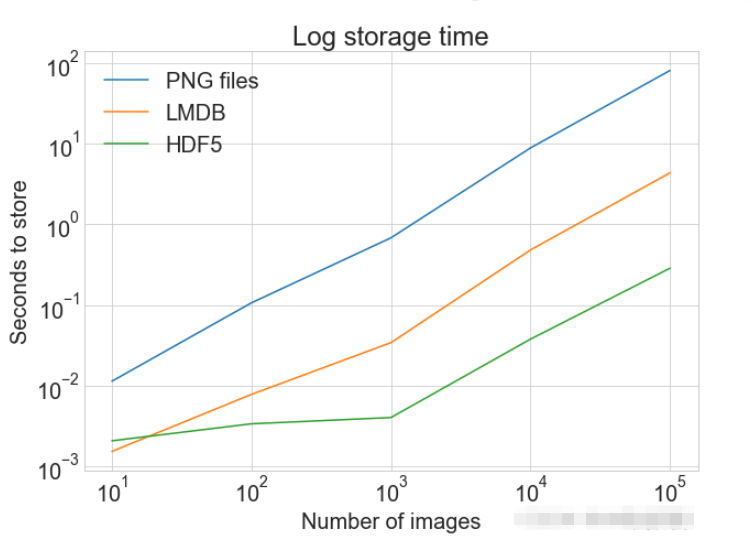
plot_with_legend(
cutoffs,
[disk_x, lmdb_x, hdf5_x],
["PNG files", "LMDB", "HDF5"],
"Number of images",
"Seconds to store",
"Log storage time",
log=True,
)
Reading of a single image
Reading from disk
def read_single_disk(image_id):
    """ 参数:
        ---------------
        image_id    图像的整数唯一 ID

        返回结果:
        ---------------
        images       图像数组 (N, 32, 32, 3) 格式
        labels       标签数组 (N,1) 格式
    """
    image = np.array(Image.open(disk_dir / f"{image_id}.png"))

    with open(disk_dir / f"{image_id}.csv", "r") as csvfile:
        reader = csv.reader(
            csvfile, delimiter=" ", quotechar="|", quoting=csv.QUOTE_MINIMAL
        )
        label = int(next(reader)[0])

return image, labelReading from LMDB Get
def read_single_lmdb(image_id):
    """ 参数:
        ---------------
        image_id    图像的整数唯一 ID

        返回结果:
        ---------------
        images       图像数组 (N, 32, 32, 3) 格式
        labels       标签数组 (N,1) 格式
    """
    # 打开 LMDB 环境
    env = lmdb.open(str(lmdb_dir / f"single_lmdb"), readonly=True)

    # 开始一个新的事务
    with env.begin() as txn:
        # 进行编码
        data = txn.get(f"{image_id:08}".encode("ascii"))
        # 加载的 CIFAR_Image 对象
        cifar_image = pickle.loads(data)
        # 检索相关位
        image = cifar_image.get_image()
        label = cifar_image.label
    env.close()

return image, labelRead from HDF5
def read_single_hdf5(image_id):
    """ 参数:
        ---------------
        image_id    图像的整数唯一 ID

        返回结果:
        ---------------
        images       图像数组 (N, 32, 32, 3) 格式
        labels       标签数组 (N,1) 格式
    """
    # 打开 HDF5 文件
    file = h6py.File(hdf5_dir / f"{image_id}.h6", "r+")

    image = np.array(file["/image"]).astype("uint8")
    label = int(np.array(file["/meta"]).astype("uint8"))

return image, labelReading method comparison
from timeit import timeit

read_single_timings = dict()

for method in ("disk", "lmdb", "hdf5"):
    t = timeit(
        "_read_single_funcs[method](0)",
        setup="image=images[0]; label=labels[0]",
        number=1,
        globals=globals(),
    )
    read_single_timings[method] = t
print(f"读取方法: {method}, 使用耗时: {t}")| Storage method | Storage time consumption |
|---|---|
| Disk | 1.7 ms |
| LMDB | 4.4 ms |
| HDF5 | 2.3 ms |
多个图像的读取
可以将多个图像保存为.png文件,这等价于多次调用 read_single_method()。这并不适用于 LMDB 或 HDF5,因为每个图像都储存在不同的数据库文件中。
多图像调整代码
从磁盘中读取多个都图像
def read_many_disk(num_images):
    """ 参数:
        ---------------
        num_images   要读取的图像数量

        返回结果:
        ---------------
        images       图像数组 (N, 32, 32, 3) 格式
        labels       标签数组 (N,1) 格式
    """
    images, labels = [], []

    # 循环遍历所有ID,一张一张地读取每张图片
    for image_id in range(num_images):
        images.append(np.array(Image.open(disk_dir / f"{image_id}.png")))

    with open(disk_dir / f"{num_images}.csv", "r") as csvfile:
        reader = csv.reader(
            csvfile, delimiter=" ", quotechar="|", quoting=csv.QUOTE_MINIMAL
        )
        for row in reader:
            labels.append(int(row[0]))
return images, labels从LMDB中读取多个都图像
def read_many_lmdb(num_images):
    """ 参数:
        ---------------
        num_images   要读取的图像数量

        返回结果:
        ---------------
        images       图像数组 (N, 32, 32, 3) 格式
        labels       标签数组 (N,1) 格式
    """
    images, labels = [], []
    env = lmdb.open(str(lmdb_dir / f"{num_images}_lmdb"), readonly=True)

    # 开始一个新的事务
    with env.begin() as txn:
        # 在一个事务中读取,也可以拆分成多个事务分别读取
        for image_id in range(num_images):
            data = txn.get(f"{image_id:08}".encode("ascii"))
            # CIFAR_Image 对象,作为值存储
            cifar_image = pickle.loads(data)
            # 检索相关位
            images.append(cifar_image.get_image())
            labels.append(cifar_image.label)
    env.close()
return images, labels从HDF5中读取多个都图像
def read_many_hdf5(num_images):
    """ 参数:
        ---------------
        num_images   要读取的图像数量

        返回结果:
        ---------------
        images       图像数组 (N, 32, 32, 3) 格式
        labels       标签数组 (N,1) 格式
    """
    images, labels = [], []

    # 打开 HDF5 文件
    file = h6py.File(hdf5_dir / f"{num_images}_many.h6", "r+")

    images = np.array(file["/images"]).astype("uint8")
    labels = np.array(file["/meta"]).astype("uint8")

    return images, labels

_read_many_funcs = dict(
    disk=read_many_disk, lmdb=read_many_lmdb, hdf5=read_many_hdf5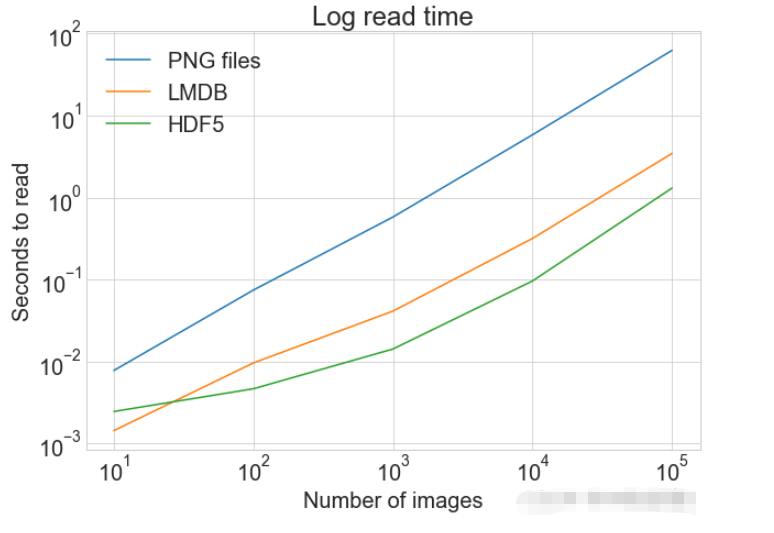
)准备数据集对比
创建一个计算方式进行对比
from timeit import timeit

read_many_timings = {"disk": [], "lmdb": [], "hdf5": []}

for cutoff in cutoffs:
    for method in ("disk", "lmdb", "hdf5"):
        t = timeit(
            "_read_many_funcs[method](num_images)",
            setup="num_images=cutoff",
            number=1,
            globals=globals(),
        )
        read_many_timings[method].append(t)

        # Print out the method, cutoff, and elapsed time
        print(f"读取方法: {method}, No. images: {cutoff}, 耗时: {t}")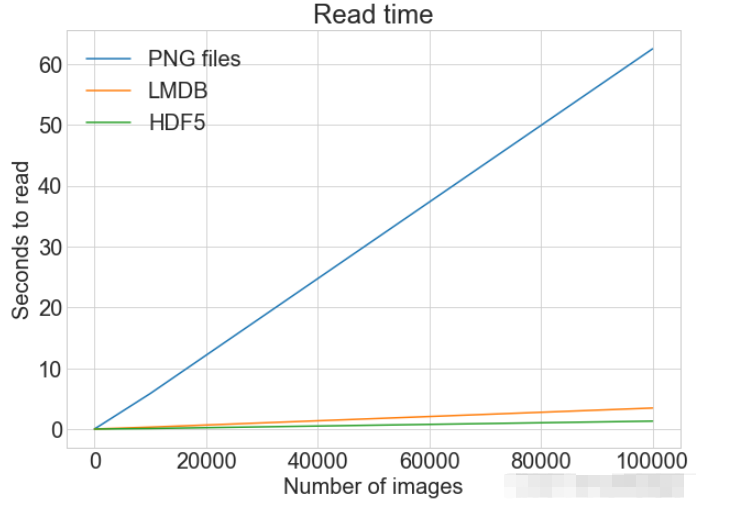
读写操作综合比较
数据对比
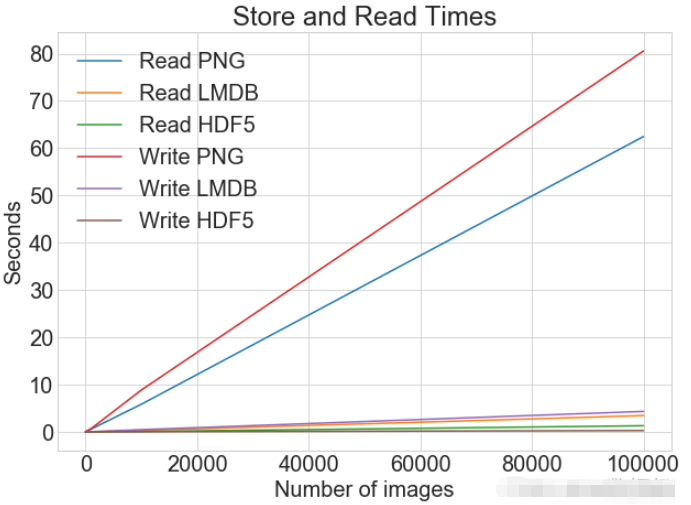
同一张图表上查看读取和写入时间
plot_with_legend(
    cutoffs,
    [disk_x_r, lmdb_x_r, hdf5_x_r, disk_x, lmdb_x, hdf5_x],
    [
        "Read PNG",
        "Read LMDB",
        "Read HDF5",
        "Write PNG",
        "Write LMDB",
        "Write HDF5",
    ],
    "Number of images",
    "Seconds",
    "Log Store and Read Times",
    log=False,
)
各种存储方式使用磁盘空间
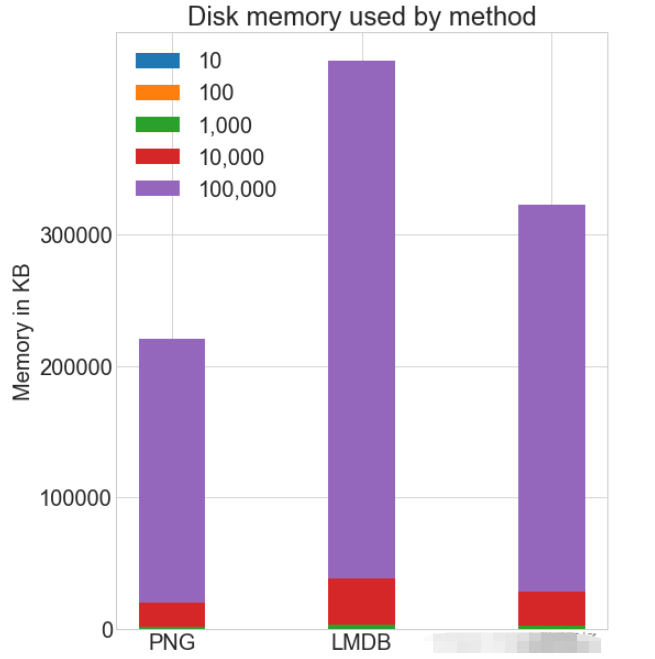
虽然 HDF5 和 LMDB 都占用更多的磁盘空间。需要注意的是 LMDB 和 HDF5 磁盘的使用和性能在很大程度上取决于各种因素,包括操作系统,更重要的是存储的数据大小。
并行操作
通常对于大的数据集,可以通过并行化来加速操作。 也就是我们经常说的并发处理。
作为.png 文件存储到磁盘实际上允许完全并发。可通过使用不同的图像名称,实现从多个线程读取多个图像,或一次性写入多个文件。
如果将所有 CIFAR 分成十组,那么可以为一组中的每个读取设置十个进程,并且相应的处理时间可以减少到原来的10%左右。
The above is the detailed content of What are the three ways to store and access Python images?. For more information, please follow other related articles on the PHP Chinese website!

Hot AI Tools

Undresser.AI Undress
AI-powered app for creating realistic nude photos

AI Clothes Remover
Online AI tool for removing clothes from photos.

Undress AI Tool
Undress images for free

Clothoff.io
AI clothes remover

AI Hentai Generator
Generate AI Hentai for free.

Hot Article
Hot Tools

Notepad++7.3.1
Easy-to-use and free code editor

SublimeText3 Chinese version
Chinese version, very easy to use

Zend Studio 13.0.1
Powerful PHP integrated development environment

Dreamweaver CS6
Visual web development tools

SublimeText3 Mac version
God-level code editing software (SublimeText3)
Hot Topics
 1378
1378
 52
52

 Python: Exploring Its Primary Applications
Apr 10, 2025 am 09:41 AM
Python: Exploring Its Primary Applications
Apr 10, 2025 am 09:41 AM
Python is widely used in the fields of web development, data science, machine learning, automation and scripting. 1) In web development, Django and Flask frameworks simplify the development process. 2) In the fields of data science and machine learning, NumPy, Pandas, Scikit-learn and TensorFlow libraries provide strong support. 3) In terms of automation and scripting, Python is suitable for tasks such as automated testing and system management.
 The 2-Hour Python Plan: A Realistic Approach
Apr 11, 2025 am 12:04 AM
The 2-Hour Python Plan: A Realistic Approach
Apr 11, 2025 am 12:04 AM
You can learn basic programming concepts and skills of Python within 2 hours. 1. Learn variables and data types, 2. Master control flow (conditional statements and loops), 3. Understand the definition and use of functions, 4. Quickly get started with Python programming through simple examples and code snippets.
 Navicat's method to view MongoDB database password
Apr 08, 2025 pm 09:39 PM
Navicat's method to view MongoDB database password
Apr 08, 2025 pm 09:39 PM
It is impossible to view MongoDB password directly through Navicat because it is stored as hash values. How to retrieve lost passwords: 1. Reset passwords; 2. Check configuration files (may contain hash values); 3. Check codes (may hardcode passwords).
 How to use AWS Glue crawler with Amazon Athena
Apr 09, 2025 pm 03:09 PM
How to use AWS Glue crawler with Amazon Athena
Apr 09, 2025 pm 03:09 PM
As a data professional, you need to process large amounts of data from various sources. This can pose challenges to data management and analysis. Fortunately, two AWS services can help: AWS Glue and Amazon Athena.
 How to start the server with redis
Apr 10, 2025 pm 08:12 PM
How to start the server with redis
Apr 10, 2025 pm 08:12 PM
The steps to start a Redis server include: Install Redis according to the operating system. Start the Redis service via redis-server (Linux/macOS) or redis-server.exe (Windows). Use the redis-cli ping (Linux/macOS) or redis-cli.exe ping (Windows) command to check the service status. Use a Redis client, such as redis-cli, Python, or Node.js, to access the server.
 How to read redis queue
Apr 10, 2025 pm 10:12 PM
How to read redis queue
Apr 10, 2025 pm 10:12 PM
To read a queue from Redis, you need to get the queue name, read the elements using the LPOP command, and process the empty queue. The specific steps are as follows: Get the queue name: name it with the prefix of "queue:" such as "queue:my-queue". Use the LPOP command: Eject the element from the head of the queue and return its value, such as LPOP queue:my-queue. Processing empty queues: If the queue is empty, LPOP returns nil, and you can check whether the queue exists before reading the element.
 How to view server version of Redis
Apr 10, 2025 pm 01:27 PM
How to view server version of Redis
Apr 10, 2025 pm 01:27 PM
Question: How to view the Redis server version? Use the command line tool redis-cli --version to view the version of the connected server. Use the INFO server command to view the server's internal version and need to parse and return information. In a cluster environment, check the version consistency of each node and can be automatically checked using scripts. Use scripts to automate viewing versions, such as connecting with Python scripts and printing version information.
 How secure is Navicat's password?
Apr 08, 2025 pm 09:24 PM
How secure is Navicat's password?
Apr 08, 2025 pm 09:24 PM
Navicat's password security relies on the combination of symmetric encryption, password strength and security measures. Specific measures include: using SSL connections (provided that the database server supports and correctly configures the certificate), regularly updating Navicat, using more secure methods (such as SSH tunnels), restricting access rights, and most importantly, never record passwords.
