
 Operation and Maintenance
Nginx
How nginx implements load balancing and multi-site sharing session
Operation and Maintenance
Nginx
How nginx implements load balancing and multi-site sharing session
How nginx implements load balancing and multi-site sharing session

Common ways to share sessions across multiple sites include:
•Use .net automatic state service (asp.net state service);
•Use .net session database;
•Use memcached.
•Use cookies to achieve sharing between multiple sites (this method is only limited to the case where several sites are in the same domain name);
Here we will practice storing sessions in the form of a database to achieve Multi-site shared session.
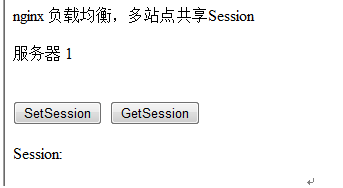
First we build the site, as shown below:
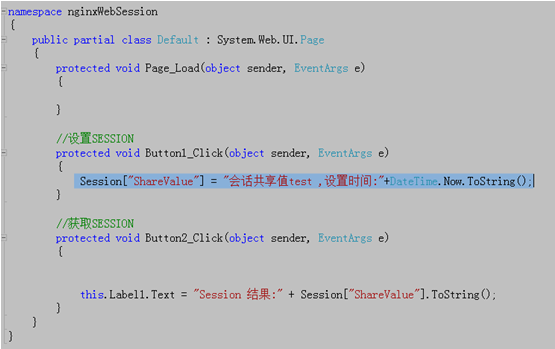
default.aspx
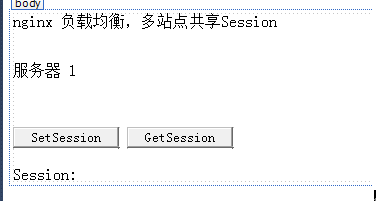
There are two buttons, setsession is mainly used to assign a value to a session (such as: session["sharevalue"] = "abcd"),
getsession is mainly used to obtain a session value.
The specific code is as follows:
That’s all the code part...
The next step is to configure the web.config. In fact, The main thing is to add the two nodes machinekey and sessionstate to the node
.
1. The main function of adding machinekey is:
"According to msdn's standard statement: "Add the key to Configure it so that it is used to encrypt and decrypt forms authentication cookie data and view state data, and to validate out-of-process session state identities. "That is to say, many encryptions of asp.net depend on the values in machinekey, such as the encryption of forms authentication cookie and viewstate. By default, the configuration of asp.net is dynamically generated by itself. If a single server does not Problem, but if multiple servers are load balanced, machinekey is also dynamically generated. The machinekey value on each server is inconsistent, resulting in inconsistent encryption results. Verification and viewstate cannot be shared, so for multiple server load balancing In this case, the same machinekey must be configured on each site." You can check other information for details.
2. Adding sessionstate mainly allows the session to be saved in the database.
The specific configuration is as follows:
Copy code The code is as follows:
validation="sha1" decryption="aes"/>
The website part is just fine. . . The following is to configure the database...
Database configuration:
Use the aspnet_regsql.exe tool
After asp.net version 2.0, Microsoft provides the aspnet_regsql.exe tool to easily configure the session database. This tool is located in the "system root directory\microsoft.net\framework\version number" folder on the web server.
Usage example:
aspnet_regsql.exe -s . -u sa - p 123456 -ssadd -sstype p
-s parameter:
represents the database instance name. You can use "." to represent the local machine.
-u and -p parameters:
represents the user name and password.
-e parameter:
You can choose a group between -u –p and -e. –e means to log in to the database through windows authentication as the current system user, and -u -p means to log in to the database as the sqlserver user.
-ssadd / –ssremove Parameters:
-ssadd means adding the session database, -ssremove means removing the session database.
sstype Parameter description:
t
Store session data in sql server tempdb in the database. This is the default setting. If session data is stored in a tempdb database, the session data will be lost when sql server is restarted.
Store session data in the aspstate database instead of the tempdb database.
c
Store session data into a custom database. If you specify the c option, you must also include the name of the custom database using the -d option.
My settings are: aspnet_regsql.exe -s . - e -d awbuisession -ssadd -sstype c
Okay. We've got the basics covered. .
Now we deploy a website we just built to iis. But since we want to load. At least two copies should be deployed.
We changed "Server 1" in defaut.aspx in one of the servers to "Server 2". The main purpose of doing this is to make a difference!
The details are as follows:

The URLs of the two websites are:
server 1: 127.0.0.1:8081;
server 2:127.0.0.1:8080;
ok. Next we are configuring nignx.
First find the nginx.conf file in the nginx\conf configuration file, open it with Notepad,
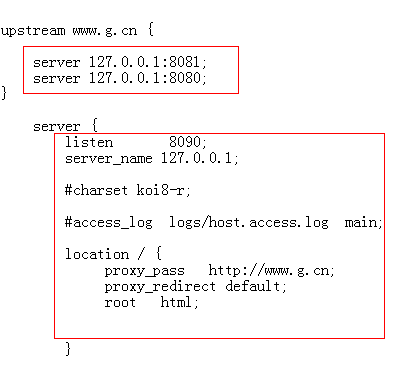
Make the above settings:
ok. If nginx is configured like this, it will be ok. Let’s start nginx..
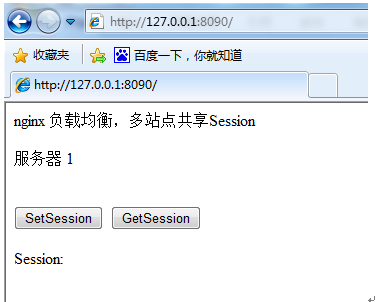
Enter the url we configured in nginx in the browser, such as: 127.0.0.1:8090
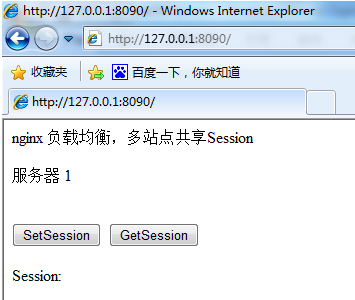
We will see Server 1 has started to serve us. Let's click "setsession" again to set a session value.
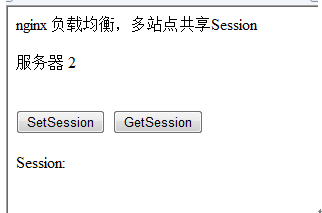
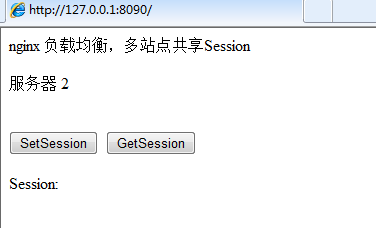
We will see server 2 start to work. At this time, we click "getsesion" again to see the session value just set on server 1. The result is as follows:
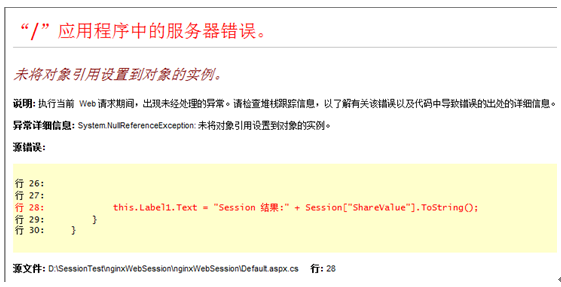
When this happens, the main reason is to store a session value in the database The session between server 1 and service 2 is not shared during the session, mainly because of a sessionid in the
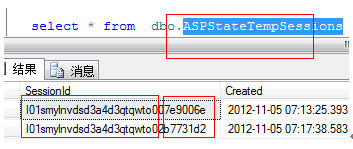
aspstatetempsessions table,
the sessionid includes Two parts: the 24-bit sessionid and 8-bit appname generated by the website. For different sites, the appname is different. If the 24-bit sessionid can be made the same on different sites, it must be ensured that the sessionid after combining and adding the appname is the same. You can modify the stored procedure tempgetappid so that the sessionid obtained has nothing to do with appname. Modify tempgetappid as follows:
Copy code The code is as follows:
alter procedure [dbo].[tempgetappid]
@appname tappname,
@appid int output
as
set @appname = 'test' --lower(@appname) Modify this so that the appname of multiple sites is a fixed value.
set @appid = null
select @appid = appid
from [awbuisession].dbo.aspstatetempapplications
where appname = @appname
if @appid is null begin
begin tran
select @appid = appid
from [awbuisession].dbo.aspstatetempapplications with (tablockx)
where appname = @appname
if @appid is null
begin
exec gethashcode @appname, @appid output
insert [awbuisession].dbo.aspstatetempapplications
values
(@appid, @appname)
if @@error = 2627
begin
declare @dupapp tappname
select @dupapp = rtrim(appname)
from [awbuisession].dbo.aspstatetempapplications
where appid = @appid
raiserror('sql session state fatal error: hash-code collision between applications ''%s '' and ''%s''. please rename the 1st application to resolve the problem.',
18, 1, @appname, @dupapp)
end
end
commit
end
return 0
After the above modifications, it is necessary to realize that multiple sites share the same sessionid.
Restart each site. Browse the website again
Click "setsession",
Click again: "getsession"
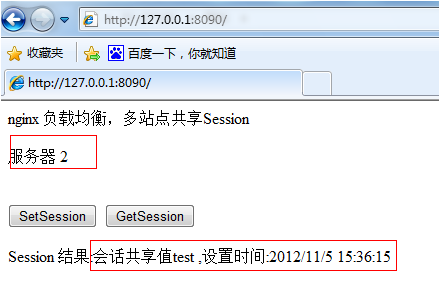
In this way we can see that server 2 gives the session value we just set in server 1.
Let’s click “getsession” again.
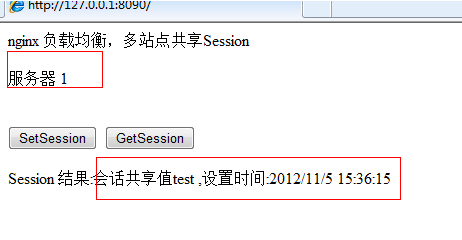
You can see that Server 1 and Server 2 return the same results, achieving “multi-site sharing” session”
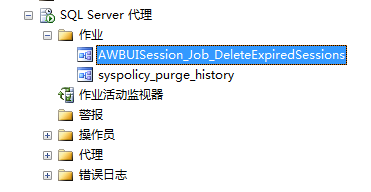
An additional point: session expiration is deleted, mainly when the job in the sql server agent is completed.
The above is the detailed content of How nginx implements load balancing and multi-site sharing session. For more information, please follow other related articles on the PHP Chinese website!

Hot AI Tools

Undresser.AI Undress
AI-powered app for creating realistic nude photos

AI Clothes Remover
Online AI tool for removing clothes from photos.

Undress AI Tool
Undress images for free

Clothoff.io
AI clothes remover

AI Hentai Generator
Generate AI Hentai for free.

Hot Article
Hot Tools

Notepad++7.3.1
Easy-to-use and free code editor

SublimeText3 Chinese version
Chinese version, very easy to use

Zend Studio 13.0.1
Powerful PHP integrated development environment

Dreamweaver CS6
Visual web development tools

SublimeText3 Mac version
God-level code editing software (SublimeText3)
Hot Topics
 1385
1385
 52
52

 How to check whether nginx is started
Apr 14, 2025 pm 01:03 PM
How to check whether nginx is started
Apr 14, 2025 pm 01:03 PM
How to confirm whether Nginx is started: 1. Use the command line: systemctl status nginx (Linux/Unix), netstat -ano | findstr 80 (Windows); 2. Check whether port 80 is open; 3. Check the Nginx startup message in the system log; 4. Use third-party tools, such as Nagios, Zabbix, and Icinga.
 How to configure cloud server domain name in nginx
Apr 14, 2025 pm 12:18 PM
How to configure cloud server domain name in nginx
Apr 14, 2025 pm 12:18 PM
How to configure an Nginx domain name on a cloud server: Create an A record pointing to the public IP address of the cloud server. Add virtual host blocks in the Nginx configuration file, specifying the listening port, domain name, and website root directory. Restart Nginx to apply the changes. Access the domain name test configuration. Other notes: Install the SSL certificate to enable HTTPS, ensure that the firewall allows port 80 traffic, and wait for DNS resolution to take effect.
 How to check whether nginx is started?
Apr 14, 2025 pm 12:48 PM
How to check whether nginx is started?
Apr 14, 2025 pm 12:48 PM
In Linux, use the following command to check whether Nginx is started: systemctl status nginx judges based on the command output: If "Active: active (running)" is displayed, Nginx is started. If "Active: inactive (dead)" is displayed, Nginx is stopped.
 How to start nginx server
Apr 14, 2025 pm 12:27 PM
How to start nginx server
Apr 14, 2025 pm 12:27 PM
Starting an Nginx server requires different steps according to different operating systems: Linux/Unix system: Install the Nginx package (for example, using apt-get or yum). Use systemctl to start an Nginx service (for example, sudo systemctl start nginx). Windows system: Download and install Windows binary files. Start Nginx using the nginx.exe executable (for example, nginx.exe -c conf\nginx.conf). No matter which operating system you use, you can access the server IP
 How to start nginx in Linux
Apr 14, 2025 pm 12:51 PM
How to start nginx in Linux
Apr 14, 2025 pm 12:51 PM
Steps to start Nginx in Linux: Check whether Nginx is installed. Use systemctl start nginx to start the Nginx service. Use systemctl enable nginx to enable automatic startup of Nginx at system startup. Use systemctl status nginx to verify that the startup is successful. Visit http://localhost in a web browser to view the default welcome page.
 How to check nginx version
Apr 14, 2025 am 11:57 AM
How to check nginx version
Apr 14, 2025 am 11:57 AM
The methods that can query the Nginx version are: use the nginx -v command; view the version directive in the nginx.conf file; open the Nginx error page and view the page title.
 How to configure nginx in Windows
Apr 14, 2025 pm 12:57 PM
How to configure nginx in Windows
Apr 14, 2025 pm 12:57 PM
How to configure Nginx in Windows? Install Nginx and create a virtual host configuration. Modify the main configuration file and include the virtual host configuration. Start or reload Nginx. Test the configuration and view the website. Selectively enable SSL and configure SSL certificates. Selectively set the firewall to allow port 80 and 443 traffic.
 How to solve nginx403
Apr 14, 2025 am 10:33 AM
How to solve nginx403
Apr 14, 2025 am 10:33 AM
How to fix Nginx 403 Forbidden error? Check file or directory permissions; 2. Check .htaccess file; 3. Check Nginx configuration file; 4. Restart Nginx. Other possible causes include firewall rules, SELinux settings, or application issues.
