

NAT configuration in USG firewall

USGFirewall NATConfiguration
Learning purpose
Master how to configure NATServer on the USG firewall
Master how to configure NATEasy IP on the USG firewall
Topology diagram
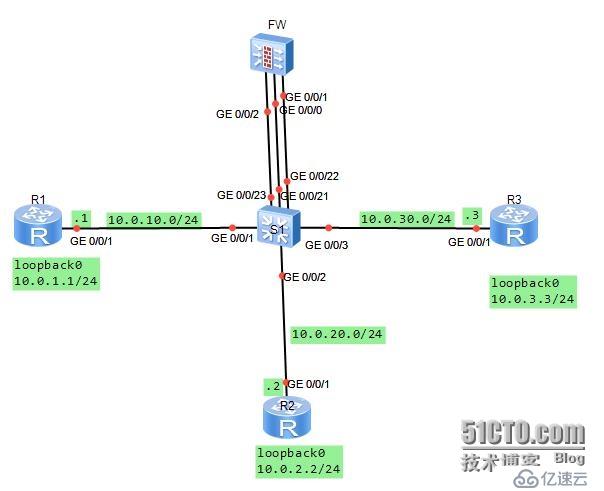
#:
You are the company's network administrator. The company is segregated into three zones using network firewalls. Now we need to publish the telnet service provided by a server (IP address: 10.0.3.3) in the DMZ area. The public addresses are 10.0.10.20 and 24. And users in the internal network Trust area access through Easy-IP. outside area. Access from other directions is prohibited.
Define the G0/0/1 and G0/0/21 interfaces to vlan11, define the G0/0/2 and G0/0/22 interfaces to vlan12, and define the G0/0/3 and The G0/0/23 interface is defined to vlan13. Three network segments are planned respectively.
LearningLearning tasks
Step 1.Basic configuration and IPAddressing
First, configure the address information for the three routers.
[Huawei]sysname R1
[R1]interface g0/0/1
[R1-GigabitEthernet0/0/1]ip add 10.0.10.124
[R1-GigabitEthernet0/0/1]desc this portconnect to S1-G0/0/1
[R1-GigabitEthernet0/0/1]interfaceloopback0
[R1-LoopBack0]ip add 10.0.1.1 24
[R1-LoopBack0]q
[Huawei]sysname R2
[R2]interface g0/0/1
[ R2-GigabitEthernet0/0/1]ip add 10.0.20.224
[R2-GigabitEthernet0/0/1]desc this portconnect to S1-G0/0/2
[R2-GigabitEthernet0/ 0/1]interfaceloopback0
[R2-LoopBack0]ip add 10.0.2.2 24
[R2-LoopBack0]q
[Huawei]sysname R3
[R3]interface g0/0/1
[R3-GigabitEthernet0/0/1]ip add 10.0.30.324
[R3-GigabitEthernet0/0/1]desc this portconnect to S1 -G0/0/3
[R3-GigabitEthernet0/0/1]interfaceloopback0
[R3-LoopBack0]ip add 10.0.3.3 24
[R3-LoopBack0] q
When configuring the address for the firewall, G0/0/1 is configured with 10.0.20.254/24.
[SRG]sysname FW
13:06:03 2014/07 /08
[FW]interface g0/0/1
13:06:30 2014/07/08
[FW-GigabitEthernet0/0/1]ip add 10.0.20.25424
13:07:01 2014/07/08
[FW-GigabitEthernet0/0/1]desc this portconnect to S1-G0/0/22
13:07:52 2014/07/08
[FW-GigabitEthernet0/0/1]interface g0/0/0
13:08:23 2014/07/08
[FW-GigabitEthernet0/0/0]dis this
13:08:31 2014/07/08
#interface GigabitEthernet0/0/0
alias GE0/MGMT
ipaddress 192.168.0.1 255.255.255.0
dhcpselect interface
dhcpserver gateway-list 192.168.0.1
#return
[FW-GigabitEthernet0/0/0]undo ip add
13:08:42 2014/07/08
Info: The DHCP server configuration on this interface will be deleted.
[FW-GigabitEthernet0/0/0]display this
13:08:46 2014/07/08
#interface GigabitEthernet0/0/0
alias GE0/MGMT
return
[FW-GigabitEthernet0/0/0 ]ip add 10.0.10.25424
13:09:29 2014/07/08
[FW-GigabitEthernet0/0/0]desc this portconnect to S1-G0/0/21
13:10:05 2014/07/08
[FW-GigabitEthernet0/0/0]interface G0/0/2
13:10:15 2014/07/ 08
[FW-GigabitEthernet0/0/2]ip add 10.0.30.25424
13:10:28 2014/07/08
[FW-GigabitEthernet0/0/ 2]desc this portconnect to S1-G0/0/23
13:10:53 2014/07/08
[FW-GigabitEthernet0/0/2]q
Vlan needs to be defined on the switch according to requirements
[Huawei]sysname S1
[S1]vlan batch 11 to 13
Info: This operation may take a few seconds. Please wait for a moment...done.
[S1]interface g0/0/1
[S1-GigabitEthernet0/0/1]port link-typeaccess
[S1 -GigabitEthernet0/0/1]port default vlan11
[S1]interface g0/0/2
[S1-GigabitEthernet0/0/2]port link-typeaccess
[S1-GigabitEthernet0/0/2]port default vlan12
[S1-GigabitEthernet0/0/2]interface g0/0/3
[S1-GigabitEthernet0/0/3]port link -typeaccess
[S1-GigabitEthernet0/0/3]port default vlan13
[S1-GigabitEthernet0/0/3]interface g0/0/21
[S1- GigabitEthernet0/0/21]port link-typeaccess
[S1-GigabitEthernet0/0/21]port default vlan11
[S1-GigabitEthernet0/0/21]interface g0/0/22
[S1-GigabitEthernet0/0/22]port link-typeaccess
[S1-GigabitEthernet0/0/22]port default vlan12
[S1-GigabitEthernet0/0/22 ]interface g0/0/23
[S1-GigabitEthernet0/0/23]port link-typeaccess
[S1-GigabitEthernet0/0/23]port default vlan13
Step 2.Configure the interface to the security zone
The firewall has four zones by default, namely "local", "trust", "untrust", and "dmz".
In the experiment, we used three zones: "trust", 'untrust" and "dmz". Configure G0/0/0 to the untrust zone, and configure G0/0/0/2 to the dmz zone. Configure G0/0/0/1 to the trust zone.
[FW]firewall zone trust
13:45:31 2014/07/08
[FW- zone-trust]dis this
13:45:35 2014/07/08
#firewall zone trust
setpriority 85
addinterface GigabitEthernet0/0/0
#return
[FW-zone-trust]undo add inter ]undo add interface g0/0/0
13:46:01 2014/07/08
[FW-zone-trust]add interface g0/0/1
13:46:22 2014/07/08
[FW-zone-trust]firewall zone untrust
[FW-zone-untrust]add interface g0/0/0
13:47:24 2014/07/08
[[FW-zone-untrust]firewall zone dmz
13:48:06 2014/07/08
[FW-zone-dmz]add interface g0/0/2
13:48:13 2014/07/08
[FW-zone-dmz]q
By default, the firewall does not allow communication between other areas outside the local area. In order to ensure the accuracy of the configuration, we configure the default firewall filtering rules to allow communication between all areas. After the configuration is completed, Test connectivity on the FW device.
[FW]firewall packet-filter default permitall
13:51:19 2014/07/08
Warning:Setting the default packetfiltering to permit poses security risks. You
are advised to configure the securitypolicy based on the actual data flows. Are
you sure you want to continue?[Y/N]y
[FW]ping -c 1 10.0.10.1
13:51:56 2014/07/08
PING 10.0.10.1: 56 data bytes,press CTRL_C to break
Reply from 10.0.10.1: bytes=56 Sequence=1 ttl=255 time=90 ms
---10.0.10.1 ping statistics ---
1packet(s) transmitted
1packet(s) received
0.00% packet loss
round-trip min/avg/max = 90/90/90 ms
[FW ]ping -c 1 10.0.20.2
13:52:08 2014/07/08
PING 10.0.20.2: 56 data bytes,press CTRL_C to break
Reply from 10.0.20.2: bytes=56 Sequence=1 ttl=255 time=400 ms
---10.0.20.2 ping statistics ---
1packet(s) transmitted
1packet(s) received
0.00% packet loss
round-trip min/avg/max = 400/400/400 ms
[FW]ping -c 1 10.0.30.3
13:52:18 2014/07/08
PING 10.0.30.3: 56 data bytes,press CTRL_C to break
Reply from 10.0.30.3 : bytes=56 Sequence=1 ttl=255 time=410 ms
---10.0.30.3 ping statistics ---
1packet(s) transmitted
1packet( s) received
0.00% packet loss
round-trip min/avg/max = 410/410/410 ms
Step 3. Configure static routing to achieve network security Connectivity
Configure default routes on R2 and R3, and configure clear static routes on FW to achieve communication between the three loopback0 interfaces. Since R1 is an Internet device and does not need to know the private network information of the internal and DMZ zones, there is no need to define a default route.
[R2]ip route-static 0.0.0.0 0 10.0.20.254
[R3]ip route-static 0.0.0.0 0 10.0.30.254
[FW]ip route-static 10.0.1.0 24 10.0.10.1
13:58:26 2014/07/08
[FW]ip route-static 10.0.2.0 24 10.0.20.2
13:58:40 2014/07/08
[FW]ip route-static 10.0.3.0 24 10.0.30.3
13:58:52 2014/07/08
Test connectivity to 10.0.1.0, 10.0.2.0, 10.0.3.0 on the firewall.
[FW]ping -c 1 10.0.1.1
14:00:18 2014/07/08
PING 10.0.1.1: 56 data bytes,press CTRL_C to break
Reply from 10.0.1.1: bytes=56 Sequence=1 ttl=255 time=80 ms
---10.0.1.1 ping statistics ---
1packet (s) transmitted
1packet(s) received
0.00% packet loss
round-trip min/avg/max = 80/80/80 ms
[FW]ping -c 1 10.0.2.2
14:00:25 2014/07/08
PING 10.0.2.2: 56 data bytes,press CTRL_C to break
Reply from 10.0.2.2: bytes=56 Sequence=1 ttl=255 time=170 ms
---10.0.2.2 ping statistics ---
1packet(s) transmitted
1packet(s) received
0.00% packet loss
round-trip min/avg/max = 170/170/170 ms
[FW ]ping -c 1 10.0.3.3
14:00:29 2014/07/08
PING 10.0.3.3: 56 data bytes,press CTRL_C to break
Reply from 10.0.3.3: bytes=56 Sequence=1 ttl=255 time=110 ms
--- 10.0.3.3 ping statistics ---
1packet(s) transmitted
1packet(s) received
0.00% packet loss
round-trip min /avg/max = 110/110/110 ms
Under the current configuration, all areas can communicate without being checked. Since NAT has not yet been defined, the internal and DMZ zones cannot communicate with the external zone.
Step 4.Configure inter-zone security filtering
Configure data sent from part of the network segment 10.0.2.3 in the Trust zone to the Untrust zone The package is released. Telnet request sent from the Untrust zone to DMZ target server 10.0.3.3 was allowed to pass..
[FW]firewall session link-state check
[FW]policy interzone trust untrust outbound
[FW-policy-interzone-trust-untrust-outbound]policy0
14:06:57 2014/07/08
[FW-policy-interzone-trust-untrust-outbound-0]policysource 10.0.2.0 0.0.0.255
14 :07:18 2014/07/08
[FW-policy-interzone-trust-untrust-outbound-0]actionpermit
14:07:31 2014/07/08
[FW-policy-interzone-trust-untrust-outbound-0]q
14:07:40 2014/07/08
[FW-policy-interzone-trust- untrust-outbound]q
14:07:40 2014/07/08
]policy interzone dmz untrust inbound
14:09:01 2014/07/08
[FW-policy-interzone-dmz-untrust-inbound]policy0
14:09:08 2014/07/08
[FW-policy-interzone-dmz- untrust-inbound-0]policydestination 10.0.3.3 0
14:09:37 2014/07/08
[FW-policy-interzone-dmz-untrust-inbound-0]policyservice service -set telnet
[FW-policy-interzone-dmz-untrust-inbound-0]actionpermit
14:09:55 2014/07/08
[FW- policy-interzone-dmz-untrust-inbound-0]q
14:09:55 2014/07/08
Step 5. ConfigureEasy-Ip, implement Trust zone to Untrust zone Access.
Configure Easy-IP to perform NAT source address translation. And bind NAT to the interface.
[FW-nat-policy-interzone-trust-untrust-outbound]policy0
14:14:00 2014/07/08
[FW-nat-policy -interzone-trust-untrust-outbound-0]policysource 10.0.2.0 0.0.0.2
55
14:14:26 2014/07/08
[FW- nat-policy-interzone-trust-untrust-outbound-0]actionsource-nat
14:14:37 2014/07/08
[FW-nat-policy-interzone-trust- untrust-outbound-0]easy-ipg0/0/0
14:14:51 2014/07/08
[FW-nat-policy-interzone-trust-untrust-outbound- 0]q
After the configuration is completed, verify whether the access between the Trust zone and the Untrust zone is normal.
PING 10.0.1.1: 56 data bytes,press CTRL_C to break
Request time out
Request time out
Request time out
Request time out
Request time out
---10.0.1.1 ping statistics ---
5packet(s) transmitted
0packet(s) received
100.00% packet loss
PING 10.0.1.1: 56 data bytes,press CTRL_C to break
Reply from 10.0.1.1: bytes=56 Sequence=1 ttl=254 time=220 ms
Reply from 10.0. 1.1: bytes=56 Sequence=2 ttl=254 time=100 ms
Reply from 10.0.1.1: bytes=56 Sequence=3 ttl=254 time=100 ms
Reply from 10.0. 1.1: bytes=56 Sequence=4 ttl=254 time=120 ms
Reply from 10.0.1.1: bytes=56 Sequence=5 ttl=254 time=440 ms
---10.0 .1.1 ping statistics ---
5packet(s) transmitted
5packet(s) received
0.00% packet loss
round-trip min/ AVG/MAX = 100/196/440 ms
Note that the connectivity between testing and 10.0.1.1 here is unreasonable. The extended ping successfully achieves connectivity because the source address of 10.0.2.2 was specified when sending the packet. The reason is that when sending a data packet directly to 10.0.1.1, when the source address of the data packet reaches 10.0.1.1, the source address of the data packet is 10.0.20.2, which does not belong to the client address range of NAT translation.
Step 6. Publish the intranet server 10.0.3.3
Configure the telnet service of the intranet server 10.0.3.3 and map it to the address 10.0.10.20
[FW] nat server protocol tcp global10.0.10.20 telnet inside 10.0.3.3 telnet
Enable the Telnet function on R3 and test it on R1. When testing, please note that the external address is 10.0.10.20, so when R1 accesses 10.0.3.3, the target address it accesses is 10.0.10.20.
[R3]user-interface vty 0 4
[R3-ui-vty0-4]authentication-mode password
Please configure the login password(maximum length 16) :16
[R3-ui-vty0-4]set authentication password ?
cipher Set the password with cipher text
[R3-ui-vty0-4]set authentication passwordcip
[R3-ui-vty0-4]set authentication passwordcipher Huawei
[R3-ui-vty0-4]user privilege level 3
[R3-ui- vty0-4]q
Press CTRL_] to quit telnet mode
Trying 10.0.10.20 ...
Connected to 10.0.10.20 ...
Login authentication
Password:
The above is the detailed content of NAT configuration in USG firewall. For more information, please follow other related articles on the PHP Chinese website!

Hot AI Tools

Undresser.AI Undress
AI-powered app for creating realistic nude photos

AI Clothes Remover
Online AI tool for removing clothes from photos.

Undress AI Tool
Undress images for free

Clothoff.io
AI clothes remover

Video Face Swap
Swap faces in any video effortlessly with our completely free AI face swap tool!

Hot Article
Hot Tools

Notepad++7.3.1
Easy-to-use and free code editor

SublimeText3 Chinese version
Chinese version, very easy to use

Zend Studio 13.0.1
Powerful PHP integrated development environment

Dreamweaver CS6
Visual web development tools

SublimeText3 Mac version
God-level code editing software (SublimeText3)
Hot Topics
 1386
1386
 52
52

 How to fix 'Error: 0x80070185, Cloud operation was unsuccessful” in OneDrive
May 16, 2023 pm 04:26 PM
How to fix 'Error: 0x80070185, Cloud operation was unsuccessful” in OneDrive
May 16, 2023 pm 04:26 PM
OneDrive is a popular cloud storage application provided by Microsoft. Most of us use OneDrive to store our files, folders, documents, etc. But some users complained that when they try to access shared files on OneDrive, it gives an error stating “Error: 0x80070185, Cloud operation was unsuccessful”. Therefore, they cannot perform any operations on OneDrive such as copying files, pasting, downloading shared files, etc. Nowadays, it is necessary to use these operations in our daily work. This error can be easily solved and for this we have some methods that we can apply and try to solve the problem. let's start! Method 1 – Sign out and sign back in to OneDrive app steps
 NAT Boost vs. Qos for games; which one is better?
Feb 19, 2024 pm 07:00 PM
NAT Boost vs. Qos for games; which one is better?
Feb 19, 2024 pm 07:00 PM
In today's situation where almost all games are online, it is not advisable to ignore the optimization of home network. Almost all routers are equipped with NATBoost and QoS features designed to enhance users' gaming experience. This article will explore the definition, advantages and disadvantages of NATBoost and QoS. NATBoost vs. Qos for games; which one is better? NATBoost, also known as Network Address Translation Boost, is a feature built into routers that improves their performance. It's especially important for gaming because it helps reduce network latency, which is the time it takes for data to be transferred between the gaming device and the server. By optimizing the data processing method within the router, NATBoost achieves faster data processing speed and lower latency, thus changing the
 8 Big Fixes if Grammarly Not Working on Windows 10 Browser
May 05, 2023 pm 02:16 PM
8 Big Fixes if Grammarly Not Working on Windows 10 Browser
May 05, 2023 pm 02:16 PM
If you have syntax issues on your Windows 10 or 11 PC, this article will help you solve the problem. Grammarly is one of the most popular typing assistants for fixing grammar, spelling, clarity, and more. It has become an essential part of writing professionals. However, if it doesn't work properly, it can be a very frustrating experience. Many Windows users have reported that this tool does not work well on their computers. We did an in-depth analysis and found the cause and solution of this problem. Why doesn't Grammarly work on my PC? Grammarly on PC may not work properly due to several common reasons. It includes the following
 Win11 firewall advanced settings gray solution
Dec 24, 2023 pm 07:53 PM
Win11 firewall advanced settings gray solution
Dec 24, 2023 pm 07:53 PM
When setting up the firewall, many friends found that their win11 firewall advanced settings were grayed out and unable to be clicked. This may be caused by not adding a control unit, or by not opening the advanced settings in the correct way. Let’s take a look at how to solve it. Win11 firewall advanced settings gray method one: 1. First, click the start menu below, search and open "Control Panel" at the top 2. Then open "Windows Defender Firewall" 3. After entering, you can open "Advanced Settings" in the left column . Method 2: 1. If the above method cannot be opened, you can right-click "Start Menu" and open "Run" 2. Then enter "mmc" and press Enter to confirm opening. 3. After opening, click on the upper left
 Fix: Windows 11 Firewall blocks printer
May 01, 2023 pm 08:28 PM
Fix: Windows 11 Firewall blocks printer
May 01, 2023 pm 08:28 PM
Firewalls monitor network traffic and can block network connections for certain programs and hardware. Windows 11 includes its own Windows Defender Firewall, which may block printers from accessing the web. Therefore, affected users cannot use their Brother printers when the firewall blocks it. Keep in mind that this issue affects other brands as well, but today we’ll show you how to fix it. Why is my Brother printer blocked by the firewall? There are several causes for this issue, and you will most likely need to open certain ports before your printer can access the network. Printer software can also cause problems, so be sure to update it as well as your printer driver. Read on to learn how
 How to enable or disable firewall on Alpine Linux?
Feb 21, 2024 pm 12:45 PM
How to enable or disable firewall on Alpine Linux?
Feb 21, 2024 pm 12:45 PM
On AlpineLinux, you can use the iptables tool to configure and manage firewall rules. Here are the basic steps to enable or disable the firewall on AlpineLinux: Check the firewall status: sudoiptables -L If the output shows rules (for example, there are some INPUT, OUTPUT, or FORWARD rules), the firewall is enabled. If the output is empty, the firewall is currently disabled. Enable firewall: sudoiptables-PINPUTACCEPTsudoiptables-POUTPUTACCEPTsudoiptables-PFORWARDAC
 Resolve error code 0xc004f074 when activating Windows 11.
May 08, 2023 pm 07:10 PM
Resolve error code 0xc004f074 when activating Windows 11.
May 08, 2023 pm 07:10 PM
After installing the latest operating system on your PC, activating your copy of Windows 11 is the main job. Not only does it unlock the true potential of the Windows 11 operating system, but it also gets rid of the annoying "Activate your Windows 11" message. However, for some users, Windows 11 activation error 0xc004f074 hinders the smooth progress of activation. This bug apparently prevents users from activating Windows 11 and forces them to use an operating system with limited functionality. Windows 11 activation error code 0xc004f074 is related to the Key Management Service. You will encounter this problem when KMS is unavailable. Okay, that's it for this tutorial
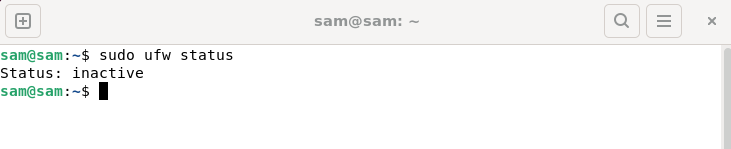 How to fix UFW status showing as inactive in Linux
Mar 20, 2024 pm 01:50 PM
How to fix UFW status showing as inactive in Linux
Mar 20, 2024 pm 01:50 PM
UFW, also known as Uncomplex Firewall, is adopted by many Linux distributions as their firewall system. UFW is designed to make it easy for novice users to manage firewall settings through both the command line interface and the graphical user interface. A UFW firewall is a system that monitors network traffic according to set rules to protect the network from network sniffing and other attacks. If you have UFW installed on your Linux system but its status shows as inactive, there could be several reasons. In this guide, I will share how to resolve the UFW firewall inactive issue on Linux systems. Why UFW Shows Inactive Status on Linux Why UFW Is Inactive by Default on Linux How to Inactive on Linux
