

How to implement nginx memory pool

1. Introduction
The latest stable version nginx1.20.2.
In order to allocate memory efficiently and quickly, and reduce memory fragmentation, nginx implements its own basic memory pool components.
Main implementation filesngx_palloc.h, ngx_palloc.c
2. Data structure
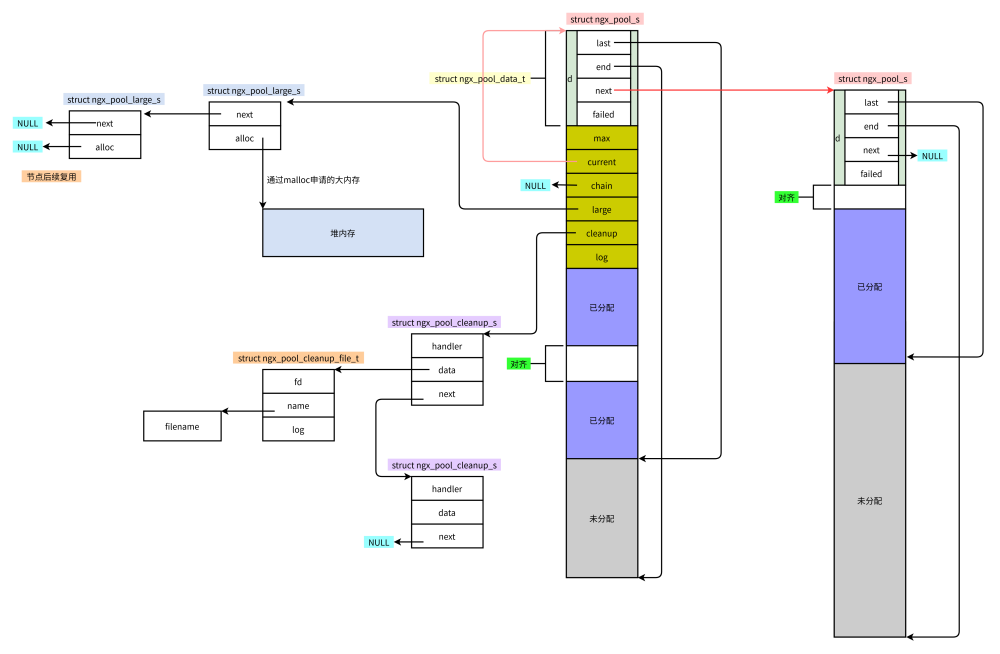
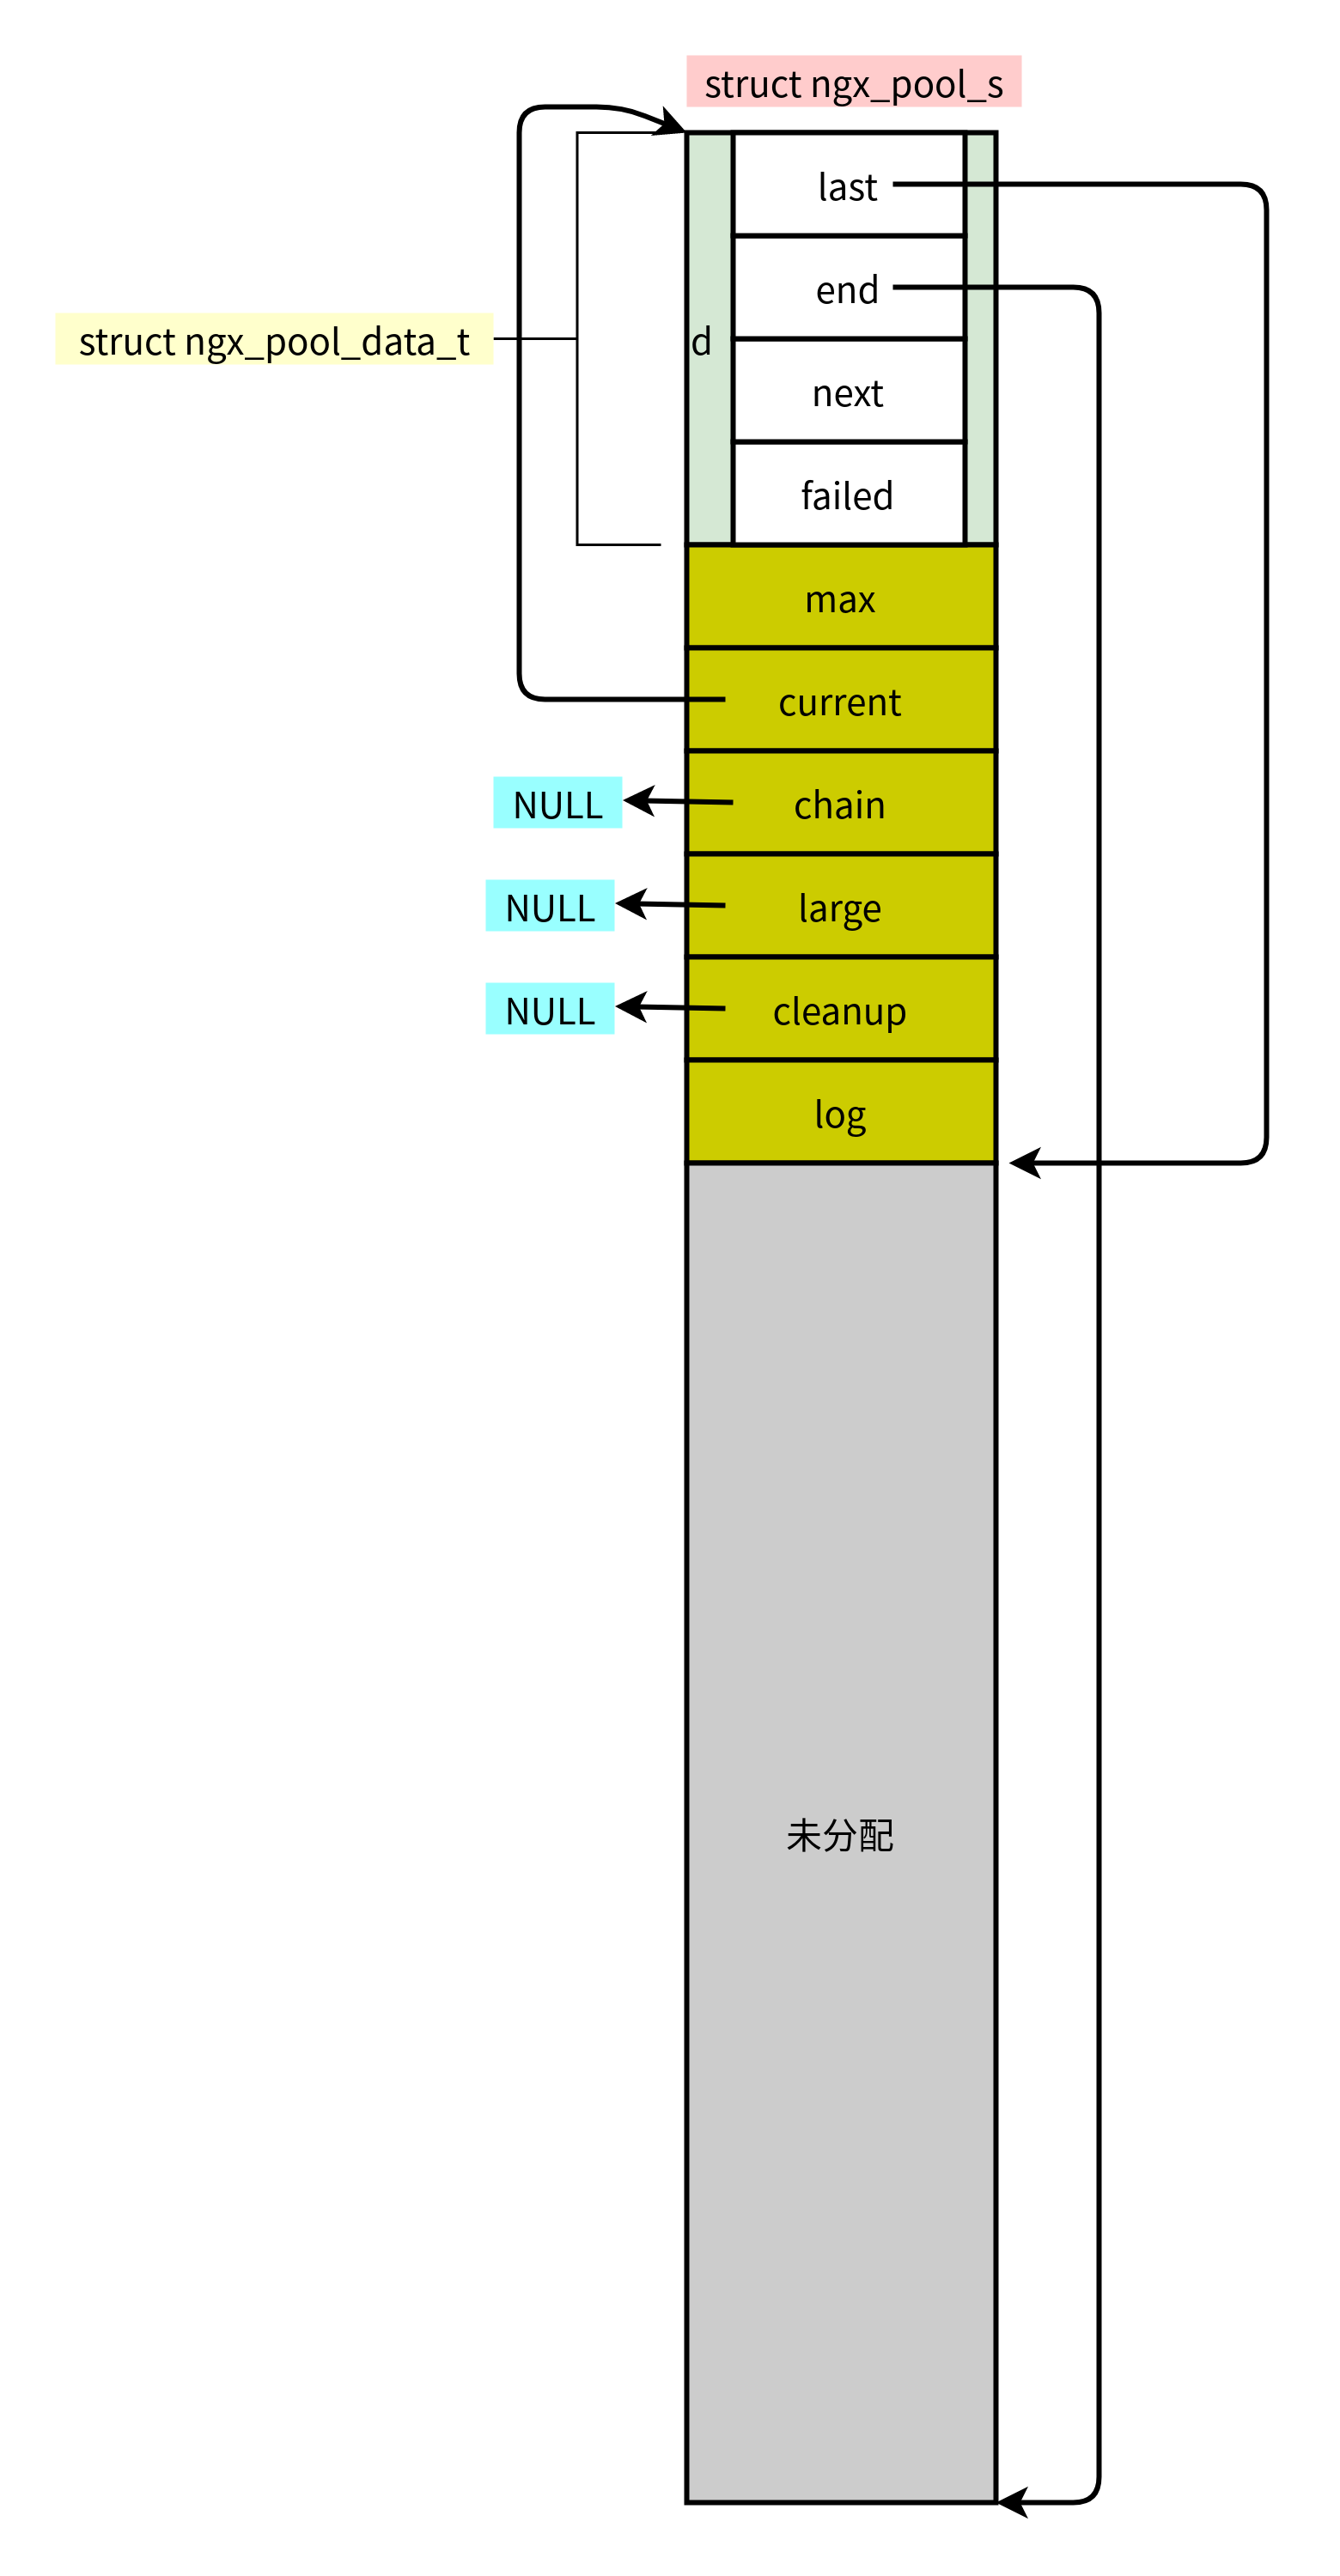
2.1 Main structure of the memory pool
typedef struct {
    u_char               *last;
    u_char               *end;
    ngx_pool_t           *next;
    ngx_uint_t            failed;
} ngx_pool_data_t;

struct ngx_pool_s {
    ngx_pool_data_t       d;
    size_t                max;
    ngx_pool_t           *current;
    ngx_chain_t          *chain;
    ngx_pool_large_t     *large;
    ngx_pool_cleanup_t   *cleanup;
    ngx_log_t            *log;
};The first memory pool One member is a structure:
Use the ngx_pool_data_t structure to represent the current memory pool information.
last: The address to be allocated next time
end: The end address of the memory pool
next: Memory pool linked list, connecting multiple memory pools
max
The entire memory pool The maximum size
current
points to starting from the current memory pool to find available memory
chain
buffer used, this does not involve
large
when When the required memory is greater than the maximum size of the memory pool, it needs to be allocated directly through malloc and then organized into a linked list
cleanup
Callback linked list for cleanup work
log
Log handle
2.2 Large memory chain
When the memory to be allocated is larger than the maximum size of the memory pool, the memory pool cannot satisfy the allocation, so it is allocated directly from the system and then forms a linked list for maintenance.
typedef struct ngx_pool_large_s  ngx_pool_large_t;

struct ngx_pool_large_s {
    ngx_pool_large_t     *next;
    void                 *alloc;
};2.3 Cleanup task chain
There is a linked list of callback tasks. When the memory pool is destroyed, this linked list will be traversed in sequence and the handlers will be called back one by one to clean up.
typedef void (*ngx_pool_cleanup_pt)(void *data);

typedef struct ngx_pool_cleanup_s  ngx_pool_cleanup_t;

struct ngx_pool_cleanup_s {
    ngx_pool_cleanup_pt   handler;
    void                 *data;
    ngx_pool_cleanup_t   *next;
};3. Memory structure diagram
3.1 Logic

/*
 * NGX_MAX_ALLOC_FROM_POOL should be (ngx_pagesize - 1), i.e. 4095 on x86.
 * On Windows NT it decreases a number of locked pages in a kernel.
 */
#define NGX_MAX_ALLOC_FROM_POOL  (ngx_pagesize - 1)

#define NGX_DEFAULT_POOL_SIZE    (16 * 1024)
Copy after loginngx_pool_t *
ngx_create_pool(size_t size, ngx_log_t *log)
{
ngx_pool_t *p;
p = ngx_memalign(NGX_POOL_ALIGNMENT, size, log);
if (p == NULL) {
return NULL;
}
p->d.last = (u_char *) p + sizeof(ngx_pool_t);
p->d.end = (u_char *) p + size;
p->d.next = NULL;
p->d.failed = 0;
size = size - sizeof(ngx_pool_t);
p->max = (size < NGX_MAX_ALLOC_FROM_POOL) ? size : NGX_MAX_ALLOC_FROM_POOL;
p->current = p;
p->chain = NULL;
p->large = NULL;
p->cleanup = NULL;
p->log = log;
return p;
}Copy after login
As you can see from the code, the maximum memory pool does not exceed the size of pagesize/* * NGX_MAX_ALLOC_FROM_POOL should be (ngx_pagesize - 1), i.e. 4095 on x86. * On Windows NT it decreases a number of locked pages in a kernel. */ #define NGX_MAX_ALLOC_FROM_POOL (ngx_pagesize - 1) #define NGX_DEFAULT_POOL_SIZE (16 * 1024)
ngx_pool_t *
ngx_create_pool(size_t size, ngx_log_t *log)
{
    ngx_pool_t  *p;

    p = ngx_memalign(NGX_POOL_ALIGNMENT, size, log);
    if (p == NULL) {
        return NULL;
    }

    p->d.last = (u_char *) p + sizeof(ngx_pool_t);
    p->d.end = (u_char *) p + size;
    p->d.next = NULL;
    p->d.failed = 0;

    size = size - sizeof(ngx_pool_t);
    p->max = (size < NGX_MAX_ALLOC_FROM_POOL) ? size : NGX_MAX_ALLOC_FROM_POOL;

    p->current = p;
    p->chain = NULL;
    p->large = NULL;
    p->cleanup = NULL;
    p->log = log;

    return p;
} 
- Memory alignment
ngx_palloc
- Memory misalignment
ngx_pnalloc
void *
ngx_palloc(ngx_pool_t *pool, size_t size)
{
#if !(NGX_DEBUG_PALLOC)
    if (size <= pool->max) {
        return ngx_palloc_small(pool, size, 1);
    }
#endif

    return ngx_palloc_large(pool, size);
}static ngx_inline void *
ngx_palloc_small(ngx_pool_t *pool, size_t size, ngx_uint_t align)
{
u_char *m;
ngx_pool_t *p;
p = pool->current;
do {
m = p->d.last;
if (align) {
m = ngx_align_ptr(m, NGX_ALIGNMENT);
}
if ((size_t) (p->d.end - m) >= size) {
p->d.last = m + size;
return m;
}
p = p->d.next;
} while (p);
return ngx_palloc_block(pool, size);
}static void *
ngx_palloc_block(ngx_pool_t *pool, size_t size)
{
u_char *m;
size_t psize;
ngx_pool_t *p, *new;
psize = (size_t) (pool->d.end - (u_char *) pool);
m = ngx_memalign(NGX_POOL_ALIGNMENT, psize, pool->log);
if (m == NULL) {
return NULL;
}
new = (ngx_pool_t *) m;
new->d.end = m + psize;
new->d.next = NULL;
new->d.failed = 0;
m += sizeof(ngx_pool_data_t);
m = ngx_align_ptr(m, NGX_ALIGNMENT);
new->d.last = m + size;
for (p = pool->current; p->d.next; p = p->d.next) {
if (p->d.failed++ > 4) {
pool->current = p->d.next;
}
}
p->d.next = new;
return m;
}It is considered that you cannot meet the allocation more than 4 times, and you will not be able to meet the allocation in the future. You will no longer be used. Reduce the number of traversals and speed up the efficiency of successful allocation
static void *
ngx_palloc_large(ngx_pool_t *pool, size_t size)
{
    void              *p;
    ngx_uint_t         n;
    ngx_pool_large_t  *large;

    p = ngx_alloc(size, pool->log);
    if (p == NULL) {
        return NULL;
    }

    n = 0;

    for (large = pool->large; large; large = large->next) {
        if (large->alloc == NULL) {
            large->alloc = p;
            return p;
        }

        if (n++ > 3) {
            break;
        }
    }

    large = ngx_palloc_small(pool, sizeof(ngx_pool_large_t), 1);
    if (large == NULL) {
        ngx_free(p);
        return NULL;
    }

    large->alloc = p;
    large->next = pool->large;
    pool->large = large;

    return p;
}void *
ngx_pmemalign(ngx_pool_t *pool, size_t size, size_t alignment)
{
void *p;
ngx_pool_large_t *large;
p = ngx_memalign(alignment, size, pool->log);
if (p == NULL) {
return NULL;
}
large = ngx_palloc_small(pool, sizeof(ngx_pool_large_t), 1);
if (large == NULL) {
ngx_free(p);
return NULL;
}
large->alloc = p;
large->next = pool->large;
pool->large = large;
return p;
}ngx_pool_cleanup_t *
ngx_pool_cleanup_add(ngx_pool_t *p, size_t size)
{
ngx_pool_cleanup_t *c;
c = ngx_palloc(p, sizeof(ngx_pool_cleanup_t));
if (c == NULL) {
return NULL;
}
if (size) {
c->data = ngx_palloc(p, size);
if (c->data == NULL) {
return NULL;
}
} else {
c->data = NULL;
}
c->handler = NULL;
c->next = p->cleanup;
p->cleanup = c;
ngx_log_debug1(NGX_LOG_DEBUG_ALLOC, p->log, 0, "add cleanup: %p", c);
return c;
}Copy after login
It can be seen that only one node is allocated here, and the handler and data data are not set, so it depends on the specific caller for settings, because the allocated node is returned here. For example, in the function ngx_pool_cleanup_t *
ngx_pool_cleanup_add(ngx_pool_t *p, size_t size)
{
ngx_pool_cleanup_t *c;
c = ngx_palloc(p, sizeof(ngx_pool_cleanup_t));
if (c == NULL) {
return NULL;
}
if (size) {
c->data = ngx_palloc(p, size);
if (c->data == NULL) {
return NULL;
}
} else {
c->data = NULL;
}
c->handler = NULL;
c->next = p->cleanup;
p->cleanup = c;
ngx_log_debug1(NGX_LOG_DEBUG_ALLOC, p->log, 0, "add cleanup: %p", c);
return c;
}ngx_create_temp_file
ngx_int_t
ngx_create_temp_file(ngx_file_t *file, ngx_path_t *path, ngx_pool_t *pool,
    ngx_uint_t persistent, ngx_uint_t clean, ngx_uint_t access)
{
    ...

    cln = ngx_pool_cleanup_add(pool, sizeof(ngx_pool_cleanup_file_t));
    if (cln == NULL) {
        return NGX_ERROR;
    }

       ...
        file->fd = ngx_open_tempfile(file->name.data, persistent, access);
				...
        if (file->fd != NGX_INVALID_FILE) {

            cln->handler = clean ? ngx_pool_delete_file : ngx_pool_cleanup_file;
            clnf = cln->data;

            clnf->fd = file->fd;
            clnf->name = file->name.data;
            clnf->log = pool->log;

            return NGX_OK;
        }
			...
}- Release large memory
- Reset the last in memory
- Reset failed count
void
ngx_reset_pool(ngx_pool_t *pool)
{
    ngx_pool_t        *p;
    ngx_pool_large_t  *l;

    for (l = pool->large; l; l = l->next) {
        if (l->alloc) {
            ngx_free(l->alloc);
        }
    }

    for (p = pool; p; p = p->d.next) {
        p->d.last = (u_char *) p + sizeof(ngx_pool_t);
        p->d.failed = 0;
    }

    pool->current = pool;
    pool->chain = NULL;
    pool->large = NULL;
}When there is insufficient space in the memory pool,
ngx_palloc_block will be called to create a new memory pool, and last points to m = sizeof(ngx_pool_data_t);, so the current newly allocated memory pool will be larger than the available size of the first memory pool (max,current,chain,large, cleanup, log) the size of these fields (maybe not that much, because it needs to be aligned, maybe it will be exactly the same after alignment), and now when resetting, p->d.last = (u_char *) p sizeof(ngx_pool_t);The available size of each memory pool becomes the same.
- Callback cleanup task
- Release large memory
- Release the memory pool itself
void
ngx_destroy_pool(ngx_pool_t *pool)
{
    ngx_pool_t          *p, *n;
    ngx_pool_large_t    *l;
    ngx_pool_cleanup_t  *c;

    for (c = pool->cleanup; c; c = c->next) {
        if (c->handler) {
            ngx_log_debug1(NGX_LOG_DEBUG_ALLOC, pool->log, 0,
                           "run cleanup: %p", c);
            c->handler(c->data);
        }
    }


    for (l = pool->large; l; l = l->next) {
        if (l->alloc) {
            ngx_free(l->alloc);
        }
    }

    for (p = pool, n = pool->d.next; /* void */; p = n, n = n->d.next) {
        ngx_free(p);

        if (n == NULL) {
            break;
        }
    }
}4.6 大内存释放
通过遍历找到要释放的节点,将内存释放,并且将alloc设置成NULL,则有了节点重用的情况。
ngx_int_t
ngx_pfree(ngx_pool_t *pool, void *p)
{
    ngx_pool_large_t  *l;

    for (l = pool->large; l; l = l->next) {
        if (p == l->alloc) {
            ngx_log_debug1(NGX_LOG_DEBUG_ALLOC, pool->log, 0,
                           "free: %p", l->alloc);
            ngx_free(l->alloc);
            l->alloc = NULL;

            return NGX_OK;
        }
    }

    return NGX_DECLINED;
}4.7 分配并清空数据
void *
ngx_pcalloc(ngx_pool_t *pool, size_t size)
{
    void *p;

    p = ngx_palloc(pool, size);
    if (p) {
        ngx_memzero(p, size);
    }

    return p;
}正常分配的空间中都是垃圾数据,所以当前函数在分配空间后,将分配的空间清零。
4.8 回调文件清理
(1) 手动关闭指定fd
遍历清理任务,找到ngx_pool_cleanup_file的handler,如果是要关闭的fd,则回调
void
ngx_pool_run_cleanup_file(ngx_pool_t *p, ngx_fd_t fd)
{
    ngx_pool_cleanup_t       *c;
    ngx_pool_cleanup_file_t  *cf;

    for (c = p->cleanup; c; c = c->next) {
        if (c->handler == ngx_pool_cleanup_file) {

            cf = c->data;

            if (cf->fd == fd) {
                c->handler(cf);
                c->handler = NULL;
                return;
            }
        }
    }
}(2) 关闭fd
void
ngx_pool_cleanup_file(void *data)
{
    ngx_pool_cleanup_file_t  *c = data;

    ngx_log_debug1(NGX_LOG_DEBUG_ALLOC, c->log, 0, "file cleanup: fd:%d",
                   c->fd);

    if (ngx_close_file(c->fd) == NGX_FILE_ERROR) {
        ngx_log_error(NGX_LOG_ALERT, c->log, ngx_errno,
                      ngx_close_file_n " \"%s\" failed", c->name);
    }
}(3) 删除文件并关闭fd
void
ngx_pool_delete_file(void *data)
{
    ngx_pool_cleanup_file_t  *c = data;

    ngx_err_t  err;

    ngx_log_debug2(NGX_LOG_DEBUG_ALLOC, c->log, 0, "file cleanup: fd:%d %s",
                   c->fd, c->name);

    if (ngx_delete_file(c->name) == NGX_FILE_ERROR) {
        err = ngx_errno;

        if (err != NGX_ENOENT) {
            ngx_log_error(NGX_LOG_CRIT, c->log, err,
                          ngx_delete_file_n " \"%s\" failed", c->name);
        }
    }

    if (ngx_close_file(c->fd) == NGX_FILE_ERROR) {
        ngx_log_error(NGX_LOG_ALERT, c->log, ngx_errno,
                      ngx_close_file_n " \"%s\" failed", c->name);
    }
}The above is the detailed content of How to implement nginx memory pool. For more information, please follow other related articles on the PHP Chinese website!

Hot AI Tools

Undresser.AI Undress
AI-powered app for creating realistic nude photos

AI Clothes Remover
Online AI tool for removing clothes from photos.

Undress AI Tool
Undress images for free

Clothoff.io
AI clothes remover

AI Hentai Generator
Generate AI Hentai for free.

Hot Article
Hot Tools

Notepad++7.3.1
Easy-to-use and free code editor

SublimeText3 Chinese version
Chinese version, very easy to use

Zend Studio 13.0.1
Powerful PHP integrated development environment

Dreamweaver CS6
Visual web development tools

SublimeText3 Mac version
God-level code editing software (SublimeText3)
Hot Topics
 1377
1377
 52
52

 How to allow external network access to tomcat server
Apr 21, 2024 am 07:22 AM
How to allow external network access to tomcat server
Apr 21, 2024 am 07:22 AM
To allow the Tomcat server to access the external network, you need to: modify the Tomcat configuration file to allow external connections. Add a firewall rule to allow access to the Tomcat server port. Create a DNS record pointing the domain name to the Tomcat server public IP. Optional: Use a reverse proxy to improve security and performance. Optional: Set up HTTPS for increased security.
 How to run thinkphp
Apr 09, 2024 pm 05:39 PM
How to run thinkphp
Apr 09, 2024 pm 05:39 PM
Steps to run ThinkPHP Framework locally: Download and unzip ThinkPHP Framework to a local directory. Create a virtual host (optional) pointing to the ThinkPHP root directory. Configure database connection parameters. Start the web server. Initialize the ThinkPHP application. Access the ThinkPHP application URL and run it.
 Welcome to nginx!How to solve it?
Apr 17, 2024 am 05:12 AM
Welcome to nginx!How to solve it?
Apr 17, 2024 am 05:12 AM
To solve the "Welcome to nginx!" error, you need to check the virtual host configuration, enable the virtual host, reload Nginx, if the virtual host configuration file cannot be found, create a default page and reload Nginx, then the error message will disappear and the website will be normal show.
 How to generate URL from html file
Apr 21, 2024 pm 12:57 PM
How to generate URL from html file
Apr 21, 2024 pm 12:57 PM
Converting an HTML file to a URL requires a web server, which involves the following steps: Obtain a web server. Set up a web server. Upload HTML file. Create a domain name. Route the request.
 How to deploy nodejs project to server
Apr 21, 2024 am 04:40 AM
How to deploy nodejs project to server
Apr 21, 2024 am 04:40 AM
Server deployment steps for a Node.js project: Prepare the deployment environment: obtain server access, install Node.js, set up a Git repository. Build the application: Use npm run build to generate deployable code and dependencies. Upload code to the server: via Git or File Transfer Protocol. Install dependencies: SSH into the server and use npm install to install application dependencies. Start the application: Use a command such as node index.js to start the application, or use a process manager such as pm2. Configure a reverse proxy (optional): Use a reverse proxy such as Nginx or Apache to route traffic to your application
 What are the most common instructions in a dockerfile
Apr 07, 2024 pm 07:21 PM
What are the most common instructions in a dockerfile
Apr 07, 2024 pm 07:21 PM
The most commonly used instructions in Dockerfile are: FROM: Create a new image or derive a new image RUN: Execute commands (install software, configure the system) COPY: Copy local files to the image ADD: Similar to COPY, it can automatically decompress tar archives or obtain URL files CMD: Specify the command when the container starts EXPOSE: Declare the container listening port (but not public) ENV: Set the environment variable VOLUME: Mount the host directory or anonymous volume WORKDIR: Set the working directory in the container ENTRYPOINT: Specify what to execute when the container starts Executable file (similar to CMD, but cannot be overwritten)
 Can nodejs be accessed from the outside?
Apr 21, 2024 am 04:43 AM
Can nodejs be accessed from the outside?
Apr 21, 2024 am 04:43 AM
Yes, Node.js can be accessed from the outside. You can use the following methods: Use Cloud Functions to deploy the function and make it publicly accessible. Use the Express framework to create routes and define endpoints. Use Nginx to reverse proxy requests to Node.js applications. Use Docker containers to run Node.js applications and expose them through port mapping.
 How to deploy and maintain a website using PHP
May 03, 2024 am 08:54 AM
How to deploy and maintain a website using PHP
May 03, 2024 am 08:54 AM
To successfully deploy and maintain a PHP website, you need to perform the following steps: Select a web server (such as Apache or Nginx) Install PHP Create a database and connect PHP Upload code to the server Set up domain name and DNS Monitoring website maintenance steps include updating PHP and web servers, and backing up the website , monitor error logs and update content.
