

How to use Docker to mount volumes to deploy Nginx

Nginx data volume
nginx has many functions, such as forward proxy, reverse proxy, load balancing, transparent proxy, etc. Generally, reverse proxy is used more often. Proxies and load balancing. We only need to synchronize the configuration file locally to complete these operations. To create an nginx configuration file, you first need to create a new file named nginx.conf in the /etc/nginx/ directory
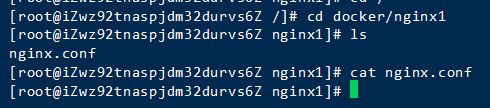
nginx1 directory also needs nginx.conf Create, just leave the content empty. Next, check whether the image is normal:

If you have not downloaded the image yet, use the following command to pull the image (default is the latest version):
docker pull nginx
Next run Container:
docker run -itd -p 80:80 --name nginx001 -v /docker/nginx1/nginx.conf:/etc/nginx/nginx.conf nginx
Explain:
-itd: Turn on interactive mode, simulate terminal, run in the background
- ##-p 80:80: The corresponding port is mapped to the host machine
- --name nginx001: Custom container name
- -v /docker/nginx1/ nginx.conf:/etc/nginx/nginx.conf: Map the corresponding file of the host to the nginx configuration file ##nginx: The running image name
Run After the above command, a random string will be returned to indicate that the container is successfully created:
 Check the running container:
 If you don’t see nginx001, there must be an error during running. Let’s take a look at the error message:
 It probably means that the events node was not found in the configuration file. Because the content of the file we created is empty, when starting the container, the nginx.conf in the corresponding directory is directly mapped to nginx.conf in nginx001. Of course, nginx with an empty configuration cannot run.
Now vi just created nginx.conf locally and start configuring:
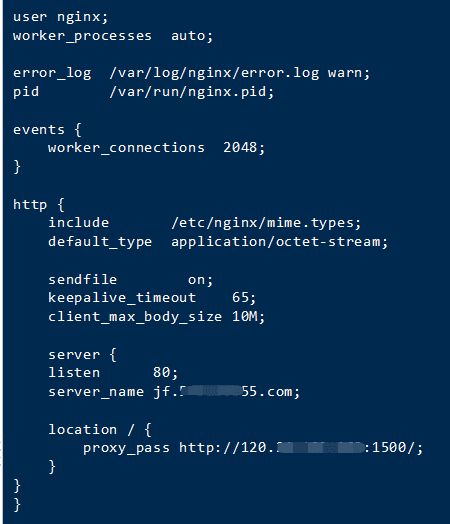 Before I deployed a simple .net core program on docker, Occupying local port 1500, now I use nginx reverse proxy to the program to a specified domain name and access it through port 80. After the configuration file is written, restart the container nginx001:
 Now nginx001 has been successfully started. Let’s access the domain name just specified:
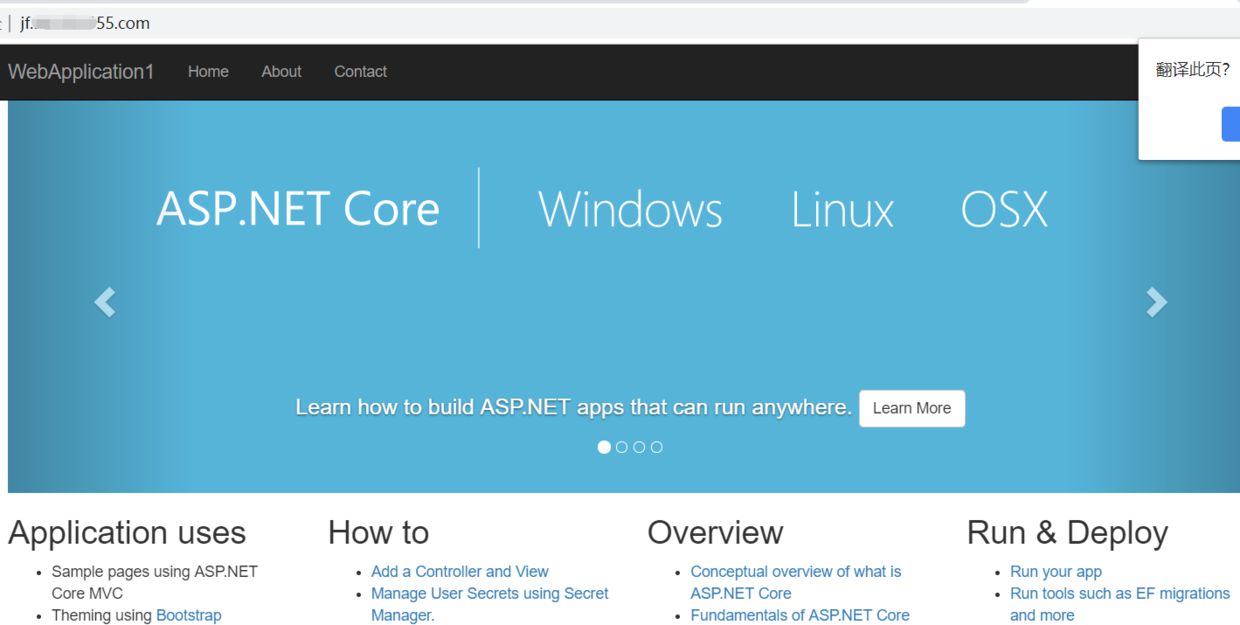 nginx configuration has taken effect.
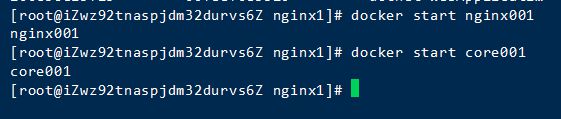
Finally, let’s try to see if restarting docker will cause configuration initialization. Restart docker:
 Start two containers:
 Visit page:
 The data volume has been successfully applied because the database has not been initialized after restarting Docker. In the future, you will no longer be afraid of docker crashes and data loss.
Supplement
The proxy_pass attribute in the nginx configuration file, when configured in a non-docker environment, localhost or 127.0.0.1 can take effect normally, but under docker the nginx container is configured with localhost or 127.0. In 0.1, there was a small pit that prevented the actual reverse proxy from being completed. Because when the container is running, docker will assign it a separate IP and port, and then map the IP occupied by docker to the container IP (for example, after mysql is started under docker, you can use localhost to log in to the client). But when nginx starts, it will first read the configuration file and run it only if the configuration is correct. Therefore, after the container runs successfully, docker will map the local IP into it. Only when accessed directly using the IP of the container, if localhost or 127.0.0.1 is written in the configuration file, the reverse proxy will be triggered. When configuring Nginx using Docker on the server, you only need to enter the IP address of the server to complete the configuration.
The above is the detailed content of How to use Docker to mount volumes to deploy Nginx. For more information, please follow other related articles on the PHP Chinese website!

Hot AI Tools

Undresser.AI Undress
AI-powered app for creating realistic nude photos

AI Clothes Remover
Online AI tool for removing clothes from photos.

Undress AI Tool
Undress images for free

Clothoff.io
AI clothes remover

Video Face Swap
Swap faces in any video effortlessly with our completely free AI face swap tool!

Hot Article
Hot Tools

Notepad++7.3.1
Easy-to-use and free code editor

SublimeText3 Chinese version
Chinese version, very easy to use

Zend Studio 13.0.1
Powerful PHP integrated development environment

Dreamweaver CS6
Visual web development tools

SublimeText3 Mac version
God-level code editing software (SublimeText3)
Hot Topics
 1387
1387
 52
52

 How to update the image of docker
Apr 15, 2025 pm 12:03 PM
How to update the image of docker
Apr 15, 2025 pm 12:03 PM
The steps to update a Docker image are as follows: Pull the latest image tag New image Delete the old image for a specific tag (optional) Restart the container (if needed)
 How to use docker desktop
Apr 15, 2025 am 11:45 AM
How to use docker desktop
Apr 15, 2025 am 11:45 AM
How to use Docker Desktop? Docker Desktop is a tool for running Docker containers on local machines. The steps to use include: 1. Install Docker Desktop; 2. Start Docker Desktop; 3. Create Docker image (using Dockerfile); 4. Build Docker image (using docker build); 5. Run Docker container (using docker run).
 How to copy files in docker to outside
Apr 15, 2025 pm 12:12 PM
How to copy files in docker to outside
Apr 15, 2025 pm 12:12 PM
Methods for copying files to external hosts in Docker: Use the docker cp command: Execute docker cp [Options] <Container Path> <Host Path>. Using data volumes: Create a directory on the host, and use the -v parameter to mount the directory into the container when creating the container to achieve bidirectional file synchronization.
 How to exit the container by docker
Apr 15, 2025 pm 12:15 PM
How to exit the container by docker
Apr 15, 2025 pm 12:15 PM
Four ways to exit Docker container: Use Ctrl D in the container terminal Enter exit command in the container terminal Use docker stop <container_name> Command Use docker kill <container_name> command in the host terminal (force exit)
 How to view the docker process
Apr 15, 2025 am 11:48 AM
How to view the docker process
Apr 15, 2025 am 11:48 AM
Docker process viewing method: 1. Docker CLI command: docker ps; 2. Systemd CLI command: systemctl status docker; 3. Docker Compose CLI command: docker-compose ps; 4. Process Explorer (Windows); 5. /proc directory (Linux).
 How to start mysql by docker
Apr 15, 2025 pm 12:09 PM
How to start mysql by docker
Apr 15, 2025 pm 12:09 PM
The process of starting MySQL in Docker consists of the following steps: Pull the MySQL image to create and start the container, set the root user password, and map the port verification connection Create the database and the user grants all permissions to the database
 How to check the name of the docker container
Apr 15, 2025 pm 12:21 PM
How to check the name of the docker container
Apr 15, 2025 pm 12:21 PM
You can query the Docker container name by following the steps: List all containers (docker ps). Filter the container list (using the grep command). Gets the container name (located in the "NAMES" column).
 How to save docker image
Apr 15, 2025 am 11:54 AM
How to save docker image
Apr 15, 2025 am 11:54 AM
To save the image in Docker, you can use the docker commit command to create a new image, containing the current state of the specified container, syntax: docker commit [Options] Container ID Image name. To save the image to the repository, you can use the docker push command, syntax: docker push image name [: tag]. To import saved images, you can use the docker pull command, syntax: docker pull image name [: tag].
