

What is Socket segmentation in Nginx server

The 1.9.1 release of nginx introduces a new feature: allowing the use of the so_reuseport socket option, which is available in new versions of many operating systems, including dragonfly bsd and linux (kernel version 3.9 and later ). This socket option allows multiple sockets to listen on the same IP and port combination. The kernel is able to load balance incoming connections across these sockets. (For nginx plus customers, this feature will appear in version 7, which will be released by the end of the year)
The so_reuseport option has many potential practical applications. Other services can also use it to simply implement rolling upgrades during execution (nginx already supports rolling upgrades). For nginx, enabling this option can reduce lock contention in certain scenarios and improve performance.
As described in the figure below, when the so_reuseport option is valid, a separate listening socket notifies the worker process of the accessed connection, and each worker thread attempts to obtain the connection.
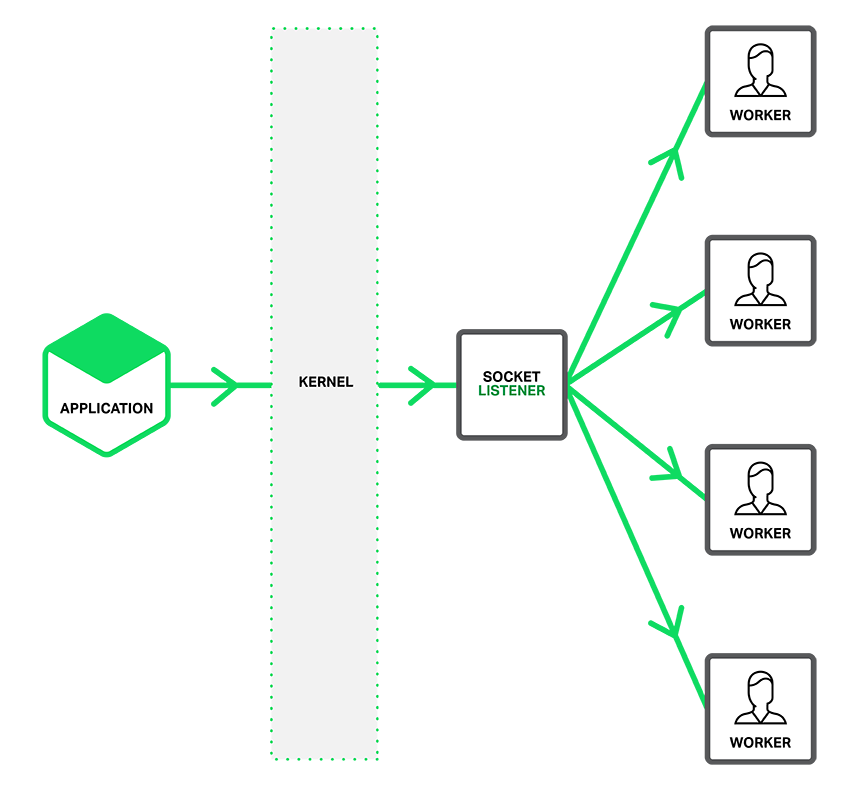
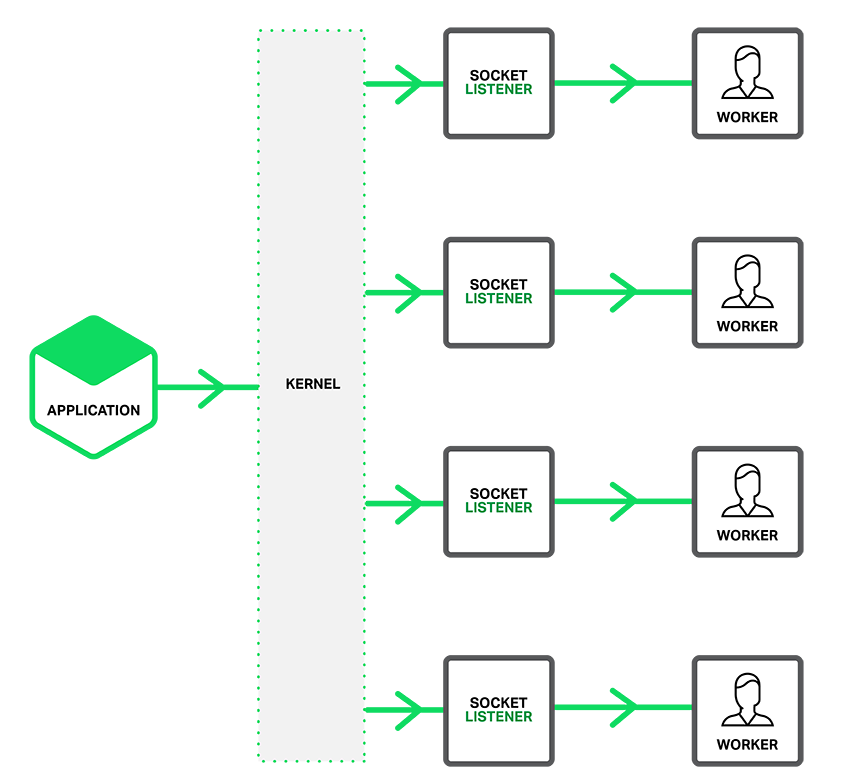
When the so_reuseport option is enabled, there are multiple socket listeners for each IP address and port binding connection, and each worker process can be assigned one . The system kernel determines which valid socket listener (and implicitly, for which worker process) gets the connection. This can reduce lock competition between worker processes when obtaining new connections (Translator's Note: Competition between worker processes requesting to obtain mutually exclusive resource locks), and can improve performance on multi-core systems. However, this also means that when a worker process falls into a blocking operation, the blocking affects not only the worker process that has accepted the connection, but also causes the worker process scheduled to be allocated by the kernel to send the connection request and therefore becomes blocked.
Set up shared socket
In order for the so_reuseport socket option to work, it should be http or tcp (stream mode) The listen item in the communication option directly introduces the latest reuseport parameter, just like the following example:
Copy code The code is as follows:
http {
server { listen 80 reuseport;
}
After referencing the reuseport parameter, the accept_mutex parameter will be invalid for the referenced socket, because the mutex (mutex) is redundant for reuseport. For ports that do not use reuseport, it is still valuable to set accept_mutex.
reuseport's benchmark performance test
I ran the benchmark tool on a 36-core AWS instance to test 4 nginx worker processes. In order to reduce the impact of the network, both the client and nginx are running locally , and let nginx return ok string instead of a file. I compared three nginx configurations: default (equivalent to accept_mutex on), accept_mutex off, and reuseport. As shown in the figure, reuseport's requests per second are two to three times that of the others, while the latency and latency standard deviation are also reduced.
latency (ms) latency stdev (ms) cpu load
accept_mutex off 15.59 26.48 10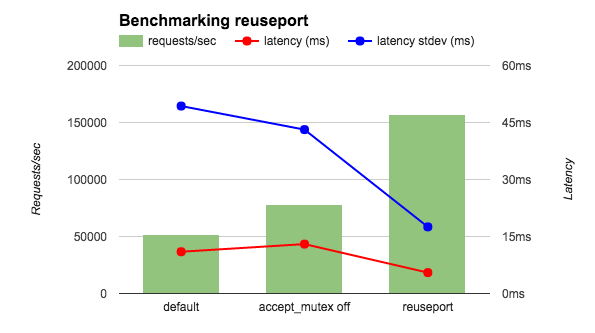 reuseport 12.35 3.15 0.3
In these performance tests, the speed of connection requests is very high, but the requests do not require a lot of processing. Other basic tests should point out that reuseport can also significantly improve performance when application traffic fits this scenario. (The reuseport parameter cannot be used in the listen directive in the mail context, such as email, because email traffic will definitely not match this scenario.) We encourage you to test first rather than directly apply it on a large scale.
The above is the detailed content of What is Socket segmentation in Nginx server. For more information, please follow other related articles on the PHP Chinese website!

Hot AI Tools

Undresser.AI Undress
AI-powered app for creating realistic nude photos

AI Clothes Remover
Online AI tool for removing clothes from photos.

Undress AI Tool
Undress images for free

Clothoff.io
AI clothes remover

Video Face Swap
Swap faces in any video effortlessly with our completely free AI face swap tool!

Hot Article
Hot Tools

Notepad++7.3.1
Easy-to-use and free code editor

SublimeText3 Chinese version
Chinese version, very easy to use

Zend Studio 13.0.1
Powerful PHP integrated development environment

Dreamweaver CS6
Visual web development tools

SublimeText3 Mac version
God-level code editing software (SublimeText3)
Hot Topics
 1387
1387
 52
52

 How to configure cloud server domain name in nginx
Apr 14, 2025 pm 12:18 PM
How to configure cloud server domain name in nginx
Apr 14, 2025 pm 12:18 PM
How to configure an Nginx domain name on a cloud server: Create an A record pointing to the public IP address of the cloud server. Add virtual host blocks in the Nginx configuration file, specifying the listening port, domain name, and website root directory. Restart Nginx to apply the changes. Access the domain name test configuration. Other notes: Install the SSL certificate to enable HTTPS, ensure that the firewall allows port 80 traffic, and wait for DNS resolution to take effect.
 How to start nginx server
Apr 14, 2025 pm 12:27 PM
How to start nginx server
Apr 14, 2025 pm 12:27 PM
Starting an Nginx server requires different steps according to different operating systems: Linux/Unix system: Install the Nginx package (for example, using apt-get or yum). Use systemctl to start an Nginx service (for example, sudo systemctl start nginx). Windows system: Download and install Windows binary files. Start Nginx using the nginx.exe executable (for example, nginx.exe -c conf\nginx.conf). No matter which operating system you use, you can access the server IP
 How to check nginx version
Apr 14, 2025 am 11:57 AM
How to check nginx version
Apr 14, 2025 am 11:57 AM
The methods that can query the Nginx version are: use the nginx -v command; view the version directive in the nginx.conf file; open the Nginx error page and view the page title.
 How to check the name of the docker container
Apr 15, 2025 pm 12:21 PM
How to check the name of the docker container
Apr 15, 2025 pm 12:21 PM
You can query the Docker container name by following the steps: List all containers (docker ps). Filter the container list (using the grep command). Gets the container name (located in the "NAMES" column).
 How to run nginx apache
Apr 14, 2025 pm 12:33 PM
How to run nginx apache
Apr 14, 2025 pm 12:33 PM
To get Nginx to run Apache, you need to: 1. Install Nginx and Apache; 2. Configure the Nginx agent; 3. Start Nginx and Apache; 4. Test the configuration to ensure that you can see Apache content after accessing the domain name. In addition, you need to pay attention to other matters such as port number matching, virtual host configuration, and SSL/TLS settings.
 How to check whether nginx is started
Apr 14, 2025 pm 01:03 PM
How to check whether nginx is started
Apr 14, 2025 pm 01:03 PM
How to confirm whether Nginx is started: 1. Use the command line: systemctl status nginx (Linux/Unix), netstat -ano | findstr 80 (Windows); 2. Check whether port 80 is open; 3. Check the Nginx startup message in the system log; 4. Use third-party tools, such as Nagios, Zabbix, and Icinga.
 How to create a mirror in docker
Apr 15, 2025 am 11:27 AM
How to create a mirror in docker
Apr 15, 2025 am 11:27 AM
Steps to create a Docker image: Write a Dockerfile that contains the build instructions. Build the image in the terminal, using the docker build command. Tag the image and assign names and tags using the docker tag command.
 How to start containers by docker
Apr 15, 2025 pm 12:27 PM
How to start containers by docker
Apr 15, 2025 pm 12:27 PM
Docker container startup steps: Pull the container image: Run "docker pull [mirror name]". Create a container: Use "docker create [options] [mirror name] [commands and parameters]". Start the container: Execute "docker start [Container name or ID]". Check container status: Verify that the container is running with "docker ps".
