
 Java
javaTutorial
web.xml What is the method for SpringBoot to package executable Jar to run SpringMVC?
Java
javaTutorial
web.xml What is the method for SpringBoot to package executable Jar to run SpringMVC?
web.xml What is the method for SpringBoot to package executable Jar to run SpringMVC?

Deploy to the webapps directory to start
The Spring version used in this article is Spring6, the SpringBoot version is 3, and the JDK is 17. It may be slightly different from before, but the overall process is not too different.
If the deployed application is started under the tomcat webapps directory, you need to configure the web.xml file in the project
web.xml file
Configure the Spring application context
<context-param>
    <param-name>contextConfigLocation</param-name>
    <param-value>/WEB-INF/spring/application-context.xml</param-value>
</context-param>
<listener>
    <listener-class>org.springframework.web.context.ContextLoaderListener</listener-class>
</listener>context-param
Within the context scope of a web application, you can use the context-param tag to set initialization parameters. These parameters are available throughout the web application and can be obtained through the getInitParameter() method of the ServletContext object.
ContextLoaderListener
ContextLoaderListener implements the ServletContextListener interface. This interface is the interface left by tomcat for the application to initialize the context environment. It is used to load the ApplicationContext when the Web application starts.
ServletContextListener has two default methods
// 在所有的servlet和filter初始化之前被调用
default public void contextInitialized(ServletContextEvent sce) {
}
// 在所有的servlet和filter销毁之后被调用
default public void contextDestroyed(ServletContextEvent sce) {
}ContextLoaderListener also inherits the ContextLoader class, and all context operations are performed in this class.
ContextLoaderListener implements the contextInitialized method, and then calls the initWebApplicationContext method of the parent class ContextLoader to pass in the ServletContext.
@Override
public void contextInitialized(ServletContextEvent event) {
   initWebApplicationContext(event.getServletContext());
}Initialize Spring Context.
initWebApplicationContext method key code
...
if (this.context == null) {
    // 创建ApplicationContext
    this.context = createWebApplicationContext(servletContext);
}
...
// 刷新ApplicationContext
configureAndRefreshWebApplicationContext(cwac, servletContext);
...
// 将当前ApplicationContext添加到ServletContext的属性中,后面有用再说
// String ROOT_WEB_APPLICATION_CONTEXT_ATTRIBUTE = WebApplicationContext.class.getName() + ".ROOT";
servletContext.setAttribute(WebApplicationContext.ROOT_WEB_APPLICATION_CONTEXT_ATTRIBUTE, this.context);
...Create ApplicationContext
In the createWebApplicationContext method, first call the determineContextClass method to determine which ApplicationContext to use. After finding it, instantiate it.
determineContextClass This method mainly determines the ApplicationContext to be used. It is first loaded from web.xml. If the user has defined it, the user-defined one is used directly.
String contextClassName = servletContext.getInitParameter(CONTEXT_CLASS_PARAM);
The configuration in web.xml is as follows,
<context-param>
    <param-name>contextClass</param-name>
    <param-value>com.xxx.XxxContext</param-value>
</context-param>If there is no configuration, Spring's default XmlWebApplicationContext class will be used.
This class is defined in the ContextLoader.properties file under the same path package of ContextLoader.
org.springframework.web.context.WebApplicationContext=org.springframework.web.context.support.XmlWebApplicationContext
Configure and refresh ApplicationContext
configureAndRefreshWebApplicationContext key code
protected void configureAndRefreshWebApplicationContext(ConfigurableWebApplicationContext wac,ServletContext sc) {
    // ...
    // 获取web.xml中配置的contextConfigLocation参数
    String configLocationParam = sc.getInitParameter(CONFIG_LOCATION_PARAM);
    if (configLocationParam != null) {
        wac.setConfigLocation(configLocationParam);
    }
    // ...
    // 刷新上下文
    wac.refresh();
}At this point, Tomcat has started the Spring environment, and the follow-up is the Spring initialization process, which will not be described here.
Initializing DispatcherServlet
<servlet>
    <servlet-name>dispatcher</servlet-name>
    <servlet-class>org.springframework.web.servlet.DispatcherServlet</servlet-class>
    <init-param>
       <param-name>contextConfigLocation</param-name>
       <param-value>/WEB-INF/spring/dispatcher-servlet.xml</param-value>
    </init-param>
    <load-on-startup>1</load-on-startup>
</servlet>
<servlet-mapping>
    <servlet-name>dispatcher</servlet-name>
    <url-pattern>/</url-pattern>
</servlet-mapping>The contextConfigLocation here belongs to the parent class FrameworkServlet of DispatcherServlet and is mainly used to load SpringMVC related configurations. The example is as follows:
<beans xmlns="http://www.springframework.org/schema/beans"
    xmlns:context="http://www.springframework.org/schema/context"
    xmlns:mvc="http://www.springframework.org/schema/mvc"
    xmlns:xsi="http://www.w3.org/2001/XMLSchema-instance"
    xsi:schemaLocation="
        http://www.springframework.org/schema/beans
        http://www.springframework.org/schema/beans/spring-beans-4.3.xsd
        http://www.springframework.org/schema/context
        http://www.springframework.org/schema/context/spring-context-4.3.xsd
        http://www.springframework.org/schema/mvc
        http://www.springframework.org/schema/mvc/spring-mvc-4.3.xsd">
    <!-- 扫描控制器和其他组件 -->
    <context:component-scan base-package="com.example.controller" />
    <!-- 配置视图解析器 -->
    <bean class="org.springframework.web.servlet.view.InternalResourceViewResolver">
        <property name="prefix" value="/WEB-INF/views/" />
        <property name="suffix" value=".jsp" />
    </bean>
    <!-- 启用Spring MVC注解支持 -->
    <mvc:annotation-driven />
</beans>DispatcherServlet class diagram
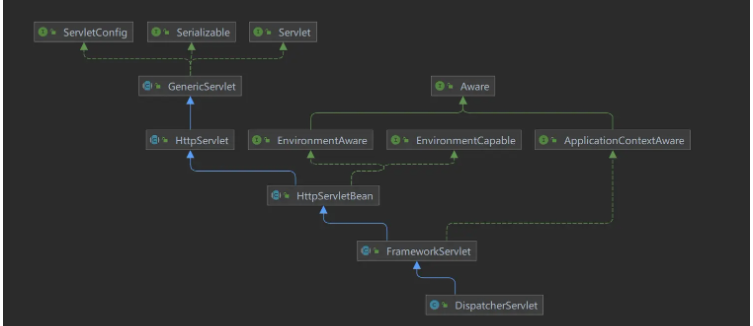
You can see that DispatcherServlet implements the Servlet interface. There is an init method in the Servlet interface. The SpringMVC configuration is loaded during initialization.
The key code is in the HttpServletBean.init() and FrameworkServlet.initServletBean() methods.
HttpServletBean.init()
public final void init() throws ServletException {
   // Set bean properties from init parameters.
   PropertyValues pvs = new ServletConfigPropertyValues(getServletConfig(), this.requiredProperties);
   if (!pvs.isEmpty()) {
      try {
         BeanWrapper bw = PropertyAccessorFactory.forBeanPropertyAccess(this);
         ResourceLoader resourceLoader = new ServletContextResourceLoader(getServletContext());
         bw.registerCustomEditor(Resource.class, new ResourceEditor(resourceLoader, getEnvironment()));
         initBeanWrapper(bw);
         bw.setPropertyValues(pvs, true);
      }
      catch (BeansException ex) {
         if (logger.isErrorEnabled()) {
            logger.error("Failed to set bean properties on servlet '" + getServletName() + "'", ex);
         }
         throw ex;
      }
   }
   // Let subclasses do whatever initialization they like.
   initServletBean();
}FrameworkServlet.initServletBean()
protected final void initServletBean() throws ServletException {
    ...
    // 在这里初始化ApplicationContext
    this.webApplicationContext = initWebApplicationContext();
    // 初始化servlet
    initFrameworkServlet();
}FrameworkServlet.initWebApplicationContext()
protected WebApplicationContext initWebApplicationContext() {
    // 此处获取根容器,就是Spring初始化的XmlWebApplicationContext,
    // 在上面把它添加到了ServletContext的属性中,标记根容器,这里把它获取出来
    // String ROOT_WEB_APPLICATION_CONTEXT_ATTRIBUTE = WebApplicationContext.class.getName() + ".ROOT";
    // servletContext.getAttribute(WebApplicationContext.ROOT_WEB_APPLICATION_CONTEXT_ATTRIBUTE);
   WebApplicationContext rootContext =
         WebApplicationContextUtils.getWebApplicationContext(getServletContext());
   WebApplicationContext wac = null;
   // 此时webApplicationContext还是null,因为DispatchServlet是被tomcat创建的,需要无参构造器
   // 构造器中没有设置webApplicationContext的代码,所以此时webApplicationContext还是null
   // 注意:在SpringBoot使用嵌入式Tomcat时,这个webApplicationContext不为null,因为FrameworkServlet还
   // 实现了ApplicationContextAware接口,所以当SpringBoot的上下文准备好之后,会回调setApplicationContext方法
   // 注入ApplicationContext,后面在细说
   if (this.webApplicationContext != null) {
      // A context instance was injected at construction time -> use it
      wac = this.webApplicationContext;
      if (wac instanceof ConfigurableWebApplicationContext cwac && !cwac.isActive()) {
         // The context has not yet been refreshed -> provide services such as
         // setting the parent context, setting the application context id, etc
         if (cwac.getParent() == null) {
            // The context instance was injected without an explicit parent -> set
            // the root application context (if any; may be null) as the parent
            cwac.setParent(rootContext);
         }
         configureAndRefreshWebApplicationContext(cwac);
      }
   }
   if (wac == null) {
      // No context instance was injected at construction time -> see if one
      // has been registered in the servlet context. If one exists, it is assumed
      // that the parent context (if any) has already been set and that the
      // user has performed any initialization such as setting the context id
      // 此处主要是获取web.xml配置的WebApplicationContext
      // 可以通过设置参数contextAttribute来设置加载SpringMVC的ApplicationContext
      // 比如下面这样。除非项目中有多个WebApplicationContext,需要使用其他WebApplicationContext才会用到
      // 一般都是null
      // <context-param>
      //    <param-name>contextAttribute</param-name>
      //    <param-value>myWebApplicationContext</param-value>
      // </context-param>
      wac = findWebApplicationContext();
   }
   if (wac == null) {
      // 现在进入到创建SpringMVC的ApplicationContext流程
      // 也就是加载contextConfigLocation定义的xml文件
      // No context instance is defined for this servlet -> create a local one
      wac = createWebApplicationContext(rootContext);
   }
   if (!this.refreshEventReceived) {
      // Either the context is not a ConfigurableApplicationContext with refresh
      // support or the context injected at construction time had already been
      // refreshed -> trigger initial onRefresh manually here.
      synchronized (this.onRefreshMonitor) {
         // 初始化策略对象
         // 比如:HandlerMapping,HandlerAdapter,ViewResolver等等
         onRefresh(wac);
      }
   }
   if (this.publishContext) {
      // Publish the context as a servlet context attribute.
      String attrName = getServletContextAttributeName();
      getServletContext().setAttribute(attrName, wac);
   }
   return wac;
}protected WebApplicationContext createWebApplicationContext(@Nullable ApplicationContext parent) {
// SpringMVC所使用的contextClass,可以在<servlet>标签下设置
// <init-param>
// <param-name>contextClass</param-name>
// <param-value>org.springframework.web.context.support.XmlWebApplicationContext</param-value>
// </init-param>
// 默认为XmlWebApplicationContext
Class<?> contextClass = getContextClass();
if (!ConfigurableWebApplicationContext.class.isAssignableFrom(contextClass)) {
throw new ApplicationContextException(
"Fatal initialization error in servlet with name '" + getServletName() +
"': custom WebApplicationContext class [" + contextClass.getName() +
"] is not of type ConfigurableWebApplicationContext");
}
// 实例化ApplicationContext
ConfigurableWebApplicationContext wac =
(ConfigurableWebApplicationContext) BeanUtils.instantiateClass(contextClass);
// 设置环境参数
wac.setEnvironment(getEnvironment());
// 设置父容器为Spring的ApplicationContext
wac.setParent(parent);
// 获取SpringMVC的contextConfigLocation文件
String configLocation = getContextConfigLocation();
if (configLocation != null) {
wac.setConfigLocation(configLocation);
}
// 配置并刷新ApplicationContext
configureAndRefreshWebApplicationContext(wac);
return wac;
}DispatchServlet initialization completed
Why we need a parent-child container
The main function of the parent-child container is to divide the framework boundaries and implement bean reuse.
In the J2EE three-tier architecture, we generally use the Spring framework in the service layer, while there are many choices in the web layer, such as Spring MVC, Struts, etc. In order to allow the web layer to use the beans of the service layer, we need to use the service layer container as the parent container of the web layer container, so that the framework integration can be achieved.
The role of the parent-child container is that when we try to get a bean from the child container (Servlet WebApplicationContext), if it cannot be found, it will be delegated to the parent container (Root WebApplicationContext). Find. Repeated definition of the same beans is avoided in each sub-container, thereby improving code reusability and maintainability.
Receive the request
The request first enters doService, and then calls doDispatch for processing.
doDispatch key code
...
// 首先根据当前请求HttpServletRequest,遍历所有的HandlerMapping执行handle方法,返回可用的HandlerExecutionChain对象。
mappedHandler = getHandler(processedRequest);
// 然后根据handler获取支持的适配器
HandlerAdapter ha = getHandlerAdapter(mappedHandler.getHandler());
// 执行HandlerInterceptor.preHandle,在controller的方法被调用前执行
if (!mappedHandler.applyPreHandle(processedRequest, response)) {
    return;
}
// 执行controller方法
mv = ha.handle(processedRequest, response, mappedHandler.getHandler());
// 执行HandlerInterceptor.postHandle,在controller的方法被调用后执行
mappedHandler.applyPostHandle(processedRequest, response, mv);
// 渲染结果到视图
processDispatchResult(processedRequest, response, mappedHandler, mv, dispatchException);HandlerMapping is the mapping between request and handler object. It can find the corresponding handler based on the request. The handler object can be of any type, such as a class annotated with @Controller, a class that implements the Controller interface, or a class that implements the HttpRequestHandler interface.
HandlerExecutionChain is the handler execution chain, which wraps the handler object and a set of HandlerInterceptor. HandlerInterceptor is an interceptor that can perform some additional operations before and after handler execution, such as permission checking, logging, etc.
HandlerAdapter is the adapter of handler. It can handle different types of handler objects, call their corresponding methods, and return ModelAndView objects. HandlerAdapter can perform parameter binding, return value processing and other operations according to the type of handler object.
HandlerInterceptor uses
to define an interceptor class, implement the HandlerInterceptor interface or inherit the HandlerInterceptorAdapter class, and override preHandle, There are three methods: postHandle and afterCompletion.
在preHandle方法中,可以获取请求和响应对象,进行预处理,比如检查请求头中的token,或者判断请求的url是否有权限访问等。如果返回true,则继续执行后续的拦截器或者处理器;如果返回false,则中断请求,不再执行后续的拦截器或者处理器。
在postHandle方法中,可以获取请求和响应对象,以及处理器返回的ModelAndView对象,进行后处理,比如修改模型数据或者视图信息等。只有在preHandle方法返回true并且处理器成功执行后,该方法才会被调用。
在afterCompletion方法中,可以获取请求和响应对象,以及处理器抛出的异常对象(如果有的话),进行清理资源或者异常处理等。只有当preHandle方法返回true时,无论处理器是否成功执行,该方法才会被调用。
在SpringMVC配置文件中,需注册拦截器类并指定拦截的URL模式。可以注册多个拦截器,并指定顺序。拦截器会按照顺序执行preHandle方法,然后按照逆序执行postHandle和afterCompletion方法。
HandlerInterceptor和Filter的区别
HandlerInterceptor利用Java反射机制实现,而Filter则通过函数回调方式实现。HandlerInterceptor可以利用Spring的AOP技术,实现更灵活的拦截逻辑,而Filter只能在请求前后进行简单的处理。
HandlerInterceptor不依赖于Servlet容器,而Filter依赖于Servlet容器。HandlerInterceptor是SpringMVC框架提供的,可以在任何情况下使用,而Filter是Servlet规范的一部分,只能在Web应用中使用。
HandlerInterceptor的执行由SpringMVC框架控制,而Filter的执行由Servlet容器控制。HandlerInterceptor可以通过IoC容器来管理,可以注入其他的Bean,而Filter则需要在web.xml中配置,或者使用@WebFilter注解,并且需要@ServletComponentScan扫描。
HandlerInterceptor只能拦截DispatcherServlet处理的请求,而Filter可以拦截任何请求。HandlerInterceptor只能对Controller方法进行拦截,而Filter可以对静态资源、JSP页面等进行拦截。
HandlerInterceptor有三个方法:preHandle,postHandle和afterCompletion,分别在请求处理前后和视图渲染前后执行,而Filter只有一个方法:doFilter,在请求处理前后执行。
处理controller返回结果
对于被controller方法,使用的适配器是RequestMappingHandlerAdapter,在handlerAdapter.handle方法执行时,会去执行对应的controller方法,处理controller方法返回的结果。
invocableMethod.invokeAndHandle(webRequest, mavContainer);
ServletInvocableHandlerMethod.invokeAndHandle
// 执行controller方法
Object returnValue = invokeForRequest(webRequest, mavContainer, providedArgs);
...
// 处理返回数据,会判断是不是有@ResponseBody注解,如果有,会使用RequestResponseBodyMethodProcessor来处理返回值
// 然后会解析请求头等等,判断应该返回什么类型的数据,然后使用对应的HttpMessageConverter写入输出流
this.returnValueHandlers.handleReturnValue(
returnValue, getReturnValueType(returnValue), mavContainer, webRequest);SpringBoot Jar启动
SpringBoot使用嵌入式Servlet容器启动应用,有Tomcat,Jetty,Undertow。
选择Servlet容器
SpringBoot默认使用Tomcat,可以在配置文件中看出。
<dependency>
    <groupId>org.springframework.boot</groupId>
    <artifactId>spring-boot-starter-web</artifactId>
</dependency>web模块自动引入了tomcat
<dependency>
  <groupId>org.springframework.boot</groupId>
  <artifactId>spring-boot-starter-tomcat</artifactId>
</dependency>
如果不使用Tomcat可以排除,引入其他服务器。
<dependency>
  <groupId>org.springframework.boot</groupId>
  <artifactId>spring-boot-starter-web</artifactId>
  <!-- 剔除Tomcat -->
  <exclusions>
    <exclusion>
      <artifactId>spring-boot-starter-tomcat</artifactId>
      <groupId>org.springframework.boot</groupId>
    </exclusion>
  </exclusions>
</dependency>
<!-- 使用jetty -->
<dependency>
  <groupId>org.springframework.boot</groupId>
  <artifactId>spring-boot-starter-jetty</artifactId>
</dependency>如果没有排除Tomcat,直接引入其他服务器,比如下面。
<dependency>
  <groupId>org.springframework.boot</groupId>
  <artifactId>spring-boot-starter-web</artifactId>
  <!-- 没有排除Tomcat -->
</dependency>
<!-- 引入jetty -->
<dependency>
  <groupId>org.springframework.boot</groupId>
  <artifactId>spring-boot-starter-jetty</artifactId>
</dependency>
如果项目中同时引入了Tomcat和其他服务器的依赖,那么SpringBoot会按照以下顺序来选择启动的服务器。
Tomcat > Jetty > Undertow
也就是说,如果有Tomcat,就优先使用Tomcat,如果没有Tomcat,就看有没有Jetty,如果有Jetty,就使用Jetty,以此类推。这个顺序是在SpringBoot的ServletWebServerFactoryConfiguration类中定义的。
// 只展示必要代码
class ServletWebServerFactoryConfiguration {
   // 当Servlet、Tomcat、UpgradeProtocol类在类路径存在时
   // 并且ServletWebServerFactory类存在,则会创建tomcatServletWebServerFactory bean。
   @ConditionalOnClass({ Servlet.class, Tomcat.class, UpgradeProtocol.class })
   @ConditionalOnMissingBean(value = ServletWebServerFactory.class, search = SearchStrategy.CURRENT)
   static class EmbeddedTomcat {
      @Bean
      TomcatServletWebServerFactory tomcatServletWebServerFactory(
         ... 代码省略
      }
   }
   // 当Servlet、Server、WebAppContext类在类路径存在时
   // 并且ServletWebServerFactory类型的Bean不存在时,则会创建JettyServletWebServerFactory bean。
   // ServletWebServerFactory是TomcatServletWebServerFactory、JettyServletWebServerFactory、
   // UndertowServletWebServerFactory的父类
   // 所以如果Tomcat被引入,上面的tomcatServletWebServerFactory就会被创建,这里的条件就不满足,不会被创建。
   @ConditionalOnClass({ Servlet.class, Server.class, Loader.class, WebAppContext.class })
   @ConditionalOnMissingBean(value = ServletWebServerFactory.class, search = SearchStrategy.CURRENT)
   static class EmbeddedJetty {
      @Bean
      JettyServletWebServerFactory JettyServletWebServerFactory(
         ... 代码省略
      }
   }
   // 分析同上
   @ConditionalOnClass({ Servlet.class, Undertow.class, SslClientAuthMode.class })
   @ConditionalOnMissingBean(value = ServletWebServerFactory.class, search = SearchStrategy.CURRENT)
   static class EmbeddedUndertow {
      @Bean
      UndertowServletWebServerFactory undertowServletWebServerFactory(
        ... 代码省略
      }
}下面继续以Tomcat为例
Tomcat配置、启动
Tomcat是在Spring容器启动的时候启动的
SpringApplication.run方法
首先创建一个ConfigurableApplicationContext对象,并调用其refresh()方法,这个对象一般是AnnotationConfigServletWebServerApplicationContext。
context = createApplicationContext();
-> refreshContext(context);
-> refresh(context);
-> applicationContext.refresh();
refresh()方法会调用其父类ServletWebServerApplicationContext的refresh()方法,在父类的refresh()中再次调用父类AbstractApplicationContext的refresh()方法,主要在onRefresh阶段,会进行服务器的配置。
... refresh()代码简略
// 这里会初始化Tomcat配置
onRefresh();
// 这里会启动Tomcat
finishRefresh();
...
回到ServletWebServerApplicationContext类的onRefresh()方法,会调用createWebServer()方法,创建web服务器。
protected void onRefresh() {
   super.onRefresh();
   try {
      // 创建服务器
      createWebServer();
   }
   catch (Throwable ex) {
      throw new ApplicationContextException("Unable to start web server", ex);
   }
}private void createWebServer() {
... 代码简略
// 获取工厂类,这里获取的就是在配置类中生效的那一个,这里为TomcatServletWebServerFactory
ServletWebServerFactory factory = getWebServerFactory();
createWebServer.tag("factory", factory.getClass().toString());
// 获取服务器
this.webServer = factory.getWebServer(getSelfInitializer());
}TomcatServletWebServerFactory.getWebServer
public WebServer getWebServer(ServletContextInitializer... initializers) {
   if (this.disableMBeanRegistry) {
      Registry.disableRegistry();
   }
   Tomcat tomcat = new Tomcat();
   File baseDir = (this.baseDirectory != null) ? this.baseDirectory : createTempDir("tomcat");
   tomcat.setBaseDir(baseDir.getAbsolutePath());
   for (LifecycleListener listener : this.serverLifecycleListeners) {
      tomcat.getServer().addLifecycleListener(listener);
   }
   // 设置Connector,对应与Tomcat Server.xml 中的<Connector></Connector>
   Connector connector = new Connector(this.protocol);
   connector.setThrowOnFailure(true);
   // 对应于Server.xml 中
   // <Service name="Catalina">
   //   <Connector port="8080" protocol="HTTP/1.1"
   //     connectionTimeout="20000"
   //     redirectPort="8443" relaxedQueryChars="[|]"/>
   // </Service>
   tomcat.getService().addConnector(connector);
   customizeConnector(connector);
   tomcat.setConnector(connector);
   tomcat.getHost().setAutoDeploy(false);
   configureEngine(tomcat.getEngine());
   for (Connector additionalConnector : this.additionalTomcatConnectors) {
      tomcat.getService().addConnector(additionalConnector);
   }
   // 准备好Context组件
   prepareContext(tomcat.getHost(), initializers);
   return getTomcatWebServer(tomcat);
}// 创建Tomcat服务器
protected TomcatWebServer getTomcatWebServer(Tomcat tomcat) {
return new TomcatWebServer(tomcat, getPort() >= 0, getShutdown());
}至此,Tomcat配置已经初始化完成,准备启动。
在finishRefresh()方法中,会启动Tomcat
getLifecycleProcessor().onRefresh();
> DefaultLifecycleProcessor.startBeans(true);
> LifecycleGroup::start
> doStart(this.lifecycleBeans, member.name, this.autoStartupOnly);
> bean.start();
> WebServerStartStopLifecycle.start
> TomcatWebServer.start();
private void startBeans(boolean autoStartupOnly) {
   Map<String, Lifecycle> lifecycleBeans = getLifecycleBeans();
   Map<Integer, LifecycleGroup> phases = new TreeMap<>();
   lifecycleBeans.forEach((beanName, bean) -> {
      if (!autoStartupOnly || (bean instanceof SmartLifecycle smartLifecycle && smartLifecycle.isAutoStartup())) {
         int phase = getPhase(bean);
         phases.computeIfAbsent(
               phase,
               p -> new LifecycleGroup(phase, this.timeoutPerShutdownPhase, lifecycleBeans, autoStartupOnly)
         ).add(beanName, bean);
      }
   });
   if (!phases.isEmpty()) {
      phases.values().forEach(LifecycleGroup::start);
   }
}public void start() {
this.webServer.start();
this.running = true;
this.applicationContext
.publishEvent(new ServletWebServerInitializedEvent(this.webServer, this.applicationContext));
}DispatchServlet配置
ServletContextInitializer
在prepareContext方法中,有一个方法configureContext
configureContext(context, initializersToUse);
configureContext方法,在这里面创建了一个TomcatStarter对象,这个类实现了ServletContainerInitializer接口,所以在容器启动过程中会被调用。
TomcatStarter starter = new TomcatStarter(initializers);
context.addServletContainerInitializer(starter, NO_CLASSES);
initializers是Spring自己定义的初始化接口ServletContextInitializer,传入TomcatStarter之后,在onStartup方法中循环调用onStartup方法。
public void onStartup(Set<Class<?>> classes, ServletContext servletContext) throws ServletException {
   try {
      for (ServletContextInitializer initializer : this.initializers) {
         initializer.onStartup(servletContext);
      }
   }
   ...
}需要注意的是,这里的initializers有些传过来的时候是一个函数式接口,在上面的factory.getWebServer(getSelfInitializer());这里传进来的,就是一个函数式接口
private org.springframework.boot.web.servlet.ServletContextInitializer getSelfInitializer() {
   return this::selfInitialize;
}实际调用在下面这个方法
private void selfInitialize(ServletContext servletContext) throws ServletException {
   prepareWebApplicationContext(servletContext);
   registerApplicationScope(servletContext);
   WebApplicationContextUtils.registerEnvironmentBeans(getBeanFactory(), servletContext);
   for (ServletContextInitializer beans : getServletContextInitializerBeans()) {
      beans.onStartup(servletContext);
   }
}在此处绕过所有ServletContextInitializer,随后执行它们的onStartup方法。
其中有一个DispatcherServletRegistrationBean,这个类实现了ServletContextInitializer接口,主要是用来添加DispatchServlet。
DispatcherServletAutoConfiguration配置类中有DispatcherServlet,DispatcherServletRegistrationBean两个Bean。
protected static class DispatcherServletRegistrationConfiguration {
   @Bean(name = DEFAULT_DISPATCHER_SERVLET_REGISTRATION_BEAN_NAME)
   @ConditionalOnBean(value = DispatcherServlet.class, name = DEFAULT_DISPATCHER_SERVLET_BEAN_NAME)
   public DispatcherServletRegistrationBean dispatcherServletRegistration(DispatcherServlet dispatcherServlet,
         WebMvcProperties webMvcProperties, ObjectProvider<MultipartConfigElement> multipartConfig) {
      // 创建DispatcherServletRegistrationBean,并把dispatcherServlet传进去
      DispatcherServletRegistrationBean registration = new DispatcherServletRegistrationBean(dispatcherServlet,
            webMvcProperties.getServlet().getPath());
      registration.setName(DEFAULT_DISPATCHER_SERVLET_BEAN_NAME);
      registration.setLoadOnStartup(webMvcProperties.getServlet().getLoadOnStartup());
      multipartConfig.ifAvailable(registration::setMultipartConfig);
      return registration;
   }
}
protected static class DispatcherServletConfiguration {
    @Bean(name = DEFAULT_DISPATCHER_SERVLET_BEAN_NAME)
    public DispatcherServlet dispatcherServlet(WebMvcProperties webMvcProperties) {
        // 创建DispatcherServlet
        DispatcherServlet dispatcherServlet = new DispatcherServlet();
        dispatcherServlet.setDispatchOptionsRequest(webMvcProperties.isDispatchOptionsRequest());
        dispatcherServlet.setDispatchTraceRequest(webMvcProperties.isDispatchTraceRequest());
        dispatcherServlet.setThrowExceptionIfNoHandlerFound(webMvcProperties.isThrowExceptionIfNoHandlerFound());
        dispatcherServlet.setPublishEvents(webMvcProperties.isPublishRequestHandledEvents());
        dispatcherServlet.setEnableLoggingRequestDetails(webMvcProperties.isLogRequestDetails());
        return dispatcherServlet;
    }
}ServletContextInitializer.onStartup方法由子类RegistrationBean实现
public final void onStartup(ServletContext servletContext) throws ServletException {
    String description = getDescription();
    if (!isEnabled()) {
        logger.info(StringUtils.capitalize(description) + " was not registered (disabled)");
        return;
    }
    // register是一个抽象方法,由子类DynamicRegistrationBean实现
    register(description, servletContext);
}
protected abstract void register(String description, ServletContext servletContext);DynamicRegistrationBean.register
protected final void register(String description, ServletContext servletContext) {
   // addRegistration是一个抽象方法,由子类ServletRegistrationBean实现
   D registration = addRegistration(description, servletContext);
   if (registration == null) {
      logger.info(StringUtils.capitalize(description) + " was not registered (possibly already registered?)");
      return;
   }
   // Servlet被添加到Context后,这里对Servlet进行配置,如拦截路径
   configure(registration);
}
protected abstract D addRegistration(String description, ServletContext servletContext);ServletRegistrationBean.addRegistration,作用类似下面
<servlet>
    <servlet-name>dispatcher</servlet-name>
    <servlet-class>org.springframework.web.servlet.DispatcherServlet</servlet-class>
</servlet>protected ServletRegistration.Dynamic addRegistration(String description, ServletContext servletContext) {
String name = getServletName();
// 添加Servlet到Context中,这里的servlet就是DispatchServlet。
return servletContext.addServlet(name, this.servlet);
}ServletRegistrationBean.configure,作用类似下面
<servlet-mapping>
    <servlet-name>dispatcher</servlet-name>
    <url-pattern>/</url-pattern>
</servlet-mapping>protected void configure(ServletRegistration.Dynamic registration) {
super.configure(registration);
String[] urlMapping = StringUtils.toStringArray(this.urlMappings);
if (urlMapping.length == 0 && this.alwaysMapUrl) {
// DEFAULT_MAPPINGS默是“/”
urlMapping = DEFAULT_MAPPINGS;
}
if (!ObjectUtils.isEmpty(urlMapping)) {
// 设置mapping
registration.addMapping(urlMapping);
}
registration.setLoadOnStartup(this.loadOnStartup);
if (this.multipartConfig != null) {
registration.setMultipartConfig(this.multipartConfig);
}
}至此,DispatchServlet已配置好,后续流程和web.xml配置调用流程基本相同。
FrameworkServlet.initWebApplicationContext()
protected WebApplicationContext initWebApplicationContext() {
    // 此处获取根容器,就是Spring初始化的XmlWebApplicationContext,
    // 在上面把它添加到了ServletContext的属性中,标记根容器,这里把它获取出来
    // String ROOT_WEB_APPLICATION_CONTEXT_ATTRIBUTE = WebApplicationContext.class.getName() + ".ROOT";
    // servletContext.getAttribute(WebApplicationContext.ROOT_WEB_APPLICATION_CONTEXT_ATTRIBUTE);
    // ===========上面为使用web.xml时的分析,下面为SpringBoot嵌入式Tomcat分析============
    // 同样是获取根容器,不过一般为AnnotationConfigServletWebServerApplicationContext
   WebApplicationContext rootContext =
         WebApplicationContextUtils.getWebApplicationContext(getServletContext());
   WebApplicationContext wac = null;
   // 此时webApplicationContext还是null,因为DispatchServlet是被tomcat创建的,需要无参构造器
   // 构造器中没有设置webApplicationContext的代码,所以此时webApplicationContext还是null
   // ===========上面为使用web.xml时的分析,下面为SpringBoot嵌入式Tomcat分析============
   // 注意:在SpringBoot使用嵌入式Tomcat时,这个webApplicationContext不为null,因为FrameworkServlet还
   // 实现了ApplicationContextAware接口,所以当SpringBoot的上下文准备好之后,会回调setApplicationContext方法
   // 注入ApplicationContext,后面在细说
   if (this.webApplicationContext != null) {
      // A context instance was injected at construction time -> use it
      wac = this.webApplicationContext;
      if (wac instanceof ConfigurableWebApplicationContext cwac && !cwac.isActive()) {
         // The context has not yet been refreshed -> provide services such as
         // setting the parent context, setting the application context id, etc
         if (cwac.getParent() == null) {
            // The context instance was injected without an explicit parent -> set
            // the root application context (if any; may be null) as the parent
            cwac.setParent(rootContext);
         }
         configureAndRefreshWebApplicationContext(cwac);
      }
   }
   if (wac == null) {
      // No context instance was injected at construction time -> see if one
      // has been registered in the servlet context. If one exists, it is assumed
      // that the parent context (if any) has already been set and that the
      // user has performed any initialization such as setting the context id
      // 此处主要是获取web.xml配置的WebApplicationContext
      // 可以通过设置参数contextAttribute来设置加载SpringMVC的ApplicationContext
      // 比如下面这样。除非项目中有多个WebApplicationContext,需要使用其他WebApplicationContext才会用到
      // 一般都是null
      // <context-param>
      //    <param-name>contextAttribute</param-name>
      //    <param-value>myWebApplicationContext</param-value>
      // </context-param>
      // ===========上面为使用web.xml时的分析,下面为SpringBoot嵌入式Tomcat分析
      // 因为wac此时不为null,这里不会进入
      wac = findWebApplicationContext();
   }
   if (wac == null) {
      // 现在进入到创建SpringMVC的ApplicationContext流程
      // 也就是加载contextConfigLocation定义的xml文件
      // ===========上面为使用web.xml时的分析,下面为SpringBoot嵌入式Tomcat分析
      // 因为wac此时不为null,这里不会进入,所以没有SpringMVC的容器,也就是没有父子容器之分,SpringBoot项目中只有一个容器
      // No context instance is defined for this servlet -> create a local one
      wac = createWebApplicationContext(rootContext);
   }
   if (!this.refreshEventReceived) {
      // Either the context is not a ConfigurableApplicationContext with refresh
      // support or the context injected at construction time had already been
      // refreshed -> trigger initial onRefresh manually here.
      synchronized (this.onRefreshMonitor) {
         // 初始化策略对象
         // 比如:HandlerMapping,HandlerAdapter,ViewResolver等等
         onRefresh(wac);
      }
   }
   if (this.publishContext) {
      // Publish the context as a servlet context attribute.
      String attrName = getServletContextAttributeName();
      getServletContext().setAttribute(attrName, wac);
   }
   return wac;
}The above is the detailed content of web.xml What is the method for SpringBoot to package executable Jar to run SpringMVC?. For more information, please follow other related articles on the PHP Chinese website!

Hot AI Tools

Undresser.AI Undress
AI-powered app for creating realistic nude photos

AI Clothes Remover
Online AI tool for removing clothes from photos.

Undress AI Tool
Undress images for free

Clothoff.io
AI clothes remover

Video Face Swap
Swap faces in any video effortlessly with our completely free AI face swap tool!

Hot Article
Hot Tools

Notepad++7.3.1
Easy-to-use and free code editor

SublimeText3 Chinese version
Chinese version, very easy to use

Zend Studio 13.0.1
Powerful PHP integrated development environment

Dreamweaver CS6
Visual web development tools

SublimeText3 Mac version
God-level code editing software (SublimeText3)
Hot Topics
 1389
1389
 52
52

 How to run jar files in Linux
Feb 20, 2024 am 10:40 AM
How to run jar files in Linux
Feb 20, 2024 am 10:40 AM
Prerequisites for running JAR files Running JAR files on a Linux system requires the installation of the Java Runtime Environment (JRE), which is the basic component required to execute Java applications, including the Java Virtual Machine (JVM), core class libraries, etc. Many mainstream Linux distributions, such as Ubuntu, Debian, Fedora, openSUSE, etc., provide software libraries of JRE packages to facilitate user installation. The following article will detail the steps to install JRE on popular distributions. After setting up the JRE, you can choose to use the command line terminal or the graphical user interface to start the JAR file according to your personal preference. Your choice may depend on familiarity with Linux shells and personal preference
 How Springboot integrates Jasypt to implement configuration file encryption
Jun 01, 2023 am 08:55 AM
How Springboot integrates Jasypt to implement configuration file encryption
Jun 01, 2023 am 08:55 AM
Introduction to Jasypt Jasypt is a java library that allows a developer to add basic encryption functionality to his/her project with minimal effort and does not require a deep understanding of how encryption works. High security for one-way and two-way encryption. , standards-based encryption technology. Encrypt passwords, text, numbers, binaries... Suitable for integration into Spring-based applications, open API, for use with any JCE provider... Add the following dependency: com.github.ulisesbocchiojasypt-spring-boot-starter2. 1.1Jasypt benefits protect our system security. Even if the code is leaked, the data source can be guaranteed.
 How SpringBoot integrates Redisson to implement delay queue
May 30, 2023 pm 02:40 PM
How SpringBoot integrates Redisson to implement delay queue
May 30, 2023 pm 02:40 PM
Usage scenario 1. The order was placed successfully but the payment was not made within 30 minutes. The payment timed out and the order was automatically canceled. 2. The order was signed and no evaluation was conducted for 7 days after signing. If the order times out and is not evaluated, the system defaults to a positive rating. 3. The order is placed successfully. If the merchant does not receive the order for 5 minutes, the order is cancelled. 4. The delivery times out, and push SMS reminder... For scenarios with long delays and low real-time performance, we can Use task scheduling to perform regular polling processing. For example: xxl-job Today we will pick
 How to use Redis to implement distributed locks in SpringBoot
Jun 03, 2023 am 08:16 AM
How to use Redis to implement distributed locks in SpringBoot
Jun 03, 2023 am 08:16 AM
1. Redis implements distributed lock principle and why distributed locks are needed. Before talking about distributed locks, it is necessary to explain why distributed locks are needed. The opposite of distributed locks is stand-alone locks. When we write multi-threaded programs, we avoid data problems caused by operating a shared variable at the same time. We usually use a lock to mutually exclude the shared variables to ensure the correctness of the shared variables. Its scope of use is in the same process. If there are multiple processes that need to operate a shared resource at the same time, how can they be mutually exclusive? Today's business applications are usually microservice architecture, which also means that one application will deploy multiple processes. If multiple processes need to modify the same row of records in MySQL, in order to avoid dirty data caused by out-of-order operations, distribution needs to be introduced at this time. The style is locked. Want to achieve points
 How to solve the problem that springboot cannot access the file after reading it into a jar package
Jun 03, 2023 pm 04:38 PM
How to solve the problem that springboot cannot access the file after reading it into a jar package
Jun 03, 2023 pm 04:38 PM
Springboot reads the file, but cannot access the latest development after packaging it into a jar package. There is a situation where springboot cannot read the file after packaging it into a jar package. The reason is that after packaging, the virtual path of the file is invalid and can only be accessed through the stream. Read. The file is under resources publicvoidtest(){Listnames=newArrayList();InputStreamReaderread=null;try{ClassPathResourceresource=newClassPathResource("name.txt");Input
 How to implement Springboot+Mybatis-plus without using SQL statements to add multiple tables
Jun 02, 2023 am 11:07 AM
How to implement Springboot+Mybatis-plus without using SQL statements to add multiple tables
Jun 02, 2023 am 11:07 AM
When Springboot+Mybatis-plus does not use SQL statements to perform multi-table adding operations, the problems I encountered are decomposed by simulating thinking in the test environment: Create a BrandDTO object with parameters to simulate passing parameters to the background. We all know that it is extremely difficult to perform multi-table operations in Mybatis-plus. If you do not use tools such as Mybatis-plus-join, you can only configure the corresponding Mapper.xml file and configure The smelly and long ResultMap, and then write the corresponding sql statement. Although this method seems cumbersome, it is highly flexible and allows us to
 Comparison and difference analysis between SpringBoot and SpringMVC
Dec 29, 2023 am 11:02 AM
Comparison and difference analysis between SpringBoot and SpringMVC
Dec 29, 2023 am 11:02 AM
SpringBoot and SpringMVC are both commonly used frameworks in Java development, but there are some obvious differences between them. This article will explore the features and uses of these two frameworks and compare their differences. First, let's learn about SpringBoot. SpringBoot was developed by the Pivotal team to simplify the creation and deployment of applications based on the Spring framework. It provides a fast, lightweight way to build stand-alone, executable
 How SpringBoot customizes Redis to implement cache serialization
Jun 03, 2023 am 11:32 AM
How SpringBoot customizes Redis to implement cache serialization
Jun 03, 2023 am 11:32 AM
1. Customize RedisTemplate1.1, RedisAPI default serialization mechanism. The API-based Redis cache implementation uses the RedisTemplate template for data caching operations. Here, open the RedisTemplate class and view the source code information of the class. publicclassRedisTemplateextendsRedisAccessorimplementsRedisOperations, BeanClassLoaderAware{//Declare key, Various serialization methods of value, the initial value is empty @NullableprivateRedisSe
