

How to use the OAuth2 framework of SpringBoot security management

OAuth3 Introduction
OAuth is an open standard that allows users to let third-party applications access the user's private resources (such as avatars, photos, videos, etc.) stored on a website. In this There is no need to provide usernames and passwords to third-party applications during the process.
Accessing data stored in a specific service provider is achieved using a token instead of a username and password. Each token authorizes a specific website to access specific resources for a specific period of time.
OAuth allows users to authorize third-party websites to flexibly access specific information stored on other resource servers, rather than all information. For example, if a user wants to log in to Zhihu through QQ, then Zhihu is a third-party application. If Zhihu wants to access some basic information of the user, it needs the user's authorization. If the user tells Zhihu his QQ user name and password, then Zhihu can access all the user's data, and only the user can revoke the permission by changing their password. This authorization method has great security risks. If you use OAuth, this problem can be solved well.
Using tokens allows users to flexibly authorize or withdraw permissions from third-party applications. OAuth 2 is the next version of the OAuth protocol, but is not backwards compatible with OAuth 1.0.
OAuth 2 focuses on simplicity for client developers, while providing specialized authentication processes for web applications, desktop applications, mobile devices, and living room devices. Traditional web development login authentication is generally based on Session, but continuing to use Session in a front-end and back-end separated architecture will cause many inconveniences, because the mobile terminal (Android, IOS, WeChat applet, etc.) either does not support Cookie (WeChat applet) , or it is very inconvenient to use. For these problems, using OAuth 2 authentication can solve them.
OAuth3 roles
First understand several basic roles in OAuth 2
Resource owner: that is, the user, with avatars, photos, videos, etc. Resources
Client: that is, third-party application
Authorization server: used to verify whether the information provided by the user is correct and return a token For third-party applications
Resource server: A server that provides user resources, such as avatars, photos, videos and other resources
Generally speaking, The authorization server and resource server can be the same server.
OAuth3 authorization process
Step 01: The client (third-party application) requests authorization from the user.
When the user clicks the Agree Authorization button on the service authorization page, the server will return an authorization certificate to the client.
Step 03: The client takes the authorization license to the authorization server to apply for a token.
Step 04: After the authorization server verifies that the information is correct, it issues the token to the client.
Step 05: The client takes the token to the resource server to access resources.
Step 06: The resource server verifies that the token is correct and opens the resource.
Authorization mode
The authorization mode of the OAuth protocol is divided into 4 types, as follows
- ##Authorization code authorization mode is the most complete function among the authorization methods. The process is the most rigorous, and the authorization code is the key. The characteristic of this mode is that the client server interacts with the authorization server. Common domestic third-party platform login functions basically adopt this method
- Simplified mode: The simplified mode does not require a client The end server participates and applies for a token directly from the authorization server in the browser. Generally, if it is a purely static page, this method can be used
- In password mode, the user directly applies to the client Providing its username and password, the client uses this information to request an access token from the authorization server. Users need to know high-level information about the client, such as whether the client application and the service provider are from the same company
- In client mode, the service provider authorizes the client rather than a specific user. Strictly speaking, the client mode cannot be regarded as a solution to the problems that the OAuth protocol solves. However, for developers, it is useful to use this method in some front-end and back-end separation applications or authentication and authorization servers provided for mobile terminals. The mode is still very convenient
<dependency>
  <groupId>org.springframework.boot</groupId>
  <artifactId>spring-boot-starter-web</artifactId>
</dependency>
<dependency>
  <groupId>org.springframework.boot</groupId>
  <artifactId>spring-boot-starter-data-redis</artifactId>
  <exclusions>
    <exclusion>
      <groupId>io.lettuce</groupId>
      <artifactId>lettuce-core</artifactId>
    </exclusion>
  </exclusions>
</dependency>
<dependency>
  <groupId>redis.clients</groupId>
  <artifactId>jedis</artifactId>
</dependency>
<dependency>
  <groupId>org.springframework.boot</groupId>
  <artifactId>spring-boot-starter-security</artifactId>
</dependency>
<dependency>
  <groupId>org.springframework.security.oauth</groupId>
  <artifactId>spring-security-oauth3</artifactId>
  <version>2.3.3.RELEASE</version>
</dependency>spring.redis.database=0
spring.redis.host=ip地址
spring.redis.port=6379
spring.redis.password=root
spring.redis.jedis.pool.max-active=8
spring.redis.jedis.pool.max-idle=8
spring.redis.jedis.pool.max-wait=-1ms
spring.redis.jedis.pool.min-idle=0
2. 配置授权服务器
授权服务器和资源服务器可以是同一台服务器,也可以是不同服务器,此处假设是同一台服务器,通过不同的配置分别开启授权服务器和资源服务器,首先是授权服务器:
@Configuration
@EnableAuthorizationServer
public class AuthorizationServerConfig extends AuthorizationServerConfigurerAdapter {
    @Autowired
    AuthenticationManager authenticationManager;
    @Autowired
    RedisConnectionFactory redisConnectionFactory;
    @Autowired
    UserDetailsService userDetailsService;
    @Bean
    PasswordEncoder passwordEncoder() {
        return new BCryptPasswordEncoder();
    }
    @Override
    public void configure(ClientDetailsServiceConfigurer clients) throws Exception {
        clients.inMemory()
                .withClient("password")
                .authorizedGrantTypes("password", "refresh_token")
                .accessTokenValiditySeconds(1800)
                .resourceIds("rid")
                .scopes("all")
                .secret("$2a$10$RMuFXGQ5AtH4wOvkUqyvuecpqUSeoxZYqilXzbz50dceRsga.WYiq");
    }
    @Override
    public void configure(AuthorizationServerEndpointsConfigurer endpoints) throws Exception {
        endpoints.tokenStore(new RedisTokenStore(redisConnectionFactory))
                .authenticationManager(authenticationManager)
                .userDetailsService(userDetailsService);
    }
    @Override
    public void configure(AuthorizationServerSecurityConfigurer security) throws Exception {
        security.allowFormAuthenticationForClients();
    }
}代码解释:
自定义类继承自 AuthorizationServerConfigurerAdapter ,完成对授权服务器的配置,然后通过 @EnableAuthorizationServer 注解开启授权服务器
注入 AuthenticationManager 用来支持 password 模式
注入 RedisConnectionFactory 用来完成 Redis 缓存,将令牌信息储存到 Redis 缓存中
注入 UserDetailsService 该对象为刷新 token 提供支持
在 configure(ClientDetailsServiceConfigurer clients) 方法中配置 password 授权模式,authorizedGrantTypes 表示 OAuth 2 中的授权模式为 password 和 refresh_token 两种,在标准的 OAuth 2 协议中,授权模式并不包括 refresh_token ,但是在 Spring Security 的实现中将其归为一种,因此如果要实现 access_token 的刷新,就需要添加这样一种授权模式;accessTokenValiditySeconds 方法配置了 access_token 的过期时间;resourceIds 配置了资源 id;secret 方法配置了加密后的密码,明文是 123
configure(AuthorizationServerEndpointsConfigurer endpoints) 方法配置了令牌的存储,AuthenticationManager 和 UserDetailsService 主要用于支持 password 模式以及令牌的刷新
configure(AuthorizationServerSecurityConfigurer security) 方法配置表示支持 client_id 和 client_secret 做登录认证
3. 配置资源服务器
@Configuration
@EnableResourceServer
public class ResourceServerConfig extends ResourceServerConfigurerAdapter {
    @Override
    public void configure(ResourceServerSecurityConfigurer resources) throws Exception {
        resources.resourceId("rid").stateless(true);
    }
    @Override
    public void configure(HttpSecurity http) throws Exception {
        http.authorizeRequests()
                .antMatchers("/admin/**").hasRole("admin")
                .antMatchers("/user/**").hasRole("user")
                .anyRequest().authenticated();
    }
}代码解释:
自定义类继承自 ResourceServerConfigurerAdapter ,并添加 @EnableResourceServer 注解开启资源服务器配置
resources.resourceId(“rid”).stateless(true); 配置资源 id,这里的资源 id 和授权服务器中的资源 id 一直,然后设置这些资源仅基于令牌认证
configure(HttpSecurity http) 方法配置 HttpSecurity
4. 配置 Security
@Configuration
public class WebSecurityConfig extends WebSecurityConfigurerAdapter {
    @Bean
    @Override
    public AuthenticationManager authenticationManagerBean() throws Exception {
        return super.authenticationManagerBean();
    }
    @Bean
    @Override
    protected UserDetailsService userDetailsService() {
        return super.userDetailsService();
    }
    @Override
    protected void configure(AuthenticationManagerBuilder auth) throws Exception {
        auth.inMemoryAuthentication()
                .withUser("admin")
                .password("$2a$10$RMuFXGQ5AtH4wOvkUqyvuecpqUSeoxZYqilXzbz50dceRsga.WYiq")
                .roles("admin")
                .and()
                .withUser("sang")
                .password("$2a$10$RMuFXGQ5AtH4wOvkUqyvuecpqUSeoxZYqilXzbz50dceRsga.WYiq")
                .roles("user");
    }
    @Override
    protected void configure(HttpSecurity http) throws Exception {
        http.antMatcher("/oauth/**").authorizeRequests()
                .antMatchers("/oauth/**").permitAll()
                .and().csrf().disable();
    }
}这里两个 Bean 将注入授权服务器配置类中使用,另外,这里的 HttpSecurity 配置主要是配置 /oauth/** 模式的 URL ,这一类的请求直接放行。在 Spring Security 配置和资源服务器配置中,一共涉及两个 HttpSecurity ,其中 Spring Security 中的配置优先级高于资源服务器中的配置,即请求地址先经过 Spring Security 的 HttpSecurity ,再经过资源服务器的 HttpSecurity。
5. 验证测试
首先创建三个简单的请求地址
@RestController
public class HelloController {
    @GetMapping("/admin/hello")
    public String admin() {
        return "Hello admin!";
    }
    @GetMapping("/user/hello")
    public String user() {
        return "Hello user!";
    }
    @GetMapping("/hello")
    public String hello() {
        return "hello";
    }
}根据前文的配置,要请求这三个地址,分别需要 admin 角色、user 角色以及登录后访问。
所有都配置完成后,启动 Redis 服务器,再启动 Spring Boot 项目,首先发送一个 POST 请求获取 token,请求地址如下(注意这里是一个 POST 请求,为了显示方便,将参数写在地址栏中):http://localhost:8080/oauth/token?username=sang&password=123&grant_type=password&client_id=password&scope=all&client_secret=123
请求地址中包含的参数有用户名、密码、授权模式、客户端 id 、scope 以及客户端密码,基本就是授权服务器中所配置的数据,请求结果如图
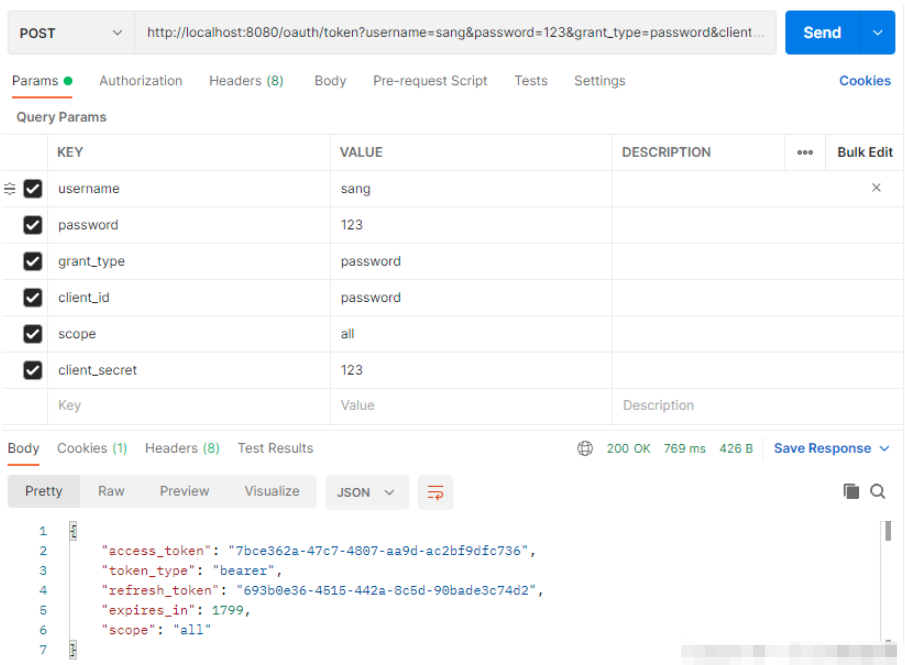
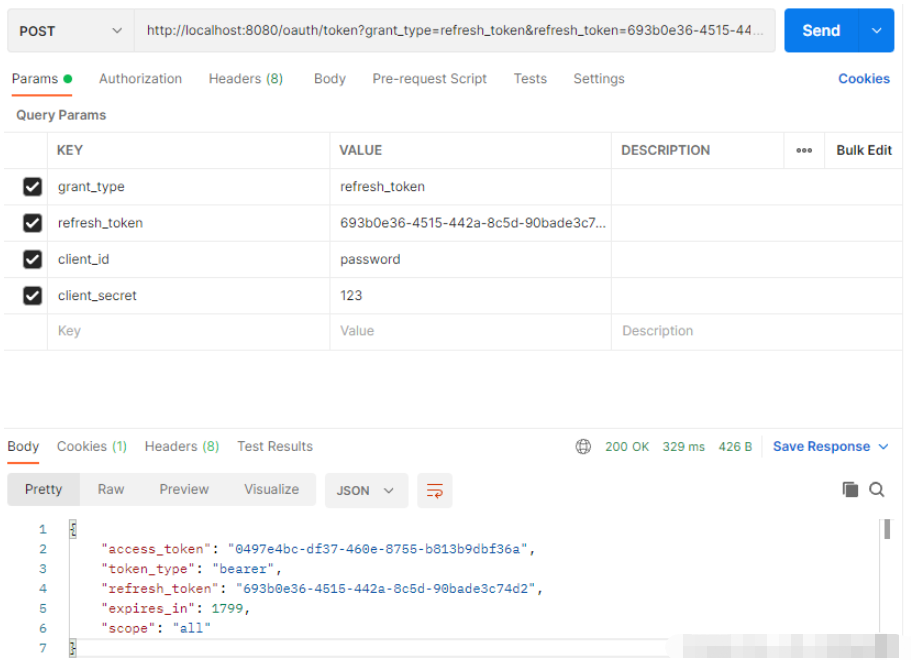
其中 access_token 是获取其它资源时要用的令牌,refresh_token 用来刷新令牌,expires_in 表示 access_token 过期时间,当 access_token 过期后,使用 refresh_token 重新获取新的 access_token (前提是 refresh_token 未过期),请求地址(注意也是POST请求):http://localhost:8080/oauth/token?grant_type=refresh_token&refresh_token=693b0e36-4515-442a-8c5d-90bade3c74d2&client_id=password&client_secret=123
获取新的 access_token 时需要携带上 refresh_token ,同事授权模式设置为 refresh_token ,在获取的结果中 access_token 会变化,同时 access_token 有效期也会变化,如图
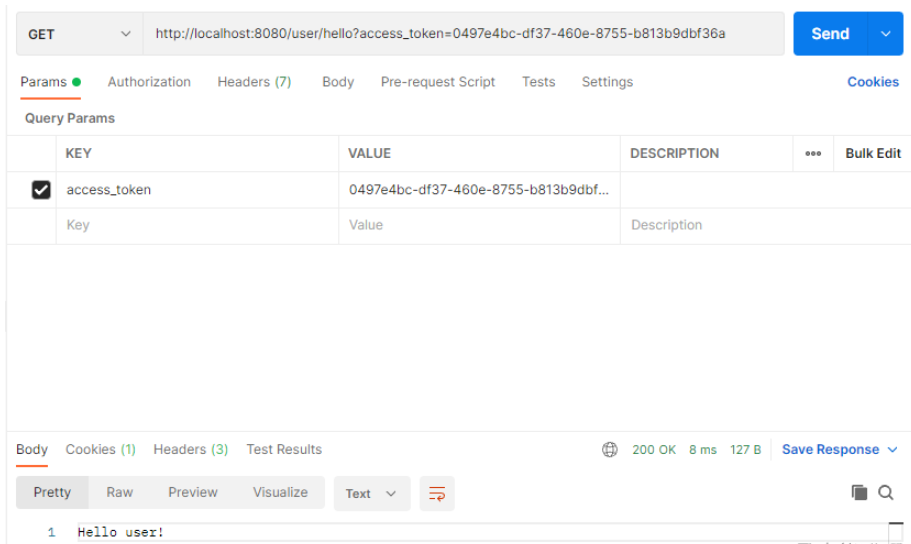
接下来访问所有资源,携带上 access_token 参数即可,例如 /user/hello 接口:http://localhost:8080/user/hello?access_token=0497e4bc-df37-460e-8755-b813b9dbf36a,访问结果如图
If a resource is illegally accessed, for example, the sang user accesses the /admin/hello interface, the result will be as shown in the figure
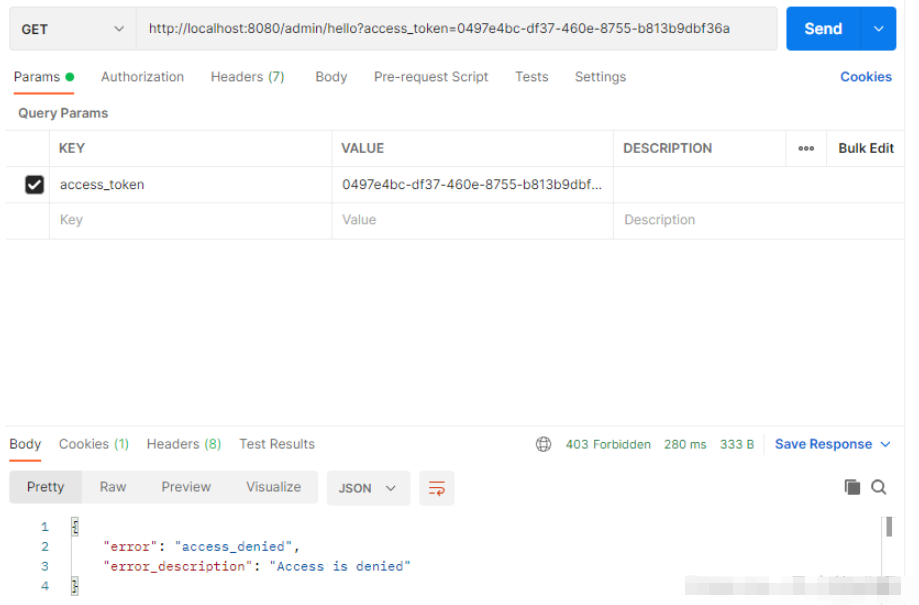
At this point, a The password mode OAuth authentication system is successfully established.
There are 4 authentication modes in OAuth. Developers need to choose one of them based on the actual situation of their own development. The password mode commonly used in front-end and back-end separation applications is introduced here. Other authorization modes are also Each has its own usage scenarios.
Overall, the use of Spring Security OAuth 2 is still relatively complicated, and the configuration is also relatively cumbersome. If the developer's application scenario is relatively simple, you can build your own OAuth 2 authentication system according to the authorization process introduced here. .
The above is the detailed content of How to use the OAuth2 framework of SpringBoot security management. For more information, please follow other related articles on the PHP Chinese website!

Hot AI Tools

Undresser.AI Undress
AI-powered app for creating realistic nude photos

AI Clothes Remover
Online AI tool for removing clothes from photos.

Undress AI Tool
Undress images for free

Clothoff.io
AI clothes remover

AI Hentai Generator
Generate AI Hentai for free.

Hot Article
Hot Tools

Notepad++7.3.1
Easy-to-use and free code editor

SublimeText3 Chinese version
Chinese version, very easy to use

Zend Studio 13.0.1
Powerful PHP integrated development environment

Dreamweaver CS6
Visual web development tools

SublimeText3 Mac version
God-level code editing software (SublimeText3)
Hot Topics
 1385
1385
 52
52

 How Springboot integrates Jasypt to implement configuration file encryption
Jun 01, 2023 am 08:55 AM
How Springboot integrates Jasypt to implement configuration file encryption
Jun 01, 2023 am 08:55 AM
Introduction to Jasypt Jasypt is a java library that allows a developer to add basic encryption functionality to his/her project with minimal effort and does not require a deep understanding of how encryption works. High security for one-way and two-way encryption. , standards-based encryption technology. Encrypt passwords, text, numbers, binaries... Suitable for integration into Spring-based applications, open API, for use with any JCE provider... Add the following dependency: com.github.ulisesbocchiojasypt-spring-boot-starter2. 1.1Jasypt benefits protect our system security. Even if the code is leaked, the data source can be guaranteed.
 How SpringBoot integrates Redisson to implement delay queue
May 30, 2023 pm 02:40 PM
How SpringBoot integrates Redisson to implement delay queue
May 30, 2023 pm 02:40 PM
Usage scenario 1. The order was placed successfully but the payment was not made within 30 minutes. The payment timed out and the order was automatically canceled. 2. The order was signed and no evaluation was conducted for 7 days after signing. If the order times out and is not evaluated, the system defaults to a positive rating. 3. The order is placed successfully. If the merchant does not receive the order for 5 minutes, the order is cancelled. 4. The delivery times out, and push SMS reminder... For scenarios with long delays and low real-time performance, we can Use task scheduling to perform regular polling processing. For example: xxl-job Today we will pick
 How to use Redis to implement distributed locks in SpringBoot
Jun 03, 2023 am 08:16 AM
How to use Redis to implement distributed locks in SpringBoot
Jun 03, 2023 am 08:16 AM
1. Redis implements distributed lock principle and why distributed locks are needed. Before talking about distributed locks, it is necessary to explain why distributed locks are needed. The opposite of distributed locks is stand-alone locks. When we write multi-threaded programs, we avoid data problems caused by operating a shared variable at the same time. We usually use a lock to mutually exclude the shared variables to ensure the correctness of the shared variables. Its scope of use is in the same process. If there are multiple processes that need to operate a shared resource at the same time, how can they be mutually exclusive? Today's business applications are usually microservice architecture, which also means that one application will deploy multiple processes. If multiple processes need to modify the same row of records in MySQL, in order to avoid dirty data caused by out-of-order operations, distribution needs to be introduced at this time. The style is locked. Want to achieve points
 How to solve the problem that springboot cannot access the file after reading it into a jar package
Jun 03, 2023 pm 04:38 PM
How to solve the problem that springboot cannot access the file after reading it into a jar package
Jun 03, 2023 pm 04:38 PM
Springboot reads the file, but cannot access the latest development after packaging it into a jar package. There is a situation where springboot cannot read the file after packaging it into a jar package. The reason is that after packaging, the virtual path of the file is invalid and can only be accessed through the stream. Read. The file is under resources publicvoidtest(){Listnames=newArrayList();InputStreamReaderread=null;try{ClassPathResourceresource=newClassPathResource("name.txt");Input
 How to implement Springboot+Mybatis-plus without using SQL statements to add multiple tables
Jun 02, 2023 am 11:07 AM
How to implement Springboot+Mybatis-plus without using SQL statements to add multiple tables
Jun 02, 2023 am 11:07 AM
When Springboot+Mybatis-plus does not use SQL statements to perform multi-table adding operations, the problems I encountered are decomposed by simulating thinking in the test environment: Create a BrandDTO object with parameters to simulate passing parameters to the background. We all know that it is extremely difficult to perform multi-table operations in Mybatis-plus. If you do not use tools such as Mybatis-plus-join, you can only configure the corresponding Mapper.xml file and configure The smelly and long ResultMap, and then write the corresponding sql statement. Although this method seems cumbersome, it is highly flexible and allows us to
 Comparison and difference analysis between SpringBoot and SpringMVC
Dec 29, 2023 am 11:02 AM
Comparison and difference analysis between SpringBoot and SpringMVC
Dec 29, 2023 am 11:02 AM
SpringBoot and SpringMVC are both commonly used frameworks in Java development, but there are some obvious differences between them. This article will explore the features and uses of these two frameworks and compare their differences. First, let's learn about SpringBoot. SpringBoot was developed by the Pivotal team to simplify the creation and deployment of applications based on the Spring framework. It provides a fast, lightweight way to build stand-alone, executable
 How SpringBoot customizes Redis to implement cache serialization
Jun 03, 2023 am 11:32 AM
How SpringBoot customizes Redis to implement cache serialization
Jun 03, 2023 am 11:32 AM
1. Customize RedisTemplate1.1, RedisAPI default serialization mechanism. The API-based Redis cache implementation uses the RedisTemplate template for data caching operations. Here, open the RedisTemplate class and view the source code information of the class. publicclassRedisTemplateextendsRedisAccessorimplementsRedisOperations, BeanClassLoaderAware{//Declare key, Various serialization methods of value, the initial value is empty @NullableprivateRedisSe
 How to get the value in application.yml in springboot
Jun 03, 2023 pm 06:43 PM
How to get the value in application.yml in springboot
Jun 03, 2023 pm 06:43 PM
In projects, some configuration information is often needed. This information may have different configurations in the test environment and the production environment, and may need to be modified later based on actual business conditions. We cannot hard-code these configurations in the code. It is best to write them in the configuration file. For example, you can write this information in the application.yml file. So, how to get or use this address in the code? There are 2 methods. Method 1: We can get the value corresponding to the key in the configuration file (application.yml) through the ${key} annotated with @Value. This method is suitable for situations where there are relatively few microservices. Method 2: In actual projects, When business is complicated, logic
