

How to configure basic memory pool initialization in Nginx

ngx_cycle 的初始化
整个初始化过程中,最重要的就是全局变量 nginx_cycle 的初始化,很多变量都是在这个过程中初始化的
nginx_cycle 又是通过两个局部变量 init_cycle 和 cycle 实现初始化的
事实上,日志初始化也可以算是对 nginx_cyle 的初始化,因为在代码中接下来马上要发生的就是一个赋值
ngx_memzero(&init_cycle, sizeof(ngx_cycle_t));
init_cycle.log = log;
ngx_cycle = &init_cycle;

// 创建内存池 1kb
init_cycle.pool = ngx_create_pool(1024, log);
if (init_cycle.pool == null) {
 return 1;
}

// 保存调用参数到全局变量,init_cycle 只用于提供 log 参数
if (ngx_save_argv(&init_cycle, argc, argv) != ngx_ok) {
 return 1;
}

// 保存配置文件路径、程序运行路径、调用参数到 init_cycle
if (ngx_process_options(&init_cycle) != ngx_ok) {
 return 1;
}

// 获取操作系统信息、cpu信息、最大连接数、是否支持非阻塞连接等
if (ngx_os_init(log) != ngx_ok) {
 return 1;
}

/*
 * ngx_crc32_table_init() requires ngx_cacheline_size set in ngx_os_init()
 */

// 对齐校验表
if (ngx_crc32_table_init() != ngx_ok) {
 return 1;
}

// 获取所有继承连接fd的相关信息
if (ngx_add_inherited_sockets(&init_cycle) != ngx_ok) {
 return 1;
}内存池
nginx 是通过资源集中管理的方式管理资源的,即打开所有即将要用的资源,以备随时取用,无论是文件还是内存
这样做的好处是避免了每次创建、打开资源造成的性能消耗
因此,便有了内存池模块,用来集中申请内存资源并进行内存资源的管理和分配
内存池结构:
// struct ngx_pool_data_t
// 内存池数据块结构 {{{
typedef struct {
 u_char    *last;  // 当前内存分配的结束位置
 u_char    *end;  // 内存池的结束位置
 ngx_pool_t   *next;  // 下一内存池
 ngx_uint_t   failed; // 内存分配失败计数
} ngx_pool_data_t; // }}}
// struct ngx_pool_s
// 内存池结构 {{{
struct ngx_pool_s {
 ngx_pool_data_t  d;  // 内存池数据块
 size_t    max;  // 待分配内存大小
 ngx_pool_t   *current; // 指向当前内存池起始位置
 ngx_chain_t   *chain;
 ngx_pool_large_t  *large; // 指向大块内存分配
 ngx_pool_cleanup_t *cleanup; // 析构函数
 ngx_log_t   *log;  // 内存分配相关的log
}; // }}}在这个函数中,使用了一个封装好的函数 ngx_memalign,这个函数是对系统中按照数据对齐方式分配内存的函数的封装,在不同的系统中实现方式不同,通过宏定义,实现了操作系统的适配,这是一个很漂亮的技巧
#if (ngx_have_posix_memalign)
// void * ngx_memalign(size_t alignment, size_t size, ngx_log_t *log)
// 用数据对齐的方式进行内存分配 {{{
void *
ngx_memalign(size_t alignment, size_t size, ngx_log_t *log)
{
 void *p;
 int err;
 // size 单位是 byte 而不是 bit
 err = posix_memalign(&p, alignment, size);
 if (err) {
  ngx_log_error(ngx_log_emerg, log, err,
      "posix_memalign(%uz, %uz) failed", alignment, size);
  p = null;
 }
 ngx_log_debug3(ngx_log_debug_alloc, log, 0,
     "posix_memalign: %p:%uz @%uz", p, size, alignment);
 return p;
} // }}}
#elif (ngx_have_memalign)
// void * ngx_memalign(size_t alignment, size_t size, ngx_log_t *log)
// 用数据对齐的方式进行内存分配 {{{
void *
ngx_memalign(size_t alignment, size_t size, ngx_log_t *log)所有有关内存分配的系统调用函数的封装都定义在 ngx_alloc.c 文件中
这里用到了 posix_memalign 系统调用,使用这个系统调用分配出来的内存是默认按照第二个参数的大小对齐的,这样在进行数据读写的时候,cpu可以周期地对整块数据进行读写,很大程度的节省了cpu时间
这个系统调用所分配的内存也是存在于堆内存中的,可以使用 free 函数进行释放,不过 malloc 分配的内存默认也是对齐的,它相对于 malloc 的优势仅仅在于可以指定默认对齐大小。
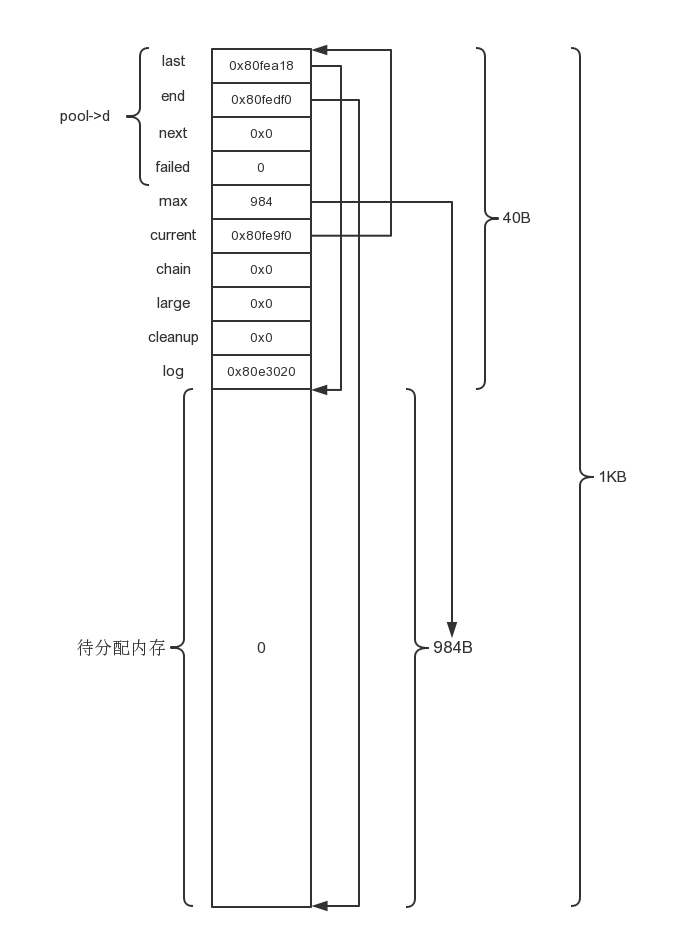
函数完成了内存池的初步分配,执行后 pool 取值:
$23 = (ngx_pool_t *) 0x80fe9f0
(gdb) p *init_cycle.pool
$24 = {
 d = {
 last = 0x80fea18,
 end = 0x80fedf0,
 next = 0x0,
 failed = 0
 },
 max = 984,
 current = 0x80fe9f0,
 chain = 0x0,
 large = 0x0,
 cleanup = 0x0,
 log = 0x80e3020 <ngx_log>
}如下图所示:
The above is the detailed content of How to configure basic memory pool initialization in Nginx. For more information, please follow other related articles on the PHP Chinese website!

Hot AI Tools

Undresser.AI Undress
AI-powered app for creating realistic nude photos

AI Clothes Remover
Online AI tool for removing clothes from photos.

Undress AI Tool
Undress images for free

Clothoff.io
AI clothes remover

Video Face Swap
Swap faces in any video effortlessly with our completely free AI face swap tool!

Hot Article
Hot Tools

Notepad++7.3.1
Easy-to-use and free code editor

SublimeText3 Chinese version
Chinese version, very easy to use

Zend Studio 13.0.1
Powerful PHP integrated development environment

Dreamweaver CS6
Visual web development tools

SublimeText3 Mac version
God-level code editing software (SublimeText3)
Hot Topics
 1387
1387
 52
52

 How to configure cloud server domain name in nginx
Apr 14, 2025 pm 12:18 PM
How to configure cloud server domain name in nginx
Apr 14, 2025 pm 12:18 PM
How to configure an Nginx domain name on a cloud server: Create an A record pointing to the public IP address of the cloud server. Add virtual host blocks in the Nginx configuration file, specifying the listening port, domain name, and website root directory. Restart Nginx to apply the changes. Access the domain name test configuration. Other notes: Install the SSL certificate to enable HTTPS, ensure that the firewall allows port 80 traffic, and wait for DNS resolution to take effect.
 How to start nginx server
Apr 14, 2025 pm 12:27 PM
How to start nginx server
Apr 14, 2025 pm 12:27 PM
Starting an Nginx server requires different steps according to different operating systems: Linux/Unix system: Install the Nginx package (for example, using apt-get or yum). Use systemctl to start an Nginx service (for example, sudo systemctl start nginx). Windows system: Download and install Windows binary files. Start Nginx using the nginx.exe executable (for example, nginx.exe -c conf\nginx.conf). No matter which operating system you use, you can access the server IP
 How to check nginx version
Apr 14, 2025 am 11:57 AM
How to check nginx version
Apr 14, 2025 am 11:57 AM
The methods that can query the Nginx version are: use the nginx -v command; view the version directive in the nginx.conf file; open the Nginx error page and view the page title.
 How to check the name of the docker container
Apr 15, 2025 pm 12:21 PM
How to check the name of the docker container
Apr 15, 2025 pm 12:21 PM
You can query the Docker container name by following the steps: List all containers (docker ps). Filter the container list (using the grep command). Gets the container name (located in the "NAMES" column).
 How to run nginx apache
Apr 14, 2025 pm 12:33 PM
How to run nginx apache
Apr 14, 2025 pm 12:33 PM
To get Nginx to run Apache, you need to: 1. Install Nginx and Apache; 2. Configure the Nginx agent; 3. Start Nginx and Apache; 4. Test the configuration to ensure that you can see Apache content after accessing the domain name. In addition, you need to pay attention to other matters such as port number matching, virtual host configuration, and SSL/TLS settings.
 How to check whether nginx is started
Apr 14, 2025 pm 01:03 PM
How to check whether nginx is started
Apr 14, 2025 pm 01:03 PM
How to confirm whether Nginx is started: 1. Use the command line: systemctl status nginx (Linux/Unix), netstat -ano | findstr 80 (Windows); 2. Check whether port 80 is open; 3. Check the Nginx startup message in the system log; 4. Use third-party tools, such as Nagios, Zabbix, and Icinga.
 How to create a mirror in docker
Apr 15, 2025 am 11:27 AM
How to create a mirror in docker
Apr 15, 2025 am 11:27 AM
Steps to create a Docker image: Write a Dockerfile that contains the build instructions. Build the image in the terminal, using the docker build command. Tag the image and assign names and tags using the docker tag command.
 How to start containers by docker
Apr 15, 2025 pm 12:27 PM
How to start containers by docker
Apr 15, 2025 pm 12:27 PM
Docker container startup steps: Pull the container image: Run "docker pull [mirror name]". Create a container: Use "docker create [options] [mirror name] [commands and parameters]". Start the container: Execute "docker start [Container name or ID]". Check container status: Verify that the container is running with "docker ps".
