

How to implement Nginx current limiting

How nginx current limiting works
nginx current limiting uses the leaky bucket algorithm, which is widely used in communications and packet switching-based computer networks , used to handle emergencies when bandwidth is limited. The principle is very similar to a bucket with water entering from above and leaking from below; if the rate of water inflow is greater than the rate of water leakage, the bucket will overflow.
In the request processing process, the water represents the request from the client, and the bucket represents a queue in which the request is waiting to be processed according to the first-in-first-out (fifo) algorithm. A leak means a request leaves the buffer and is processed by the server, an overflow means a request is dropped and never served.

1. Limit access frequency (normal traffic)
In nginx we use the ngx_http_limit_req_module module to limit the access frequency of requests, based on Implementation of leaky bucket algorithm principle. Next, we use the nginx limit_req_zone and limit_req instructions to limit the request processing rate of a single IP.
Syntax: limit_req_zone key zone rate
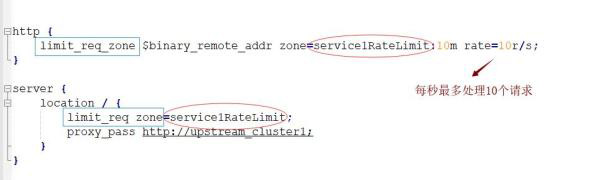
- ##key: defines the current limiting object, binary_remote_addr is a key means current limiting based on remote_addr (client IP). The purpose of binary_ is to compress the memory usage.
- zone: Define a shared memory area to store access information. myratelimit:10m represents a memory area with a size of 10m and a name of myratelimit. Every 1m can store the access information of 16,000 IP addresses, so 10m can store the access information of 160,000 IP addresses.
- The "rate" parameter is used to set the maximum access rate. "rate=10r/s" means that no more than 10 requests will be processed per second.. nginx actually tracks request information with millisecond granularity, so 10r/s is actually the limit: one request is processed every 100 milliseconds. This means that if another request arrives within the next 100 milliseconds after the last request is processed, the request will be refused to be processed.
2. Limit access frequency (burst traffic)
According to the above configuration, when the traffic suddenly increases, the excess requests will be Rejection, unable to handle burst traffic, so how to deal with burst traffic? nginx provides the burst parameter to solve the problem of burst traffic and is used in conjunction with the nodelay parameter. Burst is translated as burst, burst, indicating the number of additional requests that can be processed after exceeding the set processing rate.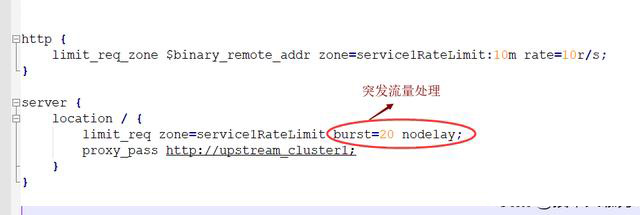
burst=20 nodelay means that these 20 requests will be processed immediately without delay, which is equivalent to handling special cases. However, even if these 20 burst requests are processed immediately, subsequent requests will not be processed immediately. burst=20 is equivalent to occupying 20 holes in the cache queue. Even if the request is processed, these 20 positions can only be released every 100ms. This achieves the effect of stable speed, but sudden traffic can also be processed normally.
3. Limit the number of concurrent connections
nginx’s ngx_http_limit_conn_module module provides the function of limiting the number of resource connections. Just use the limit_conn_zone and limit_conn instructions.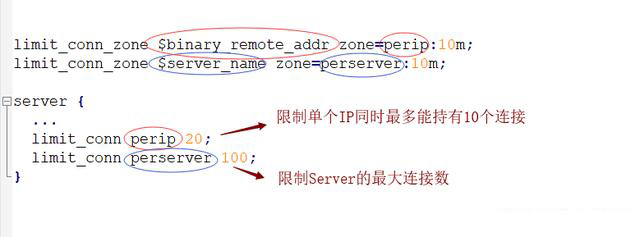
The above is the detailed content of How to implement Nginx current limiting. For more information, please follow other related articles on the PHP Chinese website!

Hot AI Tools

Undresser.AI Undress
AI-powered app for creating realistic nude photos

AI Clothes Remover
Online AI tool for removing clothes from photos.

Undress AI Tool
Undress images for free

Clothoff.io
AI clothes remover

Video Face Swap
Swap faces in any video effortlessly with our completely free AI face swap tool!

Hot Article
Hot Tools

Notepad++7.3.1
Easy-to-use and free code editor

SublimeText3 Chinese version
Chinese version, very easy to use

Zend Studio 13.0.1
Powerful PHP integrated development environment

Dreamweaver CS6
Visual web development tools

SublimeText3 Mac version
God-level code editing software (SublimeText3)
Hot Topics
 1387
1387
 52
52

 How to configure cloud server domain name in nginx
Apr 14, 2025 pm 12:18 PM
How to configure cloud server domain name in nginx
Apr 14, 2025 pm 12:18 PM
How to configure an Nginx domain name on a cloud server: Create an A record pointing to the public IP address of the cloud server. Add virtual host blocks in the Nginx configuration file, specifying the listening port, domain name, and website root directory. Restart Nginx to apply the changes. Access the domain name test configuration. Other notes: Install the SSL certificate to enable HTTPS, ensure that the firewall allows port 80 traffic, and wait for DNS resolution to take effect.
 How to check nginx version
Apr 14, 2025 am 11:57 AM
How to check nginx version
Apr 14, 2025 am 11:57 AM
The methods that can query the Nginx version are: use the nginx -v command; view the version directive in the nginx.conf file; open the Nginx error page and view the page title.
 How to start nginx server
Apr 14, 2025 pm 12:27 PM
How to start nginx server
Apr 14, 2025 pm 12:27 PM
Starting an Nginx server requires different steps according to different operating systems: Linux/Unix system: Install the Nginx package (for example, using apt-get or yum). Use systemctl to start an Nginx service (for example, sudo systemctl start nginx). Windows system: Download and install Windows binary files. Start Nginx using the nginx.exe executable (for example, nginx.exe -c conf\nginx.conf). No matter which operating system you use, you can access the server IP
 How to check the name of the docker container
Apr 15, 2025 pm 12:21 PM
How to check the name of the docker container
Apr 15, 2025 pm 12:21 PM
You can query the Docker container name by following the steps: List all containers (docker ps). Filter the container list (using the grep command). Gets the container name (located in the "NAMES" column).
 How to run nginx apache
Apr 14, 2025 pm 12:33 PM
How to run nginx apache
Apr 14, 2025 pm 12:33 PM
To get Nginx to run Apache, you need to: 1. Install Nginx and Apache; 2. Configure the Nginx agent; 3. Start Nginx and Apache; 4. Test the configuration to ensure that you can see Apache content after accessing the domain name. In addition, you need to pay attention to other matters such as port number matching, virtual host configuration, and SSL/TLS settings.
 How to check whether nginx is started
Apr 14, 2025 pm 01:03 PM
How to check whether nginx is started
Apr 14, 2025 pm 01:03 PM
How to confirm whether Nginx is started: 1. Use the command line: systemctl status nginx (Linux/Unix), netstat -ano | findstr 80 (Windows); 2. Check whether port 80 is open; 3. Check the Nginx startup message in the system log; 4. Use third-party tools, such as Nagios, Zabbix, and Icinga.
 How to create a mirror in docker
Apr 15, 2025 am 11:27 AM
How to create a mirror in docker
Apr 15, 2025 am 11:27 AM
Steps to create a Docker image: Write a Dockerfile that contains the build instructions. Build the image in the terminal, using the docker build command. Tag the image and assign names and tags using the docker tag command.
 How to start containers by docker
Apr 15, 2025 pm 12:27 PM
How to start containers by docker
Apr 15, 2025 pm 12:27 PM
Docker container startup steps: Pull the container image: Run "docker pull [mirror name]". Create a container: Use "docker create [options] [mirror name] [commands and parameters]". Start the container: Execute "docker start [Container name or ID]". Check container status: Verify that the container is running with "docker ps".
