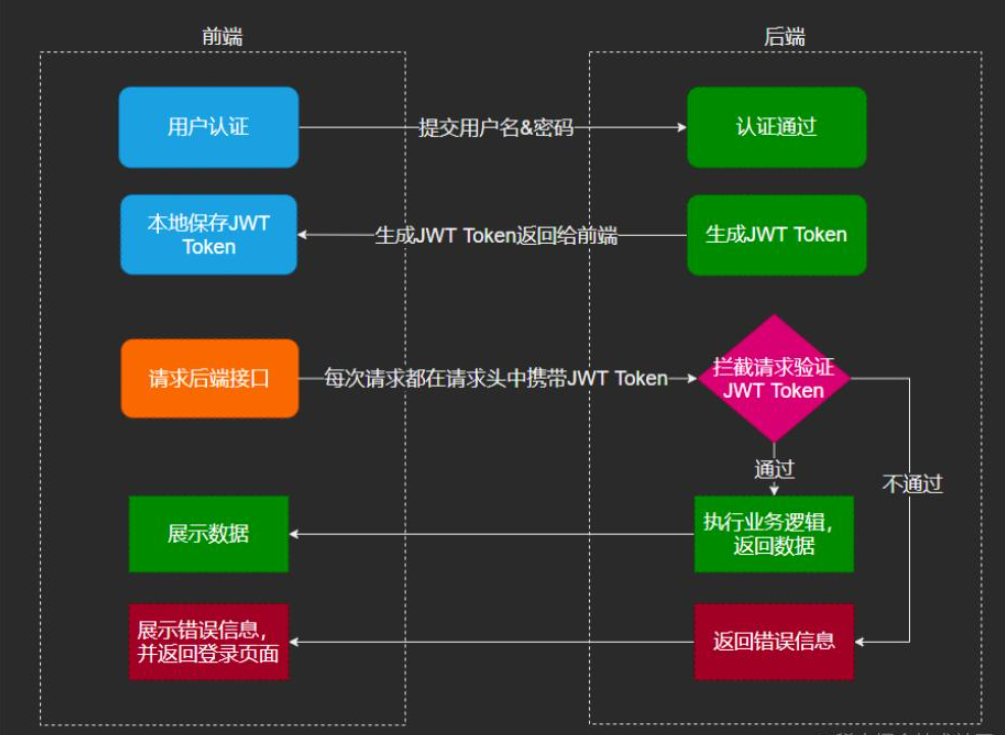
JWT (full name: Json Web Token) is an open standard (RFC 7519) that defines a compact, self-contained way to communicate between parties as a JSON object. securely transmit information between
Each user's login information will be saved in the server's Session. As the number of users increases, the server overhead will increase significantly.
Session information is stored in the server's memory, which will cause failure for distributed applications. Although the session information can be stored uniformly in the Redis cache, this may increase the complexity. sex.
Since Session authentication is based on Cookie, it is not applicable to non-browser terminals and mobile terminals.
The front-end and back-end separation system, because the front-end and back-end are cross-domain, and cookie information cannot be crossed, so session authentication cannot continue cross-domain authentication.
Simple: JWT Token data volume is small and the transmission speed is also very fast.
Cross-language: JWT Token is stored on the client in JSON encrypted form, so JWT is cross-language and supported by any web form. Cross-platform: does not rely on cookies and sessions, and does not need to store session information on the server. It is very suitable for distributed applications and can be used for expansion.

The first part of JWT is the header part, which is a description of JWT A Json object of metadata, usually as shown below.
{
    "alg": "HS256",
    "typ": "JWT"
}The alg attribute indicates the algorithm used for signature, the default is HMAC SHA256 (written as HS256), the typ attribute indicates the type of token, and JWT tokens are uniformly written as JWT.
The second part of JWT is Payload, which is also a Json object. In addition to containing the data that needs to be passed, there are seven default fields to choose from. iss: Issuer exp: Expiration time sub: Subject aud: User nbf: Not available before iat: Release time jti: JWT ID is used to identify this JWT
{
    //默认字段
    "sub":"主题123",
    //自定义字段
    "name":"java",
    "isAdmin":"true",
    "loginTime":"2021-12-05 12:00:03"
}It should be noted that by default JWT is unencrypted and anyone can interpret its content, so if you have some sensitive information, do not store it here to prevent information leakage. JSON objects are also converted to strings using the Base64 URL algorithm and saved.
The signature hash part is to sign the above two parts of data. It needs to use base64 encoded header and payload data, and generate a hash through the specified algorithm to ensure that the data will not be tamper.
<dependency>
        <groupId>io.jsonwebtoken</groupId>
        <artifactId>jjwt</artifactId>
        <version>0.9.1</version>
</dependency>public class JwtUtil
{
//创建jwt
public static String createJWT(String subject, String issue, Object claim,
long ttlMillis)
{
//当前时间
long nowMillis = System.currentTimeMillis();
//过期时间
long expireMillis = nowMillis + ttlMillis;
String result = Jwts.builder()
.setSubject(subject) //设置主题
.setIssuer(issue) //发行者
.setId(issue)//jwtID
.setExpiration(new Date(expireMillis)) //设置过期日期
.claim("user", claim)//主题,可以包含用户信息
.signWith(getSignatureAlgorithm(), getSignedKey())//加密算法
.compressWith(CompressionCodecs.DEFLATE).compact();//对载荷进行压缩
return result;
}
// 解析jwt
public static Jws<Claims> pareseJWT(String jwt)
{
Jws<Claims> claims;
try
{
claims = Jwts.parser().setSigningKey(getSignedKey())
.parseClaimsJws(jwt);
}
catch (Exception ex)
{
claims = null;
}
return claims;
}
//获取主题信息
public static Claims getClaims(String jwt)
{
Claims claims;
try
{
claims = Jwts.parser().setSigningKey(getSignedKey())
.parseClaimsJws(jwt).getBody();
}
catch (Exception ex)
{
claims = null;
}
return claims;
}
}
/**
* 获取密钥
*
* @return Key
*/
private static Key getSignedKey()
{
byte[] apiKeySecretBytes = DatatypeConverter
.parseBase64Binary(getAuthKey());
Key signingKey = new SecretKeySpec(apiKeySecretBytes,
getSignatureAlgorithm().getJcaName());
return signingKey;
}
private static SignatureAlgorithm getSignatureAlgorithm()
{
return SignatureAlgorithm.HS256;
}
//获取密钥,可以动态配置
public static String getAuthKey()
{
String auth = "123@#1234";
} Component
public class TokenInterceptor extends HandlerInterceptorAdapter
{
public static Log logger = LogManager.getLogger(TokenInterceptor.class);
@Override
public boolean preHandle(HttpServletRequest request,
HttpServletResponse response, Object handler) throws Exception
{
String uri = request.getRequestURI();
logger.info("start TokenInterceptor preHandle.." + uri);
//需要过滤特殊请求
if (SystemUtil.isFree(uri) || SystemUtil.isProtected(uri))
{
return true;
}
String metohd=request.getMethod().toString();
logger.info("TokenInterceptor request method:"+metohd);
//options 方法需要过滤
if("OPTIONS".equals(metohd))
{
return true;
}
//是否开启token认证
boolean flag = SystemUtil.getVerifyToken();
ResponseResult result = new ResponseResult();
//从请求的head信息中获取token
String token = request.getHeader("X-Token");
if (flag)
{
if(StringUtils.isEmpty(token))
{
token=request.getParameter("X-Token");
}
// token不存在
if (StringUtils.isEmpty(token))
{
result.setCode(ResultCode.NEED_AUTH.getCode());
result.setMsg(ResultCode.NEED_AUTH.getMsg());
WebUtil.writeJson(result, response);
return false;
}
else
{
Claims claims = JwtUtil.getClaims(token);
String subject = "";
if (claims != null)
{
subject = claims.getSubject();
// 验证主题
if (StringUtils.isEmpty(subject))
{
result.setCode(ResultCode.INVALID_TOKEN.getCode());
result.setMsg(ResultCode.INVALID_TOKEN.getMsg());
WebUtil.writeJson(result, response);
return false;
}
}
else
{
result.setCode(ResultCode.INVALID_TOKEN.getCode());
result.setMsg(ResultCode.INVALID_TOKEN.getMsg());
WebUtil.writeJson(result, response);
return false;
}
}
}
return true;
}
}@Configuration
public class WebConfig implements WebMvcConfigurer
{
@Resource
private TokenInterceptor tokenInterceptor;
public void addInterceptors(InterceptorRegistry registry)
{
registry.addInterceptor(tokenInterceptor).addPathPatterns("/**");
}
}
@RequestMapping("login")
public Result login(HttpServletResponse response)
{
    Map<String, Object> map = new HashMap<>();
    //
    Result result = loginAuth(user);
    int code = result.getCode();
            //登录认证成功
    if (code ==ResultCode.SUCCESS)
    {
        //默认为7天
        Long ttlMillis = 7*1000 * 60 * 60 * 24;
        //过期时间
        long expreTime = System.currentTimeMillis() + ttlMillis;
        String tokenKey = UUID.randomUUID().toString();
        String tokenId = JwtUtil.createJWT(user.getUserId(), tokenKey,
                user.getPassword(), expreTime);
        map.put("expreTime", expreTime);
        map.put("tokenId", tokenId);
    }
    else
    {
        logger.error("login error:" +FastJsonUtil.toJSONString(result));
    }
    return result;
}The above is the detailed content of How does Spring Boot integrate JWT to achieve front-end and back-end authentication?. For more information, please follow other related articles on the PHP Chinese website!
 SpringBoot project building steps
 What is the difference between j2ee and springboot
 How to calculate the refund handling fee for Railway 12306
 Computer blue screen code 0xc0000225
 What are the differences between tomcat and nginx
 How to open jar files
 How to trade on Binance
 Why is there no response when headphones are plugged into the computer?


