

How to use Linux nano command

1. Introduction to the nano command
Nano is a free and easy-to-use small editor. Its purpose is to replace the default editor Pico in the non-free Pine software package. Nano not only replicates the look and feel of Pico, but also implements some features that are missing (or disabled by default) in Pico, such as "Search and Replace" and "Go to Line and Column Numbers". Nano is a character terminal text editor similar to the editor program under DOS. It is much simpler than vi/vim and is more suitable for Linux beginners. For example, in Ubuntu system, nano is a default editor.
2. Nano command usage examples
1. Command installation
[root@s142 ~]# yum install -y nano
2. Check the command version
[root@s142 ~]# nano -V
GNU nano version 2.3.1 (compiled 04:47:52, Jun 10 2014)
3. Get command help
[root@s142 ~]# nano --help
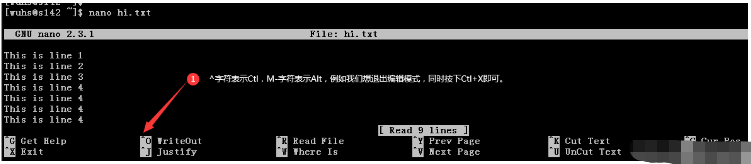
4. Edit a file
[wuhs@s142 ~]$ nano hi.txt
#5. Editing without automatic line wrapping
The nano command can open the specified file for editing, by default It will automatically break lines, that is, when you enter too long content in one line, it will automatically split it into several lines. However, processing certain files in this way may cause problems, such as the /etc/fstab file of the Linux system, so It is recommended not to use the automatic line wrapping function unless necessary, and use -w to enable editing mode.

[wuhs@s142 ~]$ nano -w hi.txt
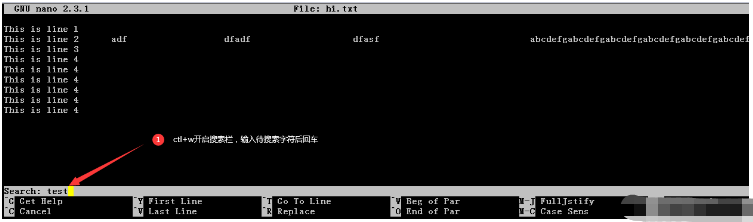
6. Search string
If we want to search for a string from the open file, enter Ctl W to open the search box, enter the string and press Enter, the cursor will automatically locate the first result found.
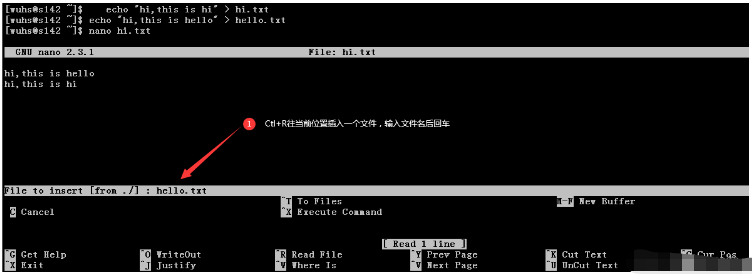
7. Insert a file into the edited file
nano supports inserting a file into the edited file. Use Ctl R and enter in the input box. The path and file name of the file, the default is the current path.
8. Other shortcut keys
The shortcut keys of the nano editor are Ctl or Alt key combinations. The following are commonly used shortcuts. key. If you need to know more, you can use Ctl G to get help on the shortcut keys.
| Shortcut keys | Use |
|---|---|
| Cut a line | |
| Copy a line | |
| Paste a line | |
| Turn one page forward | |
| Turn one page backward | |
| Save updates | |
| Exit edit mode | |
| Start the mark, move the cursor, and press the end mark again. During this period, you can use it in conjunction with shortcut keys such as cut and copy. | |
| Insert a file | |
| Get help | |
| Move the cursor one line up | |
| Move the cursor one line down |
| Parameter | Parameter Description |
|---|---|
| -h, -? , --help | Display help information |
| lines , Column | Start from the indicated column number and row number |
| -A , --smarthome | Enable smart HOME key |
| -B , --backup | Save backup of existing files |
| Directory to store unique backup files | |
| Use bold text instead of color inversion | |
| Convert the entered tab characters to blanks | |
| Enable multiple file buffer function | |
| Record and read the search/replace history string | |
| Do not refer to nanorc files | |
| Fix the numeric keypad key confusion problem | |
| Do not add line breaks to the end of the file | |
| Do not convert from DOS/Mac format | |
| Use one more line when editing | |
| Quote represents string | |
| Restricted mode | |
| Scroll by row instead of half screen | |
| Set the tab width to #number of columns | |
| Status line flashes quickly | |
| Display version information and leave | |
| more accurately detect word boundaries | |
| Syntax definition for highlighting | |
| Continuously display the cursor position | |
| Fix the backspace/delete key confusion issue | |
| Automatically indent new lines | |
| Cut from the cursor to the end of the line | |
| Do not follow symbolic links, but overwrite | |
| Enable mouse function | |
| Set the operating directory | |
| Preserve XON (^Q) and XOFF (^S) keys | |
| Silently ignore startup problems, such as rc file errors | Set the wrap width to #number of columns | -s |
| Enable alternative spell checker | |
| Auto-save on exit, do not prompt | |
| Allow universal undo [Experimental feature] | |
| View (read-only) mode | |
| Do not wrap automatically | |
| Do not display the auxiliary area | |
| Enable the suspension function | |
| Enable soft line breaks |
The above is the detailed content of How to use Linux nano command. For more information, please follow other related articles on the PHP Chinese website!

Hot AI Tools

Undresser.AI Undress
AI-powered app for creating realistic nude photos

AI Clothes Remover
Online AI tool for removing clothes from photos.

Undress AI Tool
Undress images for free

Clothoff.io
AI clothes remover

AI Hentai Generator
Generate AI Hentai for free.

Hot Article
Hot Tools

Notepad++7.3.1
Easy-to-use and free code editor

SublimeText3 Chinese version
Chinese version, very easy to use

Zend Studio 13.0.1
Powerful PHP integrated development environment

Dreamweaver CS6
Visual web development tools

SublimeText3 Mac version
God-level code editing software (SublimeText3)
Hot Topics
 1378
1378
 52
52

 Difference between centos and ubuntu
Apr 14, 2025 pm 09:09 PM
Difference between centos and ubuntu
Apr 14, 2025 pm 09:09 PM
The key differences between CentOS and Ubuntu are: origin (CentOS originates from Red Hat, for enterprises; Ubuntu originates from Debian, for individuals), package management (CentOS uses yum, focusing on stability; Ubuntu uses apt, for high update frequency), support cycle (CentOS provides 10 years of support, Ubuntu provides 5 years of LTS support), community support (CentOS focuses on stability, Ubuntu provides a wide range of tutorials and documents), uses (CentOS is biased towards servers, Ubuntu is suitable for servers and desktops), other differences include installation simplicity (CentOS is thin)
 Centos stops maintenance 2024
Apr 14, 2025 pm 08:39 PM
Centos stops maintenance 2024
Apr 14, 2025 pm 08:39 PM
CentOS will be shut down in 2024 because its upstream distribution, RHEL 8, has been shut down. This shutdown will affect the CentOS 8 system, preventing it from continuing to receive updates. Users should plan for migration, and recommended options include CentOS Stream, AlmaLinux, and Rocky Linux to keep the system safe and stable.
 How to install centos
Apr 14, 2025 pm 09:03 PM
How to install centos
Apr 14, 2025 pm 09:03 PM
CentOS installation steps: Download the ISO image and burn bootable media; boot and select the installation source; select the language and keyboard layout; configure the network; partition the hard disk; set the system clock; create the root user; select the software package; start the installation; restart and boot from the hard disk after the installation is completed.
 What are the backup methods for GitLab on CentOS
Apr 14, 2025 pm 05:33 PM
What are the backup methods for GitLab on CentOS
Apr 14, 2025 pm 05:33 PM
Backup and Recovery Policy of GitLab under CentOS System In order to ensure data security and recoverability, GitLab on CentOS provides a variety of backup methods. This article will introduce several common backup methods, configuration parameters and recovery processes in detail to help you establish a complete GitLab backup and recovery strategy. 1. Manual backup Use the gitlab-rakegitlab:backup:create command to execute manual backup. This command backs up key information such as GitLab repository, database, users, user groups, keys, and permissions. The default backup file is stored in the /var/opt/gitlab/backups directory. You can modify /etc/gitlab
 Detailed explanation of docker principle
Apr 14, 2025 pm 11:57 PM
Detailed explanation of docker principle
Apr 14, 2025 pm 11:57 PM
Docker uses Linux kernel features to provide an efficient and isolated application running environment. Its working principle is as follows: 1. The mirror is used as a read-only template, which contains everything you need to run the application; 2. The Union File System (UnionFS) stacks multiple file systems, only storing the differences, saving space and speeding up; 3. The daemon manages the mirrors and containers, and the client uses them for interaction; 4. Namespaces and cgroups implement container isolation and resource limitations; 5. Multiple network modes support container interconnection. Only by understanding these core concepts can you better utilize Docker.
 How to use docker desktop
Apr 15, 2025 am 11:45 AM
How to use docker desktop
Apr 15, 2025 am 11:45 AM
How to use Docker Desktop? Docker Desktop is a tool for running Docker containers on local machines. The steps to use include: 1. Install Docker Desktop; 2. Start Docker Desktop; 3. Create Docker image (using Dockerfile); 4. Build Docker image (using docker build); 5. Run Docker container (using docker run).
 How to mount hard disk in centos
Apr 14, 2025 pm 08:15 PM
How to mount hard disk in centos
Apr 14, 2025 pm 08:15 PM
CentOS hard disk mount is divided into the following steps: determine the hard disk device name (/dev/sdX); create a mount point (it is recommended to use /mnt/newdisk); execute the mount command (mount /dev/sdX1 /mnt/newdisk); edit the /etc/fstab file to add a permanent mount configuration; use the umount command to uninstall the device to ensure that no process uses the device.
 What to do after centos stops maintenance
Apr 14, 2025 pm 08:48 PM
What to do after centos stops maintenance
Apr 14, 2025 pm 08:48 PM
After CentOS is stopped, users can take the following measures to deal with it: Select a compatible distribution: such as AlmaLinux, Rocky Linux, and CentOS Stream. Migrate to commercial distributions: such as Red Hat Enterprise Linux, Oracle Linux. Upgrade to CentOS 9 Stream: Rolling distribution, providing the latest technology. Select other Linux distributions: such as Ubuntu, Debian. Evaluate other options such as containers, virtual machines, or cloud platforms.
