To introduce aspect-oriented programming (AOP), you need to first consider a scenario like this: the company has a human resources management system currently It has been online, but the system is running unstable and sometimes runs very slowly. In order to detect which link has the problem, the developer wants to monitor the execution time of each method, and then determine the problem based on these execution times. When the problem is resolved, remove these monitors. The system is currently running. If you manually modify thousands of methods in the system, the workload will be too much, and these monitoring methods will have to be removed in the future. If you can dynamically add code while the system is running, the problem can be solved very well. . Aspect-oriented programming (AOP) is a way of dynamically adding code to the system runtime. Spring Boot provides good support for AOP. In AOP, there are some common concepts to understand:
Join points refer to methods in a class that can be enhanced. For example, if you want to modify the function of that method, then the method is a connection point
The pointcut refers to the operation of defining the interception of the joinpoint. This definition refers to intercepting all methods starting with insert as the entry point
After intercepting the Joinpoint, the operation to be performed is to send a notification. For example, the print log monitoring mentioned before. Notifications are divided into pre-notifications, post-notifications, exception notifications, final notifications, and surrounding notifications
Aspect: the combination of Pointcut and Advice
Target (target object): The class to be enhanced becomes Target
Spring Boot provides automation for AOP configuration based on Spring Configure the solution spring-boot-starter-aop, first introduce dependencies, as follows:
<!--    AOP 依赖    -->
<dependency>
  <groupId>org.springframework.boot</groupId>
  <artifactId>spring-boot-starter-aop</artifactId>
</dependency>
Then create the UserService class under the com.sang.aop.service package, as follows:
@Service
public class UserService {
    public String getUserById(Integer id){
        System.out.println("get...");
        return "user";
    }
    public void deleteUserById(Integer id){
        System.out.println("delete...");
    }
}Then create Aspect, as follows:
@Component
@Aspect
public class LogAspect {
    @Pointcut("execution(* com.sang.aop.service.*.*(..))")
    public void pc1() {
    }
    @Before(value = "pc1()")
    public void before(JoinPoint jp) {
        String name = jp.getSignature().getName();
        System.out.println(name + "方法开始执行...");
    }
    @After(value = "pc1()")
    public void after(JoinPoint jp) {
        String name = jp.getSignature().getName();
        System.out.println(name + "方法执行结束...");
    }
    @AfterReturning(value = "pc1()", returning = "result")
    public void afterReturning(JoinPoint jp, Object result) {
        String name = jp.getSignature().getName();
        System.out.println(name + "方法返回值为:" + result);
    }
    @AfterThrowing(value = "pc1()",throwing = "e")
    public void afterThrowing(JoinPoint jp, Exception e) {
        String name = jp.getSignature().getName();
        System.out.println(name+"方法抛异常了,异常是:"+e.getMessage());
    }
    @Around("pc1()")
    public Object around(ProceedingJoinPoint pjp) throws Throwable {
        return pjp.proceed();
    }
}Code explanation:
@Aspect annotation indicates that this is an aspect class
@Pointcut( ) annotation is used in the method pc1() to define a pointcut.. The first * in execution indicates that the method returns any value, the second * indicates any class under the service package, the third * indicates any method in the class, and the two dots in brackets indicate that the method parameters are arbitrary, as described here The entry point is all methods in all classes under the service package
before() method uses the @Before annotation, indicating that this is a pre-notification, and the method is executed before the target method implement. The JoinPoint parameter can provide the name, modifiers and other information about the target method
after() method uses the @After annotation, indicating that this is a post-notification, and the method is in the target method Execute after execution
afterReturning() method uses the @AfterReturning annotation, indicating that this is a return notification, and the return value of the target method can be obtained in this method. The returning parameter in the @AfterReturning annotation represents the variable name of the return value corresponding to the method parameter. Note that the type of result is defined in the method parameters as Object, which means that the return value of the target method can be of any type. If the type of the result parameter is Long, the method can only handle the situation where the return value of the target method is Long
The afterThrowing() method uses the @AfterThrowing annotation, indicating that this is an exception notification, that is, when an exception occurs in the target method, the method will be called. The exception type is Exception, which means that all exceptions will enter Executed in this method, if the exception type is ArithmeticException, it means that only when the target method throws an ArithmeticException exception, the method will be entered for processing.
A rewritten version of this paragraph: The around() method annotated with @Around is called an surround advice. Surround notification has the most powerful function of all notifications. It can implement pre-notification, post-notification, exception notification and return notification. After the target method enters the surround notification, the target method continues execution by calling the proceed method of the ProceedingJoinPoint object. Developers can modify the execution parameters, return values, etc. of the target method here, and handle exceptions of the target method here.
After the configuration is completed, create an interface in the Controller and call the two methods in the Userservice respectively. You can see that the code in the LogAspect is dynamically embedded in the target method and executed, as follows:
getUserById method starts execution...
get...
getUserById method return value is: user
getUserById method execution ends...
deleteUserById method starts execution...
delete...
deleteUserById method return value is: null
deleteUserById method execution ends...
After the Spring Boot project is started, it will first search for index.html as the home page file in the static resource path. If it cannot be found, it will search for the dynamic index.html as the home page file.
例如,如果想使用静态的 index.html 页面作为项目的首页,只需在 resources/static 目录下创建 index.html 文件疾苦。若想使用动态页面作为项目首页,则需在 resources/templages 目录下创建 index.html (使用Thymeleaf 模板) 或者 index.ftl(使用 FreeMarker 模板),然后在 Controller 中返回逻辑视图名,如下:
@Controller
public class IndexController {
    @RequestMapping("/index")
    public String index(){
        return "index";
    }
}运行项目,输入"http://localhost:8081",查看结果

favicon.ico 是浏览器选项卡左上角的图标,可以放在静态资源路径下或者类路径下,静态资源路径下的 favicon.ico 优先级高于类路径下的 favicon.ico
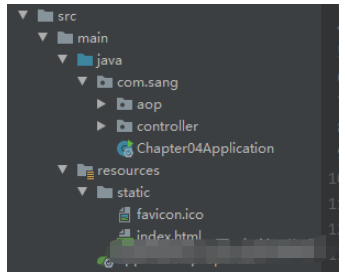
可以使用在线转换网站:https://www.bitbug.net/ 将一张普通图片转为 .ico 图片,转换成功后,将文件重命名为 favicon.ico ,然后复制到 resources/static 目录下,如图

启动项目,查看效果

注意:清缓存,然后 Ctrl+F5 强制刷新
Spring Boot 中提供了大量的自动化配置类,在 Spring Boot 的入口类上有一个 @SpringBootApplication 注解。该注解是一个组合注解,由 @SpringBootConfiguration、@EnableAutoConfiguration、@ComponentScan 组成,其中 @EnableAutoConfiguration 注解开启自动化配置,相关的自动化配置就会被使用。要移除某个自动化配置,开发者可以按照以下方法进行相应的配置更改
@SpringBootApplication
@EnableAutoConfiguration(exclude = {ErrorMvcAutoConfiguration.class})
public class Chapter04Application {
    public static void main(String[] args) {
        SpringApplication.run(Chapter04Application.class, args);
    }
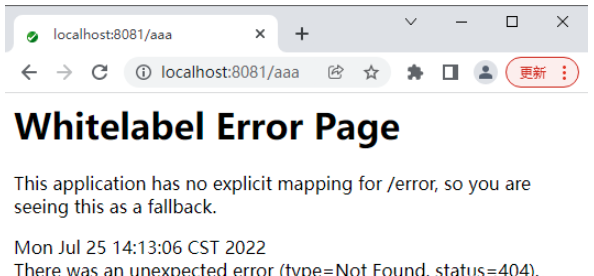
}在 @EnableAutoConfiguration 注解中使用 exclude 属性去除 Error 的自动化配置类,这时如果在 resources/static/error 目录下创建 4xx.htnl、5xx.html ,访问出错时就不会自动跳转了。由于 @EnableAutoConfiguration 注解的 exclude 属性值是一个数组,因此有多个要排除的自动化配置文件只需要继续添加即可。另外一种配置方法是在 application.properties 文件中进行配置,示例如下:
spring.autoconfigure.exclude=org.springframework.boot.autoconfigure.web.servlet.error.ErrorMvcAutoConfiguration
添加前

添加后

The above is the detailed content of How to configure SpringBoot's AOP integration with Web. For more information, please follow other related articles on the PHP Chinese website!
 SpringBoot project building steps
 What is the difference between j2ee and springboot
 WeChat payment deduction sequence
 How to solve the problem when the computer CPU temperature is too high
 What software is unity?
 Usage of urlencode function
 Usage of sprintf function in php
 jsonp solves cross-domain problems


