Fix: Sysprep fails to verify Windows 11 installation
Issues may occur with Sysprep on Windows 11, 10 and 8 platforms. When this issue occurs, the Sysprep command does not run and verify the installation as expected. Please refer to the following Windows 11/10 solutions if you have Sysprep issues that need to be fixed.
How do Sysprep errors occur in Windows?
Since Windows 8, Sysprep still cannot verify that your Windows installation is correct. This issue usually occurs due to user-installed UWP apps. Many users have reported that this issue has been resolved by uninstalling certain UWP apps installed from the MS Store.
This problem may be caused by the lack of default applications pre-installed by Windows. If this happens, you need to reinstall the missing Windows applications. The normal reinstall application command will do the job.
If you are using Windows Professional and Enterprise, Sysprep errors may be caused by the BitLocker encryption feature. The Sysprep utility does not integrate well with BitLocker. Sometimes disabling this feature is also feasible on Windows Professional and Enterprise editions and can resolve this error.
How to fix Sysprep errors in Windows?
1. Reinstall the default Windows UWP app
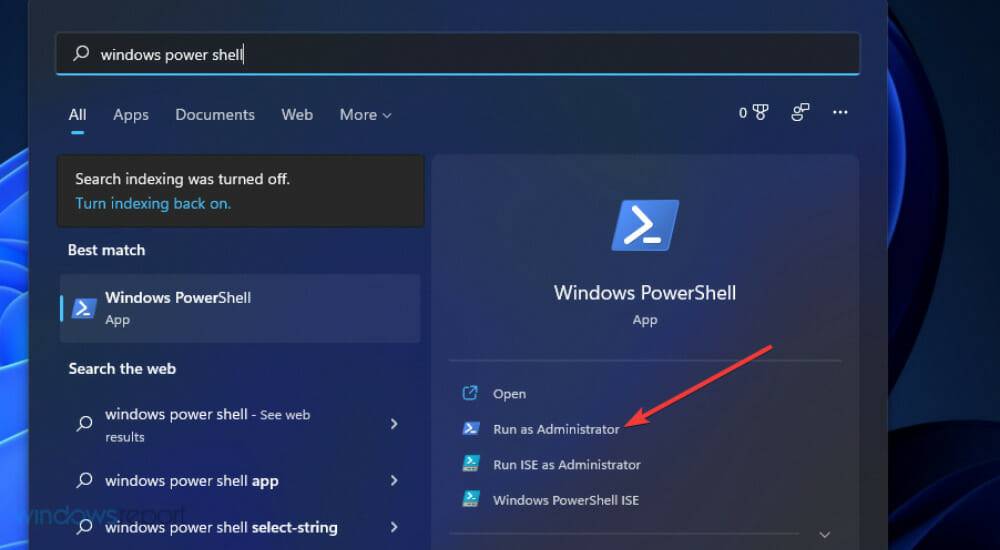
- To bring up the search box, press the Windows S keyboard shortcut.
- Type Windows PowerShell in the search box.
- Click PowerShell's Run as administrator option.

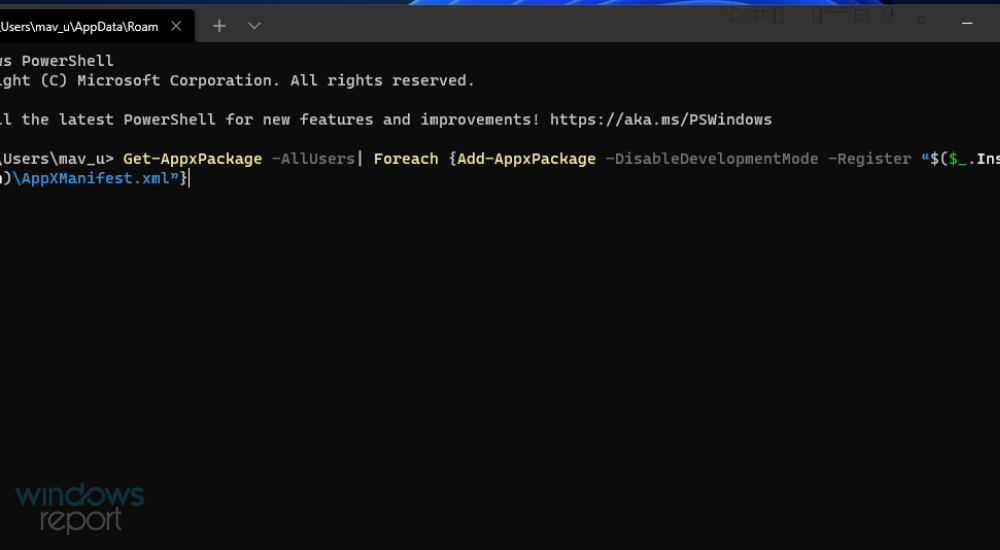
- Enter this PowerShell command:
<strong>Get-AppxPackage -AllUsers| Foreach {Add-AppxPackage -DisableDevelopmentMode -Register “$($_.InstallLocation)\AppXManifest.xml ”}</strong> - Press the Enter keyboard key to execute.

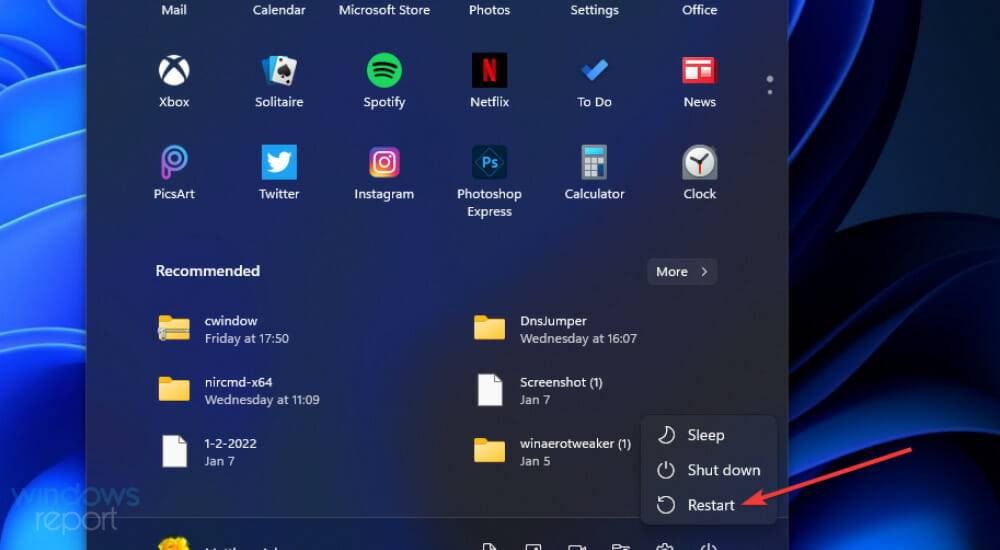
- After the command completes, click Power on the Start menu and reboot.

2. Disable BitLocker
- Use the hotkey (specified in solution one) to launch the Windows 11/10 search tool.
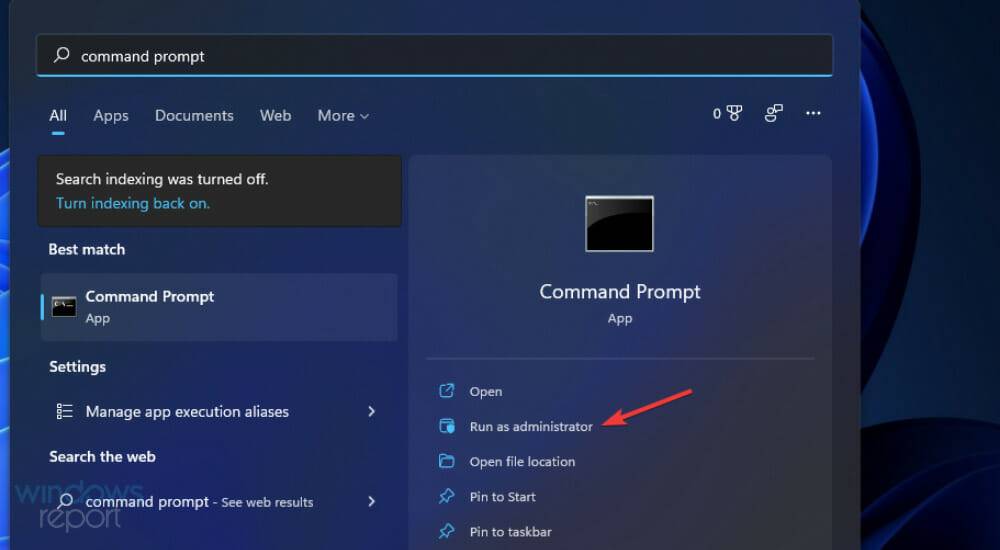
- Enter command prompt in the search tool's text box to find the application.
- Click the Run as administrator option for the command prompt displayed directly below.

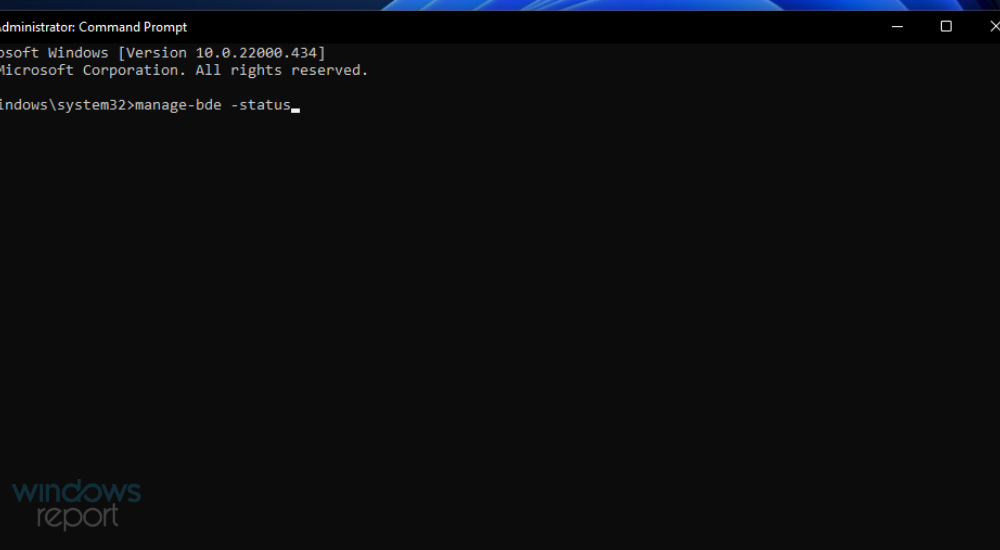
- Enter this command and press Return:
<strong>manage-bde -status</strong>
- To disable BitLocker, enter this command and press Return:
<strong>Disable-Bitlocker –MountPoint 'C:'</strong>
3. Edit the registry
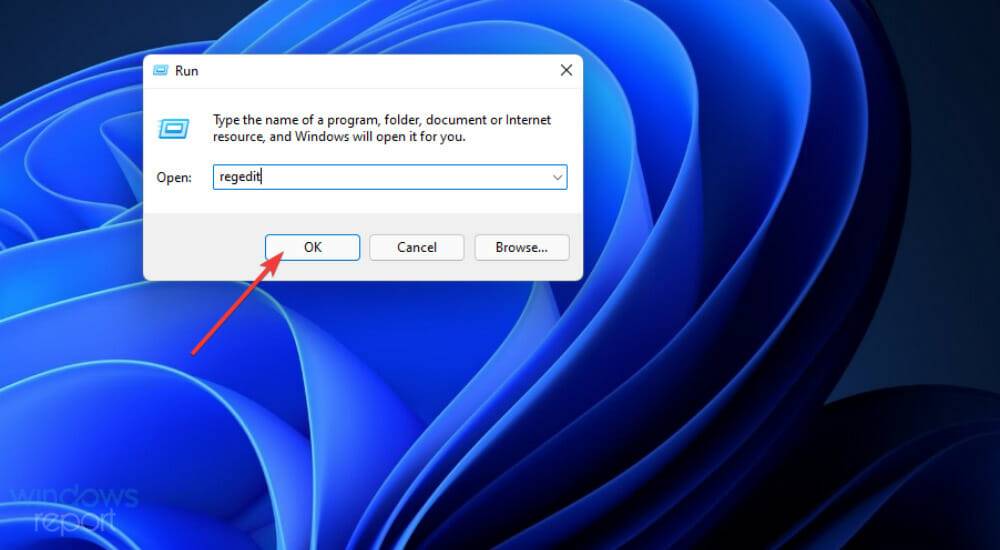
- and press the Windows R key at the same time to start running.
- Type this run command in the Open box:
<strong>regedit</strong>##Click - OK to open the Registry Editor.
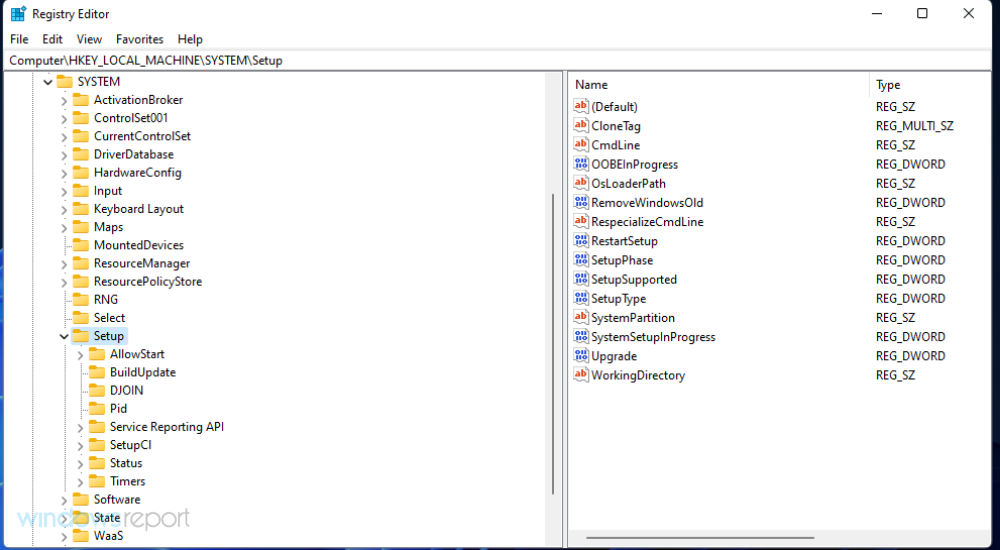
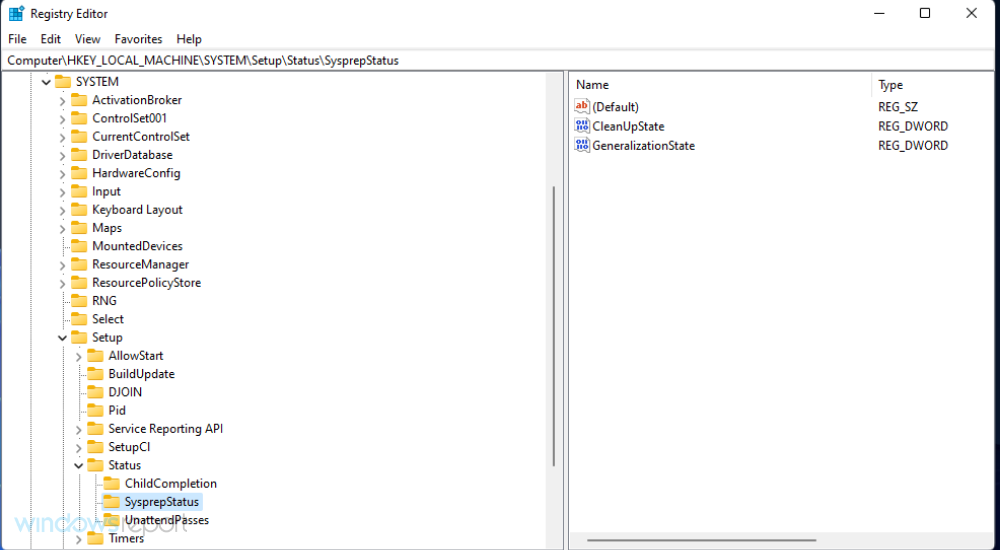
 Then navigate to this registry key:
 Computer\HKEY_LOCAL_MACHINE\SYSTEM\Setup<strong></strong>Select Registry on the left Setup key. -
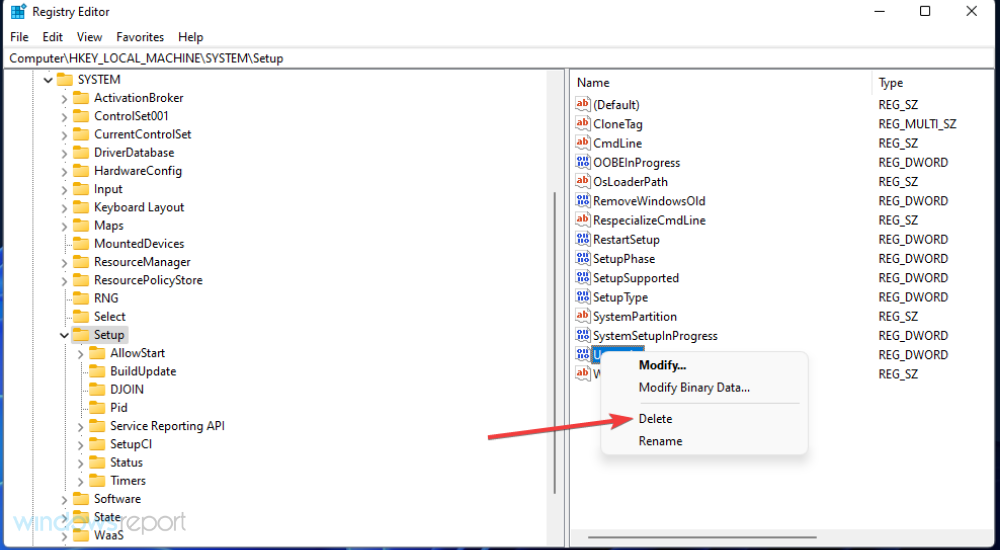
 Right-click the upgrade DWORD and select
 - Delete.
 Go to this registry key:
 -
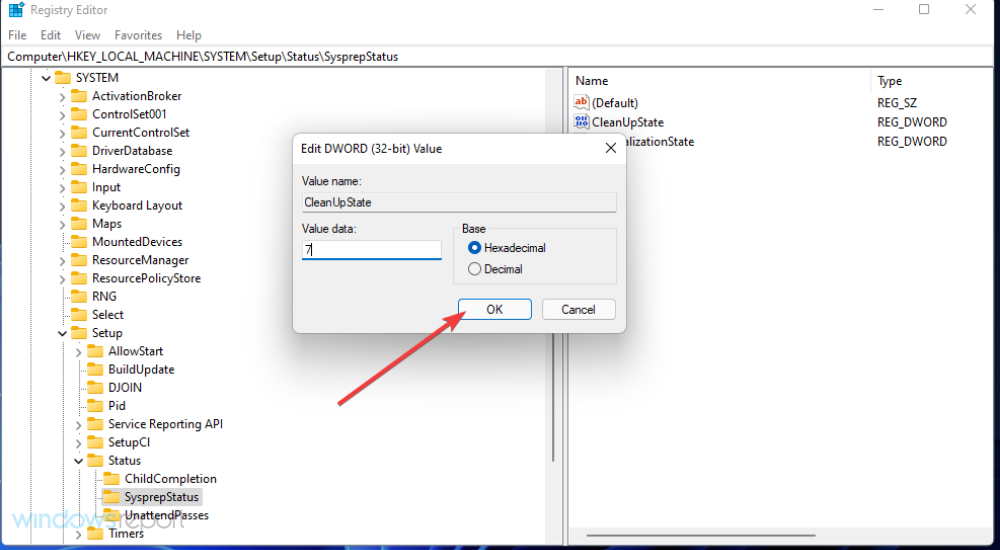
HKEY_LOCAL_MACHINE\SYSTEM\Setup\Status\SysprepStatus<strong></strong> Double-click CleanUpState DWORD.
 - Erase the current number and enter
- 7 in the value data box, then click OK the option.
 After that, press the
 - Start button. There select the Power and Restart options. This potential solution is recommended for users who need to fix Sysprep errors after recently upgrading to a new Windows platform.
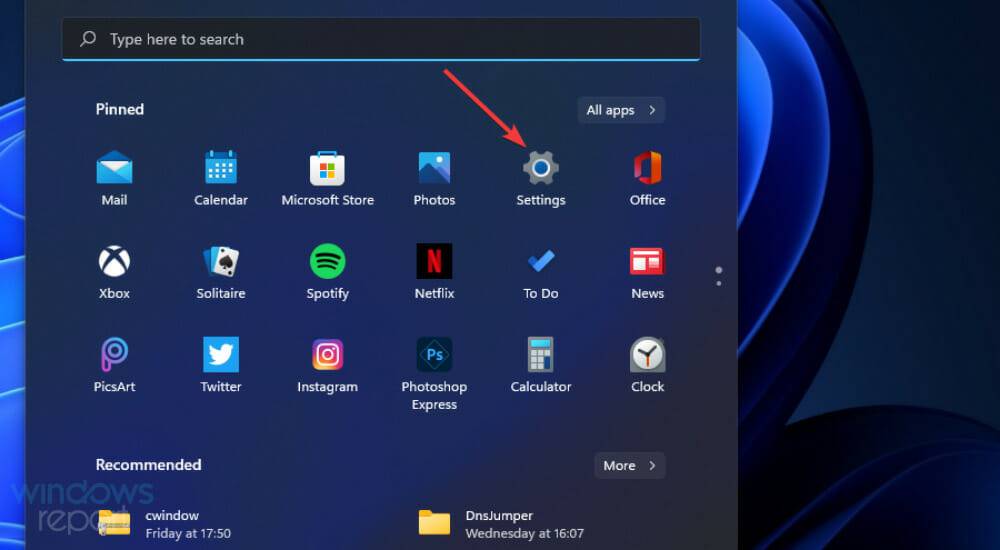
- Click
- Start and select the Pinned Settings app on that menu.
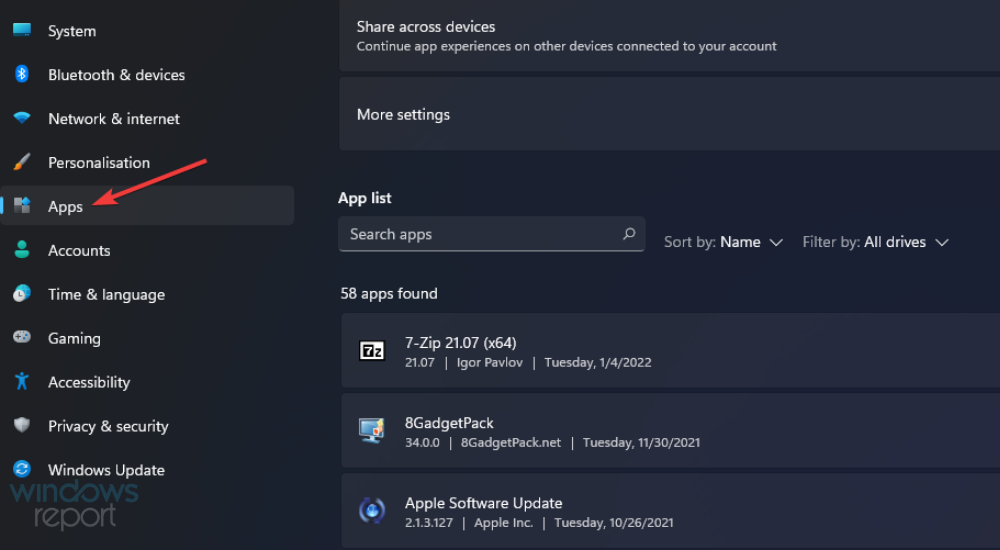
 Select the
 - Applications tab.
 Click
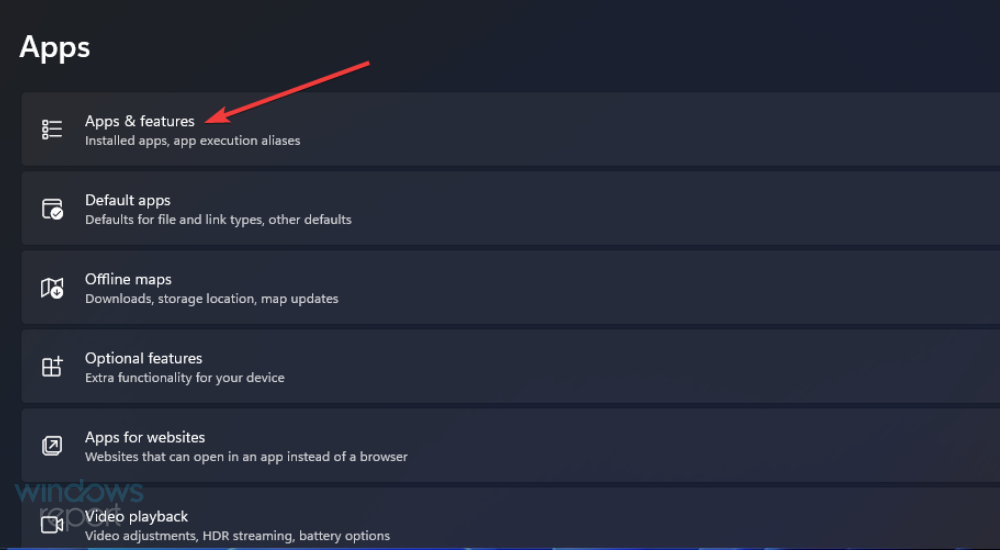
Click - Apps & Features to open the uninstall option.
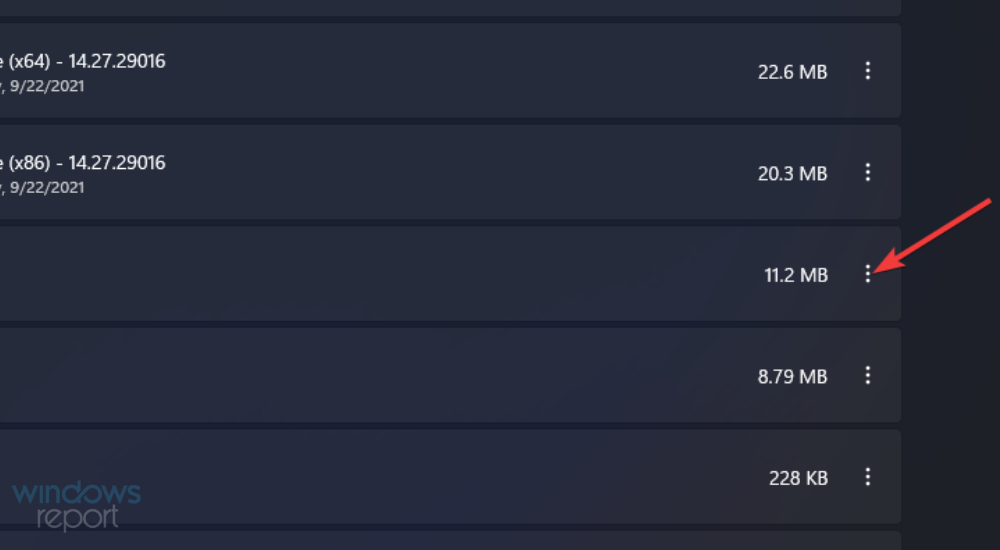
 Click the three-dot button of the UWP app downloaded from MS Store.
 -
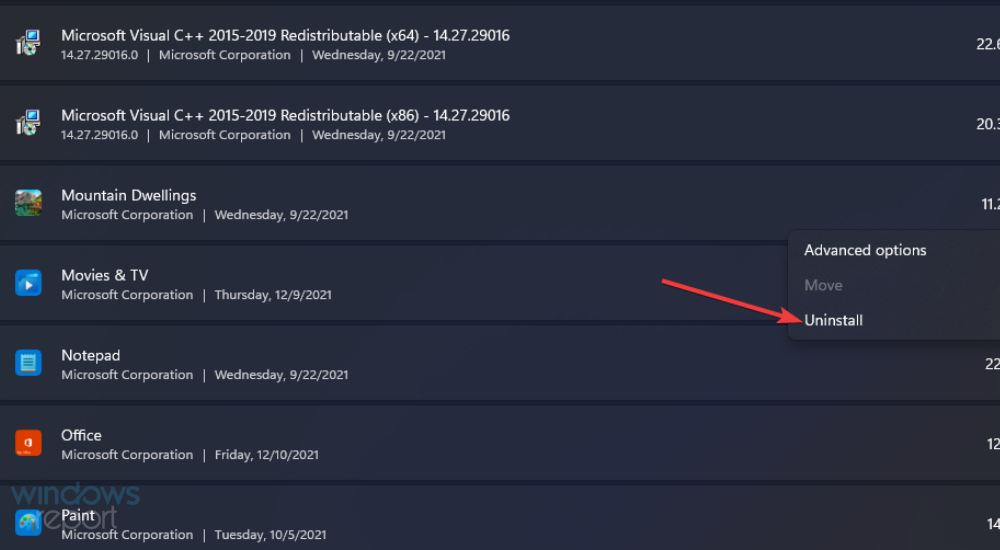
 Select the
 - Uninstall option.

You may notice that the Sysprep error message contains the path to the setupact.log file. Examining this file can help you identify what is causing your UWP app to error and potentially other factors behind it.
This is how you can check the setuppact.log file in Windows 11/10.
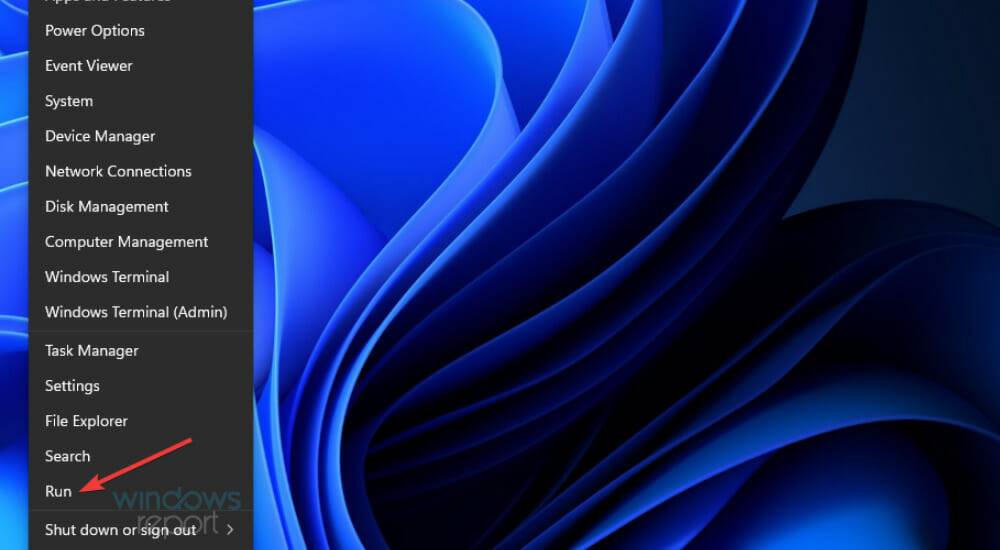
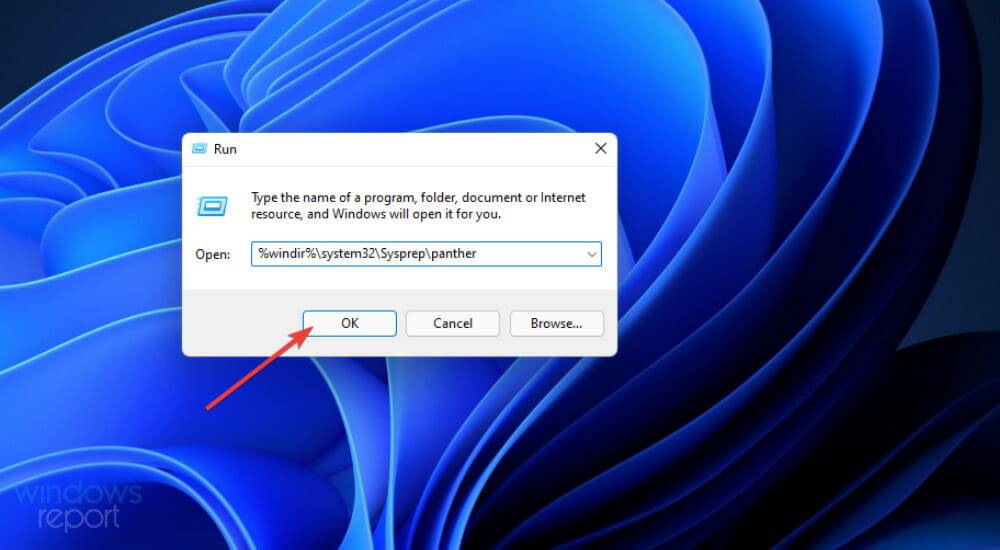
- Right-click Start and select RunAttachment on the Alternatives menu. WinX

- Enter the folder path specified in the Sysprep error message in the Open box:
<strong>%windir% \system32\Sysprep\panther</strong> - Click "OK" to open the folder.

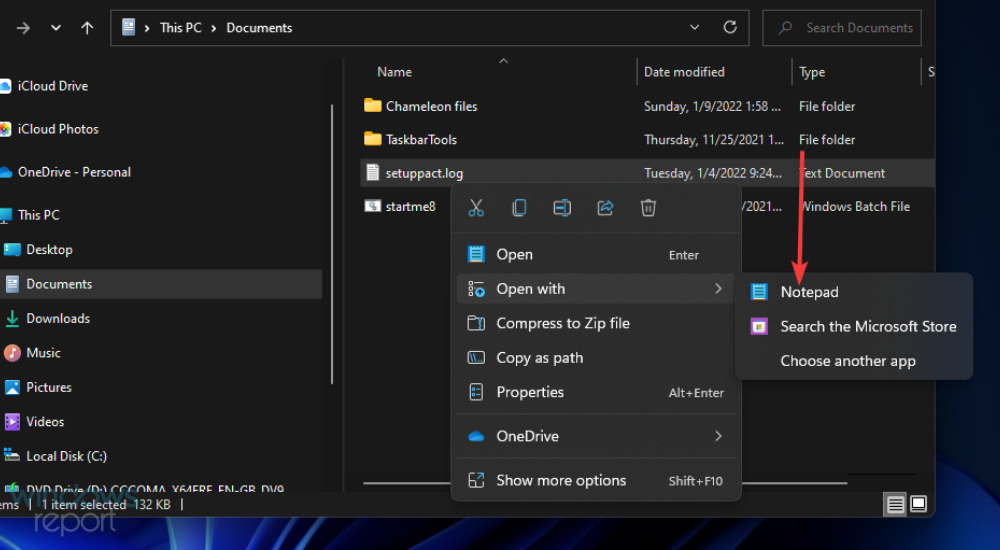
- Right-click the setup.log file in the folder and select Open with.

- Then choose to open the log file with Notepad.
To view the details of the Sysprep error, scroll down to the bottom of the log file. When there is an application causing the problem, the log file will include its details as shown below.
Although the SYSPRP package has been installed for the application [app ID], it has not been configured for all users. This package will not run properly in Sysprep images. The 0x80073cf2 error prevents SYSPRP from removing the current user's application.
If you see log details like this, you may have hit the bullseye! Simply uninstall the app (or apps) specified here as outlined in solution four.
Here are some of the best ways to fix Windows 11/10 Sysprep errors. In many cases, they may fix the bug now that a solution has been confirmed.
The above is the detailed content of Fix: Sysprep fails to verify Windows 11 installation. For more information, please follow other related articles on the PHP Chinese website!

Hot AI Tools

Undresser.AI Undress
AI-powered app for creating realistic nude photos

AI Clothes Remover
Online AI tool for removing clothes from photos.

Undress AI Tool
Undress images for free

Clothoff.io
AI clothes remover

Video Face Swap
Swap faces in any video effortlessly with our completely free AI face swap tool!

Hot Article

Hot Tools

Notepad++7.3.1
Easy-to-use and free code editor

SublimeText3 Chinese version
Chinese version, very easy to use

Zend Studio 13.0.1
Powerful PHP integrated development environment

Dreamweaver CS6
Visual web development tools

SublimeText3 Mac version
God-level code editing software (SublimeText3)

Hot Topics
 Solution for Win11 unable to install Chinese language pack
Mar 09, 2024 am 09:15 AM
Win11 is the latest operating system launched by Microsoft. Compared with previous versions, Win11 has greatly improved the interface design and user experience. However, some users reported that they encountered the problem of being unable to install the Chinese language pack after installing Win11, which caused trouble for them to use Chinese in the system. This article will provide some solutions to the problem that Win11 cannot install the Chinese language pack to help users use Chinese smoothly. First, we need to understand why the Chinese language pack cannot be installed. Generally speaking, Win11
 What software is crystaldiskmark? -How to use crystaldiskmark?
Mar 18, 2024 pm 02:58 PM
CrystalDiskMark is a small HDD benchmark tool for hard drives that quickly measures sequential and random read/write speeds. Next, let the editor introduce CrystalDiskMark to you and how to use crystaldiskmark~ 1. Introduction to CrystalDiskMark CrystalDiskMark is a widely used disk performance testing tool used to evaluate the read and write speed and performance of mechanical hard drives and solid-state drives (SSD). Random I/O performance. It is a free Windows application and provides a user-friendly interface and various test modes to evaluate different aspects of hard drive performance and is widely used in hardware reviews
 CrystalDiskinfo usage tutorial-What software is CrystalDiskinfo?
Mar 18, 2024 pm 04:50 PM
CrystalDiskInfo is a software used to check computer hardware devices. In this software, we can check our own computer hardware, such as reading speed, transmission mode, interface, etc.! So in addition to these functions, how to use CrystalDiskInfo and what exactly is CrystalDiskInfo? Let me sort it out for you! 1. The Origin of CrystalDiskInfo As one of the three major components of a computer host, a solid-state drive is the storage medium of a computer and is responsible for computer data storage. A good solid-state drive can speed up file reading and affect consumer experience. When consumers receive new devices, they can use third-party software or other SSDs to
 Oracle NVL function common problems and solutions
Mar 10, 2024 am 08:42 AM
Common problems and solutions for OracleNVL function Oracle database is a widely used relational database system, and it is often necessary to deal with null values during data processing. In order to deal with the problems caused by null values, Oracle provides the NVL function to handle null values. This article will introduce common problems and solutions of NVL functions, and provide specific code examples. Question 1: Improper usage of NVL function. The basic syntax of NVL function is: NVL(expr1,default_value).
 Implementing Machine Learning Algorithms in C++: Common Challenges and Solutions
Jun 03, 2024 pm 01:25 PM
Common challenges faced by machine learning algorithms in C++ include memory management, multi-threading, performance optimization, and maintainability. Solutions include using smart pointers, modern threading libraries, SIMD instructions and third-party libraries, as well as following coding style guidelines and using automation tools. Practical cases show how to use the Eigen library to implement linear regression algorithms, effectively manage memory and use high-performance matrix operations.
 How to resolve an incompatible software attempt to load with Edge?
Mar 15, 2024 pm 01:34 PM
When we use the Edge browser, sometimes incompatible software attempts to be loaded together, so what is going on? Let this site carefully introduce to users how to solve the problem of trying to load incompatible software with Edge. How to solve an incompatible software trying to load with Edge Solution 1: Search IE in the start menu and access it directly with IE. Solution 2: Note: Modifying the registry may cause system failure, so operate with caution. Modify registry parameters. 1. Enter regedit during operation. 2. Find the path\HKEY_LOCAL_MACHINE\SOFTWARE\Policies\Micros
 What software is photoshopcs5? -photoshopcs5 usage tutorial
Mar 19, 2024 am 09:04 AM
PhotoshopCS is the abbreviation of Photoshop Creative Suite. It is a software produced by Adobe and is widely used in graphic design and image processing. As a novice learning PS, let me explain to you today what software photoshopcs5 is and how to use photoshopcs5. 1. What software is photoshop cs5? Adobe Photoshop CS5 Extended is ideal for professionals in film, video and multimedia fields, graphic and web designers who use 3D and animation, and professionals in engineering and scientific fields. Render a 3D image and merge it into a 2D composite image. Edit videos easily
 What software is coreldraw - how to download the official free version of cdr2022?
Mar 18, 2024 pm 11:00 PM
CorelDRAW software is a vector graphics production tool software produced by Corel. It is mainly used for vector graphics, page design and image editing. Next, let the editor introduce to you what software coreldraw is? How to download the official free version of cdr2022! 1. What software is coreldraw? The origin of CorelDRAW. The full name of CorelDRAW software is CorelDRAW. It is a graphic design software for producing vector graphics. CorelDRAWX4 has been updated and optimized in text format, new interactive tables and page layer functions. CorelDRAWX4 supports online service integration and collaboration. As a graphic image tool and vector drawing software, it


