

How to install and configure Nginx

环境准备
1. 操作系统
centos 6.4 x86_64
2.软件版本
nginx 1.4.2
3.实验拓扑
4.安装yum源
[root@nginx ~]# rpm -ivh http://download.fedoraproject.org/pub/epel/6/x86_64/epel-release-6-8.noarch.rpm
[root@web1 ~]# rpm -ivh http://download.fedoraproject.org/pub/epel/6/x86_64/epel-release-6-8.noarch.rpm
[root@web2 ~]# rpm -ivh http://download.fedoraproject.org/pub/epel/6/x86_64/epel-release-6-8.noarch.rpm
5.各节点时间同步
[root@nginx ~]# ntpdate 202.120.2.101
[root@web1 ~]# ntpdate 202.120.2.101
[root@web2 ~]# ntpdate 202.120.2.101
6.关闭防火墙与selinux
[root@nginx ~]# service iptables stop
[root@nginx ~]# chkconfig iptables off
[root@nginx ~]# getenforce
disabled
[root@web1 ~]# service iptables stop
[root@web1 ~]# chkconfig iptables off
[root@web1 ~]# getenforce
disabled
[root@web2 ~]# service iptables stop
[root@web2 ~]# chkconfig iptables off
[root@web2 ~]# getenforce
disabled
安装nginx
1.解压
[root@nginx src]# tar xf nginx-1.4.2.tar.gz
2.新建nginx用户与组
[root@nginx src]# groupadd -g 108 -r nginx
[root@nginx src]# useradd -u 108 -r -g 108 nginx
[root@nginx src]# id nginx
uid=108(nginx) gid=108(nginx) 组=108(nginx)
3.准备编译配置文件
[root@nginx src]# yum install -y pcre-devel openssl-devel
[root@nginx nginx-1.4.2]# ./configure  --prefix=/usr  --sbin-path=/usr/sbin/nginx  --conf-path=/etc/nginx/nginx.conf  --error-log-path=/var/log/nginx/error.log  --http-log-path=/var/log/nginx/access.log  --pid-path=/var/run/nginx/nginx.pid  --lock-path=/var/lock/nginx.lock  --user=nginx  --group=nginx  --with-http_ssl_module  --with-http_flv_module  --with-http_stub_status_module  --with-http_gzip_static_module  --http-client-body-temp-path=/var/tmp/nginx/client/  --http-proxy-temp-path=/var/tmp/nginx/proxy/  --http-fastcgi-temp-path=/var/tmp/nginx/fcgi/  --http-uwsgi-temp-path=/var/tmp/nginx/uwsgi  --http-scgi-temp-path=/var/tmp/nginx/scgi  --with-pcre
4.编译并安装
[root@nginx nginx-1.4.2]# make && make install
5.为nginx提供sysv init脚本
[root@nginx ~]# cat /etc/init.d/nginx
#!/bin/sh
#
# nginx - this script starts and stops the nginx daemon
#
# chkconfig:  - 85 15
# description: nginx is an http(s) server, http(s) reverse \
#        proxy and imap/pop3 proxy server
# processname: nginx
# config:   /etc/nginx/nginx.conf
# config:   /etc/sysconfig/nginx
# pidfile:   /var/run/nginx.pid
# source function library.
. /etc/rc.d/init.d/functions
# source networking configuration.
. /etc/sysconfig/network
# check that networking is up.
[ "$networking" = "no" ] && exit 0
nginx="/usr/sbin/nginx"
prog=$(basename $nginx)
nginx_conf_file="/etc/nginx/nginx.conf"
[ -f /etc/sysconfig/nginx ] && . /etc/sysconfig/nginx
lockfile=/var/lock/subsys/nginx
make_dirs() {
  # make required directories
  user=`nginx -v 2>&1 | grep "configure arguments:" | sed 's/[^*]*--user=\([^ ]*\).*/\1/g' -`
  options=`$nginx -v 2>&1 | grep 'configure arguments:'`
  for opt in $options; do
    if [ `echo $opt | grep '.*-temp-path'` ]; then
      value=`echo $opt | cut -d "=" -f 2`
      if [ ! -d "$value" ]; then
        # echo "creating" $value
        mkdir -p $value && chown -r $user $value
      fi
    fi
  done
}
start() {
  [ -x $nginx ] || exit 5
  [ -f $nginx_conf_file ] || exit 6
  make_dirs
  echo -n $"starting $prog: "
  daemon $nginx -c $nginx_conf_file
  retval=$?
  echo
  [ $retval -eq 0 ] && touch $lockfile
  return $retval
}
stop() {
  echo -n $"stopping $prog: "
  killproc $prog -quit
  retval=$?
  echo
  [ $retval -eq 0 ] && rm -f $lockfile
  return $retval
}
restart() {
  configtest || return $?
  stop
  sleep 1
  start
}
reload() {
  configtest || return $?
  echo -n $"reloading $prog: "
  killproc $nginx -hup
  retval=$?
  echo
}
force_reload() {
  restart
}
configtest() {
 $nginx -t -c $nginx_conf_file
}
rh_status() {
  status $prog
}
rh_status_q() {
  rh_status >/dev/null 2>&1
}
case "$1" in
  start)
    rh_status_q && exit 0
    $1
    ;;
  stop)
    rh_status_q || exit 0
    $1
    ;;
  restart|configtest)
    $1
    ;;
  reload)
    rh_status_q || exit 7
    $1
    ;;
  force-reload)
    force_reload
    ;;
  status)
    rh_status
    ;;
  condrestart|try-restart)
    rh_status_q || exit 0
      ;;
  *)
    echo $"usage: $0 {start|stop|status|restart|condrestart|try-restart|reload|force-reload|configtest}"
    exit 2
esac6.为此脚本赋予执行权限
[root@nginx ~]# chmod +x /etc/init.d/nginx
7.添加至服务管理列表,并让其开机自动启动
[root@nginx ~]# chkconfig --add nginx
[root@nginx ~]# chkconfig nginx on
[root@nginx ~]# chkconfig nginx --list
nginx       0:关闭  1:关闭  2:启用  3:启用  4:启用  5:启用  6:关闭
8.启动nginx
[root@nginx ~]# service nginx start
正在启动 nginx:                      [确定]
9.查看一下端口
[root@nginx ~]# netstat -ntlp | grep :80
tcp    0   0 0.0.0.0:80         0.0.0.0:*          listen   3889/nginx
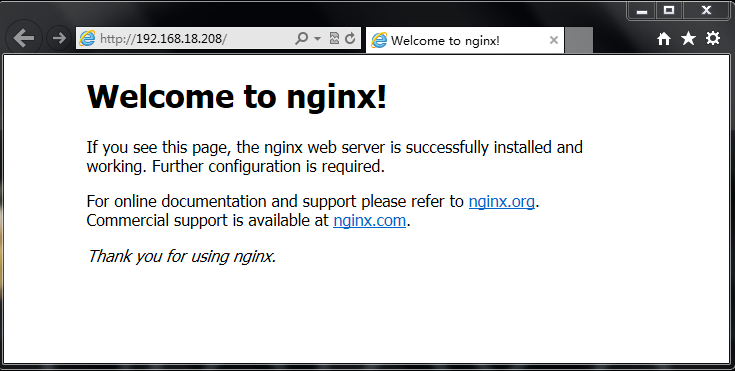
10.测试一下
The above is the detailed content of How to install and configure Nginx. For more information, please follow other related articles on the PHP Chinese website!

Hot AI Tools

Undresser.AI Undress
AI-powered app for creating realistic nude photos

AI Clothes Remover
Online AI tool for removing clothes from photos.

Undress AI Tool
Undress images for free

Clothoff.io
AI clothes remover

AI Hentai Generator
Generate AI Hentai for free.

Hot Article
Hot Tools

Notepad++7.3.1
Easy-to-use and free code editor

SublimeText3 Chinese version
Chinese version, very easy to use

Zend Studio 13.0.1
Powerful PHP integrated development environment

Dreamweaver CS6
Visual web development tools

SublimeText3 Mac version
God-level code editing software (SublimeText3)
Hot Topics


 How to allow external network access to tomcat server
Apr 21, 2024 am 07:22 AM
How to allow external network access to tomcat server
Apr 21, 2024 am 07:22 AM
To allow the Tomcat server to access the external network, you need to: modify the Tomcat configuration file to allow external connections. Add a firewall rule to allow access to the Tomcat server port. Create a DNS record pointing the domain name to the Tomcat server public IP. Optional: Use a reverse proxy to improve security and performance. Optional: Set up HTTPS for increased security.
 How to run thinkphp
Apr 09, 2024 pm 05:39 PM
How to run thinkphp
Apr 09, 2024 pm 05:39 PM
Steps to run ThinkPHP Framework locally: Download and unzip ThinkPHP Framework to a local directory. Create a virtual host (optional) pointing to the ThinkPHP root directory. Configure database connection parameters. Start the web server. Initialize the ThinkPHP application. Access the ThinkPHP application URL and run it.
 What are the nginx start and stop commands?
Apr 02, 2024 pm 08:45 PM
What are the nginx start and stop commands?
Apr 02, 2024 pm 08:45 PM
The start and stop commands of Nginx are nginx and nginx -s quit respectively. The start command starts the server directly, while the stop command gracefully shuts down the server, allowing all current requests to be processed. Other available stop signals include stop and reload.
 Welcome to nginx!How to solve it?
Apr 17, 2024 am 05:12 AM
Welcome to nginx!How to solve it?
Apr 17, 2024 am 05:12 AM
To solve the "Welcome to nginx!" error, you need to check the virtual host configuration, enable the virtual host, reload Nginx, if the virtual host configuration file cannot be found, create a default page and reload Nginx, then the error message will disappear and the website will be normal show.
 How to register phpmyadmin
Apr 07, 2024 pm 02:45 PM
How to register phpmyadmin
Apr 07, 2024 pm 02:45 PM
To register for phpMyAdmin, you need to first create a MySQL user and grant permissions to it, then download, install and configure phpMyAdmin, and finally log in to phpMyAdmin to manage the database.
 How to deploy nodejs project to server
Apr 21, 2024 am 04:40 AM
How to deploy nodejs project to server
Apr 21, 2024 am 04:40 AM
Server deployment steps for a Node.js project: Prepare the deployment environment: obtain server access, install Node.js, set up a Git repository. Build the application: Use npm run build to generate deployable code and dependencies. Upload code to the server: via Git or File Transfer Protocol. Install dependencies: SSH into the server and use npm install to install application dependencies. Start the application: Use a command such as node index.js to start the application, or use a process manager such as pm2. Configure a reverse proxy (optional): Use a reverse proxy such as Nginx or Apache to route traffic to your application
 How to solve the problem of nginx when accessing the website
Apr 02, 2024 pm 08:39 PM
How to solve the problem of nginx when accessing the website
Apr 02, 2024 pm 08:39 PM
nginx appears when accessing a website. The reasons may be: server maintenance, busy server, browser cache, DNS issues, firewall blocking, website misconfiguration, network connection issues, or the website is down. Try the following solutions: wait for maintenance to end, visit during off-peak hours, clear your browser cache, flush your DNS cache, disable firewall or antivirus software, contact the site administrator, check your network connection, or use a search engine or web archive to find another copy of the site. If the problem persists, please contact the site administrator.
 How to communicate between docker containers
Apr 07, 2024 pm 06:24 PM
How to communicate between docker containers
Apr 07, 2024 pm 06:24 PM
There are five methods for container communication in the Docker environment: shared network, Docker Compose, network proxy, shared volume, and message queue. Depending on your isolation and security needs, choose the most appropriate communication method, such as leveraging Docker Compose to simplify connections or using a network proxy to increase isolation.
