

How nginx+iis implements simple load balancing

1. nginx installation
nginx is a lightweight web server/reverse proxy server and email (imap/pop3) proxy server, and is installed in a bsd- Published under the like agreement. It was developed by Russian programmer igor sysoev and is used by Rambler (Russian: рамблер), a large Russian portal website and search engine. Its characteristics are that it occupies less memory and has strong concurrency capabilities. In fact, nginx’s concurrency capabilities do perform better among web servers of the same type. Users of nginx websites in mainland China include: Baidu, Sina, NetEase, Tencent, etc.
The latest version of nginx is 1.9.3. The one I downloaded is the window version. Generally, the actual scenario is to install it under the Linux system. Since the Linux system is currently being explored, I will not introduce it here. Official download address:. After the download is complete, unzip and run nginx.exe to start nginx. After starting, you will see nginx in the process.
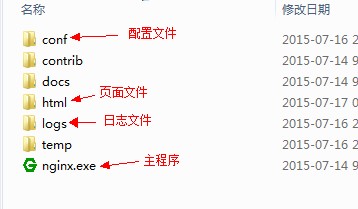
To achieve load balancing, you need to modify the configuration information of conf/nginx.conf. After modifying the configuration information, restart the nginx service. This can be achieved through the nginx -s reload command. Here we use a batch process provided by ants to operate.
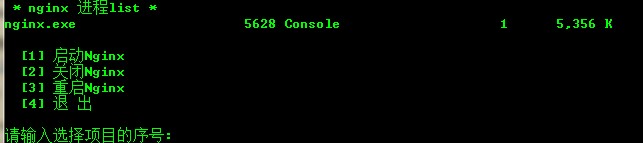
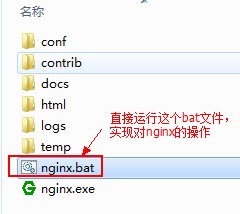
Put the nginx.bat file in the same folder as nginx.exe and run it directly. All files used in this article will be provided at the end of the article.
2. Site construction and configuration
1. Build two iis sites
There is only one under the site A simple index page used to output current server information. Since I don't have two machines, I deployed both sites to this machine and bound ports 8082 and 9000 respectively.
 protected void page_load(object sender, eventargs e)
 {
  label0.text = "请求开始时间:"+datetime.now.tostring("yyyy-mm-dd hh:mm:ss");
  label1.text = "服务器名称:" + server.machinename;//服务器名称
  label2.text = "服务器ip地址:" + request.servervariables["local_addr"];//服务器ip地址
  label3.text = "http访问端口:" + request.servervariables["server_port"];//http访问端口"
  label4.text = ".net解释引擎版本:" + ".net clr" + environment.version.major + "." + environment.version.minor + "." + environment.version.build + "." + environment.version.revision;//.net解释引擎版本
  label5.text = "服务器操作系统版本:" + environment.osversion.tostring();//服务器操作系统版本
  label6.text = "服务器iis版本:" + request.servervariables["server_software"];//服务器iis版本
  label7.text = "服务器域名:" + request.servervariables["server_name"];//服务器域名
  label8.text = "虚拟目录的绝对路径:" + request.servervariables["appl_rhysical_path"];//虚拟目录的绝对路径
  label9.text = "执行文件的绝对路径:" + request.servervariables["path_translated"];//执行文件的绝对路径
  label10.text = "虚拟目录session总数:" + session.contents.count.tostring();//虚拟目录session总数
  label11.text = "虚拟目录application总数:" + application.contents.count.tostring();//虚拟目录application总数
  label12.text = "域名主机:" + request.servervariables["http_host"];//域名主机
  label13.text = "服务器区域语言:" + request.servervariables["http_accept_language"];//服务器区域语言
  label14.text = "用户信息:" + request.servervariables["http_user_agent"];
  label14.text = "cpu个数:" + environment.getenvironmentvariable("number_of_processors");//cpu个数
  label15.text = "cpu类型:" + environment.getenvironmentvariable("processor_identifier");//cpu类型
  label16.text = "请求来源地址:" + request.headers["x-real-ip"];
}2. Modify nginx configuration information
Modify the nginx listening port and modify the listen node value under the http server. Since port 80 of this machine has been occupied, I changed it to listening to port 8083.
listen 8083;
Add upstream (server cluster) under the http node. The server settings are cluster server information. I have built two sites here and configured two pieces of information.
 #服务器集群名称为jq_one
 upstream jq_one {
   server 127.0.0.1:9000;
   server 127.0.0.1:8082;
}Find the location node under the http node and modify it
location / {
  root html;
  index index.aspx index.html index.htm; #修改主页为index.aspx
 #其中jq_one 对应着upstream设置的集群名称
 proxy_pass  http://jq_one;
 #设置主机头和客户端真实地址,以便服务器获取客户端真实ip
 proxy_set_header host  $host;
 proxy_set_header x-real-ip $remote_addr;
 proxy_set_header x-forwarded-for $proxy_add_x_forwarded_for;
}After modifying the configuration file, remember to restart the nginx service. The final complete configuration file information is as follows
3. Running results
Visit http://127.0.0.1:8083/index.aspx, visit several times, and focus on the parts marked in red.
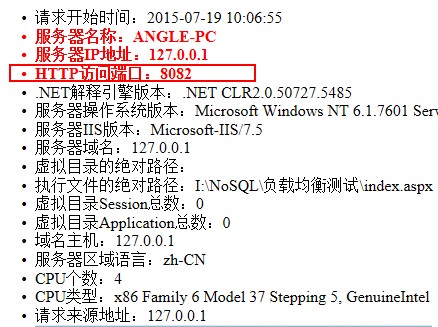
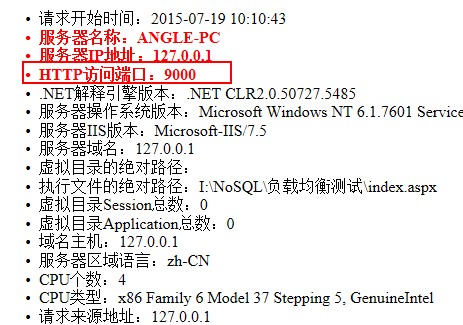
As you can see, our request is distributed to the 8082 site and the 9000 site, and the first time is the 8082 site and the second time 9000. Such a result proves that our load balancing setup was successful. Try to close 9000 of the sites, and then refresh the page and find that the output http port is always 8082, which means that one of the sites is down. As long as there is still a good site, ours can still serve.
4. Problem Analysis
Although we have built a load balancing site, there are still the following problems.
1. If the site uses session and the requests are evenly distributed to the two sites, then there must be a session sharing problem. How to solve it?
Use database to save session information
Use nginx to allocate requests for the same IP to a fixed server, modify as follows. ip_hash will calculate the hash value corresponding to the ip, and then assign it to a fixed server
  upstream jq_one{
   server 127.0.0.1:8082 ;
    server 127.0.0.1:9000 ;
   ip_hash;
}Build a redis server, and read the session from the redis server. The following article will introduce the use of distributed cache redis
2. How should the administrator update the site files? There are only two servers now. You can manually update the files to two servers. If there are 10 servers, then Manual operation is definitely not feasible
For multi-server site updates, you can use the goodsync file synchronization program, which will automatically detect file modifications and new additions, and then synchronize to other servers. You can use rsync
under Linux 3. The file upload function in the site will allocate files to different servers. How to solve the file sharing problem.
Use a file server to store all files on this server, and file operations, reading and writing are all on this server. There is also a problem here, the file server has a read and write upper limit.
4. Servers with different load configurations have different configurations. Some are high and some are low. Can the server with high configuration handle more requests?
Let me talk about it here. There are several algorithms for load balancing: rotation method, scattered method Column method, least connection method, least missing method, fastest response method, weighted method. We can use the weighting method here to distribute requests.
 upstream jq_one{
   server 127.0.0.1:8082 weight=4;
    server 127.0.0.1:9000 weight=1;
}通过weight设置每台服务器分配请求站的权重,值越高分配的越多。
5.由于请求是经过nginx转发过来的,可以在代码里面获取到用户请求的实际ip地址吗?
答案是肯定的,在localtion节点设置如下请求头信息
 #设置主机头和客户端真实地址,以便服务器获取客户端真实ip
 proxy_set_header host  $host;
 proxy_set_header x-real-ip $remote_addr;
 proxy_set_header x-forwarded-for $proxy_add_x_forwarded_for;
代码里面通过request.headers["x-real-ip"],就能获取到真实ip
6.nginx实现静态文件(image,js,css)缓存
在server节点下添加新的localtion
 #静态资源缓存设置
 location ~ \.(jpg|png|jpeg|bmp|gif|swf|css)$
 {
  expires 30d;
  root /nginx-1.9.3/html;#root: #静态文件存在地址,这里设置在/nginx-1.9.3/html下
  break;
}这是index页面的代码

The above is the detailed content of How nginx+iis implements simple load balancing. For more information, please follow other related articles on the PHP Chinese website!

Hot AI Tools

Undresser.AI Undress
AI-powered app for creating realistic nude photos

AI Clothes Remover
Online AI tool for removing clothes from photos.

Undress AI Tool
Undress images for free

Clothoff.io
AI clothes remover

AI Hentai Generator
Generate AI Hentai for free.

Hot Article
Hot Tools

Notepad++7.3.1
Easy-to-use and free code editor

SublimeText3 Chinese version
Chinese version, very easy to use

Zend Studio 13.0.1
Powerful PHP integrated development environment

Dreamweaver CS6
Visual web development tools

SublimeText3 Mac version
God-level code editing software (SublimeText3)
Hot Topics
 1378
1378
 52
52

 How to check whether nginx is started?
Apr 14, 2025 pm 12:48 PM
How to check whether nginx is started?
Apr 14, 2025 pm 12:48 PM
In Linux, use the following command to check whether Nginx is started: systemctl status nginx judges based on the command output: If "Active: active (running)" is displayed, Nginx is started. If "Active: inactive (dead)" is displayed, Nginx is stopped.
 How to configure nginx in Windows
Apr 14, 2025 pm 12:57 PM
How to configure nginx in Windows
Apr 14, 2025 pm 12:57 PM
How to configure Nginx in Windows? Install Nginx and create a virtual host configuration. Modify the main configuration file and include the virtual host configuration. Start or reload Nginx. Test the configuration and view the website. Selectively enable SSL and configure SSL certificates. Selectively set the firewall to allow port 80 and 443 traffic.
 How to check whether nginx is started
Apr 14, 2025 pm 01:03 PM
How to check whether nginx is started
Apr 14, 2025 pm 01:03 PM
How to confirm whether Nginx is started: 1. Use the command line: systemctl status nginx (Linux/Unix), netstat -ano | findstr 80 (Windows); 2. Check whether port 80 is open; 3. Check the Nginx startup message in the system log; 4. Use third-party tools, such as Nagios, Zabbix, and Icinga.
 How to start nginx in Linux
Apr 14, 2025 pm 12:51 PM
How to start nginx in Linux
Apr 14, 2025 pm 12:51 PM
Steps to start Nginx in Linux: Check whether Nginx is installed. Use systemctl start nginx to start the Nginx service. Use systemctl enable nginx to enable automatic startup of Nginx at system startup. Use systemctl status nginx to verify that the startup is successful. Visit http://localhost in a web browser to view the default welcome page.
 How to solve nginx403
Apr 14, 2025 am 10:33 AM
How to solve nginx403
Apr 14, 2025 am 10:33 AM
How to fix Nginx 403 Forbidden error? Check file or directory permissions; 2. Check .htaccess file; 3. Check Nginx configuration file; 4. Restart Nginx. Other possible causes include firewall rules, SELinux settings, or application issues.
 How to start nginx server
Apr 14, 2025 pm 12:27 PM
How to start nginx server
Apr 14, 2025 pm 12:27 PM
Starting an Nginx server requires different steps according to different operating systems: Linux/Unix system: Install the Nginx package (for example, using apt-get or yum). Use systemctl to start an Nginx service (for example, sudo systemctl start nginx). Windows system: Download and install Windows binary files. Start Nginx using the nginx.exe executable (for example, nginx.exe -c conf\nginx.conf). No matter which operating system you use, you can access the server IP
 How to solve nginx304 error
Apr 14, 2025 pm 12:45 PM
How to solve nginx304 error
Apr 14, 2025 pm 12:45 PM
Answer to the question: 304 Not Modified error indicates that the browser has cached the latest resource version of the client request. Solution: 1. Clear the browser cache; 2. Disable the browser cache; 3. Configure Nginx to allow client cache; 4. Check file permissions; 5. Check file hash; 6. Disable CDN or reverse proxy cache; 7. Restart Nginx.
 How to solve nginx403 error
Apr 14, 2025 pm 12:54 PM
How to solve nginx403 error
Apr 14, 2025 pm 12:54 PM
The server does not have permission to access the requested resource, resulting in a nginx 403 error. Solutions include: Check file permissions. Check the .htaccess configuration. Check nginx configuration. Configure SELinux permissions. Check the firewall rules. Troubleshoot other causes such as browser problems, server failures, or other possible errors.
