

How to deploy Django

PART 1. Security first
The best time to fix vulnerabilities is during development.
1.1 CSRF TOKEN
In Django’s security framework, CSRF TOKEN is a crucial security strategy. However, in many cases, some students who have just come into contact with Django will find that the form they finally wrote will report an error during POST. After some searches, they find that it is a CSRF TOKEN problem, and then follow the online method to divide the form by three, five, and two. All CSRF TOKEN configurations in settings.py were removed and the code ran normally. Little do you know that this kind of operation will greatly affect the security of the website and increase the cost of patching vulnerabilities in the later stage. Eliminating security issues during the development stage is the lowest cost.
Because the official documentation has explained the relevant content of CSRF TOKEN in detail, the specific usage will not be described here. Here we recommend a more convenient usage, which is less sensitive to developers during development and does not require special care about whether the Token has been sent successfully.
Add {% csrf_token %} to the total parent template page, and make the following settings in the <script> section: </script>

This way All non-GET|HEAD|OPTIONS|TRACE requests initiated through AJAX in JQuery will automatically include CSRF TOKEN (part of the code to obtain CSRF TOKEN is not listed). If you are using other HTTP libraries or Fetch, make the corresponding settings. Can.
1.2 API security design
In some cases, our Web service will also provide some API services to the outside world for calls by other systems. For these API interfaces, CSRF must be turned off. Otherwise it won't work properly at all. We should also take other security measures to prevent API interfaces from being abused. In addition to the normal passing parameters, we should ensure that these parameters are not tampered with by middlemen, and only allow people with authority to call the corresponding interface. For this reason, we need to introduce several additional passing parameters: timestamp, sign, access_key, access_token.
This pair of parameters includes access_key and access_token. access_key is equivalent to identifying the caller, and access_token is equivalent to the caller's secret key. The content of access_token should not be easily predicted, and access_key can choose a simpler string for the convenience of memory. Only when the two parameters match, the API call is considered legal.
Select the precision of the timestamp according to business requirements, you can choose seconds or milliseconds. The main purpose of adding a timestamp is to prevent this call from being replayed. The server should verify whether the timestamp passed by the client is within a time range. Timestamps that expire should be considered illegal requests. In order to ensure the authenticity of the parameters, another parameter sign needs to be introduced, because even if the timestamp is replayed, there is still a risk of tampering.
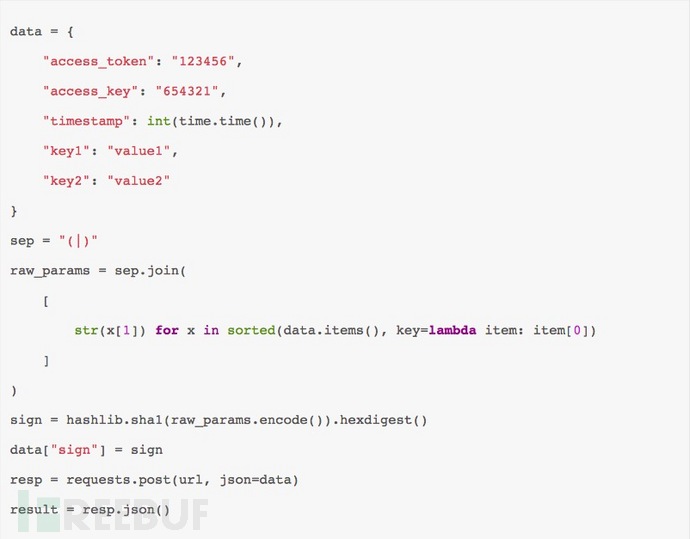
sign is the signature value of all parameters, which is generated by all parameter values participating in hash calculation. Every time the parameters change, the sign needs to be regenerated to ensure the authenticity of the parameters. A commonly used algorithm is: sort the parameter value according to the alphabetical order of the parameter key, and use specific separators to connect all parameters, then perform hash calculation, and pass the sign parameter to the server together. For example, the existing parameter ak=2222&at=1111×tamp=3333&key1=aaa, after sorting according to alphabetical order, is 22221111aaa3333, after adding the separator (|), it is 2222(|)1111(|)aaa(|)3333, and then This string calculates sha1 and generates a sign value. It is relatively simple to write in Python code:
1.3 Some miscellaneous items
In addition to the two more important points above, there are also There are some areas that require a little extra attention.
Turn off DEBUG mode in the production environment;
Do not add settings.py to version management, and protect SECRET_KEY;
Set ALLOWED_HOSTS;
Use the ORM provided by Django as much as possible to avoid directly executing SQL statements through .raw() and other methods. If it cannot be avoided, you must Escape parameters correctly to avoid SQL injection vulnerabilities;
Disable Django Admin as much as possible. If you must use it, please modify the default Admin URL;
PART 2. How to deploy
Pull the code from git, use pip to install project dependencies, and run the service through manage.py. This all looks good, but you really plan to use it in a production environment Do this?
2.1 Isolation environment
Under normal circumstances, there will only be one Python environment on our server. When deploying, we usually use pip to install the dependencies required for the project. These packages will Is installed into the global site-packages directory.
When deploying multiple projects, this method of installing dependencies can easily lead to dependency conflicts. To give a simple example, we now have two projects, Project-A and Project-B. Both A and B depend on different versions of the third-party package third-A. When we install -r requirements-a.txt through pip, The dependency third-A is installed into the global Python environment. When we install pip install -r requirements-b.txt again, third-A will also be installed again. At this time, if the versions that the two projects depend on are inconsistent, for example Project A requires version 1.0, and project B requires version 2.0, which will cause dependency conflicts and cause dependency installation to fail.
So how to solve this problem? What we can easily think of is that if we have multiple independent isolation environments and each project is deployed in an independent environment, then this problem will be easily solved. Virtualenv was born to solve this problem. It can create a separate running environment for each project to avoid dependency conflicts.
2.2 Version Management
We knew earlier how to create an isolated environment and deploy different projects in different environments, but there is a problem. The Python version used by all environments is the same. If you happen to need to deploy multiple different versions of Python projects, such as Python 2.7 (I know this version will not be maintained soon, but I will give an example here), Python 3.6 and Jython projects, installing them one by one seems a bit complicated. , even when compiling and installing, a certain compilation parameter is accidentally missing and needs to be recompiled, which increases the deployment workload to some extent.
We can use pyenv to manage the problems of multiple Python versions, and further use the pyenv plug-in pyenv-virtualenv to manage the problems of multiple Python versions and multiple virtual environments.
2.3 Gateway interface
After we have solved the problems of various environments, it is time to consider how to run the project. If you want to use python manage.py runserver 0.0.0.0 :80, that’s a bit too simple.
Django has built-in a simple WSGI implementation for us to start the Web service through the above method. If you just want to debug or only provide services to a few people, it is also an option. solution, although this solution does not look so elegant.
If you really want to deploy the application to an actual production environment, then you also need a high-performance WSGI Server, not the simple WSGI Server provided by django. Gunicorn and uWSGI are both relatively mainstream WSGI servers. Just choose one of them according to the actual deployment environment.
However, I personally prefer Gunicorn. Although uWSGI has the upper hand in many performance tests, the reason for choosing Gunicorn is that it is very simple compared to uWSGI and does not have very complicated and rarely used functions. , and some functions in uWSGI have been gradually supported by Nginx, and Gunicorn is relatively simple and convenient to configure. Another thing to note is that if you want to deploy on Windows, you may need to use Apache mod_wsgi.
2.4 Reverse proxy
After our WSGI Server is started, we need to consider the issue of reverse proxy. The reason why there is another layer of Nginx to perform reverse proxy is The following reasons:
Nginx is needed to handle static resources. If you set Django's DEBUG mode to False, you will find that many static resources such as CSS and JS cannot be loaded. This is because Django will not actively handle these requests, and Nginx needs to help handle them;
Use Nginx to perform load balancing of multiple backends. If your service is deployed on multiple servers, or a primary and backup deployment, these can be achieved by simple settings on Nginx;
directly There are certain security risks when uWSGI or Gunicorn are exposed. It will be more convenient to use Nginx to handle HTTP problems; That sentence, if your service is very simple and only accessed by a few people, there is no need to make such complicated settings.
2.5 Process DaemonAs of now, we have successfully deployed the service and can start providing services normally. But we think less about it. If our Django unfortunately exits for some unknown reason, then our Web service will become a 502. In order to ensure the stability of the service, we need to guard the Django process. When an unknown problem occurs and causes an abnormal exit, the required process needs to be automatically pulled up.
Using supervisor as a monitoring tool can ensure the stable survival of the Django process. It is important to be careful to avoid the Supervisord remote command execution vulnerability to avoid more serious accidents.
PART 3. Background service
Generally speaking, if you want to start a background service, celery is a universal choice, but many times we don’t want to introduce such heavy dependencies, so we need to Think of a way to start the background service.
A simple method is to make the command of manage.py, start our background service through ./manage.py runcommand, and control the start and stop of the service by writing a shell script, or manage it through supervisor.
If you want the background process to start and stop at the same time as the Web service, then putting it in wsgi.py is a good choice. Initialize the relevant background service in wsgi.py and start it. However, this approach is not flexible enough. When the Web service or background service needs to be updated separately, both need to be restarted. However, using the first method, one of the services can be updated separately.
The above is the detailed content of How to deploy Django. For more information, please follow other related articles on the PHP Chinese website!

Hot AI Tools

Undresser.AI Undress
AI-powered app for creating realistic nude photos

AI Clothes Remover
Online AI tool for removing clothes from photos.

Undress AI Tool
Undress images for free

Clothoff.io
AI clothes remover

Video Face Swap
Swap faces in any video effortlessly with our completely free AI face swap tool!

Hot Article
Hot Tools

Notepad++7.3.1
Easy-to-use and free code editor

SublimeText3 Chinese version
Chinese version, very easy to use

Zend Studio 13.0.1
Powerful PHP integrated development environment

Dreamweaver CS6
Visual web development tools

SublimeText3 Mac version
God-level code editing software (SublimeText3)
Hot Topics
 1386
1386
 52
52

 How to check django version
Dec 01, 2023 pm 02:25 PM
How to check django version
Dec 01, 2023 pm 02:25 PM
Steps to check the Django version: 1. Open a terminal or command prompt window; 2. Make sure Django has been installed. If Django is not installed, you can use the package management tool to install it and enter the pip install django command; 3. After the installation is complete , you can use python -m django --version to check the Django version.
 Django vs. Flask: A comparative analysis of Python web frameworks
Jan 19, 2024 am 08:36 AM
Django vs. Flask: A comparative analysis of Python web frameworks
Jan 19, 2024 am 08:36 AM
Django and Flask are both leaders in Python Web frameworks, and they both have their own advantages and applicable scenarios. This article will conduct a comparative analysis of these two frameworks and provide specific code examples. Development Introduction Django is a full-featured Web framework, its main purpose is to quickly develop complex Web applications. Django provides many built-in functions, such as ORM (Object Relational Mapping), forms, authentication, management backend, etc. These features allow Django to handle large
 Django Framework Pros and Cons: Everything You Need to Know
Jan 19, 2024 am 09:09 AM
Django Framework Pros and Cons: Everything You Need to Know
Jan 19, 2024 am 09:09 AM
Django is a complete development framework that covers all aspects of the web development life cycle. Currently, this framework is one of the most popular web frameworks worldwide. If you plan to use Django to build your own web applications, then you need to understand the advantages and disadvantages of the Django framework. Here's everything you need to know, including specific code examples. Django advantages: 1. Rapid development-Djang can quickly develop web applications. It provides a rich library and internal
 How to check django version
Nov 30, 2023 pm 03:08 PM
How to check django version
Nov 30, 2023 pm 03:08 PM
How to check the django version: 1. To check through the command line, enter the "python -m django --version" command in the terminal or command line window; 2. To check in the Python interactive environment, enter "import django print(django. get_version())" code; 3. Check the settings file of the Django project and find a list named INSTALLED_APPS, which contains installed application information.
 How to upgrade Django version: steps and considerations
Jan 19, 2024 am 10:16 AM
How to upgrade Django version: steps and considerations
Jan 19, 2024 am 10:16 AM
How to upgrade Django version: steps and considerations, specific code examples required Introduction: Django is a powerful Python Web framework that is continuously updated and upgraded to provide better performance and more features. However, for developers using older versions of Django, upgrading Django may face some challenges. This article will introduce the steps and precautions on how to upgrade the Django version, and provide specific code examples. 1. Back up project files before upgrading Djan
 What is the difference between django versions?
Nov 20, 2023 pm 04:33 PM
What is the difference between django versions?
Nov 20, 2023 pm 04:33 PM
The differences are: 1. Django 1.x series: This is an early version of Django, including versions 1.0, 1.1, 1.2, 1.3, 1.4, 1.5, 1.6, 1.7, 1.8 and 1.9. These versions mainly provide basic web development functions; 2. Django 2.x series: This is the mid-term version of Django, including 2.0, 2.1, 2.2 and other versions; 3. Django 3.x series: This is the latest version series of Django. Including versions 3.0, 3, etc.
 Is django front-end or back-end?
Nov 21, 2023 pm 02:36 PM
Is django front-end or back-end?
Nov 21, 2023 pm 02:36 PM
django is the backend. Details: Although Django is primarily a backend framework, it is closely related to front-end development. Through features such as Django's template engine, static file management, and RESTful API, front-end developers can collaborate with back-end developers to build powerful, scalable web applications.
 Django, Flask, and FastAPI: Which framework is right for beginners?
Sep 27, 2023 pm 09:06 PM
Django, Flask, and FastAPI: Which framework is right for beginners?
Sep 27, 2023 pm 09:06 PM
Django, Flask, and FastAPI: Which framework is right for beginners? Introduction: In the field of web application development, there are many excellent Python frameworks to choose from. This article will focus on the three most popular frameworks, Django, Flask and FastAPI. We will evaluate their features and discuss which framework is best for beginners to use. At the same time, we will also provide some specific code examples to help beginners better understand these frameworks. 1. Django: Django
