 Java
Java
 javaTutorial
 How Gitlab-runner+Docker implements automatic deployment of SpringBoot projects
How Gitlab-runner+Docker implements automatic deployment of SpringBoot projects
1. Environmental requirements
The operating systems of the following servers are all Centos7
Server A: Gitlab
Server B: GitlabRunner, Docker, docker-compose, Java1.8, maven3.6.3, git
ps: Here you can put GitlabRunner, Java1.8, maven3.6.3, git of server B It is proposed separately and deployed independently. The reason why Java is needed is maven, which is used for packaging.
For the convenience of demonstration, application server B only needs to use docker and docker-compose.
For related service construction tutorials, please refer to official documents or other third-party reliable blog tutorials!
My current service version
Gitlab: 14.9
GitlabRunner: 14.10.0
docker: 20.10.14
docker-compose: 1.29.2
Git: 2.31.1, check beforehand Check whether Git is the latest version, otherwise errors will occur later.
2. Main process
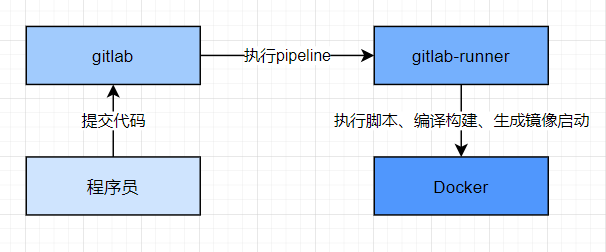
Our main process is to manage the code through Gitlab, and then use Gitlab's own Gitlab CI/CD function to register and bind with GitlabRunner.
Once the binding is successful, GitlabRunner will be activated every time the code is submitted and the corresponding script will be executed for automatic deployment.
3.GitlabRunner installation and registration
3.1 Installation
Summary: There are 2 steps in total:
1. Add the gitlab official library:
For Debian/Ubuntu/Mint
curl -L https://packages.gitlab.com/install/repositories/runner/gitlab-runner/script.deb.sh | sudo bash
For RHEL/CentOS/Fedora
curl -L https://packages.gitlab.com/install/repositories/runner/gitlab-runner/script.rpm.sh | sudo bash
2. Command installation:
For Debian /Ubuntu/Mint
sudo apt-get install gitlab-ci-multi-runner
For RHEL/CentOS/Fedora
sudo yum -y install gitlab-ci-multi-runner
3.2 Start registration
1. Open the warehouse that Gitlab needs to automatically deploy, select Setting-》CI/CD -》Runners.
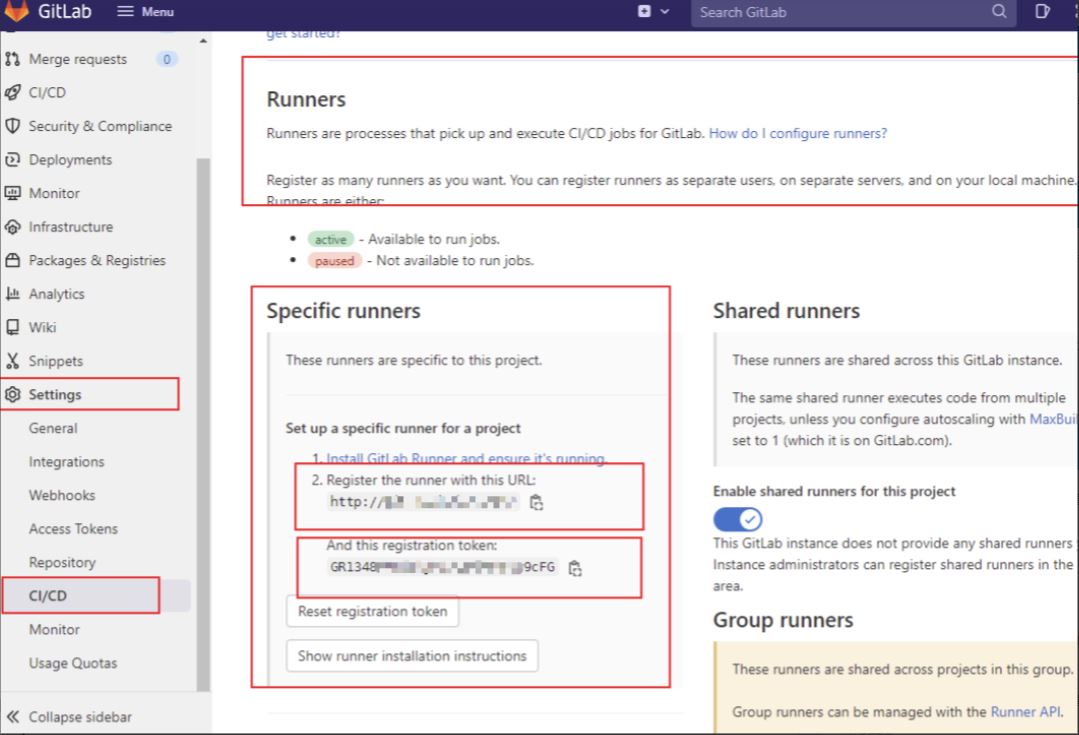
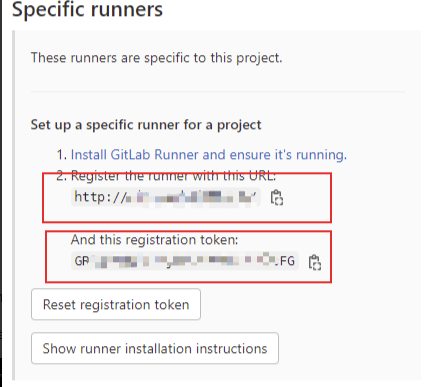
2. As shown below, you can see the two most critical information, which will be used when registering GitlabRunner later.
3.GitlabRunner registration:
Basic command:
Registration: gitlab-runner register
View registered Runners: gitlab-runner list
Cancel all registrations: gitlab-runner unregister --all-runners
Return to the server B. Execute the command gitlab-runner register Detailed registration process:

- ##Enter the GitLab instance URL (for example, https: //gitlab.com/):
Enter the service URL of gitlab
- Enter the registration token:
Enter the token, refer to the picture above
- Enter a description for the runner:
Enter a description for the runner
- Enter tags for the runner (comma-separated)
- Enter optional maintenance note for the runner:
Enter optional maintenance note
##Enter an executor: docker machine, docker-ssh machine, custom, docker -windows, docker-ssh, ssh, kubernetes, docker, parallels, shell, virtualbox: - Press Enter to end, the config.
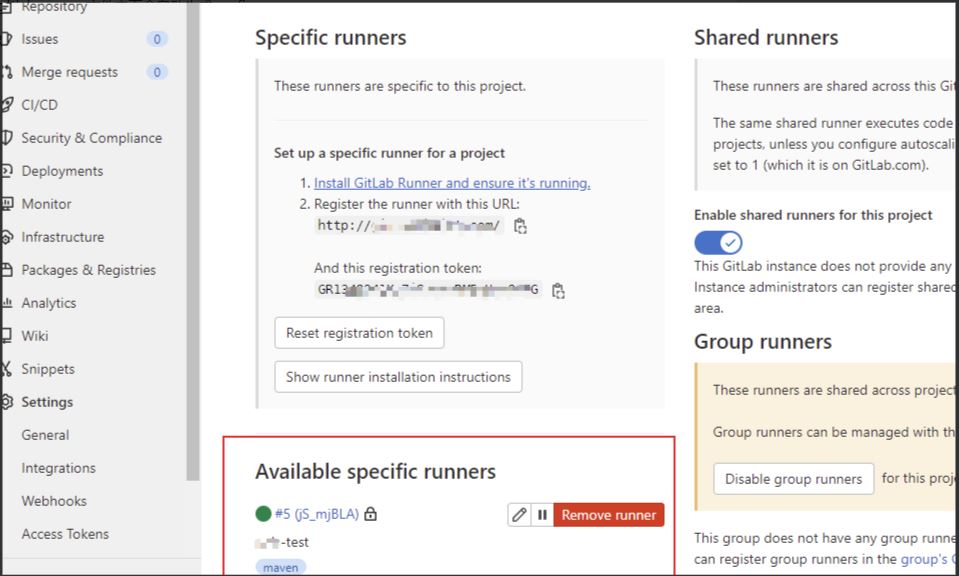
Go back to the gitlab background Runner settings, refresh the page and you will see the newly added Runner:
 4. Make a script! Important!!!
After submitting the code, how should we use Shell scripts to control the build and deployment? Gitlab has provided us with a template, which is to create a file named: .gitlab-ci.yml in the root directory of the warehouse
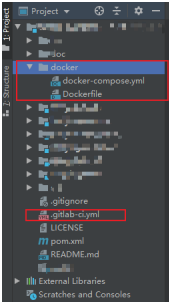
Here we take a springboot project as an example, and add 3 files to the original project ( .gitlab-ci.yml, Dockerfile, docker-compose.yml), the location and content of the file are shown below. Just modify the content according to your needs. You need to be familiar with some basic file structures and syntax of Dockerfile and docker-compose.yml. :
3 file location map
 .gitlab-ci.yml
stages:
  - build
  - deploy_dev
  - clean
# 打包镜像
build:
  stage: build
  only:
    - dev
  script:
    - $MAVEN_HOME/bin/mvn clean package '-Dmaven.test.skip=true'
    - cp ./XXX/target/XXX.jar docker/
    - cd docker
    - docker build -t dev/XXX:v1.0.0 .
  tags:
    - maven
# 部署开发服务器
deploy_dev:
  stage: deploy_dev
  only:
    - dev
  script:
    - cd docker
    - docker-compose down
    - docker-compose up -d
  tags:
    - maven
#清理虚悬镜像
clean:
  stage: clean
  only:
    - dev
  script:
    - docker rmi $(docker images -q -f dangling=true)
  tags:
- mavenCreate a Docker folder in the root directory,
Create Dockerfile:
#FROM java:8 #java:8这个镜像体积有643MB,打包镜像后体积太大了,不建议使用
# openjdk:8-jre-alpine 体积最小,只有85MB
FROM openjdk:8-jre-alpine
# 以下2个RUN解决 java验证码接口报错的问题,
RUN echo -e "https://mirror.tuna.tsinghua.edu.cn/alpine/v3.4/main\n\
https://mirror.tuna.tsinghua.edu.cn/alpine/v3.4/community" > /etc/apk/repositories
RUN apk --update add curl bash ttf-dejavu && \
      rm -rf /var/cache/apk/*
COPY . /opt/app
WORKDIR /opt/appCreate docker-compose.yml:
version: '3.1'
services:
  education-course:
    container_name: dev-XXX-server
    restart: always
    image: dev/XXX:v1.0.0
    network_mode: "host"
    volumes:
      - /opt/XXX-server/logs:/XXX/logs
command: java -jar -Xms1024m -Xmx1024m -Duser.timezone=GMT+08 xxx.jar --spring.profiles.active=dev5. Test
The local idea submits the code once to the dev branch, and it can be Running
点进去看,出现问题
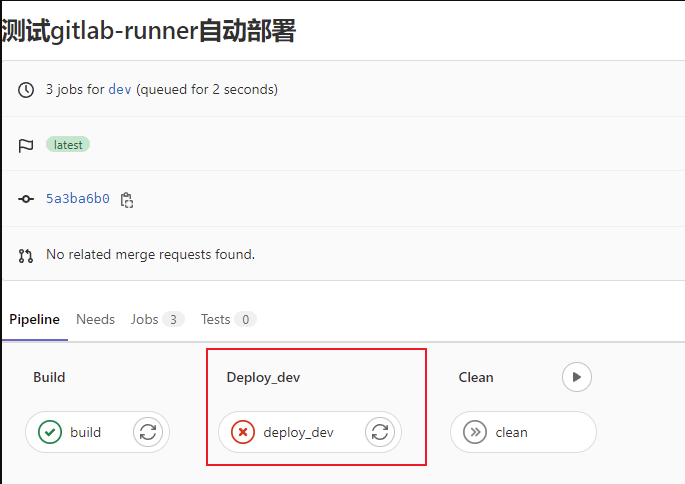
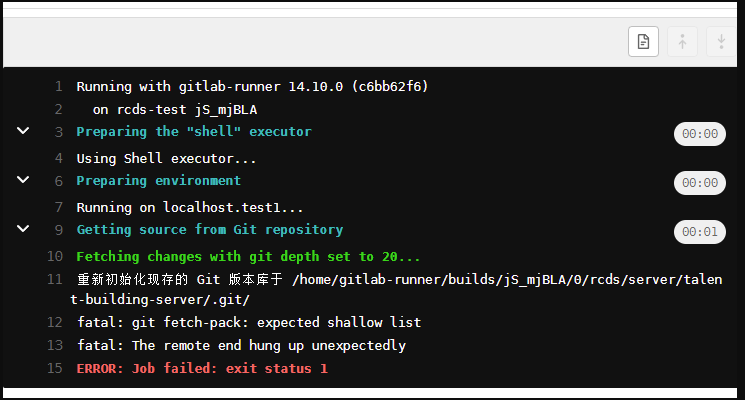
这里提示我们的git版本太低了
当前git版本:
[root@localhost local]# git --version
git version 1.8.3.1
升级最新版git后:
[root@localhost yum.repos.d]# git --version
git version 2.24.4
回到gitlab后台,这里手动再执行一次:

最新的一次已通过 passed:

查看日志的方法,进第一个build查看日志,获取项目的路径(大家有更好的方法可以告诉下我)
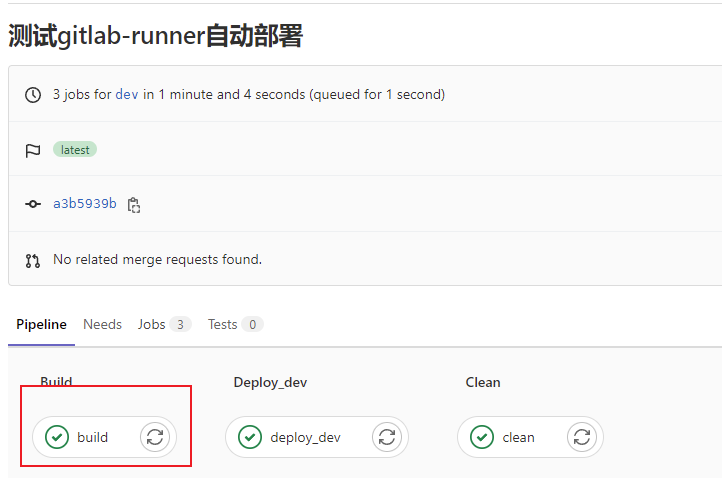
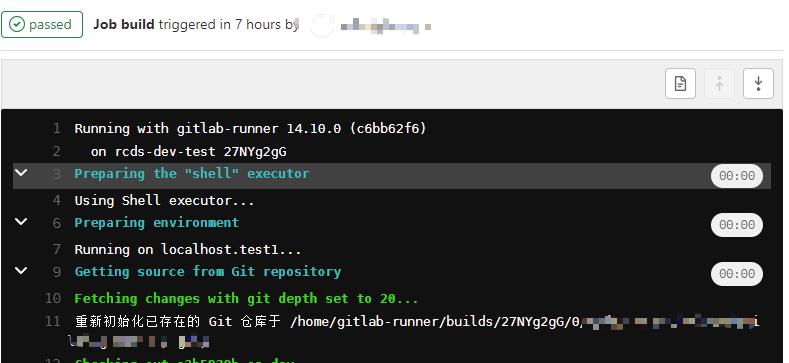
cd到 项目的docker目录,使用
docker-compose logs -ft
测试接口:

6.常见问题
问题1:自动化部署build报错:

解决方法,执行命令:
sudo chmod 777 /var/run/docker.sock
问题2:docker apline temporary error (try again later) 错误
没有dns导致的
在本机系统上创建daemon文件添加dns,然后重启docker
vim /etc/docker/daemon.json
{
"dns": ["8.8.8.8"]
}
sudo service docker restartThe above is the detailed content of How Gitlab-runner+Docker implements automatic deployment of SpringBoot projects. For more information, please follow other related articles on the PHP Chinese website!

Hot AI Tools

Undresser.AI Undress
AI-powered app for creating realistic nude photos

AI Clothes Remover
Online AI tool for removing clothes from photos.

Undress AI Tool
Undress images for free

Clothoff.io
AI clothes remover

AI Hentai Generator
Generate AI Hentai for free.

Hot Article

Hot Tools

Notepad++7.3.1
Easy-to-use and free code editor

SublimeText3 Chinese version
Chinese version, very easy to use

Zend Studio 13.0.1
Powerful PHP integrated development environment

Dreamweaver CS6
Visual web development tools

SublimeText3 Mac version
God-level code editing software (SublimeText3)

Hot Topics
 How to package project with pycharm
Apr 25, 2024 am 03:54 AM
There are four ways to package a project in PyCharm: Package as a separate executable file: Export to EXE single file format. Packaged as an installer: Generate Setuptools Makefile and build. Package as a Docker image: specify an image name, adjust build options, and build. Package as a container: Specify the image to build, adjust runtime options, and start the container.
 Pi Node Teaching: What is a Pi Node? How to install and set up Pi Node?
Mar 05, 2025 pm 05:57 PM
Detailed explanation and installation guide for PiNetwork nodes This article will introduce the PiNetwork ecosystem in detail - Pi nodes, a key role in the PiNetwork ecosystem, and provide complete steps for installation and configuration. After the launch of the PiNetwork blockchain test network, Pi nodes have become an important part of many pioneers actively participating in the testing, preparing for the upcoming main network release. If you don’t know PiNetwork yet, please refer to what is Picoin? What is the price for listing? Pi usage, mining and security analysis. What is PiNetwork? The PiNetwork project started in 2019 and owns its exclusive cryptocurrency Pi Coin. The project aims to create a one that everyone can participate
 Docker completes local deployment of LLama3 open source large model in three minutes
Apr 26, 2024 am 10:19 AM
Overview LLaMA-3 (LargeLanguageModelMetaAI3) is a large-scale open source generative artificial intelligence model developed by Meta Company. It has no major changes in model structure compared with the previous generation LLaMA-2. The LLaMA-3 model is divided into different scale versions, including small, medium and large, to suit different application needs and computing resources. The parameter size of small models is 8B, the parameter size of medium models is 70B, and the parameter size of large models reaches 400B. However, during training, the goal is to achieve multi-modal and multi-language functionality, and the results are expected to be comparable to GPT4/GPT4V. Install OllamaOllama is an open source large language model (LL
 Agile development and operation of PHP microservice containerization
May 08, 2024 pm 02:21 PM
Answer: PHP microservices are deployed with HelmCharts for agile development and containerized with DockerContainer for isolation and scalability. Detailed description: Use HelmCharts to automatically deploy PHP microservices to achieve agile development. Docker images allow for rapid iteration and version control of microservices. The DockerContainer standard isolates microservices, and Kubernetes manages the availability and scalability of the containers. Use Prometheus and Grafana to monitor microservice performance and health, and create alarms and automatic repair mechanisms.
 PHP distributed system architecture and practice
May 04, 2024 am 10:33 AM
PHP distributed system architecture achieves scalability, performance, and fault tolerance by distributing different components across network-connected machines. The architecture includes application servers, message queues, databases, caches, and load balancers. The steps for migrating PHP applications to a distributed architecture include: Identifying service boundaries Selecting a message queue system Adopting a microservices framework Deployment to container management Service discovery
 How to install deepseek
Feb 19, 2025 pm 05:48 PM
There are many ways to install DeepSeek, including: compile from source (for experienced developers) using precompiled packages (for Windows users) using Docker containers (for most convenient, no need to worry about compatibility) No matter which method you choose, Please read the official documents carefully and prepare them fully to avoid unnecessary trouble.
 How to optimize the performance of Java functions through containerization?
Apr 29, 2024 pm 03:09 PM
Containerization improves Java function performance in the following ways: Resource isolation - ensuring an isolated computing environment and avoiding resource contention. Lightweight - takes up less system resources and improves runtime performance. Fast startup - reduces function execution delays. Consistency - Decouple applications and infrastructure to ensure consistent behavior across environments.
 Deploy JavaEE applications using Docker Containers
Jun 05, 2024 pm 08:29 PM
Deploy Java EE applications using Docker containers: Create a Dockerfile to define the image, build the image, run the container and map the port, and then access the application in the browser. Sample JavaEE application: REST API interacts with database, accessible on localhost after deployment via Docker.


