

How to use the Composer package manager?

With the continuous growth of the PHP community and the complexity of applications, the traditional way of manually installing and managing PHP applications can no longer meet our needs. Instead, we need a more efficient and automated way to manage dependencies and version control of PHP applications. This is where the Composer package manager comes into play.
Composer is the most popular dependency management and version control tool in the PHP community, which allows you to install and manage the dependencies and libraries required by your PHP applications. This article explains how to use the Composer package manager to manage your PHP application's dependencies.
- Installing and Configuring Composer
To start using Composer, you need to install it on your system. Before installing, make sure your computer has PHP and its related dependencies installed. On Linux and Mac, you can install Composer using the following curl command:
curl -sS https://getcomposer.org/installer | sudo php -- --install-dir=/usr/local/bin --filename=composer
On Windows, you can download the Composer installer and install it by following the instructions for your operating system.
After the installation is complete, you need to configure Composer. This includes specifying the Composer installation location, setting folder permissions, and adding the PHP executable file path to the system PATH. This allows you to access Composer from anywhere. You can use the following command to test whether Composer has been successfully installed:
composer
If the installation is successful, you should be able to see the version information of Composer. Next, we’ll learn how to use Composer to manage PHP application dependencies.
- Create and configure the composer.json file
To start using Composer to manage your PHP application's dependencies, you need to create a composer.json file in the root directory of your project. A file named composer.json. This file contains dependencies and version information on which the project depends, as well as other configuration items.
You can use the following command to create a new composer.json file:
composer init
This command will create a new composer.json file at an interactive prompt and ask you to provide the project Basic information as well as dependencies and version information on which it depends. After setup is complete, Composer will generate a new composer.json file.
The following is an example composer.json file:
{
    "name": "my-app",
    "description": "My Application",
    "type": "project",
    "license": "MIT",
    "authors": [
        {
            "name": "John Doe",
            "email": "john@example.com"
        }
    ],
    "require": {
        "monolog/monolog": "^1.0",
        "symfony/console": "^5.2"
    }
}In this example, we define the basic information of the project (name, description, license and author) , as well as two external libraries (Monolog and Symfony Console) it depends on. For each dependency, we also specify its version range. In this example, we require Monolog 1.0 or higher, and Symfony Console 5.2 or higher.
You can find the required package on [packagist.org](https://packagist.org/) and add it to the composer.json file. By using these commands, you can quickly and easily add, remove, or update your dependencies.
- Installing Dependencies
Once your composer.json file is set up, next, you need to use Composer to install the required Dependencies. You can use the following command to install all dependencies defined in your composer.json file:
composer install
When you run this command, Composer will download you from packagist.org The required package, install all the dependencies it requires, and install them all into the vendor/ directory. This is useful for the introduction and management of transitive dependencies.
- Update Dependencies
Once your dependencies have been installed, you can use Composer to update them to the latest versions, update the versions of certain dependencies, and update automatically All relevant dependencies.
You can update all dependencies using the following command:
composer update
Or you can choose to update specific dependencies as shown below:
composer update monolog/monolog
Once you have updated your dependencies, Composer will download and install the latest version and update it to the vendor/ directory.
- Use a custom installation path
Composer also allows you to install packages to a custom location. This gives you more control over your project's file structure and avoids a confusing and disjointed code base.
You can use the following command to set the installation path to /path/to/custom-directory:
composer install --prefer-dist --no-dev --no-interaction --no-scripts --optimize-autoloader --no-progress --working-dir=/path/to/project-directory --no-suggest --no-plugins
The above command will install all dependencies to /path/to/ custom-directory directory.
- Installing packages locally
In addition to obtaining packages from Composer's default package sources, you can also install packages into a local directory and Add to your project. This makes it easier for you to develop and test your code without being restricted by your network connection.
You can use the following command to install packages from a local directory into your project:
composer require /path/to/local/package
Once you complete these steps, you can use Composer to manage your PHP projects Dependencies and version control. This will allow you to work with your code base more efficiently and securely while improving your code quality and performance.
The above is the detailed content of How to use the Composer package manager?. For more information, please follow other related articles on the PHP Chinese website!

Hot AI Tools

Undresser.AI Undress
AI-powered app for creating realistic nude photos

AI Clothes Remover
Online AI tool for removing clothes from photos.

Undress AI Tool
Undress images for free

Clothoff.io
AI clothes remover

AI Hentai Generator
Generate AI Hentai for free.

Hot Article
Hot Tools

Notepad++7.3.1
Easy-to-use and free code editor

SublimeText3 Chinese version
Chinese version, very easy to use

Zend Studio 13.0.1
Powerful PHP integrated development environment

Dreamweaver CS6
Visual web development tools

SublimeText3 Mac version
God-level code editing software (SublimeText3)
Hot Topics
 1377
1377
 52
52

 Composer's advanced features: aliases, scripts, and conflict resolution
Jun 03, 2024 pm 12:37 PM
Composer's advanced features: aliases, scripts, and conflict resolution
Jun 03, 2024 pm 12:37 PM
Composer provides advanced features, including: 1. Aliases: define convenient names for packages for repeated reference; 2. Scripts: execute custom commands when installing/updating packages, used to create database tables or compile resources; 3. Conflict resolution: use priorities Rules, satisfaction constraints, and package aliases resolve the different requirements of multiple packages for the same dependency version to avoid installation conflicts.
 Agile development and operation of PHP microservice containerization
May 08, 2024 pm 02:21 PM
Agile development and operation of PHP microservice containerization
May 08, 2024 pm 02:21 PM
Answer: PHP microservices are deployed with HelmCharts for agile development and containerized with DockerContainer for isolation and scalability. Detailed description: Use HelmCharts to automatically deploy PHP microservices to achieve agile development. Docker images allow for rapid iteration and version control of microservices. The DockerContainer standard isolates microservices, and Kubernetes manages the availability and scalability of the containers. Use Prometheus and Grafana to monitor microservice performance and health, and create alarms and automatic repair mechanisms.
 PHP code version control and collaboration
May 07, 2024 am 08:54 AM
PHP code version control and collaboration
May 07, 2024 am 08:54 AM
PHP code version control: There are two version control systems (VCS) commonly used in PHP development: Git: distributed VCS, where developers store copies of the code base locally to facilitate collaboration and offline work. Subversion: Centralized VCS, a unique copy of the code base is stored on a central server, providing more control. VCS helps teams track changes, collaborate and roll back to earlier versions.
 The role of PHP CI/CD in DevOps projects
May 08, 2024 pm 09:09 PM
The role of PHP CI/CD in DevOps projects
May 08, 2024 pm 09:09 PM
PHPCI/CD is a key practice in DevOps projects that automates the build, test, and deployment processes to improve development efficiency and software quality. A typical PHPCI/CD pipeline consists of the following stages: 1) Continuous Integration: Whenever the code changes, the code is automatically built and tested. 2) Continuous deployment: Speed up delivery by automatically deploying tested and integrated code to the production environment. By implementing the PHPCI/CD pipeline, you can increase development efficiency, improve software quality, shorten time to market, and improve reliability.
 Visualization technology of PHP data structure
May 07, 2024 pm 06:06 PM
Visualization technology of PHP data structure
May 07, 2024 pm 06:06 PM
There are three main technologies for visualizing data structures in PHP: Graphviz: an open source tool that can create graphical representations such as charts, directed acyclic graphs, and decision trees. D3.js: JavaScript library for creating interactive, data-driven visualizations, generating HTML and data from PHP, and then visualizing it on the client side using D3.js. ASCIIFlow: A library for creating textual representation of data flow diagrams, suitable for visualization of processes and algorithms.
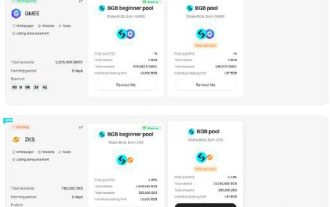 What is Bitget Launchpool? How to use Bitget Launchpool?
Jun 07, 2024 pm 12:06 PM
What is Bitget Launchpool? How to use Bitget Launchpool?
Jun 07, 2024 pm 12:06 PM
BitgetLaunchpool is a dynamic platform designed for all cryptocurrency enthusiasts. BitgetLaunchpool stands out with its unique offering. Here, you can stake your tokens to unlock more rewards, including airdrops, high returns, and a generous prize pool exclusive to early participants. What is BitgetLaunchpool? BitgetLaunchpool is a cryptocurrency platform where tokens can be staked and earned with user-friendly terms and conditions. By investing BGB or other tokens in Launchpool, users have the opportunity to receive free airdrops, earnings and participate in generous bonus pools. The income from pledged assets is calculated within T+1 hours, and the rewards are based on
 How to use Redis cache in PHP array pagination?
May 01, 2024 am 10:48 AM
How to use Redis cache in PHP array pagination?
May 01, 2024 am 10:48 AM
Using Redis cache can greatly optimize the performance of PHP array paging. This can be achieved through the following steps: Install the Redis client. Connect to the Redis server. Create cache data and store each page of data into a Redis hash with the key "page:{page_number}". Get data from cache and avoid expensive operations on large arrays.
 How to use PHP CI/CD to iterate quickly?
May 08, 2024 pm 10:15 PM
How to use PHP CI/CD to iterate quickly?
May 08, 2024 pm 10:15 PM
Answer: Use PHPCI/CD to achieve rapid iteration, including setting up CI/CD pipelines, automated testing and deployment processes. Set up a CI/CD pipeline: Select a CI/CD tool, configure the code repository, and define the build pipeline. Automated testing: Write unit and integration tests and use testing frameworks to simplify testing. Practical case: Using TravisCI: install TravisCI, define the pipeline, enable the pipeline, and view the results. Implement continuous delivery: select deployment tools, define deployment pipelines, and automate deployment. Benefits: Improve development efficiency, reduce errors, and shorten delivery time.
