
 Backend Development
Python Tutorial
How to implement a human-computer backgammon game based on Python
Backend Development
Python Tutorial
How to implement a human-computer backgammon game based on Python
How to implement a human-computer backgammon game based on Python

Everyone’s Battle
Game rules: p1 is black, p2 is white, black takes the lead, and one side wins when five pieces are connected.
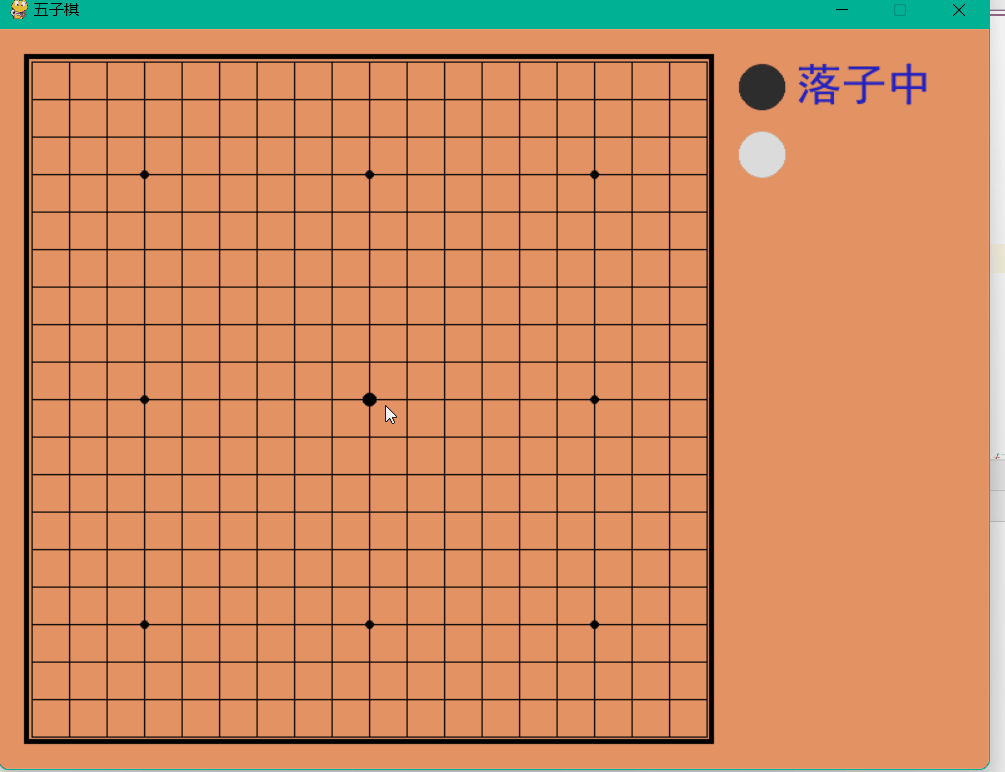
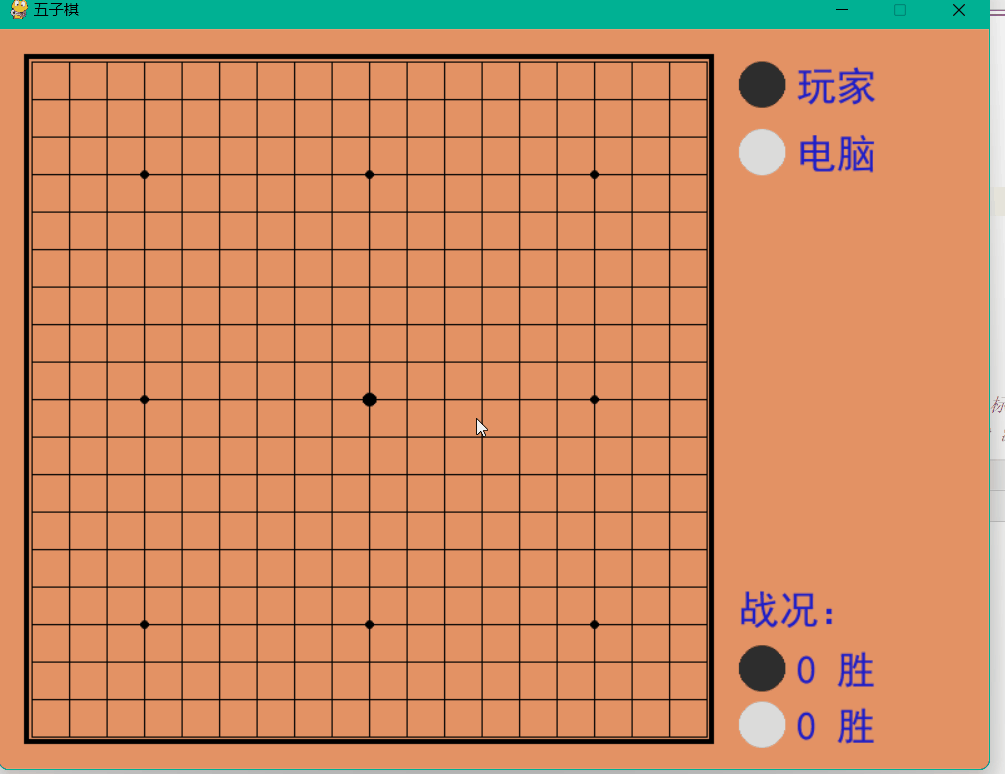
Dynamic demonstration
Source code sharing
cheackboard.py
Definition of black and white, Positions and winning rules.
from collections import namedtuple

Chessman = namedtuple('Chessman', 'Name Value Color')
Point = namedtuple('Point', 'X Y')

BLACK_CHESSMAN = Chessman('黑子', 1, (45, 45, 45))
WHITE_CHESSMAN = Chessman('白子', 2, (219, 219, 219))

offset = [(1, 0), (0, 1), (1, 1), (1, -1)]


class Checkerboard:
    def __init__(self, line_points):
        self._line_points = line_points
        self._checkerboard = [[0] * line_points for _ in range(line_points)]

    def _get_checkerboard(self):
        return self._checkerboard

    checkerboard = property(_get_checkerboard)

    # 判断是否可落子
    def can_drop(self, point):
        return self._checkerboard[point.Y][point.X] == 0

    def drop(self, chessman, point):
        """
        落子
        :param chessman:
        :param point:落子位置
        :return:若该子落下之后即可获胜,则返回获胜方,否则返回 None
        """
        print(f'{chessman.Name} ({point.X}, {point.Y})')
        self._checkerboard[point.Y][point.X] = chessman.Value

        if self._win(point):
            print(f'{chessman.Name}获胜')
            return chessman

    # 判断是否赢了
    def _win(self, point):
        cur_value = self._checkerboard[point.Y][point.X]
        for os in offset:
            if self._get_count_on_direction(point, cur_value, os[0], os[1]):
                return True

    def _get_count_on_direction(self, point, value, x_offset, y_offset):
        count = 1
        for step in range(1, 5):
            x = point.X + step * x_offset
            y = point.Y + step * y_offset
            if 0 <= x < self._line_points and 0 <= y < self._line_points and self._checkerboard[y][x] == value:
                count += 1
            else:
                break
        for step in range(1, 5):
            x = point.X - step * x_offset
            y = point.Y - step * y_offset
            if 0 <= x < self._line_points and 0 <= y < self._line_points and self._checkerboard[y][x] == value:
                count += 1
            else:
                break

return count >= 5人人VS.py
Import module
If a module error occurs, enter the following command in the pycharm terminal.
To install the corresponding module, use the following command: ``` pip install corresponding module -i https://pypi.douban.com/simple ```
import sys
import pygame
from pygame.locals import *
import pygame.gfxdraw
from 小游戏.五子棋.checkerboard import Checkerboard, BLACK_CHESSMAN, WHITE_CHESSMAN, Point
Set chessboard and chess piece parameters
SIZE = 30  # 棋盘每个点时间的间隔
Line_Points = 19  # 棋盘每行/每列点数
Outer_Width = 20  # 棋盘外宽度
Border_Width = 4  # 边框宽度
Inside_Width = 4  # 边框跟实际的棋盘之间的间隔
Border_Length = SIZE * (Line_Points - 1) + Inside_Width * 2 + Border_Width  # 边框线的长度
Start_X = Start_Y = Outer_Width + int(Border_Width / 2) + Inside_Width  # 网格线起点(左上角)坐标
SCREEN_HEIGHT = SIZE * (Line_Points - 1) + Outer_Width * 2 + Border_Width + Inside_Width * 2  # 游戏屏幕的高
SCREEN_WIDTH = SCREEN_HEIGHT + 200  # 游戏屏幕的宽

Stone_Radius = SIZE // 2 - 3  # 棋子半径
Stone_Radius2 = SIZE // 2 + 3
Checkerboard_Color = (0xE3, 0x92, 0x65)  # 棋盘颜色
BLACK_COLOR = (0, 0, 0)
WHITE_COLOR = (255, 255, 255)
RED_COLOR = (200, 30, 30)
BLUE_COLOR = (30, 30, 200)

RIGHT_INFO_POS_X = SCREEN_HEIGHT + Stone_Radius2 * 2 + 10
In-game font settings
def print_text(screen, font, x, y, text, fcolor=(255, 255, 255)):
    imgText = font.render(text, True, fcolor)
    screen.blit(imgText, (x, y))


def main():
    pygame.init()
    screen = pygame.display.set_mode((SCREEN_WIDTH, SCREEN_HEIGHT))
    pygame.display.set_caption('五子棋')

    font1 = pygame.font.SysFont('SimHei', 32)
    font2 = pygame.font.SysFont('SimHei', 72)
    fwidth, fheight = font2.size('黑方获胜')

    checkerboard = Checkerboard(Line_Points)
    cur_runner = BLACK_CHESSMAN
    winner = None
    computer = AI(Line_Points, WHITE_CHESSMAN)

    black_win_count = 0
white_win_count = 0The movement cycle
    while True:
        for event in pygame.event.get():
            if event.type == QUIT:
                sys.exit()
            elif event.type == KEYDOWN:
                if event.key == K_RETURN:
                    if winner is not None:
                        winner = None
                        cur_runner = BLACK_CHESSMAN
                        checkerboard = Checkerboard(Line_Points)
                        computer = AI(Line_Points, WHITE_CHESSMAN)
            elif event.type == MOUSEBUTTONDOWN:
                if winner is None:
                    pressed_array = pygame.mouse.get_pressed()
                    if pressed_array[0]:
                        mouse_pos = pygame.mouse.get_pos()
                        click_point = _get_clickpoint(mouse_pos)
                        if click_point is not None:
                            if checkerboard.can_drop(click_point):
                                winner = checkerboard.drop(cur_runner, click_point)
                                if winner is None:
                                    cur_runner = _get_next(cur_runner)
                                    computer.get_opponent_drop(click_point)
                                    AI_point = computer.AI_drop()
                                    winner = checkerboard.drop(cur_runner, AI_point)
                                    if winner is not None:
                                        white_win_count += 1
                                    cur_runner = _get_next(cur_runner)
                                else:
                                    black_win_count += 1
                        else:
print('超出棋盘区域')Draw the chessboard
def _draw_checkerboard(screen):
    # 填充棋盘背景色
    screen.fill(Checkerboard_Color)
    # 画棋盘网格线外的边框
    pygame.draw.rect(screen, BLACK_COLOR, (Outer_Width, Outer_Width, Border_Length, Border_Length), Border_Width)
    # 画网格线
    for i in range(Line_Points):
        pygame.draw.line(screen, BLACK_COLOR,
                         (Start_Y, Start_Y + SIZE * i),
                         (Start_Y + SIZE * (Line_Points - 1), Start_Y + SIZE * i),
                         1)
    for j in range(Line_Points):
        pygame.draw.line(screen, BLACK_COLOR,
                         (Start_X + SIZE * j, Start_X),
                         (Start_X + SIZE * j, Start_X + SIZE * (Line_Points - 1)),
                         1)
    # 画星位和天元
    for i in (3, 9, 15):
        for j in (3, 9, 15):
            if i == j == 9:
                radius = 5
            else:
                radius = 3
            # pygame.draw.circle(screen, BLACK, (Start_X + SIZE * i, Start_Y + SIZE * j), radius)
            pygame.gfxdraw.aacircle(screen, Start_X + SIZE * i, Start_Y + SIZE * j, radius, BLACK_COLOR)
pygame.gfxdraw.filled_circle(screen, Start_X + SIZE * i, Start_Y + SIZE * j, radius, BLACK_COLOR)Run the box to return the coordinates of the movement
def _get_clickpoint(click_pos):
    pos_x = click_pos[0] - Start_X
    pos_y = click_pos[1] - Start_Y
    if pos_x < -Inside_Width or pos_y < -Inside_Width:
        return None
    x = pos_x // SIZE
    y = pos_y // SIZE
    if pos_x % SIZE > Stone_Radius:
        x += 1
    if pos_y % SIZE > Stone_Radius:
        y += 1
    if x >= Line_Points or y >= Line_Points:
        return None

return Point(x, y)Execution file
if __name__ == '__main__':
main()Human-machine battle
Dynamic demonstration
The above is the detailed content of How to implement a human-computer backgammon game based on Python. For more information, please follow other related articles on the PHP Chinese website!

Hot AI Tools

Undresser.AI Undress
AI-powered app for creating realistic nude photos

AI Clothes Remover
Online AI tool for removing clothes from photos.

Undress AI Tool
Undress images for free

Clothoff.io
AI clothes remover

AI Hentai Generator
Generate AI Hentai for free.

Hot Article
Hot Tools

Notepad++7.3.1
Easy-to-use and free code editor

SublimeText3 Chinese version
Chinese version, very easy to use

Zend Studio 13.0.1
Powerful PHP integrated development environment

Dreamweaver CS6
Visual web development tools

SublimeText3 Mac version
God-level code editing software (SublimeText3)
Hot Topics
 1385
1385
 52
52

 PHP and Python: Code Examples and Comparison
Apr 15, 2025 am 12:07 AM
PHP and Python: Code Examples and Comparison
Apr 15, 2025 am 12:07 AM
PHP and Python have their own advantages and disadvantages, and the choice depends on project needs and personal preferences. 1.PHP is suitable for rapid development and maintenance of large-scale web applications. 2. Python dominates the field of data science and machine learning.
 Python vs. JavaScript: Community, Libraries, and Resources
Apr 15, 2025 am 12:16 AM
Python vs. JavaScript: Community, Libraries, and Resources
Apr 15, 2025 am 12:16 AM
Python and JavaScript have their own advantages and disadvantages in terms of community, libraries and resources. 1) The Python community is friendly and suitable for beginners, but the front-end development resources are not as rich as JavaScript. 2) Python is powerful in data science and machine learning libraries, while JavaScript is better in front-end development libraries and frameworks. 3) Both have rich learning resources, but Python is suitable for starting with official documents, while JavaScript is better with MDNWebDocs. The choice should be based on project needs and personal interests.
 Detailed explanation of docker principle
Apr 14, 2025 pm 11:57 PM
Detailed explanation of docker principle
Apr 14, 2025 pm 11:57 PM
Docker uses Linux kernel features to provide an efficient and isolated application running environment. Its working principle is as follows: 1. The mirror is used as a read-only template, which contains everything you need to run the application; 2. The Union File System (UnionFS) stacks multiple file systems, only storing the differences, saving space and speeding up; 3. The daemon manages the mirrors and containers, and the client uses them for interaction; 4. Namespaces and cgroups implement container isolation and resource limitations; 5. Multiple network modes support container interconnection. Only by understanding these core concepts can you better utilize Docker.
 How to choose the PyTorch version on CentOS
Apr 14, 2025 pm 06:51 PM
How to choose the PyTorch version on CentOS
Apr 14, 2025 pm 06:51 PM
When installing PyTorch on CentOS system, you need to carefully select the appropriate version and consider the following key factors: 1. System environment compatibility: Operating system: It is recommended to use CentOS7 or higher. CUDA and cuDNN:PyTorch version and CUDA version are closely related. For example, PyTorch1.9.0 requires CUDA11.1, while PyTorch2.0.1 requires CUDA11.3. The cuDNN version must also match the CUDA version. Before selecting the PyTorch version, be sure to confirm that compatible CUDA and cuDNN versions have been installed. Python version: PyTorch official branch
 How to run programs in terminal vscode
Apr 15, 2025 pm 06:42 PM
How to run programs in terminal vscode
Apr 15, 2025 pm 06:42 PM
In VS Code, you can run the program in the terminal through the following steps: Prepare the code and open the integrated terminal to ensure that the code directory is consistent with the terminal working directory. Select the run command according to the programming language (such as Python's python your_file_name.py) to check whether it runs successfully and resolve errors. Use the debugger to improve debugging efficiency.
 Python: Automation, Scripting, and Task Management
Apr 16, 2025 am 12:14 AM
Python: Automation, Scripting, and Task Management
Apr 16, 2025 am 12:14 AM
Python excels in automation, scripting, and task management. 1) Automation: File backup is realized through standard libraries such as os and shutil. 2) Script writing: Use the psutil library to monitor system resources. 3) Task management: Use the schedule library to schedule tasks. Python's ease of use and rich library support makes it the preferred tool in these areas.
 Is the vscode extension malicious?
Apr 15, 2025 pm 07:57 PM
Is the vscode extension malicious?
Apr 15, 2025 pm 07:57 PM
VS Code extensions pose malicious risks, such as hiding malicious code, exploiting vulnerabilities, and masturbating as legitimate extensions. Methods to identify malicious extensions include: checking publishers, reading comments, checking code, and installing with caution. Security measures also include: security awareness, good habits, regular updates and antivirus software.
 How to install nginx in centos
Apr 14, 2025 pm 08:06 PM
How to install nginx in centos
Apr 14, 2025 pm 08:06 PM
CentOS Installing Nginx requires following the following steps: Installing dependencies such as development tools, pcre-devel, and openssl-devel. Download the Nginx source code package, unzip it and compile and install it, and specify the installation path as /usr/local/nginx. Create Nginx users and user groups and set permissions. Modify the configuration file nginx.conf, and configure the listening port and domain name/IP address. Start the Nginx service. Common errors need to be paid attention to, such as dependency issues, port conflicts, and configuration file errors. Performance optimization needs to be adjusted according to the specific situation, such as turning on cache and adjusting the number of worker processes.
