How to integrate Activemq in Springboot
1 Import the dependencies required for integration:
<dependency>
      <groupid>org.springframework.boot</groupid>
      <artifactid>spring-boot-starter-activemq</artifactid>
    </dependency>
2 Create the application.properties file
spring.activemq.broker-url=tcp://127.0.0.1:61616
spring.activemq.user=admin
spring.activemq.password=admin
server.port=8080
queue=myqueue
3. Customize the configuration file QueueConfig to read the queue name of the configuration file and create it based on the queue name A Queue
package com.example.demo;

import javax.jms.Queue;

import org.apache.activemq.ActiveMQConnectionFactory;
import org.apache.activemq.command.ActiveMQQueue;
import org.springframework.beans.factory.annotation.Value;
import org.springframework.context.annotation.Bean;
import org.springframework.context.annotation.Configuration;
import org.springframework.jms.config.DefaultJmsListenerContainerFactory;
import org.springframework.jms.core.JmsTemplate;

@Configuration
public class QueueConfig {

  @Value("${queue}")
  private String queue;

  @Bean
  public Queue logQueue() {
    return new ActiveMQQueue(queue);
}}4. Create a producer and you can directly use the provided template JmsMessagingTemplate to send messages:
package com.example.demo.producter;

import javax.jms.Queue;

import org.slf4j.Logger;
import org.slf4j.LoggerFactory;
import org.springframework.beans.factory.annotation.Autowired;
import org.springframework.jms.core.JmsMessagingTemplate;
import org.springframework.stereotype.Component;

import com.example.demo.SpringbootActivemqApplication;

@Component
public class Producter {
  @Autowired
  private JmsMessagingTemplate jmsMessagingTemplate;
  @Autowired
  private Queue queue;
  private static Logger logger = LoggerFactory.getLogger(
Producter
.class); public void send() { String str = "生产者生产数据:" + System.currentTimeMillis(); jmsMessagingTemplate.convertAndSend(queue, str); logger.info("生产者数据:{}", str); } }5. Start the class:
package com.example.demo;

import org.springframework.beans.factory.annotation.Autowired;
import org.springframework.boot.SpringApplication;
import org.springframework.boot.autoconfigure.SpringBootApplication;
import org.springframework.context.ApplicationListener;
import org.springframework.context.event.ContextRefreshedEvent;
import org.springframework.scheduling.annotation.EnableScheduling;

import com.example.demo.producter.Producter;
import com.example.demo.producter.consumer.Consumer;

@SpringBootApplication
@EnableScheduling
public class SpringbootActivemqApplication implements ApplicationListener<contextrefreshedevent> {
  @Autowired
  public Producter producter;
  @Autowired
  public Consumer consumer;

  public static void main(String[] args) {
    SpringApplication.run(SpringbootActivemqApplication.class, args);
    //onApplicationEvent方法 在启动springboot的时候 会运行该方法,可根据项目实际情况 选择合适调用消息发送方法

  }

  @Override
  public void onApplicationEvent(ContextRefreshedEvent event) {
    producter.send();
  }

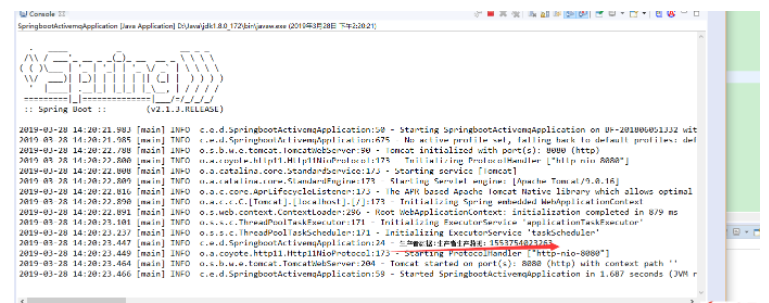
}</contextrefreshedevent>6. Start the project ,Console output content:


7. Create a consumer. Creating a consumer is relatively easy. You only need to listen to the queue:
package com.example.demo.producter.consumer;

import org.springframework.jms.annotation.JmsListener;
import org.springframework.stereotype.Component;

@Component
public class Consumer {

  @JmsListener(destination = "${queue}")
  public void receive(String msg) {
    System.out.println("监听器收到msg:" + msg);
  }

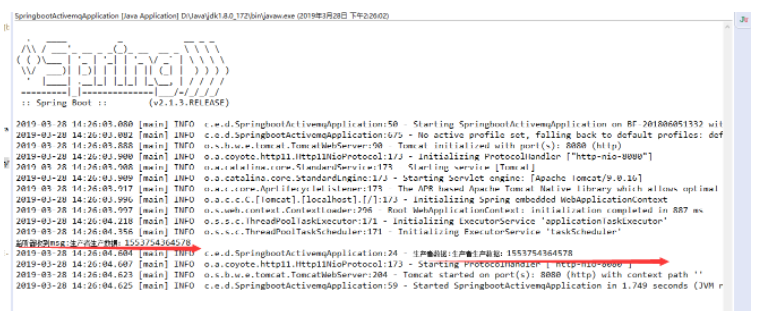
}8. Final result:

The above is the detailed content of How to integrate Activemq in Springboot. For more information, please follow other related articles on the PHP Chinese website!

Hot AI Tools

Undresser.AI Undress
AI-powered app for creating realistic nude photos

AI Clothes Remover
Online AI tool for removing clothes from photos.

Undress AI Tool
Undress images for free

Clothoff.io
AI clothes remover

Video Face Swap
Swap faces in any video effortlessly with our completely free AI face swap tool!

Hot Article

Hot Tools

Notepad++7.3.1
Easy-to-use and free code editor

SublimeText3 Chinese version
Chinese version, very easy to use

Zend Studio 13.0.1
Powerful PHP integrated development environment

Dreamweaver CS6
Visual web development tools

SublimeText3 Mac version
God-level code editing software (SublimeText3)

Hot Topics
 1389
1389
 52
52
 How Springboot integrates Jasypt to implement configuration file encryption
Jun 01, 2023 am 08:55 AM
Introduction to Jasypt Jasypt is a java library that allows a developer to add basic encryption functionality to his/her project with minimal effort and does not require a deep understanding of how encryption works. High security for one-way and two-way encryption. , standards-based encryption technology. Encrypt passwords, text, numbers, binaries... Suitable for integration into Spring-based applications, open API, for use with any JCE provider... Add the following dependency: com.github.ulisesbocchiojasypt-spring-boot-starter2. 1.1Jasypt benefits protect our system security. Even if the code is leaked, the data source can be guaranteed.
 How SpringBoot integrates Redisson to implement delay queue
May 30, 2023 pm 02:40 PM
Usage scenario 1. The order was placed successfully but the payment was not made within 30 minutes. The payment timed out and the order was automatically canceled. 2. The order was signed and no evaluation was conducted for 7 days after signing. If the order times out and is not evaluated, the system defaults to a positive rating. 3. The order is placed successfully. If the merchant does not receive the order for 5 minutes, the order is cancelled. 4. The delivery times out, and push SMS reminder... For scenarios with long delays and low real-time performance, we can Use task scheduling to perform regular polling processing. For example: xxl-job Today we will pick
 How to use Redis to implement distributed locks in SpringBoot
Jun 03, 2023 am 08:16 AM
1. Redis implements distributed lock principle and why distributed locks are needed. Before talking about distributed locks, it is necessary to explain why distributed locks are needed. The opposite of distributed locks is stand-alone locks. When we write multi-threaded programs, we avoid data problems caused by operating a shared variable at the same time. We usually use a lock to mutually exclude the shared variables to ensure the correctness of the shared variables. Its scope of use is in the same process. If there are multiple processes that need to operate a shared resource at the same time, how can they be mutually exclusive? Today's business applications are usually microservice architecture, which also means that one application will deploy multiple processes. If multiple processes need to modify the same row of records in MySQL, in order to avoid dirty data caused by out-of-order operations, distribution needs to be introduced at this time. The style is locked. Want to achieve points
 How to solve the problem that springboot cannot access the file after reading it into a jar package
Jun 03, 2023 pm 04:38 PM
Springboot reads the file, but cannot access the latest development after packaging it into a jar package. There is a situation where springboot cannot read the file after packaging it into a jar package. The reason is that after packaging, the virtual path of the file is invalid and can only be accessed through the stream. Read. The file is under resources publicvoidtest(){Listnames=newArrayList();InputStreamReaderread=null;try{ClassPathResourceresource=newClassPathResource("name.txt");Input
 How to implement Springboot+Mybatis-plus without using SQL statements to add multiple tables
Jun 02, 2023 am 11:07 AM
When Springboot+Mybatis-plus does not use SQL statements to perform multi-table adding operations, the problems I encountered are decomposed by simulating thinking in the test environment: Create a BrandDTO object with parameters to simulate passing parameters to the background. We all know that it is extremely difficult to perform multi-table operations in Mybatis-plus. If you do not use tools such as Mybatis-plus-join, you can only configure the corresponding Mapper.xml file and configure The smelly and long ResultMap, and then write the corresponding sql statement. Although this method seems cumbersome, it is highly flexible and allows us to
 20 Best Practices for Java ActiveMQ
Feb 20, 2024 pm 09:48 PM
1. Choose the appropriate client transport protocol ActiveMQ supports a variety of client transport protocols, including STOMP, AMQP and OpenWire. Choose the right protocol based on your application needs to optimize performance and reliability. 2. Configure message persistence. Persistent messages are persisted even after server restarts, while non-persistent messages are not. For critical messages, choose persistence to ensure reliable delivery. Demo code: //Set message persistence MessageProducerproducer=session.createProducer(destination);producer.setDeliveryMode(Deliv
 Comparison and difference analysis between SpringBoot and SpringMVC
Dec 29, 2023 am 11:02 AM
SpringBoot and SpringMVC are both commonly used frameworks in Java development, but there are some obvious differences between them. This article will explore the features and uses of these two frameworks and compare their differences. First, let's learn about SpringBoot. SpringBoot was developed by the Pivotal team to simplify the creation and deployment of applications based on the Spring framework. It provides a fast, lightweight way to build stand-alone, executable
 How SpringBoot customizes Redis to implement cache serialization
Jun 03, 2023 am 11:32 AM
1. Customize RedisTemplate1.1, RedisAPI default serialization mechanism. The API-based Redis cache implementation uses the RedisTemplate template for data caching operations. Here, open the RedisTemplate class and view the source code information of the class. publicclassRedisTemplateextendsRedisAccessorimplementsRedisOperations, BeanClassLoaderAware{//Declare key, Various serialization methods of value, the initial value is empty @NullableprivateRedisSe


