Fix: VAN 1067 error when running Valorant on Windows 11
The operating system looks much better than its predecessor and has gamer-oriented features like AutoHDR and DirectStorage, but Valorant players are having some trouble launching the game.
This is not the first issue faced by gamers earlier, Valorant not opening on Windows 11 is another issue plaguing them but we have covered the ways to fix it.
It now appears that Valorant players switching to Windows 11 are facing issues due to the Secure Boot and TPM 2.0 services, which causes the game menu to only show an exit option when running.
Many users are receiving VAN 1067 errors, but this should not be cause for alarm as there are several solutions to resolve this issue.
Is Valorant a new product on the market?
Valorant is a fairly new game on the market, but the developers have made it clear that it requires TPM 2.0 and Secure Boot to run on Windows 11.
While it is still new, issues may arise as many of its major features are still in beta, which in turn seems to be causing glitches.
Why does Valorant get VAN 1067 error?
One of the main causes of VAN 1067 errors is using a device that does not meet the game’s eligibility requirements.
If you want to play Valorant on Windows 11, you need to enable both Secure Boot and TPM 2.0 services.
Secure Boot protects users from security threats, and TPM 2.0 is a hardware security measure for Windows 11.
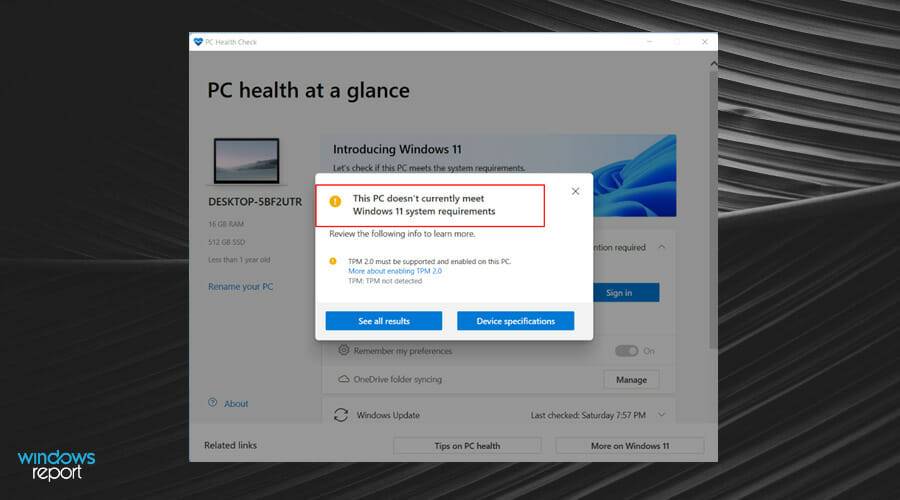
The Microsoft PC Health Check app will also help you identify any apps and hardware that are incompatible with Windows 11.
We recommend that you first run the application to detect potential incompatibilities, then provide a compatibility report, and finally provide you with instructions on how to take corrective action.
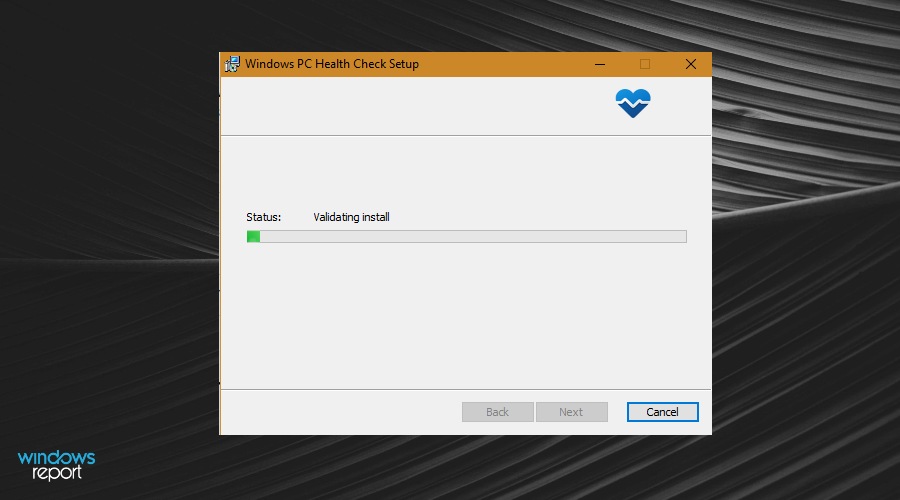
- Open your browser and download the PC Health Check app and click on it to start the installation.

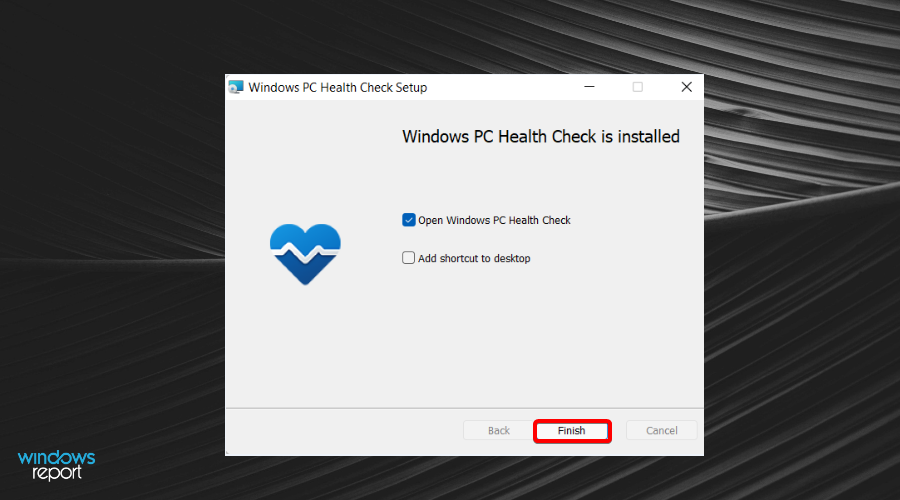
- After completing the process, click the "Finish" button.

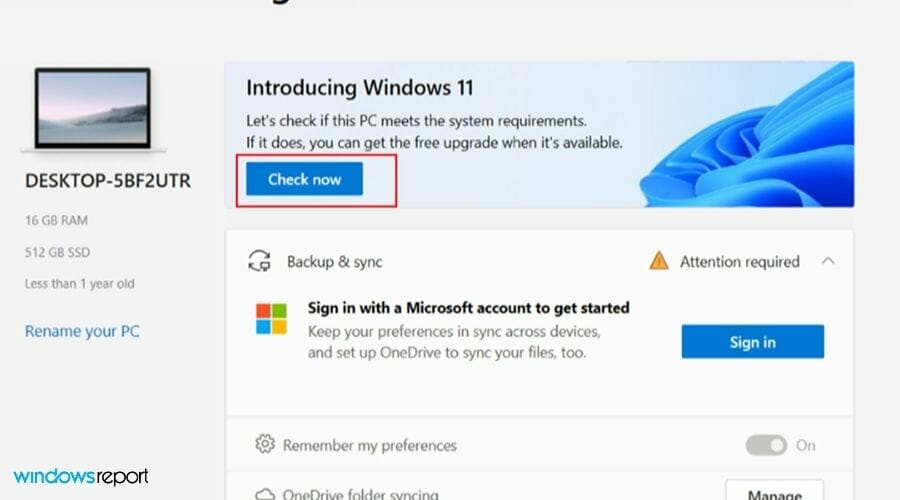
- Next click the Check Now button.

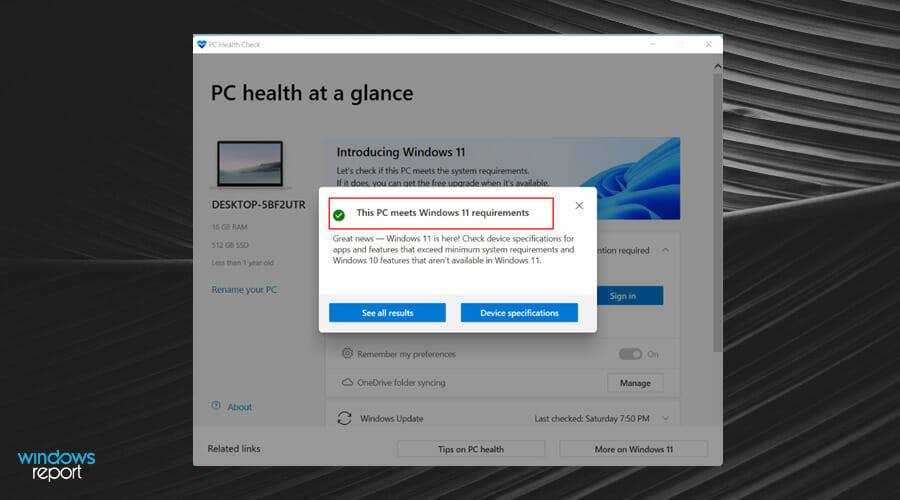
- If your PC meets the requirements, you will receive a message: This PC meets Windows 11 requirements.

- If not, you will receive this message: This PC does not currently meet Windows 11 system requirements.

If you're having trouble running Windows 11, it could be caused by some bugs that can be easily fixed. If your device meets the above requirements, you can use the following solutions to correct the error.
How to fix VAN 1067 error in Valorant on Windows 11?
1. Enable TPM 2.0 and Secure Boot
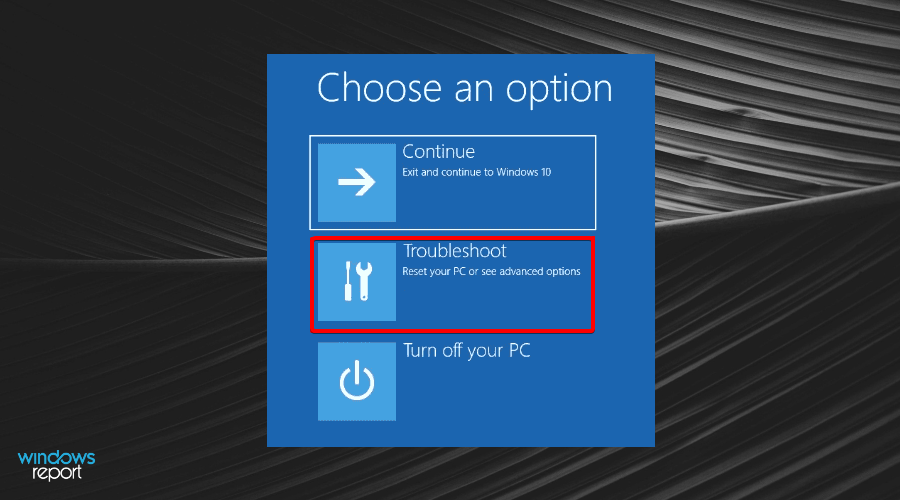
- Press the Shift restart key to reboot your PC to Windows Recovery Environment (WinRE).
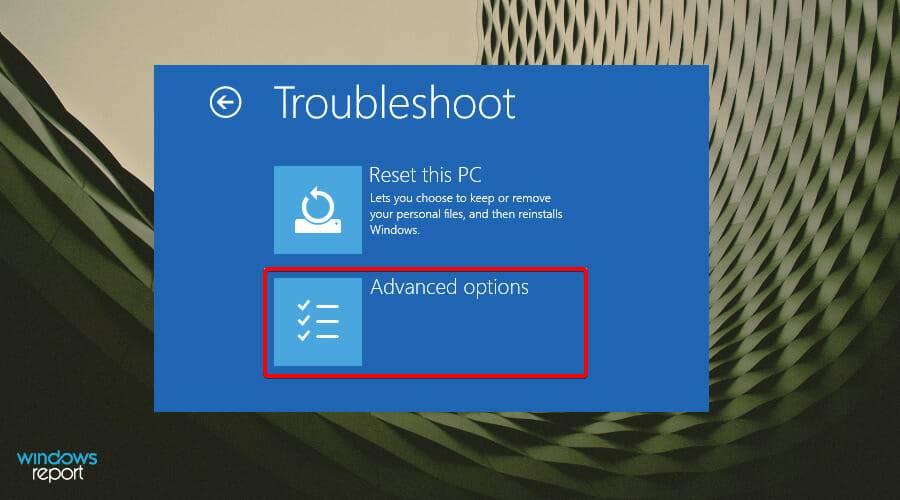
- Navigate to Troubleshooting.

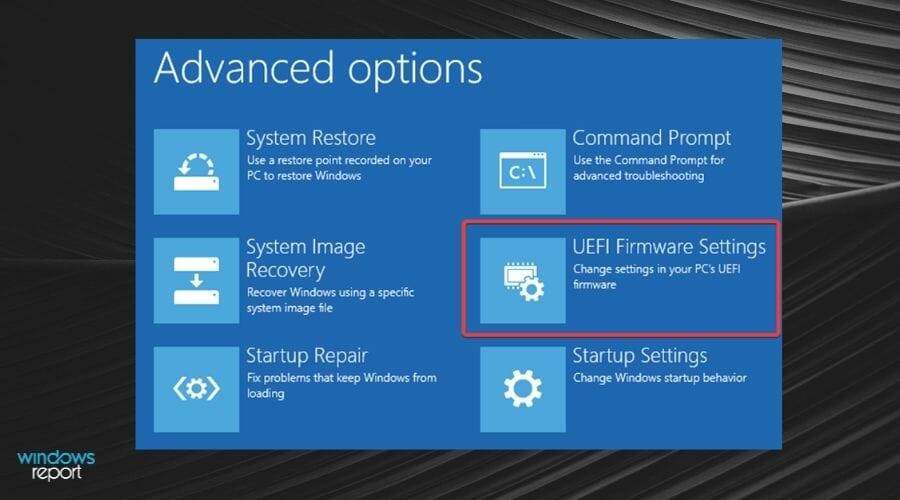
- Select Advanced Options.

- Click on UEFI Firmware Settings.

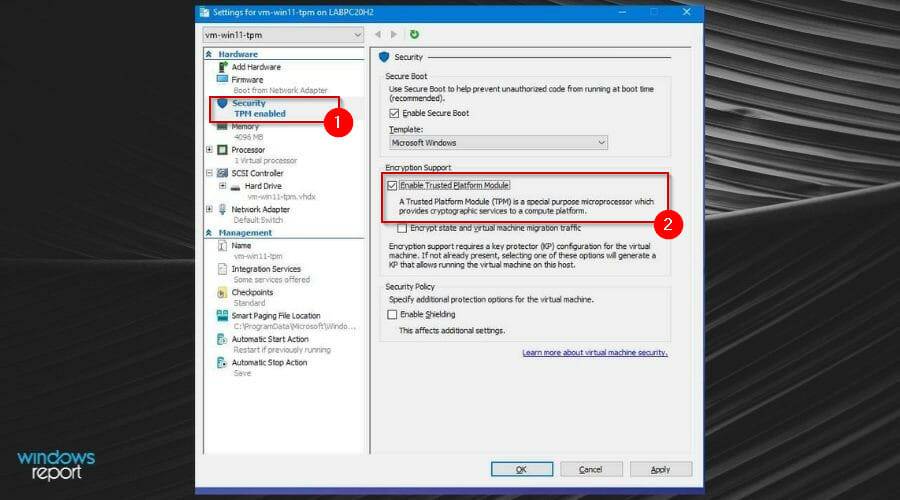
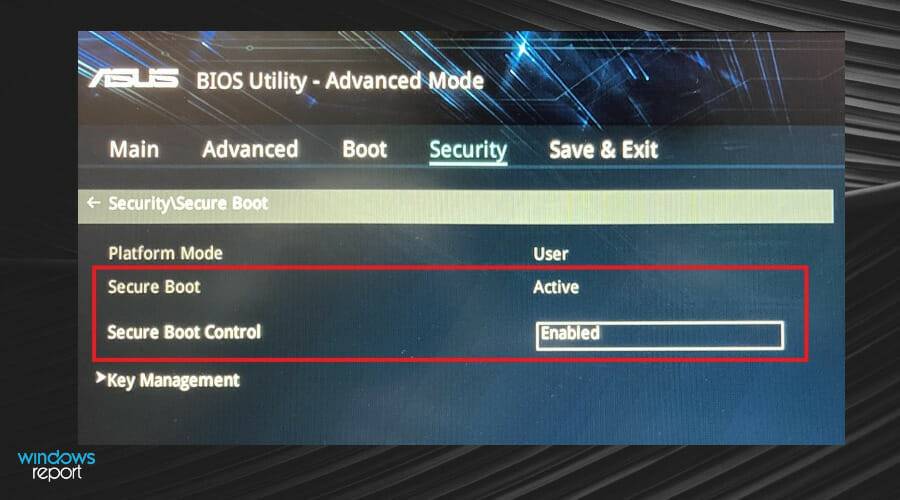
- Go to the Security tab, find the Trusted Platform Module (TPM) and enable it.

- Also, find Secure Boot and enable it. UEFI settings are usually different based on different PCs.

2. Check for Windows updates
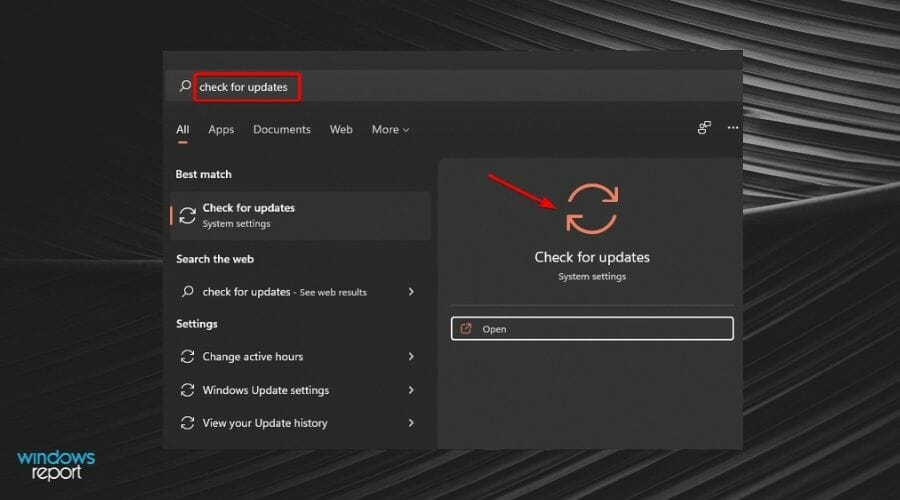
- Press the Windows key and search for in the search bar Check for updates.

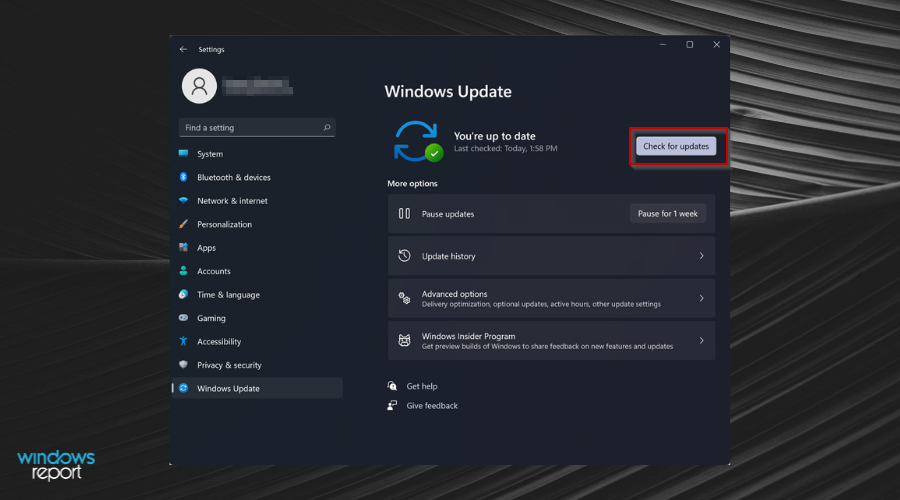
- Click C to check for updates.

- If you have any pending updates, please proceed with the installation and restart your system.
3. Disable discord
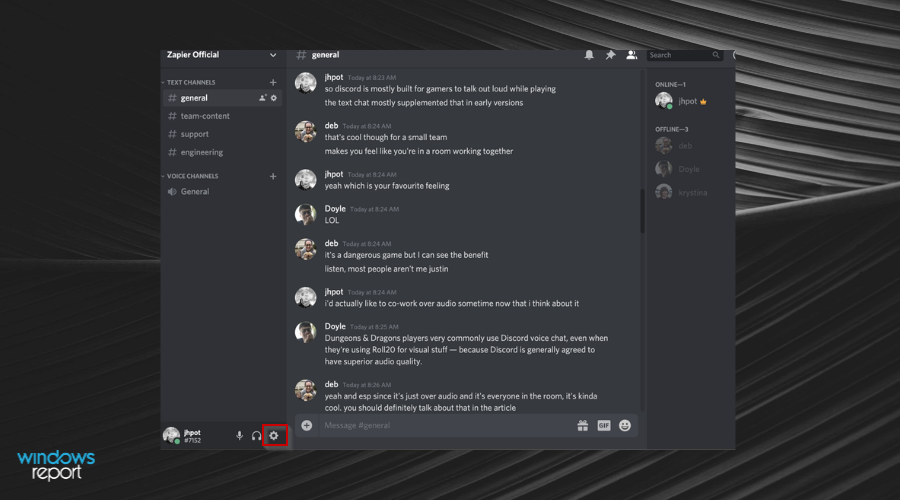
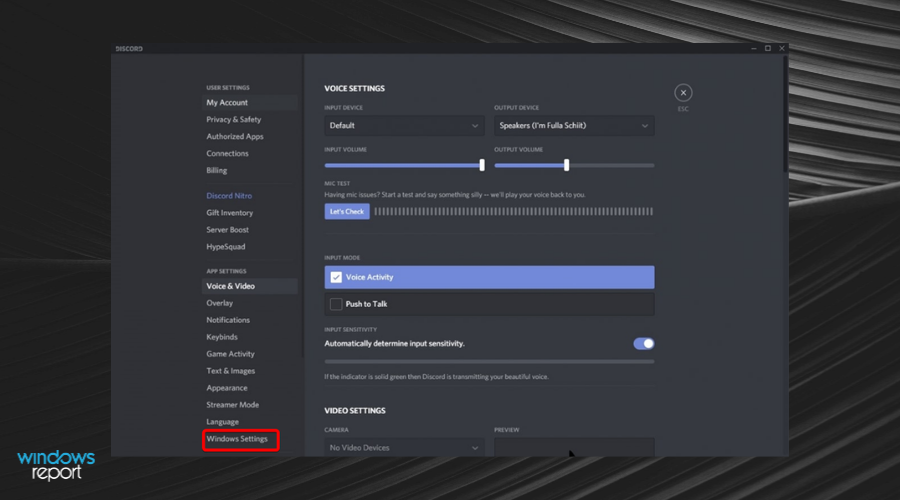
- Go to the Settingsmenu in Discord.

- Click Windows Settings.

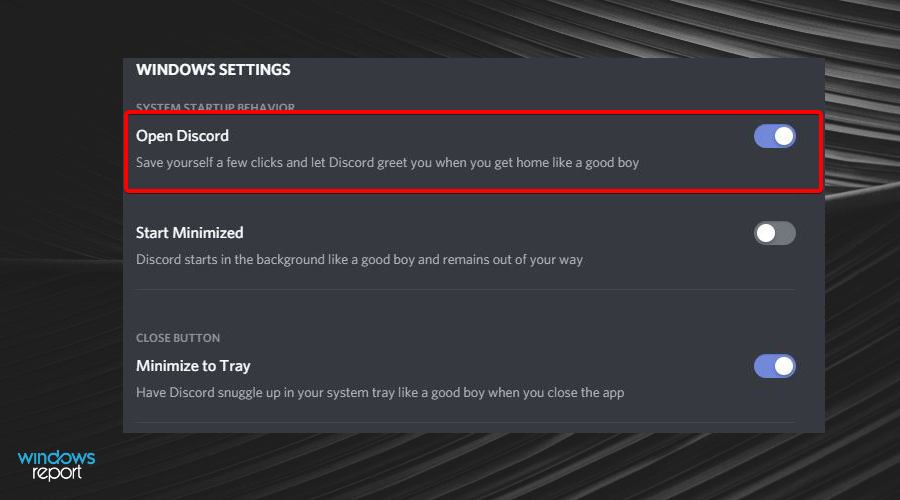
- CloseOpen Discord.

- Restart your computer.
4. Restart the VGC service
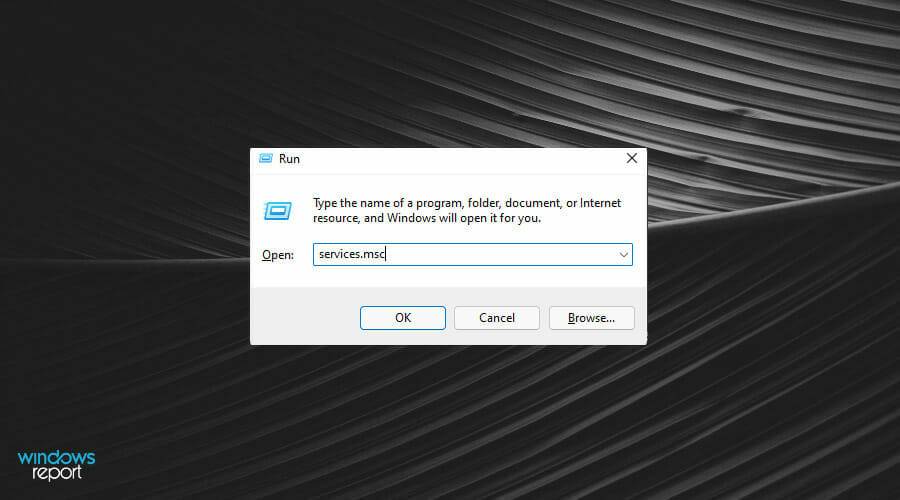
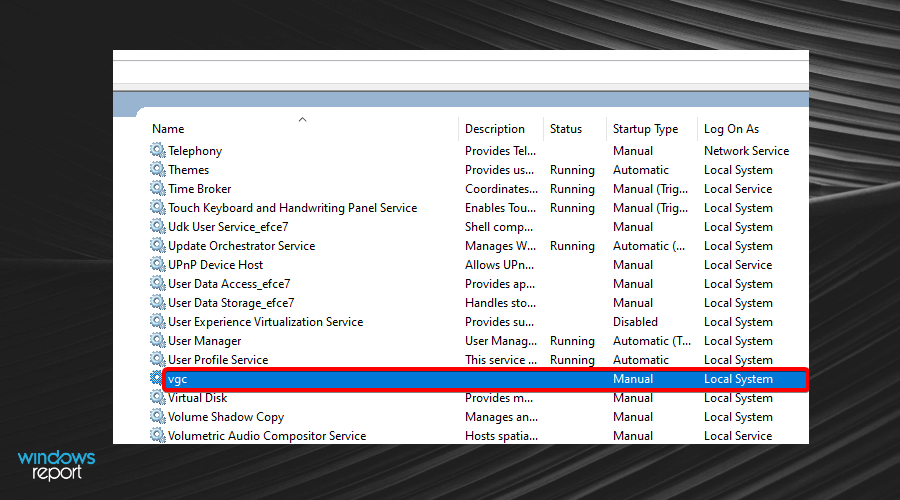
- Press the Win R key to open the "Run" dialog box, type services.msc and click OK to open the Services window.

- Foundvgc.

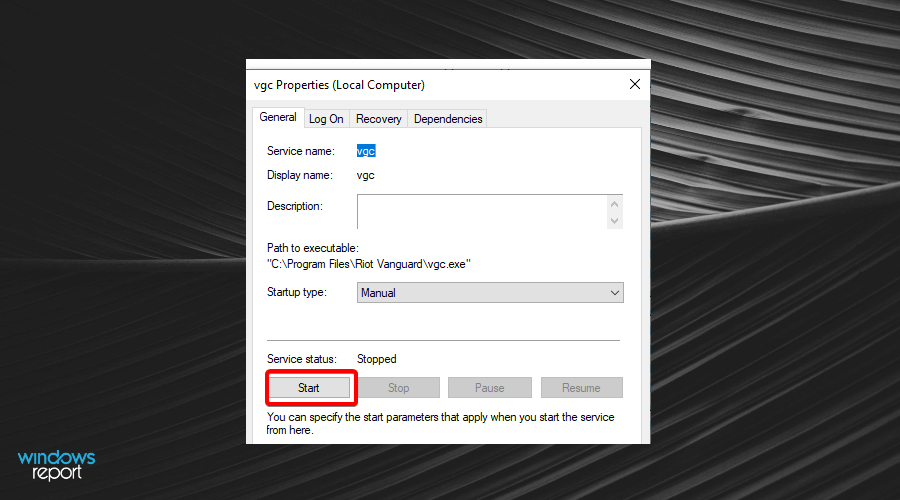
- Double-click it and select Start.

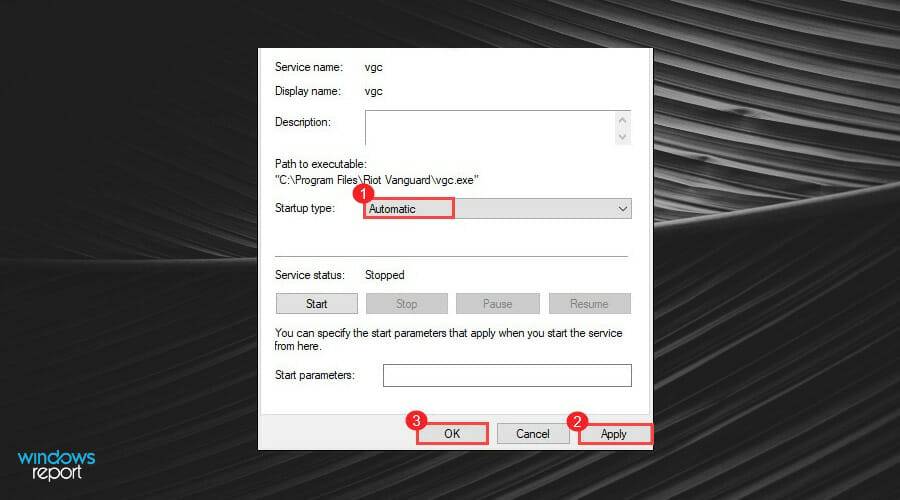
- Click Startup type and select Automatic, click Apply to save changes, and then click OK.

5. Disable CSM
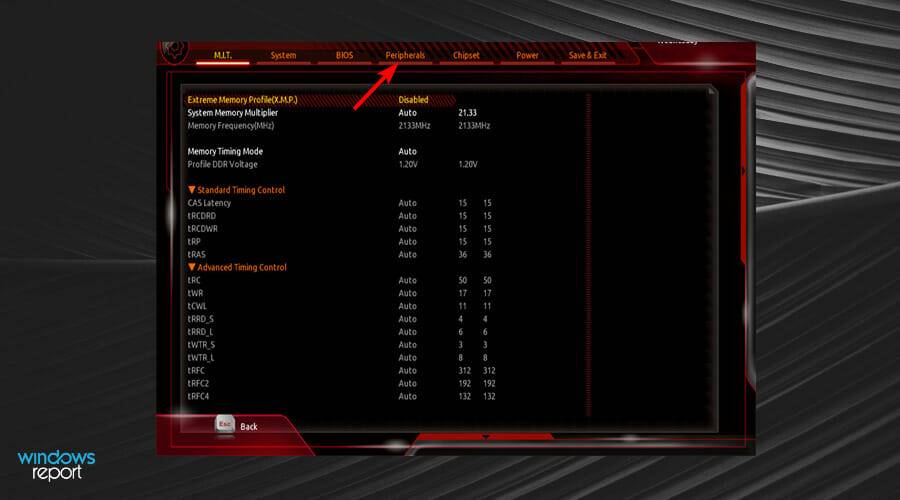
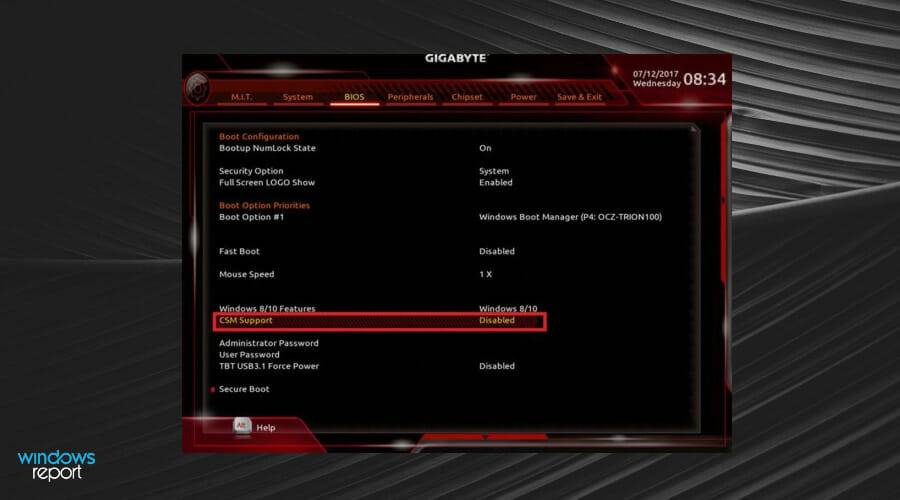
5.1 Disable CSM on Gigabyte
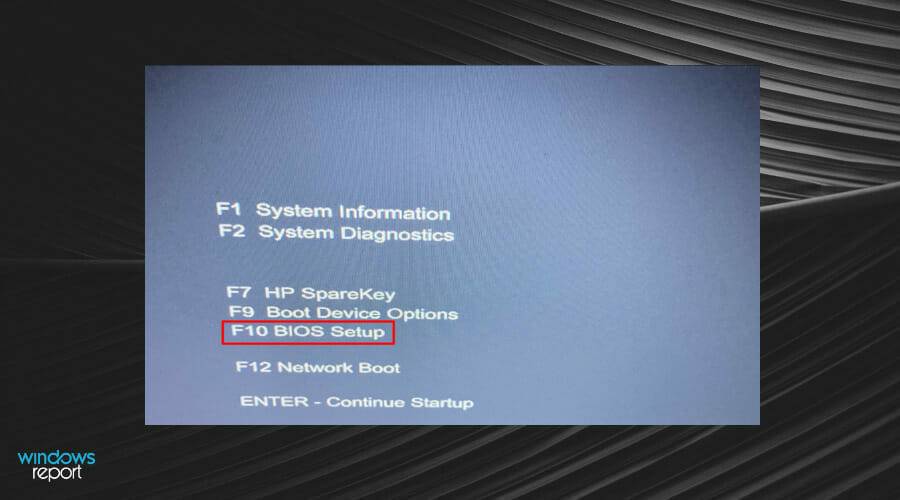
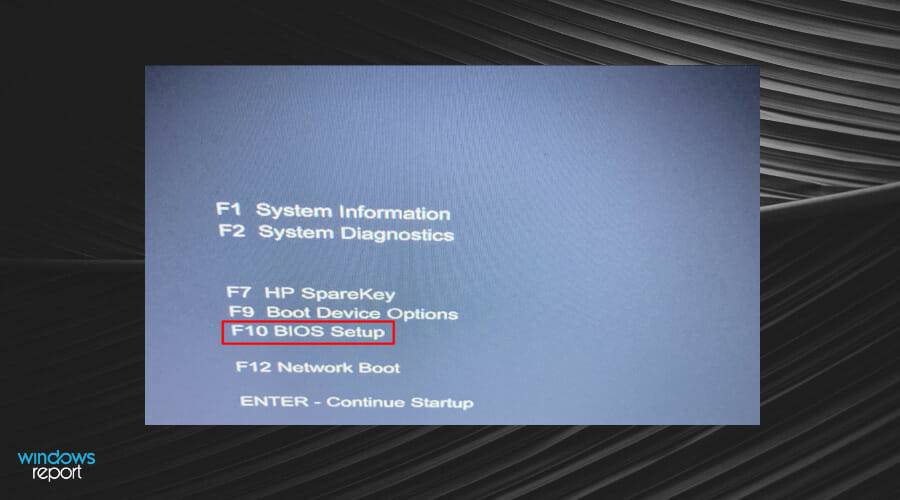
- on When the computer starts, press the key to enter the BIOS screen or the security menuDel.

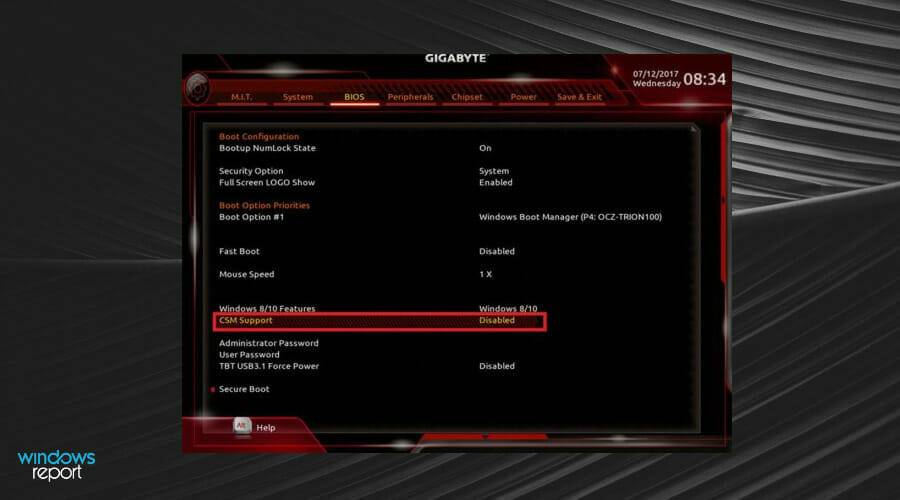
- Find CSM Support under the BIOS tab and double-click it, then select Disabled.

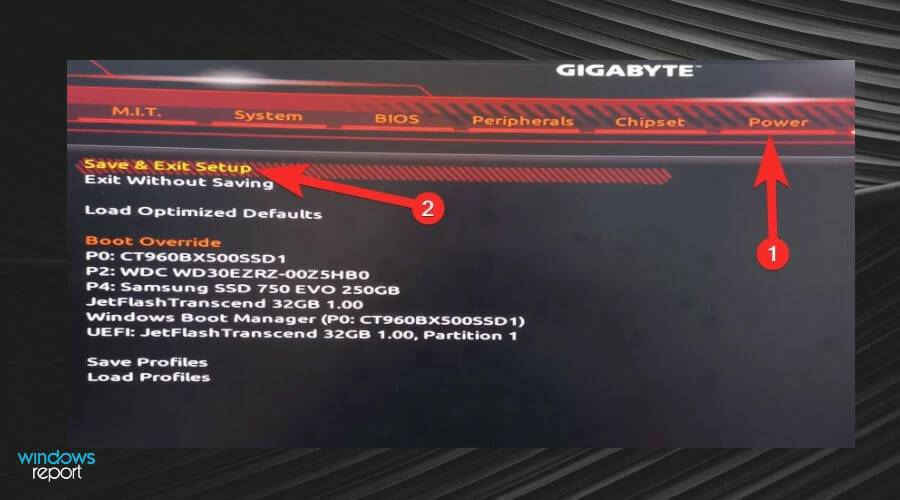
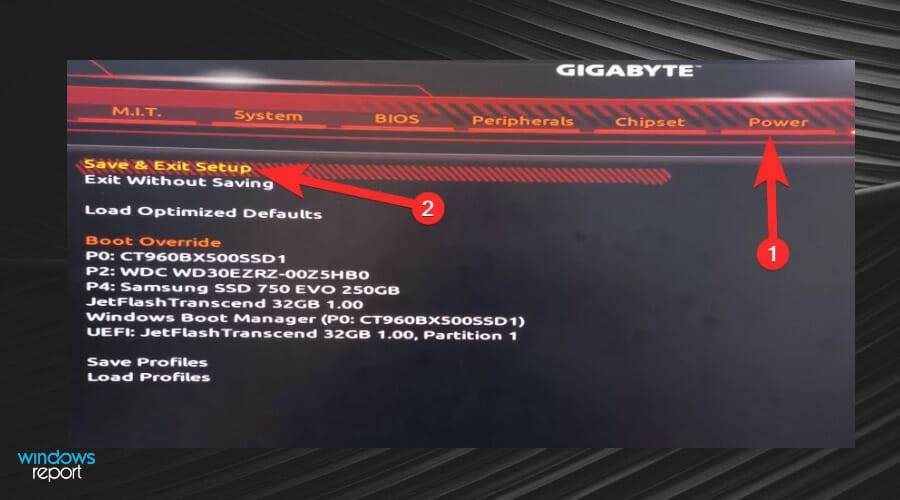
- Save changes, click the Power tab, then go to Save and Exit Settings.

- Reboot the system again and enter the BIOS screen.
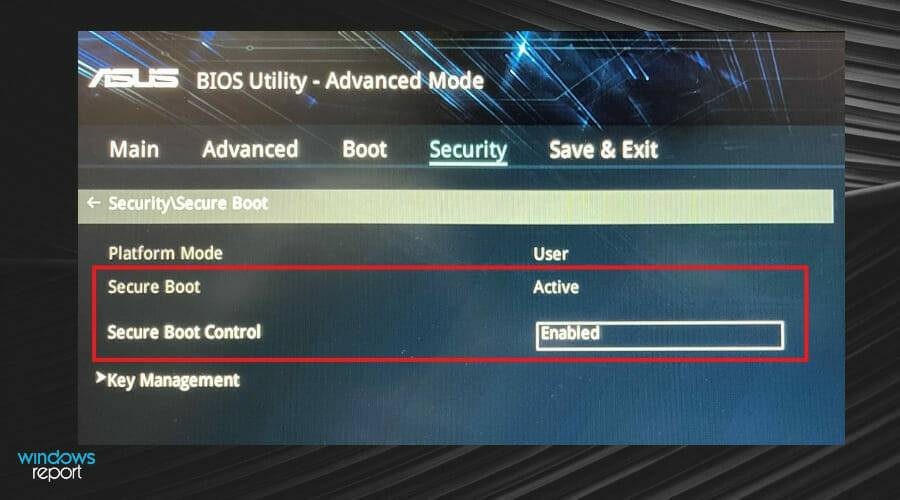
- Double-click Secure Boot in the BIOS tab and select Enabled.

- Again, go to the Power tab and click Save and Exit Setup.

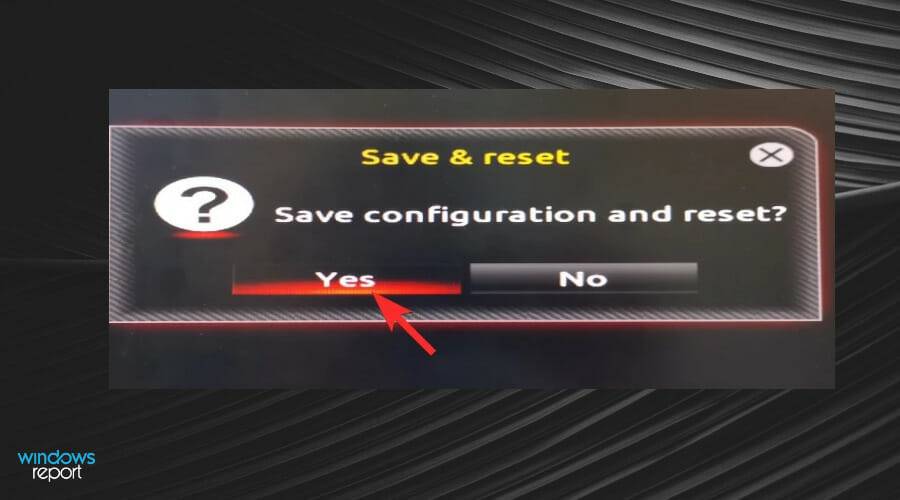
- Click Yes and reboot the system one last time.

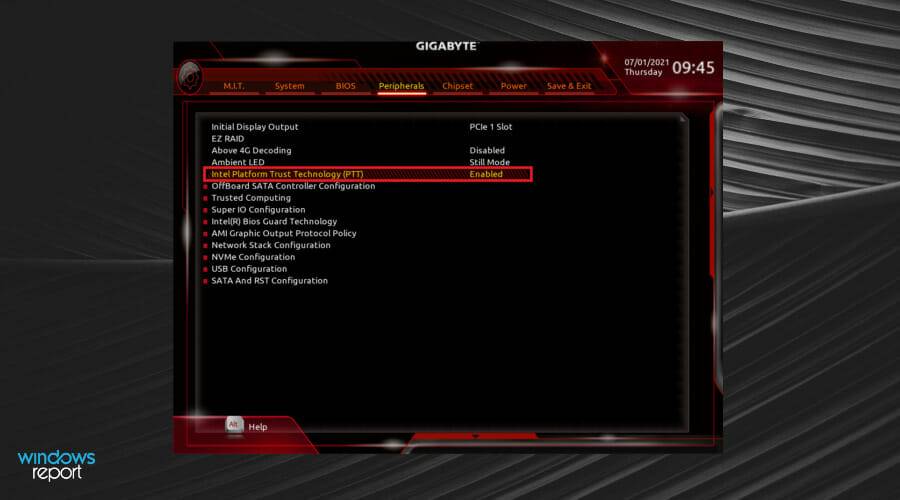
- Enter the BIOS screen again and go to the Peripherals tab.

- Now, double-click on Intel Platform Trust Technology (PTT) and select Enabled.

- Save these changes by going to the Power tab and clicking Save & Exit Setup.

5.2 Disable CSM on MSI
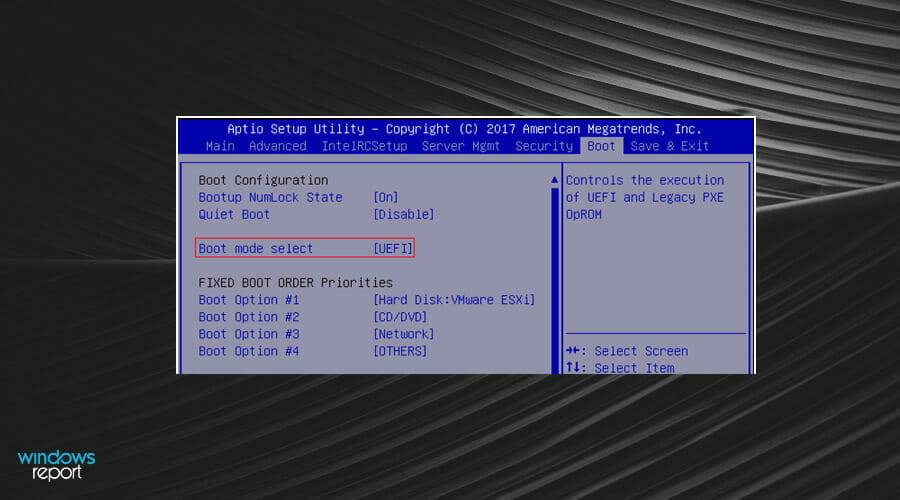
- Press key to enter the BIOS screenDel .

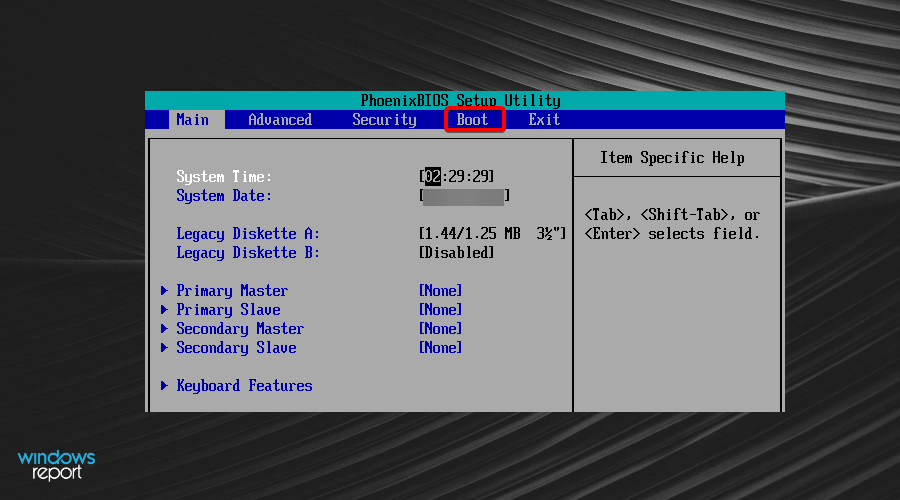
- Once in the menu, click the Bootstrap tab at the top of the screen.

- Find Boot modeSelect and UEFI.

- Press the F10 key to save these changes and exit the BIOS.
- Your computer will automatically restart.
5.3 Biostar disables CSM
- Press the key to enter the BIOS screenF12.
- Go to the Bootstrap tab.

- Find CSM Support and set it to Disabled.

- Exit and restart the system.
Disabling CSM will be different for each system depending on your motherboard. The above steps are only applicable for VAN 1067 error Windows 11 GB motherboards, VAN 1067 error Windows 11 MSI motherboards and VAN 1067 error Windows 11 Biostar motherboards.
Why can’t I find CSM?
Turning off CSM on Windows 11 requires access to the BIOS. You can look for a switch option in the BIOS settings to help you turn it off.
You will also need a compatible operating system and BIOS version to manage your system. Once turned off, your motherboard will have UEFI support enabled.
It is recommended that before disabling CSM, make sure to save the state of all other settings to avoid problems.
Other things to note include:
Make sure you have compatible hardware: The most common cause of this error is using old hardware or peripherals. Older devices are those that have not been tested for compatibility with Windows 11.
These may include motherboards, graphics cards, and monitors that have not been produced in the past five years or so. Before trying to disable CSM, check if it is compatible with Windows 10, especially if you use these features on your system. This error can also be caused by older CPUs (manufactured before 2010), keyboards, and mice.
Make sure your drive is set up correctly: There are two main types of drives, MBR (Master Boot Record) and GPT (GUID Partition Table). The master boot record is the older of the two.
The most important step is to determine what kind of drive you have and what partitions and data currently exist to prevent the drive from having mismatched partition table issues.
Can I go back to Windows 10 to avoid this error?
If you find the above solutions too cumbersome, you can always downgrade from Windows 11 to Windows 10.
You will then be able to play Valorant without errors or worries about meeting Windows 11 system requirements.
The above is the detailed content of Fix: VAN 1067 error when running Valorant on Windows 11. For more information, please follow other related articles on the PHP Chinese website!

Hot AI Tools

Undresser.AI Undress
AI-powered app for creating realistic nude photos

AI Clothes Remover
Online AI tool for removing clothes from photos.

Undress AI Tool
Undress images for free

Clothoff.io
AI clothes remover

Video Face Swap
Swap faces in any video effortlessly with our completely free AI face swap tool!

Hot Article

Hot Tools

Notepad++7.3.1
Easy-to-use and free code editor

SublimeText3 Chinese version
Chinese version, very easy to use

Zend Studio 13.0.1
Powerful PHP integrated development environment

Dreamweaver CS6
Visual web development tools

SublimeText3 Mac version
God-level code editing software (SublimeText3)

Hot Topics
 1389
1389
 52
52
 Ventoy secure boot settingsSecure Boot
Jun 18, 2024 pm 09:00 PM
Ventoy is a USB boot tool that can directly boot ISO/WIM/IMG/VHD(x)/EFI and other types of files in the USB flash drive. It is very easy to use. Laptops have secure boot turned on by default. If they are not turned off or cannot be turned off, they cannot be booted from a USB device. Ventoy also supports secure boot. The principle is to inject a GRUB installation certificate into the current computer. As long as your computer After being injected once, any USB disk PE booted based on grub can pass. The official description of Ventoy is a GIF image. The playback speed is too fast and you may not be able to remember it. The editor has divided the GIF image to make it easier to understand. Ventoy secure boot has EnrollKey and Enro
 Fix: VAN 1067 error when running Valorant on Windows 11
May 22, 2023 pm 02:41 PM
The operating system looks much better than its predecessor and has gamer-oriented features like AutoHDR and DirectStorage, but Valorant players have had some trouble launching the game. This is not the first issue faced by gamers earlier, Valorant not opening on Windows 11 is another issue plaguing them but we have covered the ways to fix it. Now it seems that Valorant players who switched to Windows 11 are facing issues due to Secure Boot and TPM2.0 services, which causes the game menu to only show an exit option while running. Many users are getting the VAN1067 error, but it shouldn't be a cause for alarm
 Acer laptop disables secure boot and removes password in Bios
Jun 19, 2024 am 06:49 AM
I repaired an Acer laptop and had to turn off secure boot when entering PE. I recorded how to turn off secure boot and remove the password from Bios. Turn on the computer and when the screen is not on, keep pressing the F2 key to enter the BIOS. On Acer laptops, turn off Secure Boot and press the arrow keys to switch to Boot. If SecureBoot is gray and unclickable, switch to the Security page, select SetSupervisorPassword and press Enter to set the password. Then switch to Boot, SecureBoot can be selected as Disabled, and press F10 to save. Modify and clear the BIOS password on your Acer notebook. Switch to the Security menu and select SetSupervisorPasswo.
 Dell computer bios interface to set USB disk startup items
Feb 10, 2024 pm 10:09 PM
How do you set up a USB drive if your computer is a Dell laptop? Many friends have found that Dell laptops will not display the USB disk option by pressing the boot hotkey, so they need to enter the BIOS to set up the USB disk boot, so what if they don't know how to operate it? Now follow the editor’s steps to demonstrate how to set up a USB flash drive on a Dell laptop. Many friends assemble Dell computers, but don't know how to use the USB boot tool after entering the USBPE interface. Many friends don't know that they need to enter the BIOS interface to set up USB boot, so pressing the boot hotkey will not appear. what should we do? Let’s see how Dell sets up USB boot! Set up Dell laptop to reinstall system bootable from USB disk
 The system has posted in safe mode ASUS motherboard
Jun 19, 2024 am 07:35 AM
After the computer is turned on, it prompts The system has posted in safe mode. You can set it in the BIOS to ignore the F1 error. Although it does not prompt, it directly enters the BIOS when it is turned on. Sometimes F1 is useless every time it is turned on. Then you need to restart the BIOS, and then exit the BIOS to enter the system. . thesystemhaspostedinsafemode=The system is in safe mode. This problem is relatively common on ASUS motherboards. As long as you turn off the XMP of the memory and adjust the memory frequency back to normal, you can boot normally without the thesystemhaspostedinsafemode error. Updating the latest motherboard BIOS should be OK.
 How to deal with the black screen problem after entering Win11 BIOS
Jan 03, 2024 pm 01:05 PM
Bios setting is a very important function in the computer. If the user finds that he cannot enter the BIOS setting page and the computer has a black screen, then the editor strongly recommends that you read this article. What to do if win11 enters BIOS black screen 1. First, check whether the monitor is fully functional and operating normally. Please confirm whether the monitor's power cord is firmly connected. 2. In addition, you need to carefully check the power switch of the monitor to see if it can start up and shut down normally. 3. Also make sure that the monitor's interface is fastened and not loose, and that the monitor's settings should also remain correct in their default state. 4. If the above steps prove that the monitor is running well, then we can start troubleshooting other problems! 5. It is recommended to scan and
![Windows PC keeps booting into BIOS [Fix]](https://img.php.cn/upload/article/000/887/227/171012121854600.jpg?x-oss-process=image/resize,m_fill,h_207,w_330) Windows PC keeps booting into BIOS [Fix]
Mar 11, 2024 am 09:40 AM
Windows PC keeps booting into BIOS [Fix]
Mar 11, 2024 am 09:40 AM
If your Windows PC frequently enters the BIOS interface, this may cause difficulty in use. I'm stuck with the BIOS screen every time I turn on my computer, and restarting doesn't help. If you are facing this problem, then the solutions provided in this article will help you. Why does my computer keep booting in BIOS? Your computer's frequent restarts in BIOS mode may be caused by a variety of reasons, such as improper boot sequence settings, damaged SATA cables, loose connections, BIOS configuration errors, or hard drive failures, etc. Fix Windows PC Keeps Booting into BIOS If your Windows PC keeps booting into BIOS, use the fix below. Check your boot order and re-plug the
 ASUS releases BIOS update for Z790 motherboards to alleviate instability issues with Intel's 13th/14th generation Core processors
Aug 09, 2024 am 12:47 AM
According to news from this website on August 8, MSI and ASUS today launched a beta version of BIOS containing the 0x129 microcode update for some Z790 motherboards in response to the instability issues in Intel Core 13th and 14th generation desktop processors. ASUS's first batch of motherboards to provide BIOS updates include: ROGMAXIMUSZ790HEROBetaBios2503ROGMAXIMUSZ790DARKHEROBetaBios1503ROGMAXIMUSZ790HEROBTFBetaBios1503ROGMAXIMUSZ790HEROEVA-02 joint version BetaBios2503ROGMAXIMUSZ790A


