

1. Usage example
nginx instruction to declare shared memory is:
1 |
|
Here is just one declared name, the maximum available memory is 10g of shared memory. The meaning of each parameter here is as follows:
/users/mike/nginx-cache: This is a path parameter that specifies the storage location of the files cached in the shared memory. The reason why a file is generated here is that for the response from the upstream service, a file can be generated and stored on nginx. If there is a subsequent request for the same, the file can be read directly or read from the shared memory. Caching to respond to the client;
levels: In the Linux operating system, if all files are placed in a folder, then when the number of files is very large, a disk drive may It is impossible to read so many files. If they are placed in multiple folders, you can take advantage of multiple drivers and read them. The levels parameter here specifies how to generate the folder. Assume that the file name generated by nginx for a certain response data of the upstream service is e0bd86606797639426a92306b1b98ad9. Then for the above levels=1:2, it will take the value from the end of the file name, taking 1 bit first (that is, 9) as the first level Subdirectory name, and then take 2 digits (that is, ad) as the secondary subdirectory name;
keys_zone: This parameter specifies the name of the current shared memory, here is one, and the following 10m means that the memory size of the current shared memory used to store keys is 10m;
max_size: This parameter specifies the maximum memory available for the current shared memory;
inactive: This parameter specifies the maximum survival time of the current shared memory. If there is no request to access the memory data during this period, it will be eliminated by the lru algorithm;
This parameter is set to use_temp_path to control whether the generated file is first stored in a temporary folder and then moved to the specified directory
2. Working principle
The management of shared memory is mainly divided into several parts as shown in the following figure:
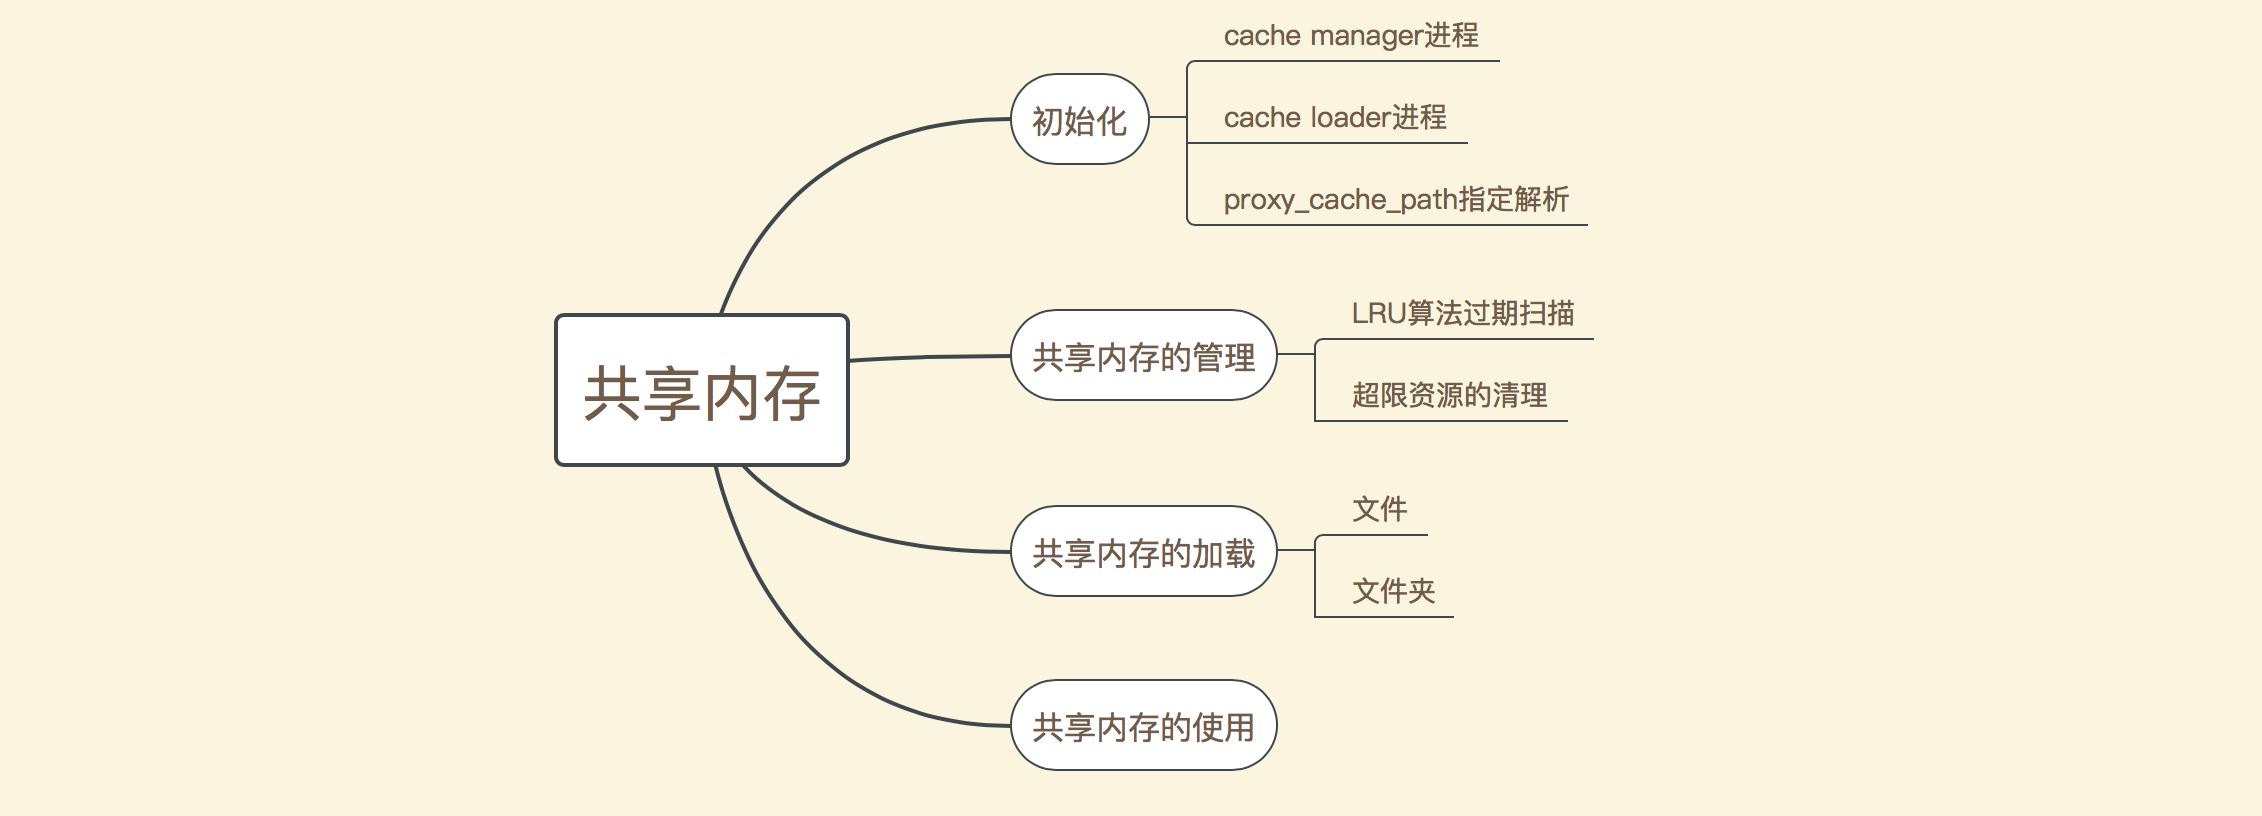
As you can see, the main It is divided into several aspects such as initialization, shared memory management, shared memory loading and shared memory use. During the initialization process, the proxy_cache_path instruction will first be parsed, and then the cache manager and cache loader processes will be started respectively. The cache manager process here mainly manages shared memory, and it mainly clears expired data through the LRU algorithm, or when resources are tight. Forcefully delete some unreferenced memory data; the main job of the cache loader process is to read the existing files in the file storage directory and load them into shared memory after nginx is started; and the use of shared memory is mainly in The caching of response data after the request is processed will be explained in a later article. This article mainly explains the working principles of the first three parts.
According to the above division, the management of shared memory can be mainly divided into three parts (the use of shared memory will be explained later). The following is a schematic diagram of the processing flow of these three parts:
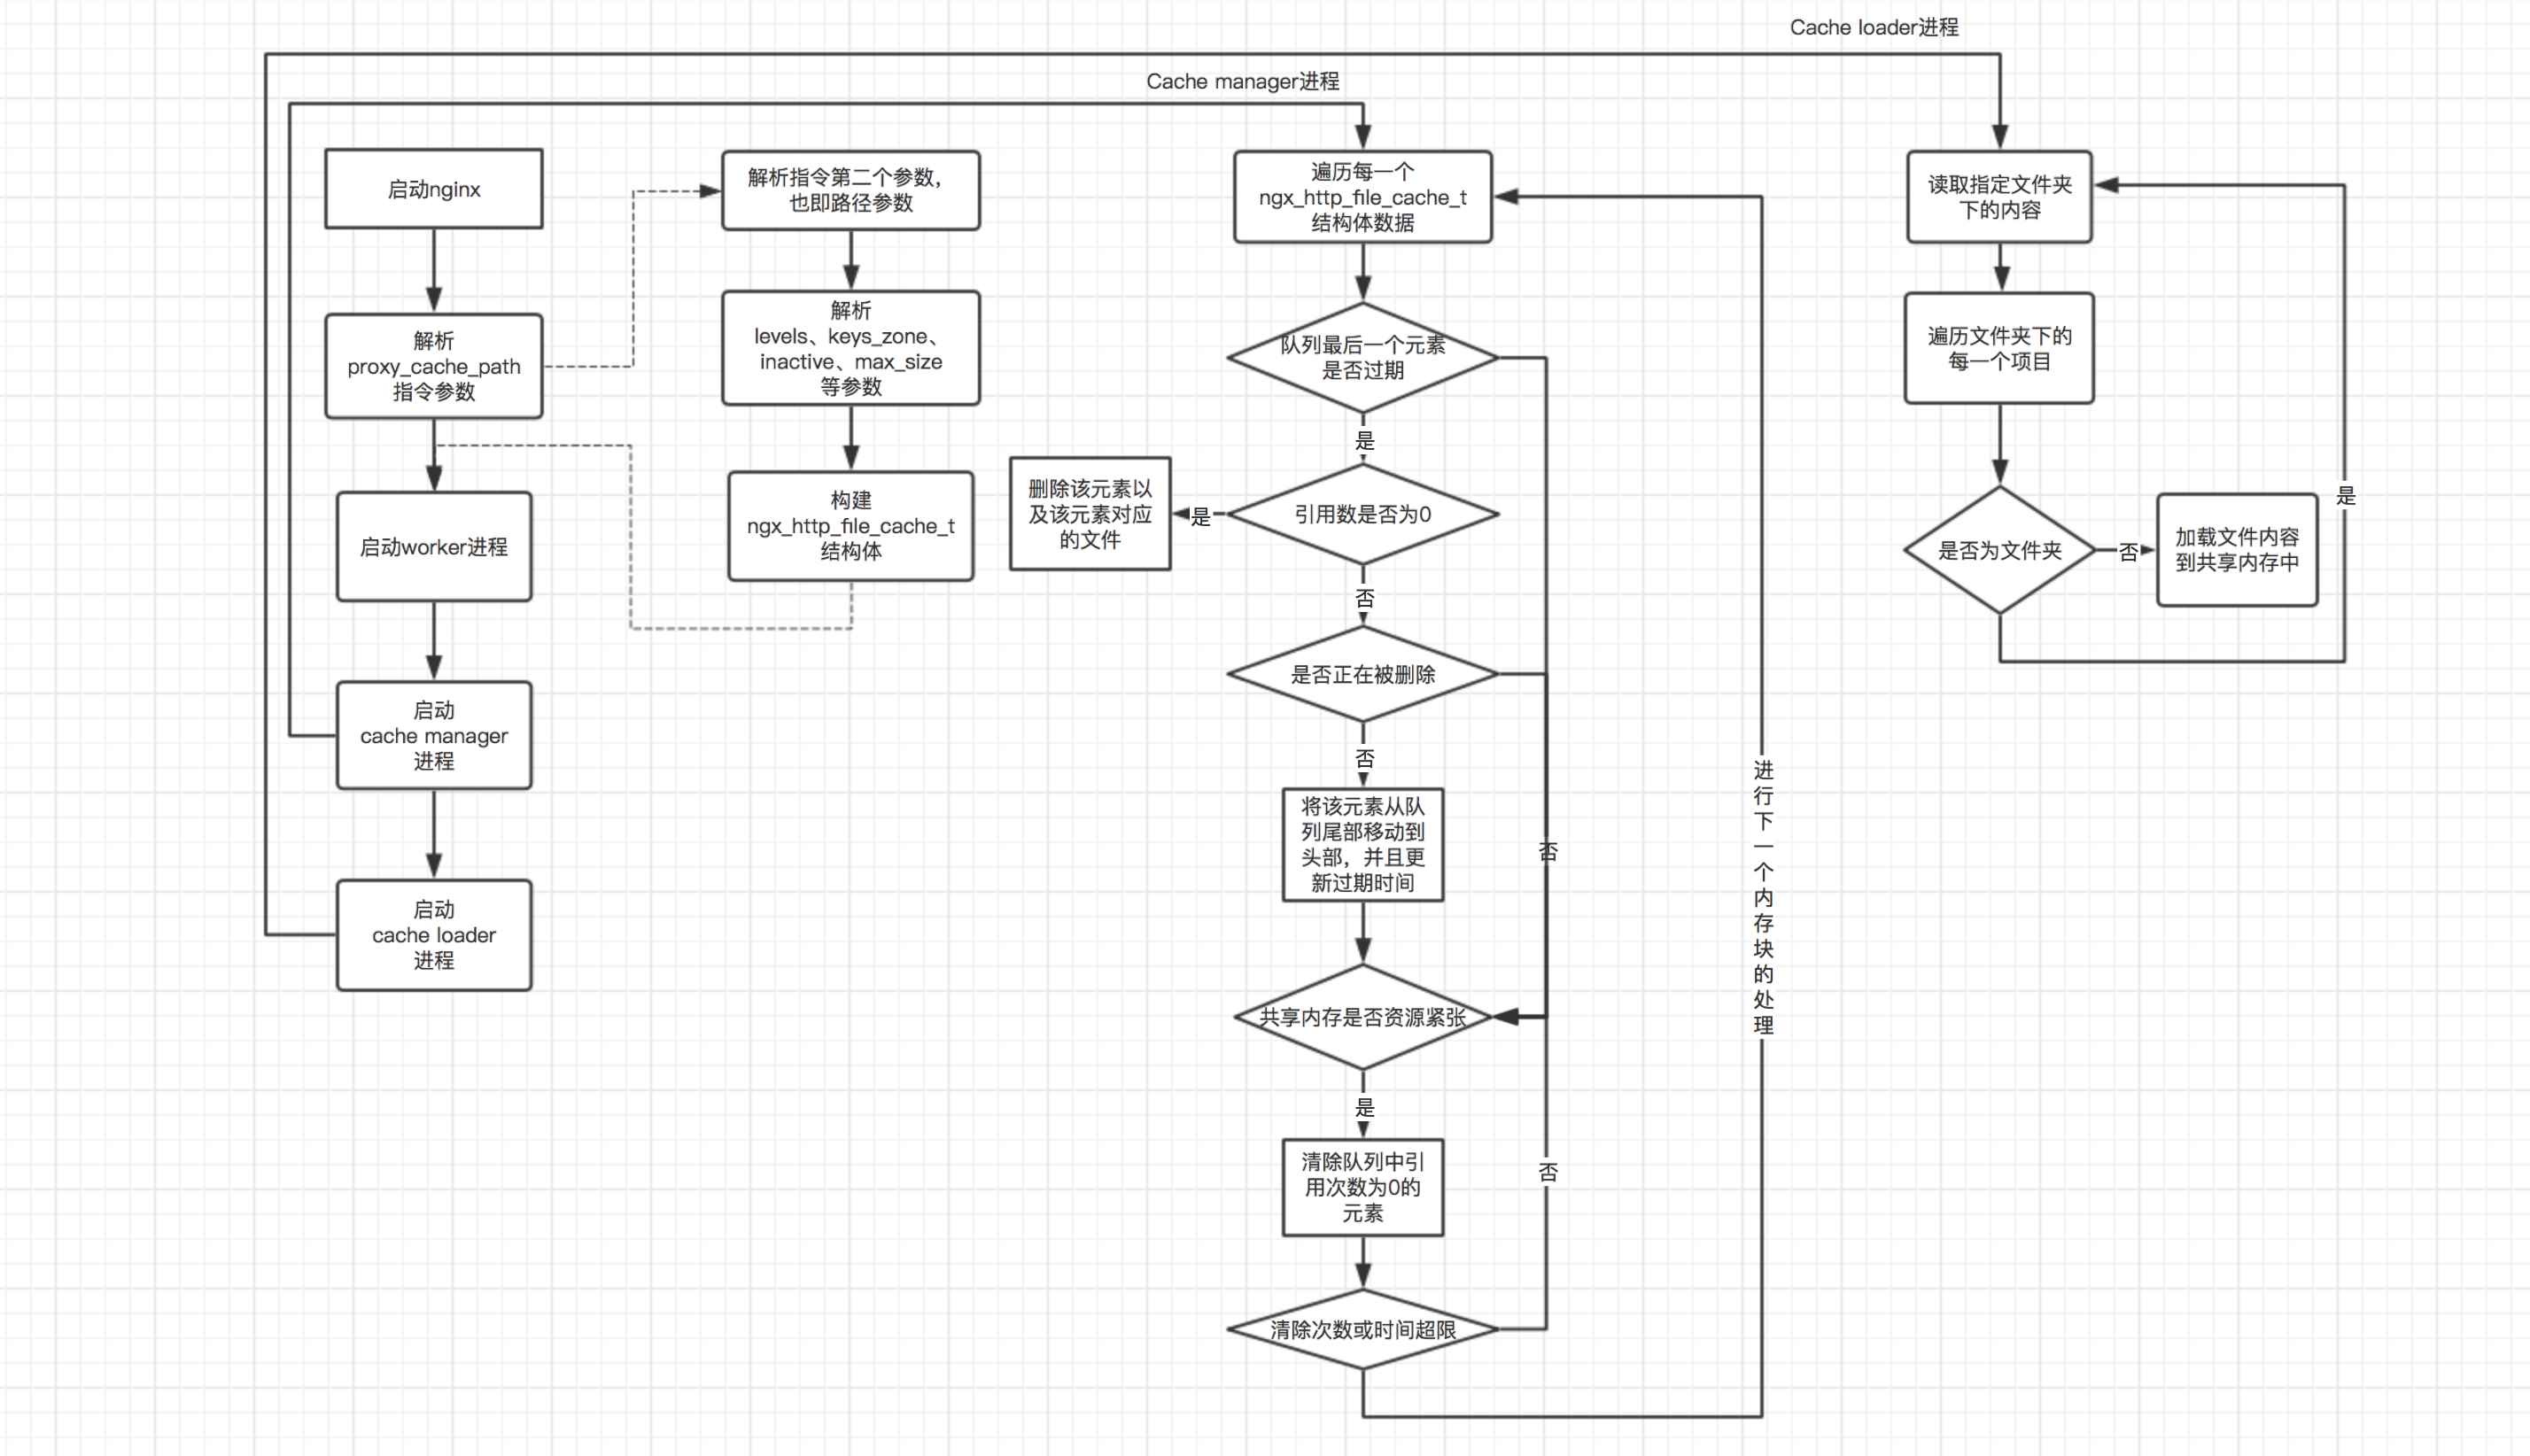
As can be seen from the above flow chart, in the main process, the proxy_cache_path instruction and startup are mainly analyzed. The cache manager process and the work of starting the cache loader process. In the cache manager process, the main work is divided into two parts: 1. Check whether the element at the end of the queue has expired. If it expires and the reference number is 0, delete the element and the file corresponding to the element; 2. Check whether the current shared memory Resources are tight. If resources are tight, delete all elements and their files with a reference number of 0, regardless of whether they are expired. In the processing flow of the cache loader process, it mainly recursively traverses the files in the directory where the files are stored and its subdirectories, and then loads these files into the shared memory. It should be noted that the cache manager process will enter the next cycle after traversing all shared memory blocks each time, while the cache loader process will be executed once 60 seconds after nginx is started, and then the process will exit.
3. Source code interpretation
3.1 proxy_cache_path directive analysis
For the parsing of each nginx instruction, an ngx_command_t structure is defined in the corresponding module. There is a set method in the structure that specifies the method used to parse the current instruction. The following is the definition of the ngx_command_t structure corresponding to proxy_cache_path:
1 2 3 4 5 6 7 8 9 10 |
|
As you can see, the parsing method used by this instruction is ngx_http_file_cache_set_slot(). Here we read the source code of this method directly:
1 2 3 4 5 6 7 8 9 10 11 12 13 14 15 16 17 18 19 20 21 22 23 24 25 26 27 28 29 30 31 32 33 34 35 36 37 38 39 40 41 42 43 44 45 46 47 48 49 50 51 52 53 54 55 56 57 58 59 60 61 62 63 64 65 66 67 68 69 70 71 72 73 74 75 76 77 78 79 80 81 82 83 84 85 86 87 88 89 90 91 92 93 94 95 96 97 98 99 100 101 102 103 104 105 106 107 108 109 110 111 112 113 114 115 116 117 118 119 120 121 122 123 124 125 126 127 128 129 130 131 132 133 134 135 136 137 138 139 140 141 142 143 144 145 146 147 148 149 150 151 152 153 154 155 156 157 158 159 160 161 162 163 164 165 166 167 168 169 170 171 172 173 174 175 176 177 178 179 180 181 182 183 184 185 186 187 188 189 190 191 192 193 194 195 196 197 198 199 200 201 202 203 204 205 206 207 208 209 210 211 212 213 214 215 216 217 218 219 220 221 222 223 224 225 226 227 228 229 230 231 232 233 234 235 236 237 238 239 240 241 242 243 244 245 246 247 248 249 250 251 252 253 254 255 256 257 258 259 260 261 262 263 264 265 266 267 268 269 270 271 272 273 274 275 276 277 278 279 280 281 282 283 284 285 286 287 288 289 290 291 292 293 294 295 296 297 298 299 300 301 302 303 304 305 306 307 308 309 310 311 312 313 314 315 316 317 318 319 320 321 322 323 324 325 326 327 328 329 330 331 332 333 334 335 336 337 338 339 340 341 342 343 344 345 346 347 348 349 350 351 352 353 354 355 356 357 358 359 360 361 362 363 364 365 366 |
|
As can be seen from the above code, in the proxy_cache_path method, an ngx_http_file_cache_t structure is mainly initialized. Each attribute in the structure is determined by parsing each parameter of proxy_cache_path.
3.2 Starting cache manager and cache loader processes
nginx程序的入口方法是nginx.c的main()方法,如果开启了master-worker进程模式,那么最后就会进入ngx_master_process_cycle()方法,该方法首先会启动worker进程,以接收客户端的请求;然后会分别启动cache manager和cache loader进程;最后进入一个无限循环中,以处理用户在命令行向nginx发送的指令。如下是cache manager和cache loader进程启动的源码:
1 2 3 4 5 6 7 8 9 10 11 12 13 14 15 |
|
对于cache manager和cache loader进程的启动,可以看到,其主要是在ngx_start_cache_manager_processes()方法中,如下是该方法的源码:
1 2 3 4 5 6 7 8 9 10 11 12 13 14 15 16 17 18 19 20 21 22 23 24 25 26 27 28 29 30 31 32 33 34 35 36 37 38 39 40 41 42 43 44 45 46 47 48 49 50 51 52 53 54 55 56 57 58 59 60 61 62 63 |
|
上面的代码其实比较简单,首先检查是否有任何一个路径指定了使用cache manager或者cache loader,如果有,则启动对应的继承,否则是不会创建cache manager和cache loader进程的。而启动这两个进程所使用的方法都是:
1 2 3 4 5 6 7 8 9 |
|
这里的ngx_spawn_process()方法的作用主要是创建一个新的进程,该进程创建之后就会执行第二个参数所指定的方法,并且执行该方法时传入的参数是这里第三个参数所指定的结构体对象。观察上面两个启动进程的方式,其在新进程创建之后所执行的方法都是ngx_cache_manager_process_cycle(),只不过调用该方法时传入的参数不一样,一个是ngx_cache_manager_ctx,另一个则是ngx_cache_loader_ctx。这里我们首先看一下这两个结构体的定义:
1 2 3 4 5 6 7 8 9 10 11 12 |
|
可以看到,这两个结构体主要是分别定义了cache manager和cache loader两个进程的不同行为。下面我们来看一下ngx_cache_manager_process_cycle()方法是如何调用这两个方法的:
1 2 3 4 5 6 7 8 9 10 11 12 13 14 15 16 17 18 19 20 21 22 23 24 25 26 27 28 29 30 31 32 33 34 35 36 37 38 39 40 41 42 43 44 45 46 47 48 49 50 51 52 53 54 55 56 57 |
|
上面的代码中,首先创建了一个事件对象,ev.handler = ctx->handler;指定了该事件所需要处理的逻辑,也即上面两个结构体中的第一个参数所对应的方法;然后将该事件添加到事件队列中,即ngx_add_timer(&ev, ctx->delay);,需要注意的是,这里的第二个参数就是上面两个结构体中所指定的第三个参数,也就是说这里是以事件的延迟时间的方式来控制hander()方法的执行时间的;最后,在一个无限for循环中,通过ngx_process_events_and_timers()方法来不断检查事件队列的事件,并且处理事件。
3.3 cache manager进程处理逻辑
对于cache manager处理的流程,通过上面的讲解可以看出,其是在其所定义的cache manager结构体中的ngx_cache_manager_process_handler()方法中进行的。如下是该方法的源码:
1 2 3 4 5 6 7 8 9 10 11 12 13 14 15 16 17 18 19 20 21 22 23 24 25 26 27 |
|
这里首先会获取所有的路径定义,然后检查其manager()方法是否为空,如果不会空,则调用该方法。这里的manager()方法所指向的实际方法就是在前面3.1节中对proxy_cache_path指令进行解析中进行定义的,也即cache->path->manager = ngx_http_file_cache_manager;,也就是说该方法是管理cache的主要方法。在调用完了管理方法之后,接下来会继续将当前的事件添加到事件队列中,以进行下一次cache管理循环。如下是ngx_http_file_cache_manager()方法的源码:
1 2 3 4 5 6 7 8 9 10 11 12 13 14 15 16 17 18 19 20 21 22 23 24 25 26 27 28 29 30 31 32 33 34 35 36 37 38 39 40 41 42 43 44 45 46 47 48 49 50 51 52 53 54 55 56 57 58 59 60 61 62 63 64 65 66 67 68 69 70 71 72 73 74 75 76 77 78 79 80 81 82 83 84 85 86 87 88 89 90 91 92 93 |
|
在ngx_http_file_cache_manager()方法中,首先会进入ngx_http_file_cache_expire()方法,该方法的主要作用是检查当前共享内存队列尾部的元素是否过期,如果过期,则根据其引用次数和是否正在被删除而判断是否需要将该元素以及该元素对应的磁盘文件进行删除。在进行这个检查之后,然后会进入一个无限for循环,这里循环的主要目的是检查当前的共享内存是否资源比较紧张,也即是否所使用的内存超过了max_size定义的最大内存,或者是当前所缓存的文件总数超过了总文件数的7/8。如果这两个条件有一个达到了,就会尝试进行强制清除缓存文件,所谓的强制清除就是删除当前共享内存中所有被引用数为0的元素及其对应的磁盘文件。这里我们首先阅读ngx_http_file_cache_expire()方法:
1 2 3 4 5 6 7 8 9 10 11 12 13 14 15 16 17 18 19 20 21 22 23 24 25 26 27 28 29 30 31 32 33 34 35 36 37 38 39 40 41 42 43 44 45 46 47 48 49 50 51 52 53 54 55 56 57 58 59 60 61 62 63 64 65 66 67 68 69 70 71 72 73 74 75 76 77 78 79 80 81 82 83 84 85 86 87 88 89 90 91 92 93 94 95 96 97 98 99 100 101 102 103 104 105 106 107 108 109 110 111 112 113 114 115 116 117 118 119 120 121 |
|
可以看到,这里的主要处理逻辑是首先会火嘴队列尾部的元素,根据lru算法,队列尾部的元素是最有可能过期的元素,因而只需要检查该元素即可。然后检查该元素是否过期,如果没有过期,则退出当前方法,否则检查当前元素是否引用数为0,也就是说如果当前元素已经过期,并且引用数为0,则直接删除该元素及其对应的磁盘文件。如果当前元素引用数不为0,则会检查其是否正在被删除,需要注意的是,如果一个元素正在被删除,那么删除进程是会将其引用数置为1的,以防止其他的进程也进行删除操作。如果其正在被删除,则当前进程不会处理该元素,如果没有被删除,则当前进程会尝试将该元素从队列尾部移动到队列头部,这么做的主要原因在于,虽然元素已经过期,但是其引用数不为0,并且没有进程正在删除该元素,那么说明该元素还是一个活跃元素,因而需要将其移动到队列头部。
下面我们来看一下,当资源比较紧张时,cache manager是如何强制清除元素的,如下是ngx_http_file_cache_forced_expire()方法的源码:
1 2 3 4 5 6 7 8 9 10 11 12 13 14 15 16 17 18 19 20 21 22 23 24 25 26 27 28 29 30 31 32 33 34 35 36 37 38 39 40 41 42 43 44 45 46 47 48 49 50 51 52 53 54 55 56 57 58 59 60 61 62 63 |
|
可以看到,这里的处理逻辑比较简单,主要是从队列尾部开始往前依次检查队列中的元素的引用次数是否为0,如果为0,则直接删除,然后检查下一个元素。如果不为0,则检查下一个元素,如此往复。这里需要注意的是,如果检查总共有20次元素正在被引用过程中,则跳出当前循环。
3.4 cache loader进程处理逻辑
前面已经讲到,cache loader的主要处理流程在ngx_cache_loader_process_handler()方法中,如下是该方法的主要处理逻辑:
1 2 3 4 5 6 7 8 9 10 11 12 13 14 15 16 17 18 19 20 21 22 23 24 25 |
|
这里cache loader与cache manager的处理主流程是非常相似的,主要是通过调用各个路径的loader()方法进行数据加载的,而loader()方法的具体实现方法也是在proxy_cache_path配置项解析的时候定义的,具体的定义如下(在3.1节最后一部分):
cache->path->loader = ngx_http_file_cache_loader;
这里我们继续阅读ngx_http_file_cache_loader()方法的源码:
1 2 3 4 5 6 7 8 9 10 11 12 13 14 15 16 17 18 19 20 21 22 23 24 25 26 27 28 29 30 31 32 33 34 35 36 37 38 39 40 41 42 43 44 45 46 47 48 49 50 51 |
|
在加载过程中,首先将目标加载目录封装到一个ngx_tree_ctx_t结构体中,并且为其指定加载文件所使用的方法。最终的加载逻辑主要是在ngx_walk_tree()方法中进行的,而整个加载过程也是通过递归来实现的。如下是ngx_walk_tree()方法的实现原理:
1 2 3 4 5 6 7 8 9 10 11 12 13 14 15 16 17 18 19 20 21 22 23 24 25 26 27 28 29 30 31 32 33 34 35 36 37 38 39 40 41 42 43 44 45 46 47 48 49 50 51 52 53 54 55 56 57 58 59 60 61 62 63 64 65 66 67 68 69 70 71 72 73 74 75 76 77 78 79 80 81 82 83 84 85 86 87 88 89 90 91 92 93 94 95 96 97 98 99 100 101 102 103 104 105 106 107 108 109 110 111 112 113 114 115 116 117 118 119 120 121 122 123 124 125 126 127 128 129 130 131 132 133 134 135 136 137 138 139 140 141 142 143 144 145 146 147 148 149 150 151 152 153 154 155 156 157 158 159 160 161 162 163 164 165 166 167 168 169 170 171 172 173 174 175 176 177 178 179 180 181 182 183 184 185 186 187 188 189 190 191 192 193 194 195 |
|
从上面的处理流程可以看出,真正的加载文件的逻辑在ngx_http_file_cache_manage_file()方法中,如下是该方法的源码:
1 2 3 4 5 6 7 8 9 10 11 12 13 14 15 16 17 18 19 20 21 22 23 24 25 26 27 28 29 30 31 32 33 |
|
这里的加载逻辑整体而言比较简单,主要过程就是将该文件加载到共享内存中,并且会判断加载的文件数量是否超限,如果超限了,则会休眠指定的时长;另外,也会判断加载文件的总耗时是否超过了指定时长,如果超过了,也会休眠指定的时长。
The above is the detailed content of Analysis of nginx shared memory mechanism examples. For more information, please follow other related articles on the PHP Chinese website!


![[Web front-end] Node.js quick start](https://img.php.cn/upload/course/000/000/067/662b5d34ba7c0227.png)


