

Fix: Extended volume grayed out on Windows 11

You will receive a low disk space warning on your Windows 11 PC when there is not enough storage space to save a new program or install a new update on a specific drive.
In this case, the option to expand the volume comes in handy. There are many ways you can easily expand your drive and create additional storage space on it.
However, several Windows 11 users have reported that the Extend Volume option is grayed out in the Disk Management console for them.
This will restrict users from continuing to expand the volume and get rid of low disk space warnings on Windows 11 PCs.
If you are also one of the users who are facing grayed out Extend Volume option on Windows 11, then you are at the right place.
Because this tutorial lists all the effective solutions that you can follow and possibly solve the problem. Let’s look at the solutions one by one.
Why is the Extend Volume option grayed out in the Windows 11 Disk Management console?
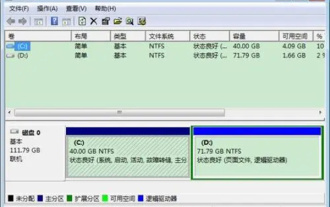
You open the Disk Management console to fix low storage space on your disk drive, only to find that the Extend Volume option is grayed out in Windows 11. This can be really frustrating.
Just like any other Windows 11 issue, there could be multiple reasons or one specific reason why this option is grayed out or unavailable to you.
- This may be because the partition you want to extend is in FAT or FAT32 format. Microsoft only allows the expand volume option for NTFS partitions in the Disk Management console.
- There is no adjacent unallocated space behind the primary partition you want to extend.
- Also, this issue may pop up if there is no unallocated space available in any other dynamic disk.
- MBR partitions cannot be expanded beyond 2 TB.
One of the above mentioned reasons might be one of the reasons triggering the issue and the Extended Volume option has been disabled in Windows 11 PC.
The good thing is that you can easily fix this problem with the below mentioned solutions and then expand the volume without any difficulty.
How to fix grayed out Extended Volume option in Windows 11?
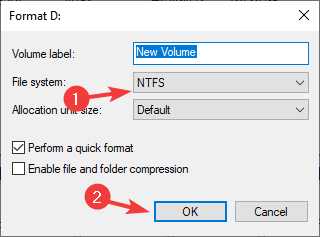
1. Convert FAT to NTFS
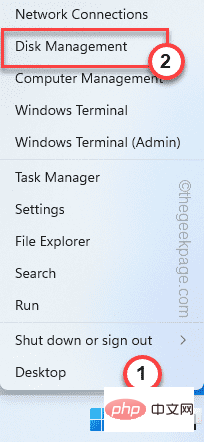
- Open the Start menu.
- Search Disk Management and open it.
- Right-click the drive and select Format.

- Under File System, select NTFS.
- Click OK. Do not change any other settings.
- Click OK again to confirm the operation.
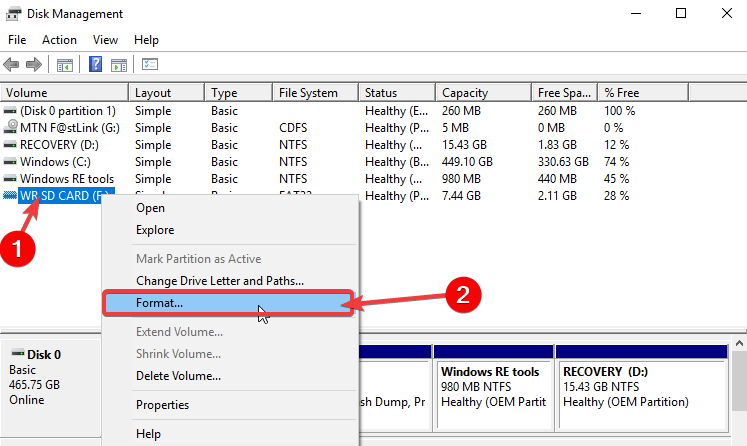
This will initiate the conversion of FAT to NTFS format. Once the formatting is complete, you can go ahead and try to see if the extend volume option is available.
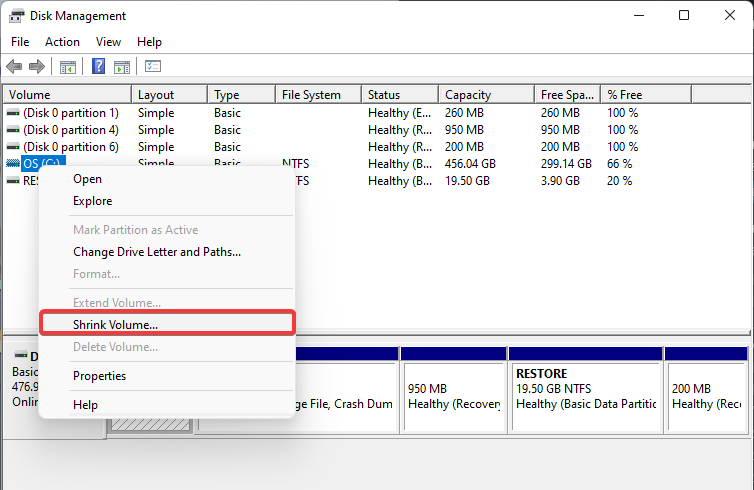
2. Delete adjacent volumes
- Open the Start menu.
- Search Disk Management and open it.
- Right-click on the disk drive and select Delete Volume from the context menu.
- Click Yes on the confirmation dialog box.
- The volume will be deleted and is now available as Unallocated.
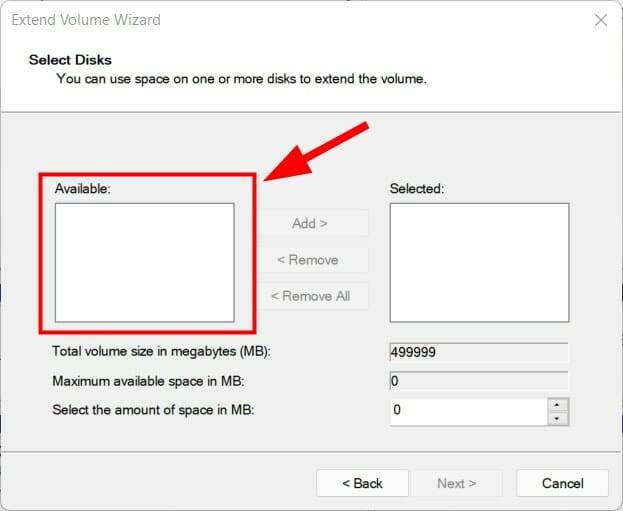
- Right-click the volume you want to extend and select Extend Volume.
- Select the number of disks in the Available section and click Add.
- Click Next.
- The wizard will start the expansion process.
- Click FinishClose the disk management tool.
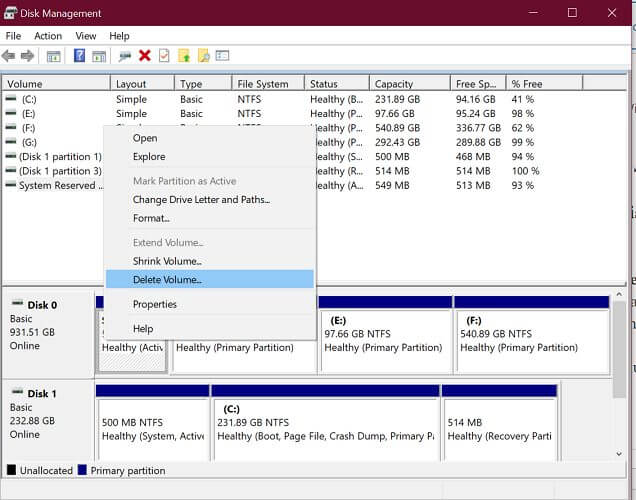
Now, after deleting the volume and adding unallocated space to the volume, you will be able to see the Extend Volume option fully working.
3. Expand to external disk

Notes Once a disk is converted to dynamic, you will not be able to restore this option because the disk cannot be converted back to a basic disk. You need to completely reformat the disk before you can convert it again.
- Shut down your PC and connect the external hard drive.
- Open the Start menu.
- Search Disk Management and open it.
- The new hard drive will be connected. Right-click on the disk with partitions and select Convert to Dynamic Disk.
- Check the box next to the correct disk and click OK.
- ClickConvert.
- Click to confirm the operation. The hard drive will now be converted to dynamic.
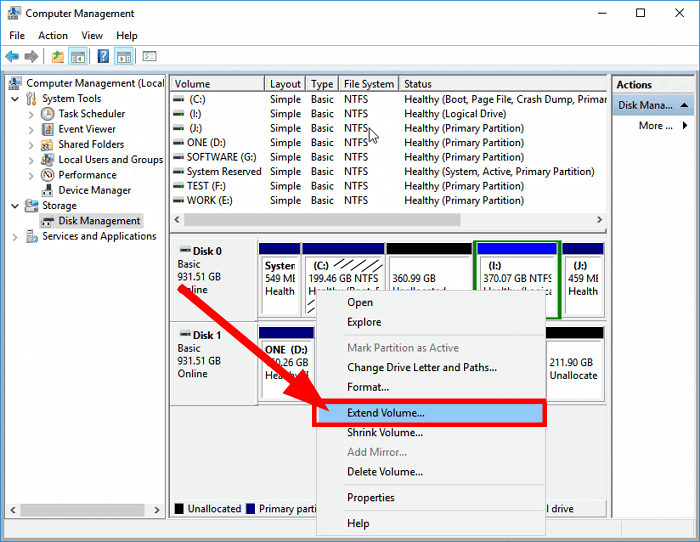
- Right-click the volume you want to extend and select
- Extend Volume. Select the number of disks in the Available section and click
- Add. Click
- Next. On the last screen, click
- Finish.

- to open the
- Start menu. Search
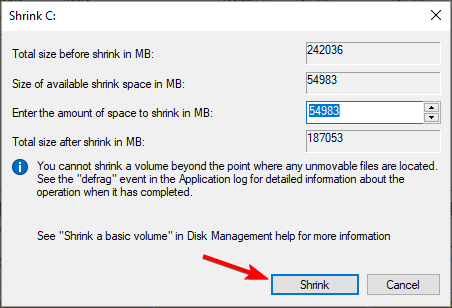
- Disk Management and open it. Right-click on a disk drive that has enough space and select
- Shrink Volume. Enter the amount of space you wish to shrink.
- Click
- shrink. Select
- OK to confirm. Right-click the volume you want to extend and select
- Extend Volume. Select the number of disks in the Available section and click
- Add. Click
- Next. On the last screen, click
- Finish.
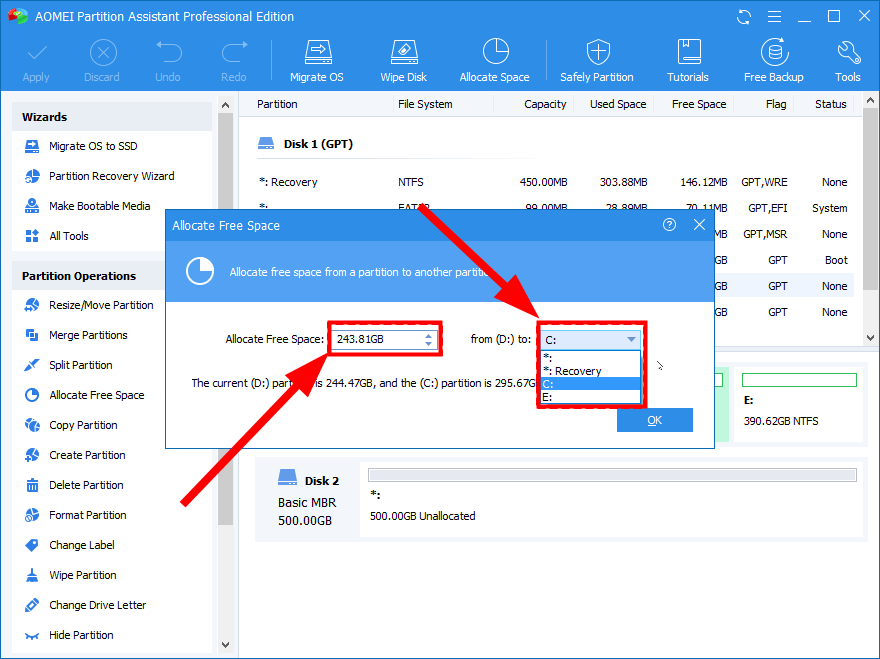
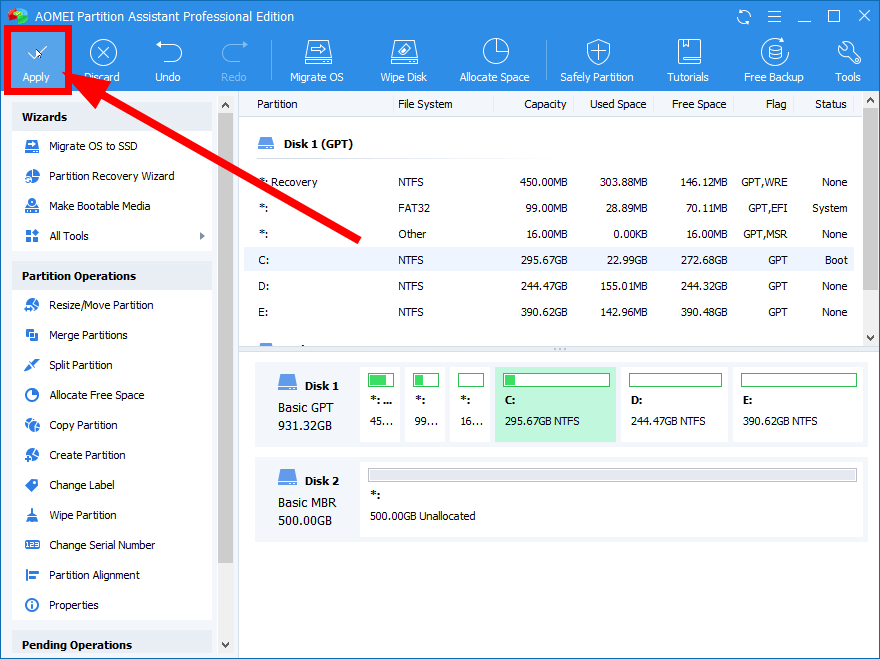
- Download
- AOMEI Partition Assistant. to install the software on your PC.
- Open
- AOMEI Partition Assistant. Right-click a drive that has enough free space and select
- Allocateavailable space. Specify the space size and select the target partition.
- Click
- OK. Select Continue and click the
- Apply button at the top.
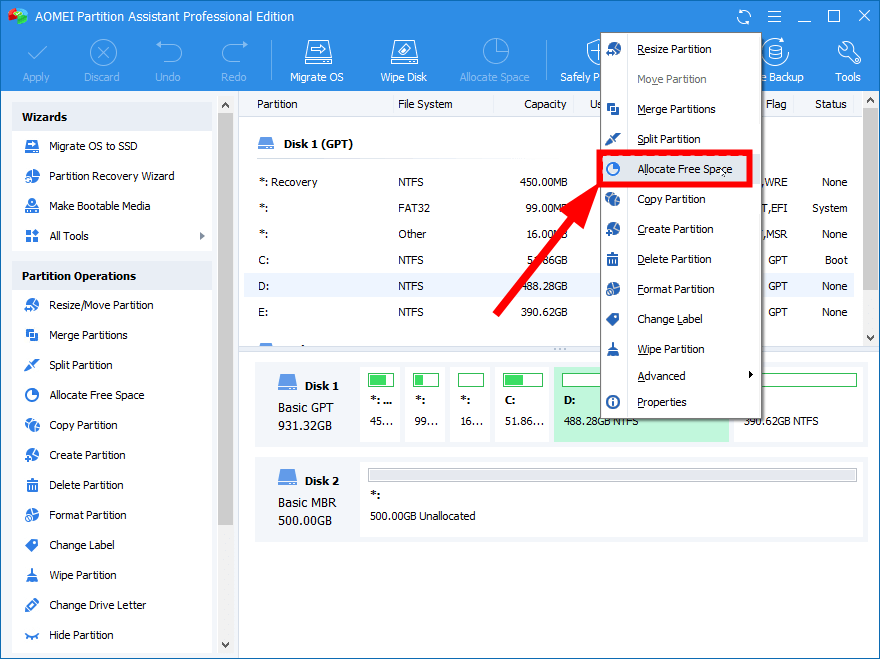
AOMEI Partition Assistant is one of the trustworthy third-party tools that can help you manage different tasks related to disk management on your Windows 11 PC.
The tool comes with many features, including the option to easily expand, shrink or merge partitions in just a few clicks. All this happens without any data loss. What can I do to prevent the disk drive from becoming full on my Windows 11 PC? It's important to keep your PC with plenty of storage space available to ensure it runs properly and has enough space to install new applications. There are several ways to prevent your disk drive from becoming full.➡ Check for viruses and malware
A PC with viruses or malware will generate useless files and occupy storage space. In this case, it is necessary to check for viruses or malware and remove them from your PC.
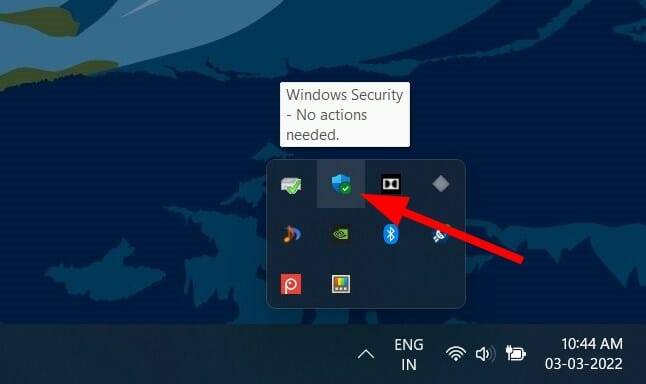
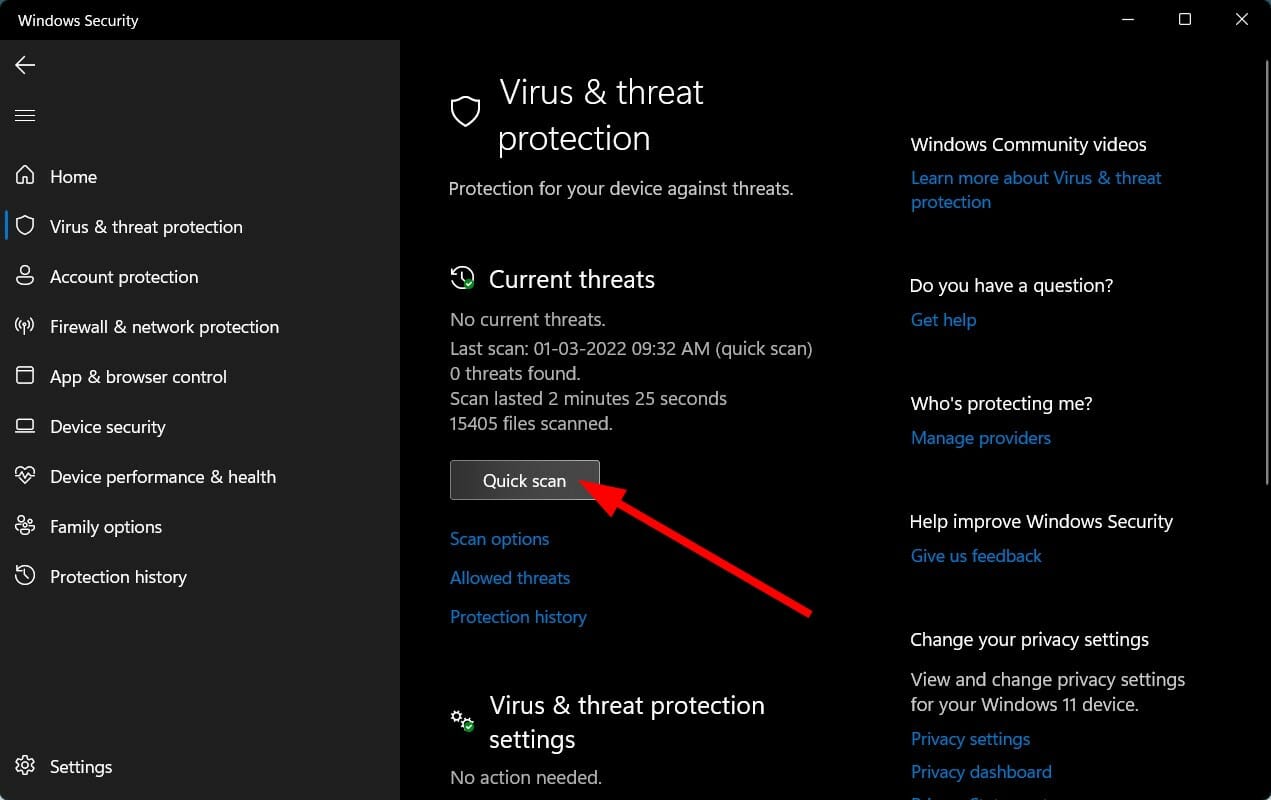
- Click the Up Arrow button on the taskbar in the lower right corner.
- Select Windows Security.
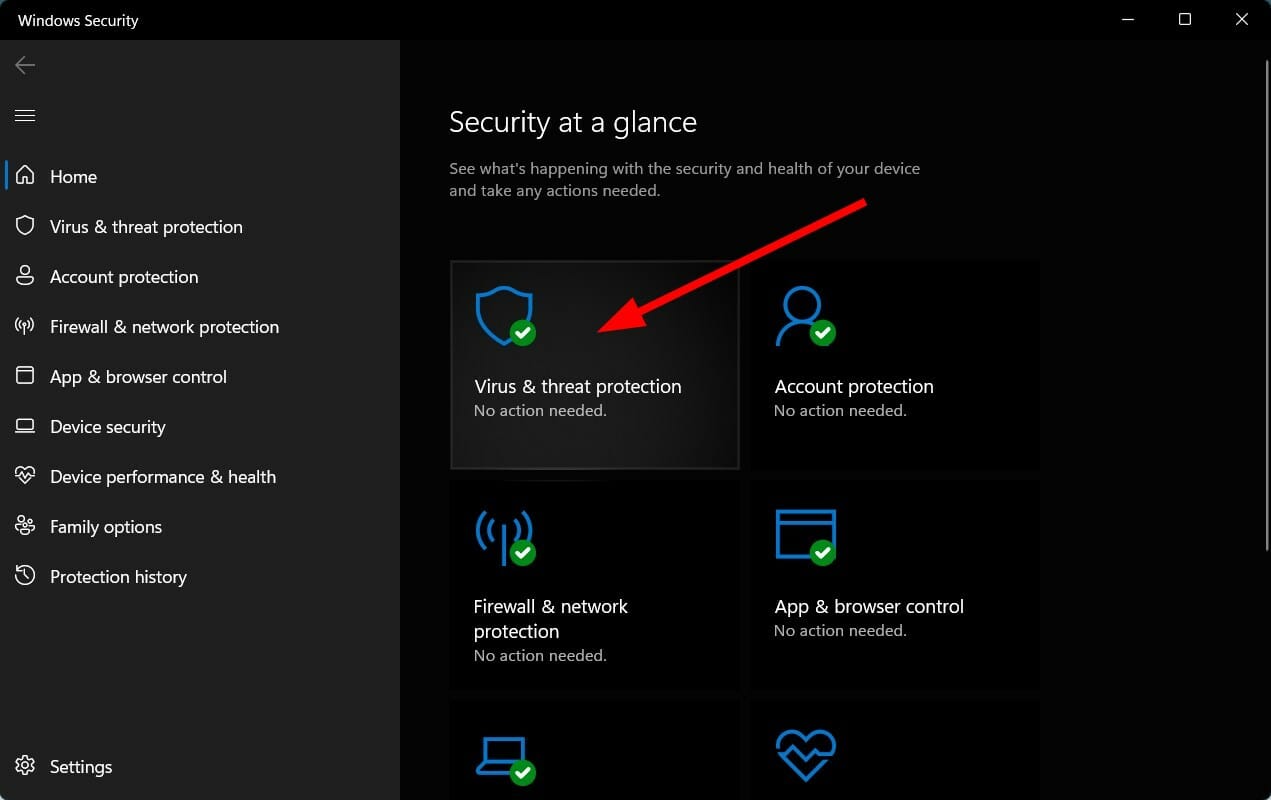
- Select Virus and Threat Protection.
- Click the Quick Scan button.
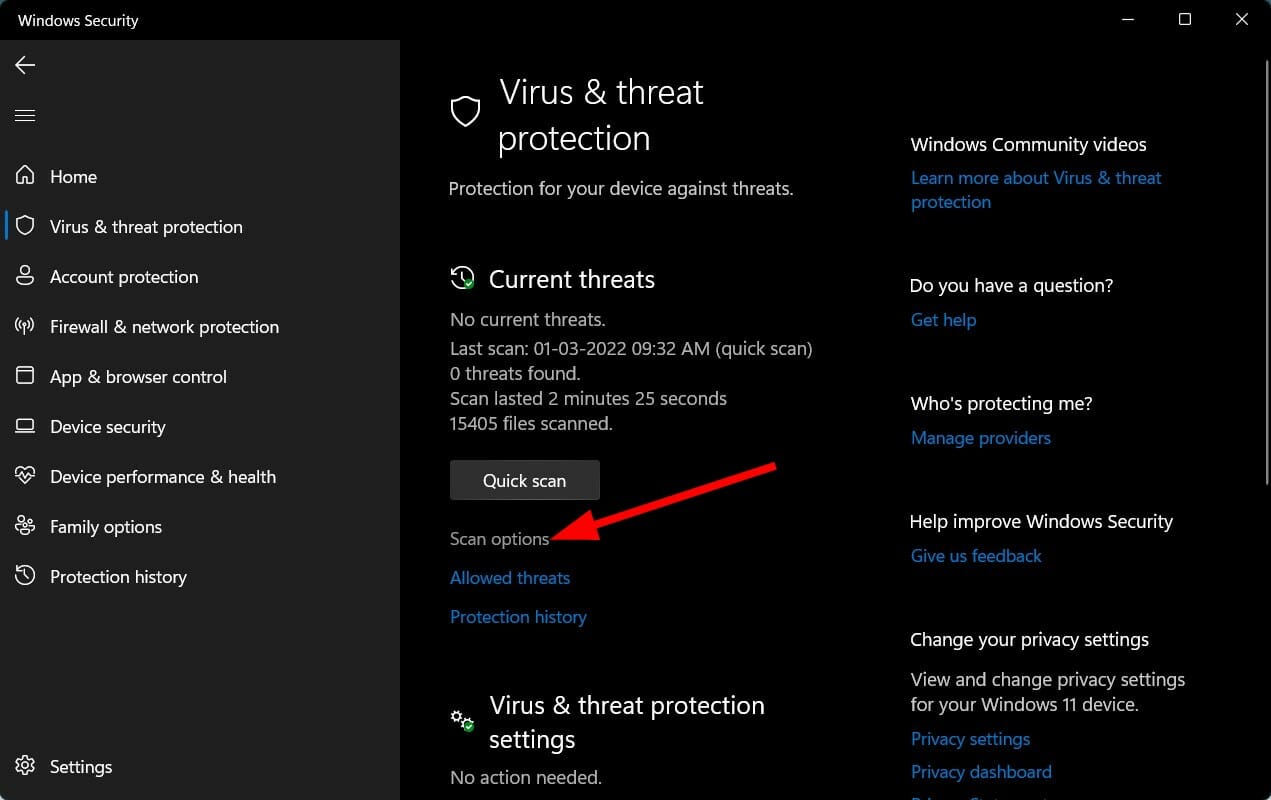
- Alternatively, you can select the Scan Options button.
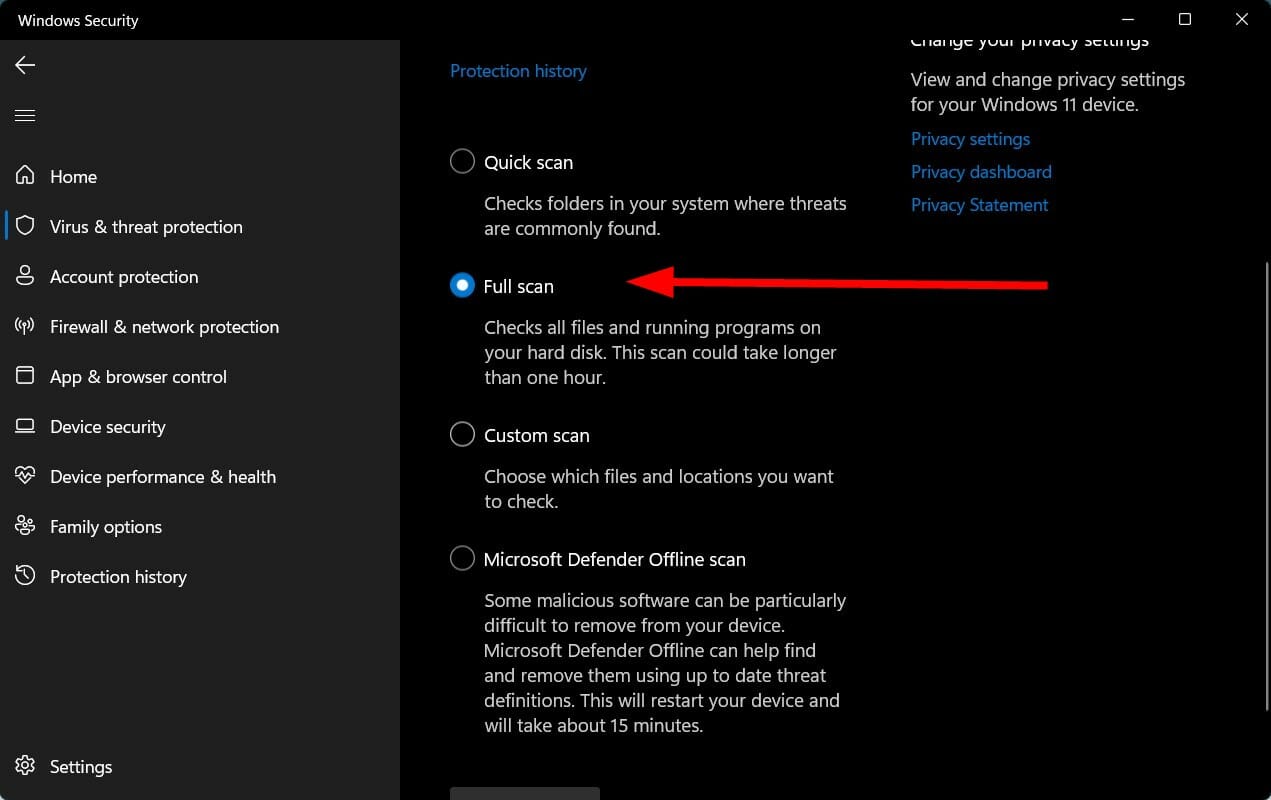
- Under Scan Options, select Full Scan to deeply scan your PC for viruses or malware.

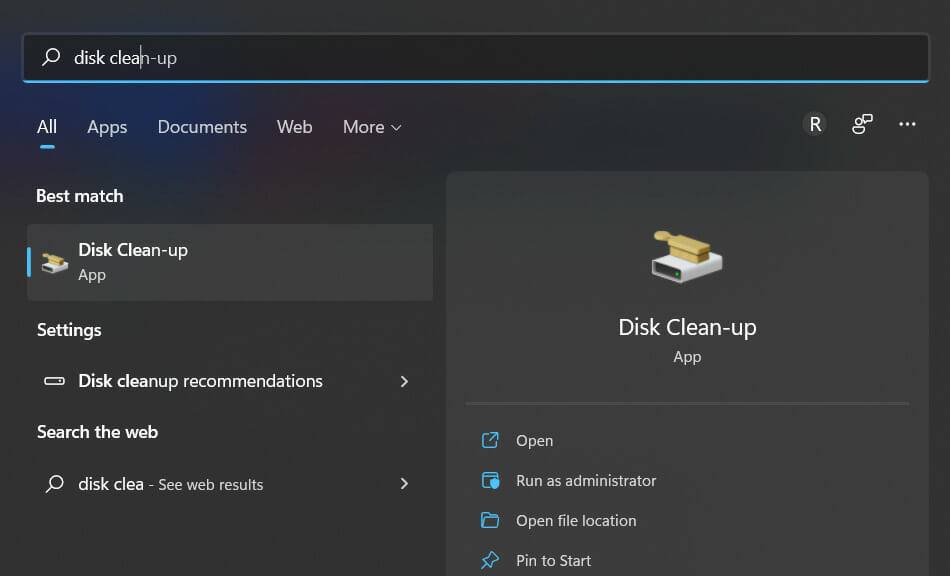
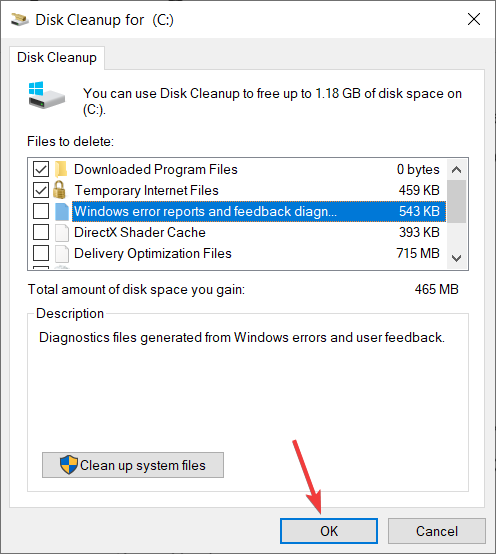
➡ Run Disk Cleanup
The Disk Cleanup tool is a great way to clear all unnecessary files from your disk storage.
- Open the Start menu.
- Search Disk Cleanup and open it.
- SelectC drive from the drop-down menu.
-
Check all the boxes you want to delete.
- You will be asked to confirm.
- Click the OK button.
➡ Repair Disk Drive
If the disk drive has errors and the file system is corrupted then it will also show you that your hard drive has been corrupted for no reason. Fill up.
To resolve this issue, you can use the Chkdsk command in Command Prompt.
- Open Command Prompt.
- Type the following command and press Enter:
chkdsk C: /f /r /x - Once the process is complete, enter the following command and press Enter:
DISM.exe /Online /Cleanup-image /Restorehealth - You will see the "Operation completed successfully" message.
- Restart your computer.
➡ Move large files to another drive
If you have multiple large files on your disk drive, then we recommend that you move them to on another drive with enough space.
Additionally, you can transfer all your large files to an external hard drive and save PC space for more important files.
The above solutions will help you fix grayed out Extended Volume option on Windows 11 PC.
The above is the detailed content of Fix: Extended volume grayed out on Windows 11. For more information, please follow other related articles on the PHP Chinese website!

Hot AI Tools

Undresser.AI Undress
AI-powered app for creating realistic nude photos

AI Clothes Remover
Online AI tool for removing clothes from photos.

Undress AI Tool
Undress images for free

Clothoff.io
AI clothes remover

Video Face Swap
Swap faces in any video effortlessly with our completely free AI face swap tool!

Hot Article
Hot Tools

Notepad++7.3.1
Easy-to-use and free code editor

SublimeText3 Chinese version
Chinese version, very easy to use

Zend Studio 13.0.1
Powerful PHP integrated development environment

Dreamweaver CS6
Visual web development tools

SublimeText3 Mac version
God-level code editing software (SublimeText3)
Hot Topics
 1387
1387
 52
52

 Ubuntu system disk partition scheme design and practical experience sharing
Feb 12, 2024 pm 02:54 PM
Ubuntu system disk partition scheme design and practical experience sharing
Feb 12, 2024 pm 02:54 PM
As an open source operating system, Ubuntu is very popular on both servers and personal computers. Disk partitioning is a very important step when installing Ubuntu. A reasonable disk partitioning scheme can improve the performance and stability of the system, and at the same time To better manage data and files, this article will share some experience in the design and practice of Ubuntu system disk partitioning scheme, and how to partition the disk on Ubuntu20.04. Ubuntu20.04 disk partition Ubuntu20.04 is the latest long-term support version, which introduces many new features and improvements. Before doing disk partitioning, we first need to understand some basic concepts. 1. Primary partition and extended partition: The primary partition is used to install
 win11 disk partition tutorial
Jan 10, 2024 am 08:57 AM
win11 disk partition tutorial
Jan 10, 2024 am 08:57 AM
Sometimes the system's default partition cannot meet our needs. At this time, we need to manually partition the win11 disk. We only need to open the disk manager to easily modify the partition. How to partition a win11 disk: 1. First, right-click "This Computer" and open Computer "Management" 2. Then enter "Disk Management" under the storage option on the left 3. Then check the disk status on the right to see if there is available space. (If there is free space, skip to step 6) 4. If there is no free space, right-click the disk with space and select "Compress Volume" 5. Then select the amount of space that needs to be freed and click "Compress" 6. When the compression is completed The available space will appear. Right-click it and select "New Simple Volume" 7. Then enter the desired simple volume size and click "Next Page" 8.
 How to partition a disk with the partition tool diskgenius - How to partition a disk with the partition tool diskgenius
Mar 06, 2024 am 10:16 AM
How to partition a disk with the partition tool diskgenius - How to partition a disk with the partition tool diskgenius
Mar 06, 2024 am 10:16 AM
I believe that all the users here are familiar with the partitioning tool diskgenius, but do you know how to partition the disk with the partitioning tool diskgenius? The following article will bring you the method of partitioning the disk with the partitioning tool diskgenius. Let us take a look below. Insert the USB boot disk into the USB interface of the computer, restart the computer, and then continue to press the corresponding computer startup shortcut key (the startup shortcut keys of different computers may be different, you can check according to the keys prompted by the computer's normal startup or the official website) . Then select the USB boot disk in the startup options and press the Enter key to confirm the selection. The steps are as above. 2. Select [02] on the u start main menu interface to run u start win8pe defense.
 How to partition on Debian 12
Mar 21, 2024 pm 10:01 PM
How to partition on Debian 12
Mar 21, 2024 pm 10:01 PM
In Debian12, there are various graphical and command line tools available for partitioning disks. This article will introduce some common tools that you can use to partition storage devices (such as hard drives/SSDs) on Debian12. These tools provide flexibility and control, allowing you to easily manage disk space according to your needs. With these tools, you can effectively divide disk space, create partitions for different purposes, and ensure the security and reliability of your data. Whether you prefer graphical interface or command line operation, Debian12 provides suitable tools to allow you to perform disk partitioning operations according to your preferences and needs. Content topic: Debian12’s common disk partitioning program uses GNOME Disk
![System Reserved Partition Not Showing in Disk Management [Quick Recovery]](https://img.php.cn/upload/article/000/465/014/168376632735495.jpg?x-oss-process=image/resize,m_fill,h_207,w_330) System Reserved Partition Not Showing in Disk Management [Quick Recovery]
May 11, 2023 am 08:52 AM
System Reserved Partition Not Showing in Disk Management [Quick Recovery]
May 11, 2023 am 08:52 AM
Is the system reserved partition not showing up in Disk Management on Windows 10/11 devices? The System Reserved Partition, or SRP, is a small partition on your hard drive that stores Windows startup information. If the files are deleted in some way, operating system startup problems may occur. Usually, this problem occurs if the partition size is less than 600MB. The system reserved partition is available in Disk Management because Windows does not assign a drive letter to it. Therefore, unlike other drives, it will not be visible in File Explorer. Things can get serious if you delete the system reserved partition from Disk Management. If this happens, users may be unable to update Windows to
 6 Ways to Turn on Disk Management on Windows 11
May 02, 2023 pm 04:25 PM
6 Ways to Turn on Disk Management on Windows 11
May 02, 2023 pm 04:25 PM
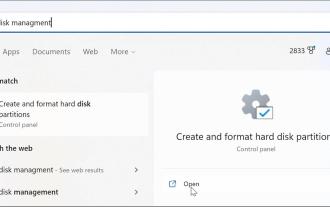
Need to quickly partition a new drive or change a drive letter on Windows 11? You need to use disk management. Here's how to launch it on a Windows 11 PC. If you want to create and resize partitions, initialize hard drives, change drive letters, etc. on Windows 11, you need to use the Disk Management tool. You can use this tool in a variety of ways, as well as open it. If you want to speed up your workflow, here are six different ways to turn on Disk Management in Windows 11. 1. Search for Disk Management To avoid clicking through menus, you can search for Disk Management and open it directly. To open Disk Management using the search bar in the Start menu, use the following steps: Click Start
 Where is win7 disk management?
Feb 29, 2024 pm 02:22 PM
Where is win7 disk management?
Feb 29, 2024 pm 02:22 PM
Many users must have found that their memory is a bit too much and is almost full, so they want to know where the disk management is performed, so let's take a look at where the disk management is in the win7 system. Where is win7 disk management? 1. Click the windoes button, find "Control Panel" and click it. 2. The next step will be to find and click on the “Administrative Tools” option. 3. Here, you need to double-click and enable the "Computer Management" function, which will display a comprehensive management window. 4. Next, please click on the "Storage" category item listed on the left side of the window. 5. Then click "Disk Management" further, so that subsequent operations can be carried out smoothly.
 Fix: New SSD not showing up in Windows 11, 10
Apr 14, 2023 pm 02:52 PM
Fix: New SSD not showing up in Windows 11, 10
Apr 14, 2023 pm 02:52 PM
SSDs have revolutionized the world of technology. These data storage solutions, with their ultra-fast and unparalleled read/write speeds, make every user eager to install their system operating system in them. But what if your new SSD doesn’t show up on your Windows device? This is a typical issue you might face with a brand new SSD plugged into your system. Don't worry. We just got the right solution, all you have to do is follow these steps and your SSD will be back in your File Explorer in no time. Solution - 1. Check the SSD connection. If you are using a USB hub, connect the SSD directly to your system. Check the SSD's connectors for any physical defects.