How to disable display scaling for high DPI settings in Windows 11 or 10
The default display scaling feature is the most important part of the Windows operating system and is fully implemented in Windows 10 or later. But sometimes, this feature of certain apps can cause compatibility issues, unreadable text, blurry logos, and ultimately, app crashes. Processing content above 2160p resolution will cause a lot of trouble. There are many ways to disable the default display scaling feature on high DPI settings. We've selected the best ones and detailed step-by-step instructions for each process.
How to disable display scaling on high DPI settings
There is a way, all you have to do is disable high DPI scaling for a single application, and there is a way to do it across Windows Disable it.
Disabling high DPI settings for individual applications
Way - 1 Disabling high DPI individually
You must disable high DPI scaling only for conflicting applications.
NOTE – For example, we used Adobe Photoshop CC 2015. We will disable high DPI settings for this app only.
1. Press the Windows key and enter " Adobe Photoshop " (in your case, just enter the name of the application).
2. Then, right-click on the application and click "Open file location".
This should lead you to the location of the executable file.
[If it does direct you to the shortcut file, right-click the shortcut file again and click "Open file location." ]

#3. Once you find the main executable file, right-click on it and click "Properties".
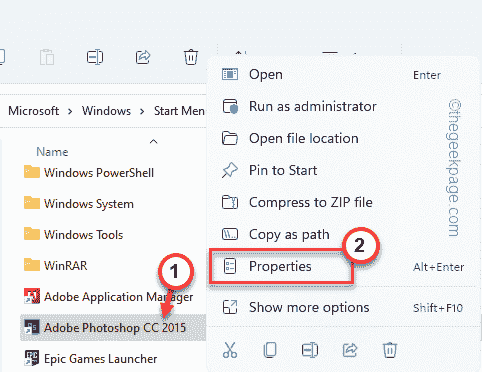
4. Then, go to the "Compatibility" section.
5. Here, click on "Change high DPI settings".
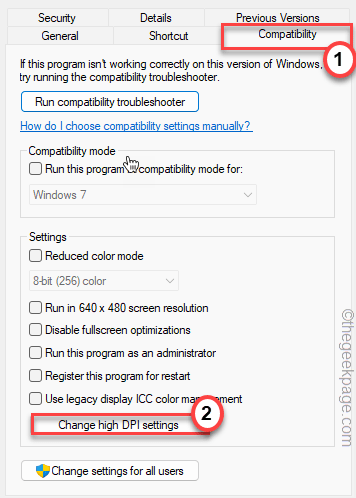
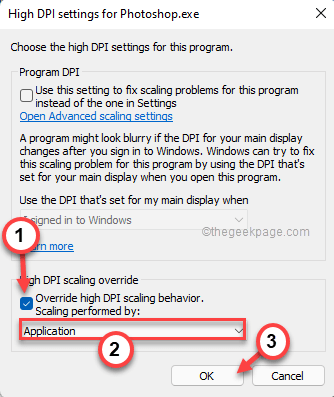
#6. Next, go to the High DPI Scale Override settings.
7. Then, just check the "Override high DPI scaling behavior. Scale execution: " box.
8. Set the drop-down menu to "Application".
[
The DPI scaling executor has three options.
Application - The application will prioritize scaling the display itself.
System – This is the default Windows behavior.
System (Enhancement) - Use this feature to allow Windows to enhance menus and text.
]
9. Finally, click “OK”.
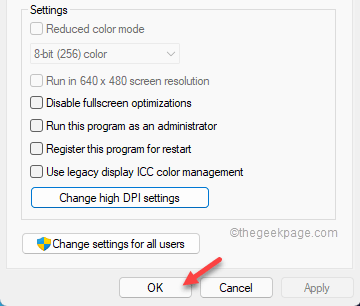
10. Return to the original properties window and click "Apply" and "Confirm".
When finished, open the app again and check the zoom behavior again.
Method 2 - Using the Registry Editor
There is no clear way to stop the high DPI scaling feature other than disabling the scaling feature. You can adjust the registry and create separate manifest files for problematic applications.
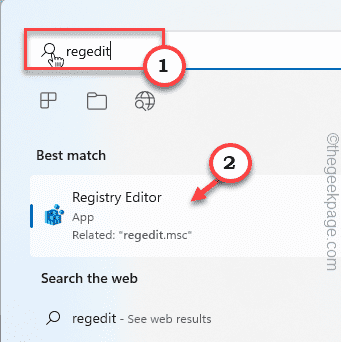
1. Enter "regedit" in the search bar.
2. Then, click on “Registry Editor” to access it.
NOTE -
You should always make a registry backup before making any changes to the registry. Just follow these steps -
. After opening the Registry Editor, click "File" and "Export".
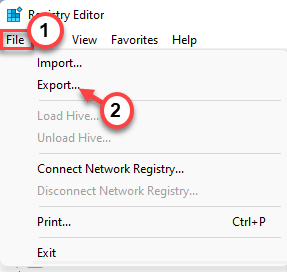
Bay. Then, name this backup and save it in a safe place.
You can use this backup to restore the registry if any problems occur.
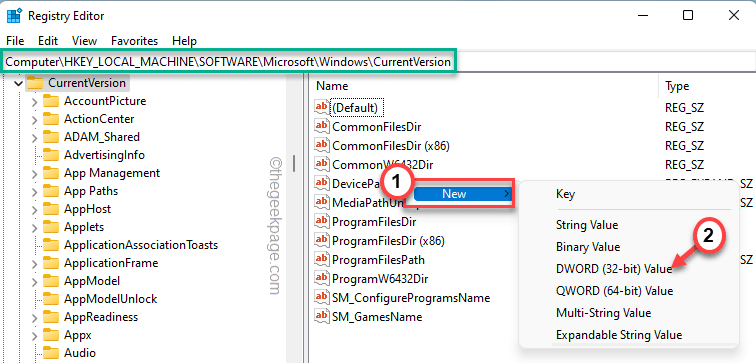
3. When the Registry Editor opens, navigate in this way -
HKEY_LOCAL_MACHINE\SOFTWARE\Microsoft\Windows\CurrentVersion
4. Now, in the right pane, right-click on the space and click on " New>" and "DWORD (32-bit) Value" to create a new value.
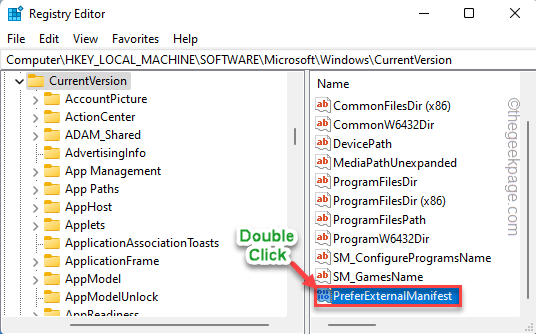
5. Then name this new value " PreferExternalManifest ".
6. Finally, double-click the value to set it.
7. 现在,将值设置为“ 1 ”。
8. 然后,单击“确定”保存更改。
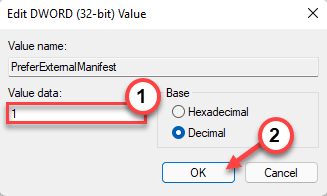
关闭注册表编辑器。
9. 打开记事本。
10. 在空白的记事本页面中,复制粘贴以下行。
false
11. 现在,点击“文件”和“另存为... ”。
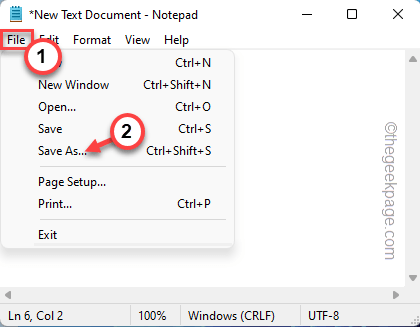
12. 在“文件名:”框中,写入可执行文件名,并在记事本文件名的末尾附加“ .mainfest ”。
[
示例 – 假设您在使用 photoshop.exe 时遇到了这个问题。所以,这个记事本文件的名字应该是——“ photoshop.exe.manifest ”。
]
13. 将“文件类型:”设置为“所有文件”。
14. 然后,导航到桌面。
15. 最后,点击“保存”保存文件。
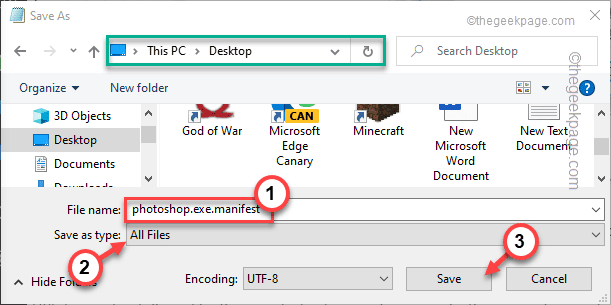
之后,关闭记事本屏幕。
16. 最后,将这个新的清单文件移动到您遇到此问题的应用程序的根目录中。
[
示例– 在我们的例子中,我们必须将“ photoshop.exe.manifest ”文件移动到 photoshop.exe 的根文件夹,即 –
C:\程序文件\Adobe
]
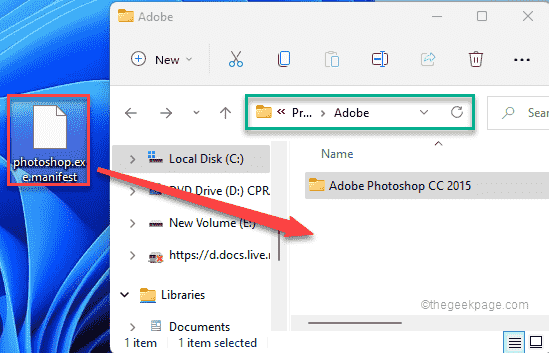
之后,关闭文件资源管理器。
现在,尝试打开应用程序并检查文本是否看起来很模糊。
方式 3 – 使用 DPI AWARENESS ENABLER
如果您不喜欢为每个显示模糊文本的应用程序生成清单文件,您可以使用 DPI Awareness Enabler。
1. 下载DPI Awareness Enabler。
2. 下载完成后,解压“ DPI Awareness Enabler ”文件。
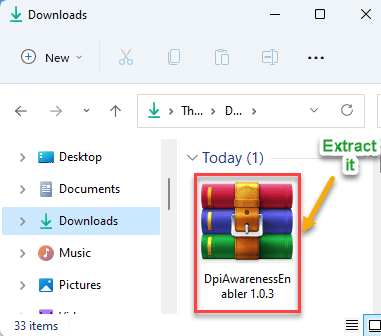
3. 解压后,右键单击“ DpiAwarenessEnabler ”应用程序,然后点击“以管理员身份运行”以运行该应用程序。
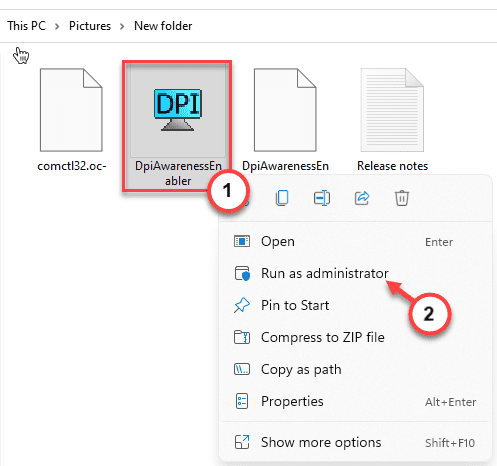
4.让应用检测所有应用的列表。
5. 然后,从上方的框中选择应用程序。然后,将应用程序从上框向下拖动到下框。
这将关闭下框中所有应用程序的高 DPI 设备功能。
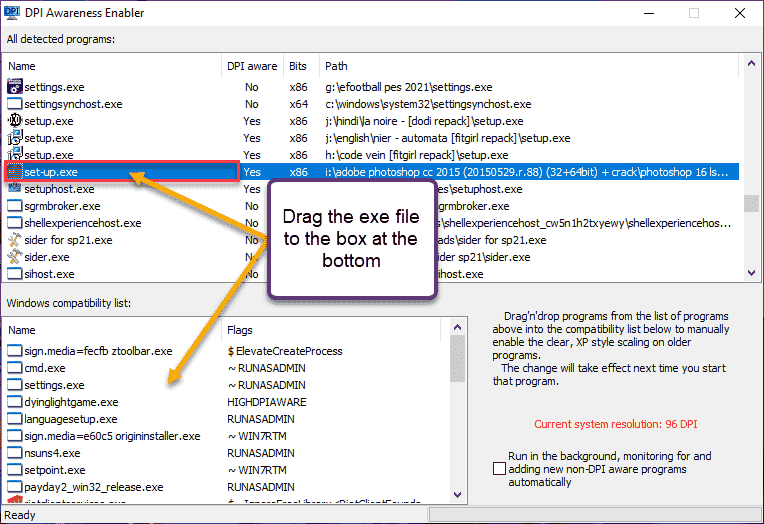
就是这样!因此,通过这种方式,您只需在 DpiAwarenessEnabler 应用程序中拖放 exe 文件即可轻松禁用高 DPI 功能。
过程 2 – 禁用整个系统的高 DPI
还有另一种方法可以禁用整个系统的高 DPI 设置。
方式 1 - 使用设置
1.首先,同时按下 Windows键+I 键。
2. 然后,点击“系统”设置。
3. 之后,在右侧窗格中,单击“显示”设置。
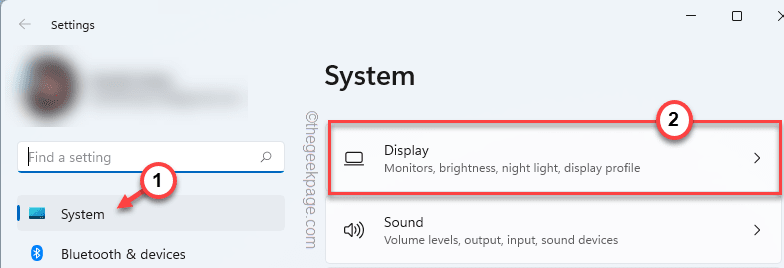
显示设置将可见。
4. 在右侧,点击“缩放”选项。*
5. 现在,您可以从下拉列表中切换计数。
在您的系统上启动应用程序并检查。
您的屏幕将关闭一次并再次出现。现在,最小化设置,然后启动有问题的应用程序。
如果这解决了问题,您无需执行任何进一步的步骤。
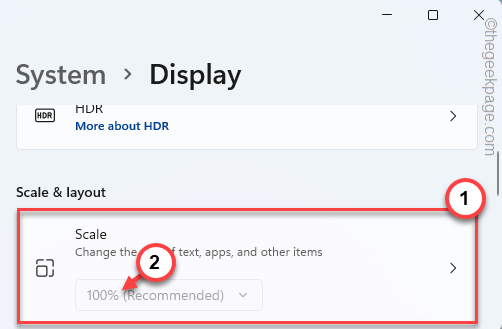
*注意——
如果您看到下拉列表显示为灰色并且您无法修改缩放比例,请按照以下步骤操作。
1. 点击“缩放”设置中的箭头按钮。

2. Here you will find the Custom Zoom box.
You can write anything between 100-500. [Example - Let's say you want 125% scaling, just type " 125 " in the box. ]
3. When finished, click on the Scale line to apply custom scaling.
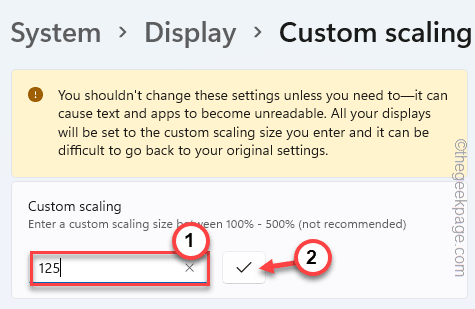
You must log out of your account to perform custom scaling.
4. Just click "Exit now" to exit the machine.
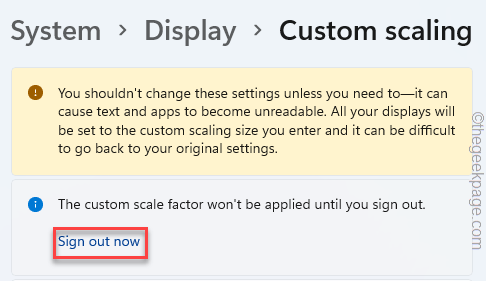
You will be automatically logged out of your current account. You just need to log back into the system and test the application.
The above is the detailed content of How to disable display scaling for high DPI settings in Windows 11 or 10. For more information, please follow other related articles on the PHP Chinese website!

Hot AI Tools

Undresser.AI Undress
AI-powered app for creating realistic nude photos

AI Clothes Remover
Online AI tool for removing clothes from photos.

Undress AI Tool
Undress images for free

Clothoff.io
AI clothes remover

AI Hentai Generator
Generate AI Hentai for free.

Hot Article

Hot Tools

Notepad++7.3.1
Easy-to-use and free code editor

SublimeText3 Chinese version
Chinese version, very easy to use

Zend Studio 13.0.1
Powerful PHP integrated development environment

Dreamweaver CS6
Visual web development tools

SublimeText3 Mac version
God-level code editing software (SublimeText3)

Hot Topics
 CUDA's universal matrix multiplication: from entry to proficiency!
Mar 25, 2024 pm 12:30 PM
General Matrix Multiplication (GEMM) is a vital part of many applications and algorithms, and is also one of the important indicators for evaluating computer hardware performance. In-depth research and optimization of the implementation of GEMM can help us better understand high-performance computing and the relationship between software and hardware systems. In computer science, effective optimization of GEMM can increase computing speed and save resources, which is crucial to improving the overall performance of a computer system. An in-depth understanding of the working principle and optimization method of GEMM will help us better utilize the potential of modern computing hardware and provide more efficient solutions for various complex computing tasks. By optimizing the performance of GEMM
 Huawei's Qiankun ADS3.0 intelligent driving system will be launched in August and will be launched on Xiangjie S9 for the first time
Jul 30, 2024 pm 02:17 PM
On July 29, at the roll-off ceremony of AITO Wenjie's 400,000th new car, Yu Chengdong, Huawei's Managing Director, Chairman of Terminal BG, and Chairman of Smart Car Solutions BU, attended and delivered a speech and announced that Wenjie series models will be launched this year In August, Huawei Qiankun ADS 3.0 version was launched, and it is planned to successively push upgrades from August to September. The Xiangjie S9, which will be released on August 6, will debut Huawei’s ADS3.0 intelligent driving system. With the assistance of lidar, Huawei Qiankun ADS3.0 version will greatly improve its intelligent driving capabilities, have end-to-end integrated capabilities, and adopt a new end-to-end architecture of GOD (general obstacle identification)/PDP (predictive decision-making and control) , providing the NCA function of smart driving from parking space to parking space, and upgrading CAS3.0
 How to Adjust Logitech Driver DPI Settings
Jan 17, 2024 pm 01:30 PM
The Logitech driver adjusts the dpi of the mouse according to the needs of different users to provide the same comfortable experience. Because each user's needs are different, dpi needs to be adjusted individually to meet their needs. How to adjust dpi in Logitech driver: 1. First, users need to open the Logitech driver on the official website and bind the device. 2. After the first step is completed, enter the "Settings" interface and select "Sensitivity" to set it. 3. Finally, use the sliding punctuation point to adjust the dpi speed on this interface.
 Which version of Apple 16 system is the best?
Mar 08, 2024 pm 05:16 PM
The best version of the Apple 16 system is iOS16.1.4. The best version of the iOS16 system may vary from person to person. The additions and improvements in daily use experience have also been praised by many users. Which version of the Apple 16 system is the best? Answer: iOS16.1.4 The best version of the iOS 16 system may vary from person to person. According to public information, iOS16, launched in 2022, is considered a very stable and performant version, and users are quite satisfied with its overall experience. In addition, the addition of new features and improvements in daily use experience in iOS16 have also been well received by many users. Especially in terms of updated battery life, signal performance and heating control, user feedback has been relatively positive. However, considering iPhone14
 Always new! Huawei Mate60 series upgrades to HarmonyOS 4.2: AI cloud enhancement, Xiaoyi Dialect is so easy to use
Jun 02, 2024 pm 02:58 PM
On April 11, Huawei officially announced the HarmonyOS 4.2 100-machine upgrade plan for the first time. This time, more than 180 devices will participate in the upgrade, covering mobile phones, tablets, watches, headphones, smart screens and other devices. In the past month, with the steady progress of the HarmonyOS4.2 100-machine upgrade plan, many popular models including Huawei Pocket2, Huawei MateX5 series, nova12 series, Huawei Pura series, etc. have also started to upgrade and adapt, which means that there will be More Huawei model users can enjoy the common and often new experience brought by HarmonyOS. Judging from user feedback, the experience of Huawei Mate60 series models has improved in all aspects after upgrading HarmonyOS4.2. Especially Huawei M
 What are the computer operating systems?
Jan 12, 2024 pm 03:12 PM
A computer operating system is a system used to manage computer hardware and software programs. It is also an operating system program developed based on all software systems. Different operating systems have different users. So what are the computer systems? Below, the editor will share with you what computer operating systems are. The so-called operating system is to manage computer hardware and software programs. All software is developed based on operating system programs. In fact, there are many types of operating systems, including those for industrial use, commercial use, and personal use, covering a wide range of applications. Below, the editor will explain to you what computer operating systems are. What computer operating systems are Windows systems? The Windows system is an operating system developed by Microsoft Corporation of the United States. than the most
 Differences and similarities of cmd commands in Linux and Windows systems
Mar 15, 2024 am 08:12 AM
Linux and Windows are two common operating systems, representing the open source Linux system and the commercial Windows system respectively. In both operating systems, there is a command line interface for users to interact with the operating system. In Linux systems, users use the Shell command line, while in Windows systems, users use the cmd command line. The Shell command line in Linux system is a very powerful tool that can complete almost all system management tasks.
 Detailed explanation of how to modify system date in Oracle database
Mar 09, 2024 am 10:21 AM
Detailed explanation of the method of modifying the system date in the Oracle database. In the Oracle database, the method of modifying the system date mainly involves modifying the NLS_DATE_FORMAT parameter and using the SYSDATE function. This article will introduce these two methods and their specific code examples in detail to help readers better understand and master the operation of modifying the system date in the Oracle database. 1. Modify NLS_DATE_FORMAT parameter method NLS_DATE_FORMAT is Oracle data


