
./configure --prefix=/usr/local/nginx --with-http_dav_module --with-http_stub_status_module --with-http_addition_module --with-http_sub_module --with-http_flv_module --with-http_mp4_module
 Operation and Maintenance
Nginx
How to use nginx to implement a load balancing cluster with dynamic and static separation
Operation and Maintenance
Nginx
How to use nginx to implement a load balancing cluster with dynamic and static separation
How to use nginx to implement a load balancing cluster with dynamic and static separation

1. Experimental environment
1.1 System and services
The operating system and services used this time:
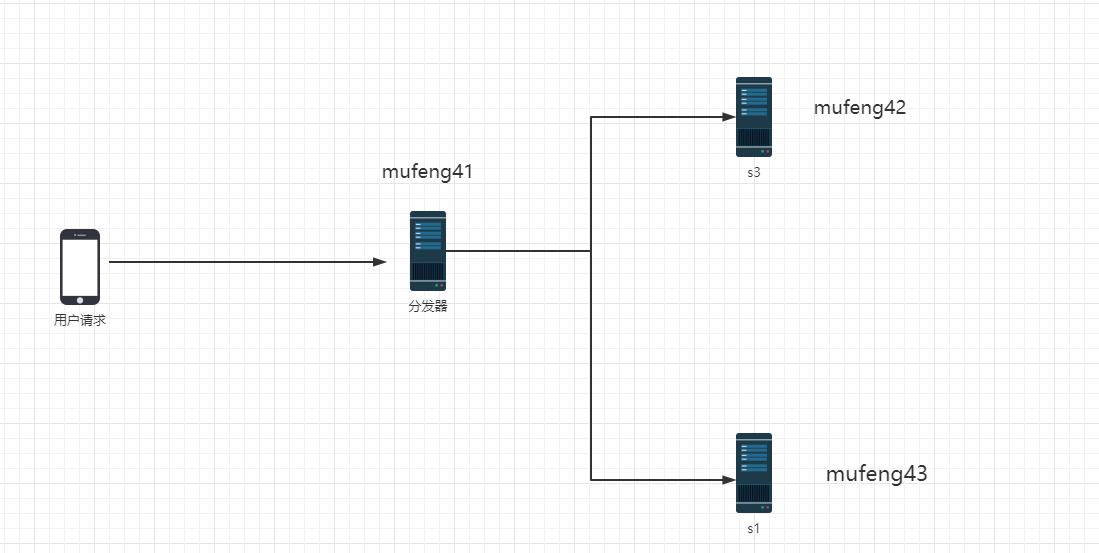
This experiment requires a total of 3 servers, one nginx is used as a load balancing distributor and a distributor for dynamic and static separation, and two apache servers are used as back-end servers. nginx is used to realize load balancing and static and dynamic separation of the two apache servers.
Operating system: centos7.6
nginx version: 1.22 version
apache version: 2.4.6 that comes with the system by default
php version: 5.4.16## that comes with the system by default
- Static file processing: You can use nginx or apache
- Dynamic file processing : apache, tomcat
- Image file processing: squid
1) Polling (default)
Every Requests are assigned to different backend servers one by one in chronological order. If the backend server goes down, it can be automatically eliminated.
2) weight
Specifies the polling probability, weight is proportional to the access ratio, and is used when the performance of the back-end server is uneven.
3) ip_hash
Each request is allocated according to the hash result of the accessed IP, so that each visitor has fixed access to a back-end server, which can solve the session problem.
4) air (third party)
Requests are allocated according to the response time of the backend server, and those with short response times are allocated first.
5) url_hash (third party)
Distribute requests according to the hash result of the accessed URL, so that the same URL is directed to the same back-end server. It is more effective when the back-end server is cached
[root@mufeng41 ~]#  yum -y install gcc gcc-c++ autoconf automake

[root@mufeng41 ~]# yum -y install zlib zlib-devel openssl openssl-devel pcre pcre-devel
Copy after login
When Mu Feng Xiaoyue did this step of installation, she forgot to mount the image, which wasted a lot. time, so you need to mount it in advance and configure the yum source. Upload the nginx compressed package and decompress it[root@mufeng41 ~]# yum -y install gcc gcc-c++ autoconf automake [root@mufeng41 ~]# yum -y install zlib zlib-devel openssl openssl-devel pcre pcre-devel
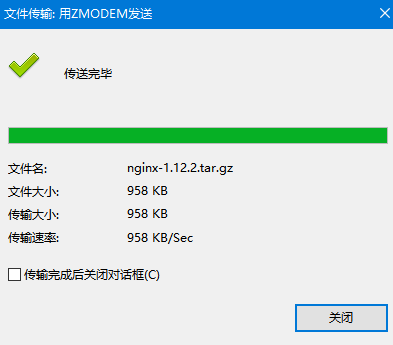
[root@mufeng41 ~]# ll nginx-1.12.2.tar.gz
-rw-r--r--. 1 root root 981687 8月  27 2019 nginx-1.12.2.tar.gz
[root@mufeng41 ~]# tar xf nginx-1.12.2.tar.gz  -C /usr/local/src/
root@mufeng41 ~]# cd !$
cd /usr/local/src/
[root@mufeng41 src]# ls
nginx-1.12.2
[root@mufeng41 src]# cd nginx-1.12.2/
[root@mufeng41 nginx-1.12.2]# ls
auto  CHANGES  CHANGES.ru  conf  configure  contrib  html  LICENSE  man  README  src
[root@mufeng41 nginx-1.12.2]#
./configure --prefix=/usr/local/nginx --with-http_dav_module --with-http_stub_status_module --with-http_addition_module --with-http_sub_module --with-http_flv_module --with-http_mp4_module
Copy after login
Yes Explanation of parameters: ./configure --prefix=/usr/local/nginx --with-http_dav_module --with-http_stub_status_module --with-http_addition_module --with-http_sub_module --with-http_flv_module --with-http_mp4_module
- –with-http_dav_module enables ngx_http_dav_module support (adds PUT, DELETE, MKCOL: create collection, COPY and MOVE methods). It is closed by default and needs to be compiled and turned on
- –with-http_stub_status_module Enable ngx_http_stub_status_module support (get the working status of nginx since the last startup)
- –with-http_addition_module Enable ngx_http_addition_module support (acts as an output filter, supports incomplete buffering, responds to requests in parts) ##–with-http_sub_module Enable ngx_http_sub_module support (allows replacing some of the nginx response with some other text Text)
- –with-http_flv_module Enable ngx_http_flv_module support (provides time-based offset file seeking memory usage)
- –with -http_mp4_module enables support for mp4 files (providing time-based offset files for seeking memory usage)
- 3.3 Start compiling and installing nginx
Use
make && make installInstallation<div class="code" style="position:relative; padding:0px; margin:0px;"><pre class='brush:php;toolbar:false;'>[root@mufeng41 nginx-1.12.2]# make && make install</pre><div class="contentsignin">Copy after login</div></div>How to determine whether the execution is successful?
Answer:
echo $?3.4 Generate a running nginx user
[root@mufeng41 nginx-1.12.2]# useradd -u 8000 -s /sbin/nologin  nginx
[root@mufeng41 nginx-1.12.2]# id nginx
uid=8000(nginx) gid=8000(nginx) 组=8000(nginx)
[root@mufeng41 nginx-1.12.2]#
3.5 Start nginx and test
If you don’t know where the nginx configuration file and startup script are, you can search for them. Use
find / -name nginx.conf.Start the service
[root@itlaoxin163 ~]# find / -name nginx.conf
/usr/local/nginx/conf/nginx.conf

# 启动
[root@mufeng41 nginx-1.12.2]# /usr/local/nginx/sbin/nginx

[root@mufeng41 nginx-1.12.2]# netstat -antup |grep 80
tcp        0      0 0.0.0.0:80              0.0.0.0:*               LISTEN      25286/nginx: master
udp        0      0 0.0.0.0:58076           0.0.0.0:*
View the effect
[root@mufeng41 nginx-1.12.2]# systemctl stop firewalld.service
[root@mufeng41 nginx-1.12.2]# curl -I 127.0.0.1
HTTP/1.1 200 OK
Server: nginx/1.12.2
Date: Fri, 24 Mar 2023 11:06:29 GMT
Content-Type: text/html
Content-Length: 612
Last-Modified: Fri, 24 Mar 2023 11:01:53 GMT
Connection: keep-alive
ETag: "641d8321-264"
Accept-Ranges: byte
四. 配置nginx成为分发器
4.1 先备份配置文件
[root@mufeng41 conf]# pwd
/usr/local/nginx/conf
[root@mufeng41 conf]# cp nginx.conf nginx.conf.bak
[root@mufeng41 conf]#
4.2 把nginx设置成分发器,实现动静分离
配置如下图:
配置分发器
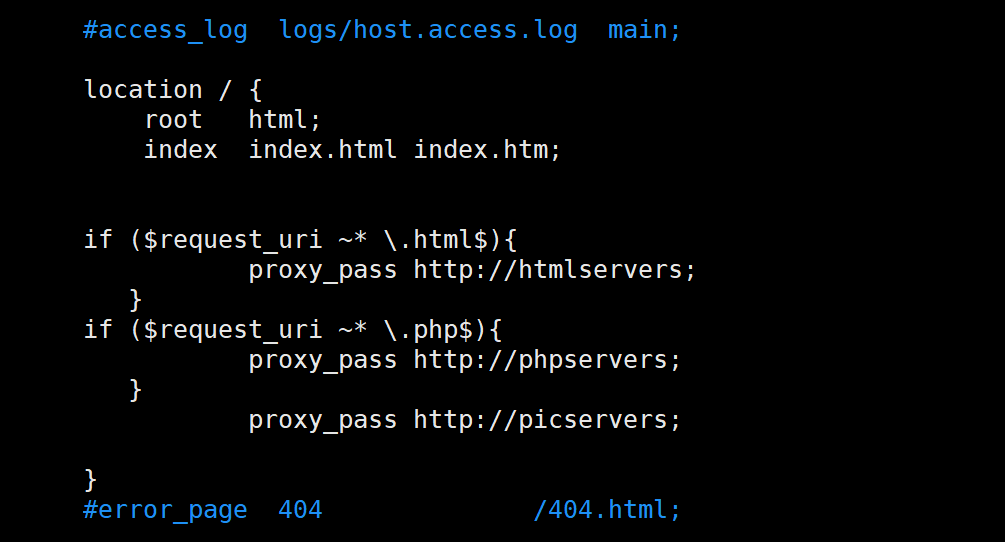
location / {
            root   html;
            index  index.html index.htm;


        if ($request_uri ~* \.html$){
                   proxy_pass http://htmlservers;
           }
        if ($request_uri ~* \.php$){
                   proxy_pass http://phpservers;
           }
                   proxy_pass http://picservers;

}注释:
location 的作用是根据请求的 URI,将请求转发到不同的后端服务器上进行处理。具体解释如下:
location /:表示所有请求(URI)都会被这个 location 块所匹配。
root html:表示当访问的 URI对应的文件不存在时,会在 nginx 安装目录下的 html 目录中查找对应的文件。
index index.html
index.htm:表示当访问的 URI 对应的目录中没有指定的默认文件时,会尝试访问 index.html 或 index.htm 文件。
if ($request_uri ~* .html$):表示如果请求的 URI 包含 .html,则执行下面的语句。
proxy_pass http://htmlservers:表示将请求转发到名为 htmlservers 的后端服务器处理。
if ($request_uri ~* .php$):表示如果请求的 URI 包含 .php,则执行下面的语句。
proxy_pass http://phpservers:表示将请求转发到名为 phpservers 的后端服务器处理。
proxy_pass http://picservers:表示将请求转发到名为 picservers 的后端服务器处理,这个语句没有条件限制,如果以上两个if 语句都不匹配,则会执行这个语句。
接下来设置负载均衡对应的IP
定义负载均衡设备的IP
在nginx配置文件最后一行}前添加一下内容:

代码如下:
 upstream  htmlservers {
         server 192.168.1.42:80;
         server 192.168.1.43:80;
 }
 upstream  phpservers{
         server 192.168.1.42:80;
         server 192.168.1.43:80;
 }
 upstream  picservers {
         server 192.168.1.42:80;
         server 192.168.1.43:80;
}配置文件是否有错误
[root@mufeng41 conf]# /usr/local/nginx/sbin/nginx -t
nginx: the configuration file /usr/local/nginx/conf/nginx.conf syntax is ok
nginx: configuration file /usr/local/nginx/conf/nginx.conf test is successful
重启nginx
[root@mufeng41 conf]# /usr/local/nginx/sbin/nginx -s reload
五. 配置两台http服务器
接下来,需要在 mufeng42和mufeng43上操作
5.1 配置mufeng42服务器 配置web服务器:
[root@mufeng42 ~]# yum install httpd php -y
生成静态测试文件
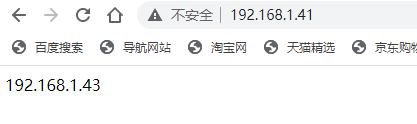
[root@mufeng42 ~]# echo 192.168.1.42 > /var/www/html/index.html
在创建一个php文件:
[root@itlaoxin162 ~]# vim /var/www/html/test.php
写入内容:
echo "我是42服务器";echo "我是沐风晓月"<?phpphpinfo();?>
启动apache
[root@mufeng42 ~]# systemctl restart httpd
5.2 配置mufeng43服务器
安装http并生成静态文件
[root@mufeng43 ~]# yum install httpd php -y
[root@mufeng43 ~]# echo 192.168.1.43 > /var/www/html/index.html
建立php文件
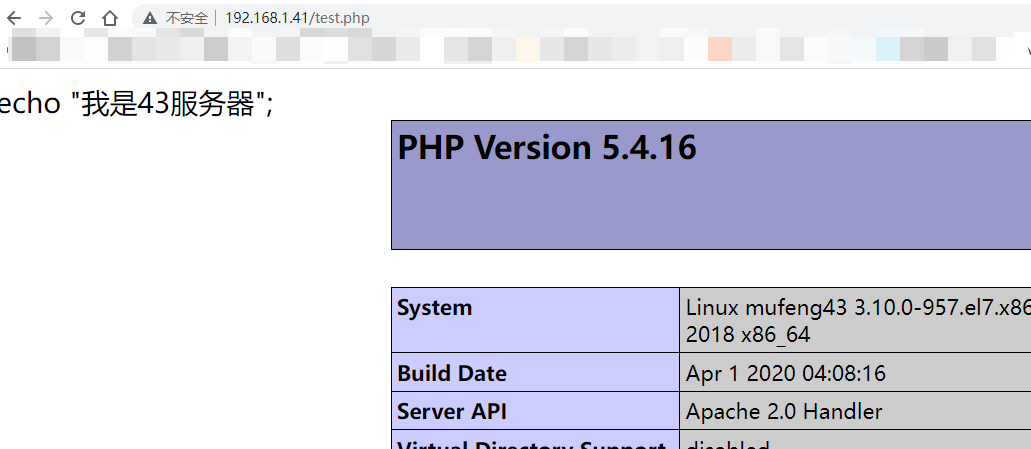
[root@mufeng43 ~]# cd /var/www/html/

[root@mufeng43 html]# vi mufeng.php
[root@mufeng43 html]# cat mufeng.php
echo "我是43服务器";
<?php
phpinfo();
?>
启动配置文件
[root@mufeng43 html]# systemctl restart httpd
5.3 测试
到目前为止,nginx负载均衡就结束了,接下来就可以测试了:
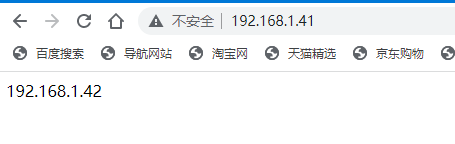
测试静态页面
浏览器输入: http://192.168.1.41/ 进行测试
测试转发动态页面:
浏览器输入 http://192.168.1.41/test.php
The above is the detailed content of How to use nginx to implement a load balancing cluster with dynamic and static separation. For more information, please follow other related articles on the PHP Chinese website!

Hot AI Tools

Undresser.AI Undress
AI-powered app for creating realistic nude photos

AI Clothes Remover
Online AI tool for removing clothes from photos.

Undress AI Tool
Undress images for free

Clothoff.io
AI clothes remover

AI Hentai Generator
Generate AI Hentai for free.

Hot Article
Hot Tools

Notepad++7.3.1
Easy-to-use and free code editor

SublimeText3 Chinese version
Chinese version, very easy to use

Zend Studio 13.0.1
Powerful PHP integrated development environment

Dreamweaver CS6
Visual web development tools

SublimeText3 Mac version
God-level code editing software (SublimeText3)
Hot Topics


 How to allow external network access to tomcat server
Apr 21, 2024 am 07:22 AM
How to allow external network access to tomcat server
Apr 21, 2024 am 07:22 AM
To allow the Tomcat server to access the external network, you need to: modify the Tomcat configuration file to allow external connections. Add a firewall rule to allow access to the Tomcat server port. Create a DNS record pointing the domain name to the Tomcat server public IP. Optional: Use a reverse proxy to improve security and performance. Optional: Set up HTTPS for increased security.
 What are the nginx start and stop commands?
Apr 02, 2024 pm 08:45 PM
What are the nginx start and stop commands?
Apr 02, 2024 pm 08:45 PM
The start and stop commands of Nginx are nginx and nginx -s quit respectively. The start command starts the server directly, while the stop command gracefully shuts down the server, allowing all current requests to be processed. Other available stop signals include stop and reload.
 How to run thinkphp
Apr 09, 2024 pm 05:39 PM
How to run thinkphp
Apr 09, 2024 pm 05:39 PM
Steps to run ThinkPHP Framework locally: Download and unzip ThinkPHP Framework to a local directory. Create a virtual host (optional) pointing to the ThinkPHP root directory. Configure database connection parameters. Start the web server. Initialize the ThinkPHP application. Access the ThinkPHP application URL and run it.
 How to register phpmyadmin
Apr 07, 2024 pm 02:45 PM
How to register phpmyadmin
Apr 07, 2024 pm 02:45 PM
To register for phpMyAdmin, you need to first create a MySQL user and grant permissions to it, then download, install and configure phpMyAdmin, and finally log in to phpMyAdmin to manage the database.
 How to deploy nodejs project to server
Apr 21, 2024 am 04:40 AM
How to deploy nodejs project to server
Apr 21, 2024 am 04:40 AM
Server deployment steps for a Node.js project: Prepare the deployment environment: obtain server access, install Node.js, set up a Git repository. Build the application: Use npm run build to generate deployable code and dependencies. Upload code to the server: via Git or File Transfer Protocol. Install dependencies: SSH into the server and use npm install to install application dependencies. Start the application: Use a command such as node index.js to start the application, or use a process manager such as pm2. Configure a reverse proxy (optional): Use a reverse proxy such as Nginx or Apache to route traffic to your application
 Welcome to nginx!How to solve it?
Apr 17, 2024 am 05:12 AM
Welcome to nginx!How to solve it?
Apr 17, 2024 am 05:12 AM
To solve the "Welcome to nginx!" error, you need to check the virtual host configuration, enable the virtual host, reload Nginx, if the virtual host configuration file cannot be found, create a default page and reload Nginx, then the error message will disappear and the website will be normal show.
 How to solve the problem of nginx when accessing the website
Apr 02, 2024 pm 08:39 PM
How to solve the problem of nginx when accessing the website
Apr 02, 2024 pm 08:39 PM
nginx appears when accessing a website. The reasons may be: server maintenance, busy server, browser cache, DNS issues, firewall blocking, website misconfiguration, network connection issues, or the website is down. Try the following solutions: wait for maintenance to end, visit during off-peak hours, clear your browser cache, flush your DNS cache, disable firewall or antivirus software, contact the site administrator, check your network connection, or use a search engine or web archive to find another copy of the site. If the problem persists, please contact the site administrator.
 How to communicate between docker containers
Apr 07, 2024 pm 06:24 PM
How to communicate between docker containers
Apr 07, 2024 pm 06:24 PM
There are five methods for container communication in the Docker environment: shared network, Docker Compose, network proxy, shared volume, and message queue. Depending on your isolation and security needs, choose the most appropriate communication method, such as leveraging Docker Compose to simplify connections or using a network proxy to increase isolation.
