

nginx(engine x) is a high-performance http server and reverse proxy server. This software was developed to solve the c10k problem.
nginx's architecture takes advantage of many modern operating system features to implement a high-performance http server. For example, on Linux systems, nginx uses epoll, sendfile, file aio, directio and other mechanisms, which makes nginx not only highly efficient, but also has a very low resource usage. Officials claim that nginx only needs 2.5 to maintain 10,000 inactive http keep-alive connections. m memory. 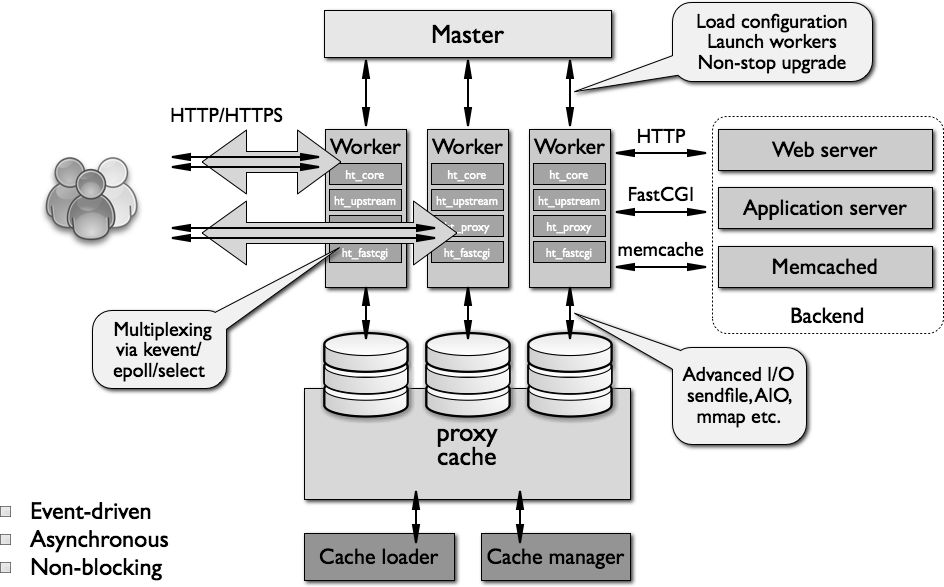
nginx will run multiple processes at the same time as needed: a master process (master) and several worker processes (worker). When the cache is configured, there will also be a cache loader process (cache loader) and Cache manager process (cache manager), etc. All processes contain only one thread, and inter-process communication is mainly realized through the "shared memory" mechanism. The main process runs as the root user, while the workers, cache loader, and cache manager should all run as unprivileged users.
1. Install nginx
In the centos6 version of epel source, the rpm package of nginx has been added, but the version of this rpm package is lower. If you need to update the version, you can use the officially produced rpm package, or use the source code package to compile and install.
You can also use some nginx versions with enhanced secondary development functions. For example, Taobao's tengine and openresty are good choices.
1.1 Common compilation parameters
--prefix=path: Specify the nginx installation directory
--conf-path=path: Specify the nginx.conf configuration file Path
--user=name: User of nginx worker process
--with-pcre: Enable pcre regular expression support
--with-http_ssl_module: Enable SSL support
--with -http_stub_status_module: used to monitor the status of nginx
--with-http-realip_module: allows changing the client ip address in the client request header
--with-file-aio: enables file aio
-- add-module=path: Add a third-party external module
A complete compilation solution is provided here:
--prefix=/usr/local/nginx \
--conf-path=/etc /nginx/nginx.conf \
--error-log-path=/var/log/nginx/error.log \
--http-log-path=/var/log/nginx/access.log \
--http-client-body-temp-path=/var/tmp/nginx/client_body \
--http-proxy-temp-path=/var/tmp/nginx/proxy \
--http-fastcgi-temp-path=/var/tmp/nginx/fastcgi \
--http-uwsgi-temp-path=/var/tmp/nginx/uwsgi \
--pid-path= /var/run/nginx.pid \
--lock-path=/var/lock/nginx \
--user=nginx \
--group=nginx \
--with- file-aio \
--with-http_ssl_module \
--with-http_realip_module \
--with-http_sub_module \
--with-http_gzip_static_module \
--with-http_stub_status_module \
--with-pcre
1.2 Starting and shutting down nginx
Start nginx:
# nginx -c /etc/nginx/nginx.conf
Close nginx
# nginx -s stop
Reread the configuration file
# nginx -s reload
# pkill -hup nginx
Reopen the log file
# nginx -s reopen
# pkill -usr1 nginx
You can also download the /etc/init.d/nginx file in the nginx rpm package and modify the path It can be used after:
# service nginx {start|stop|status|restart|reload|configtest|}
2. nginx.conf configuration file
nginx configuration file is mainly divided into four parts: main (global settings), http ( General settings of http), server (virtual host settings), location (matching url path). There are also some other configuration sections, such as event, upstream, etc.
2.1 General settings
user nginx
Specify the user and group running the nginx workre process
worker_rlimit_nofile
#Specify all worker processes The maximum number of files that can be opened
worker_cpu_affinity
Set the cpu stickiness of the worker process to avoid the performance consumption caused by switching between CPUs. For example, worker_cpu_affinity 0001 0010 0100 1000; (quad-core)
worker_processes 4
The number of worker processes. This value can be set to the same as the number of cpu. If ssl and gzip are turned on, it can be increased appropriately. This value
worker_connections 1000
The maximum number of concurrent connections that a single worker process can accept is placed in the event segment
error_log logs/error.log info
The storage path of the error log and record level
use epoll
Use the epoll event model and place it in the event segment
2.2 http server
server {}:
Define a virtual host
listen 80;
Define the listening address and port. By default, listening is on all addresses of this machine
server_name name [...];
Define the virtual host name, you can use multiple names, you can also use regular expressions or wildcards.
sendfile on
Enable sendfile call to quickly respond to the client
keepalive_timeout 65
Long connection timeout, unit is seconds.
send_timeout
Specify the timeout period for responding to the client
client_max_body_size 10m
The maximum size of the entity allowed to be requested by the client
root path
Set the request url The root directory on the file system where the corresponding resource is located
location [ = | ~ | ~* | ^~ ] uri { ... }
设置一个 uri 匹配路径
=:精确匹配
~:正则表达式匹配,区分字符大小写
~*:正则表达式匹配,不区分字符大小写
^~:uri 的前半部分匹配,且不实用正则表达式
优先级:
= > location 完整路径 > ^~ > ~ > ~* > location 起始路径 > location /
allow 和 deny
基于 ip 访问控制,如:
仅允许 192.168.0.0/24 网段客户端访问
allow 192.168.0.0/24;
deny all;
stub_status on
开启状态显式,仅能用于 location 中:
开启状态显式页面
location /status {
stub_status on;
allow 172.16.0.0/16;
deny all;
}
rewrite
url 重写,可以使用多种标记
例如:
rewrite ^/images/(.*\.jpg)$ /imgs/$1 break;
可用的 flag:
- last:重写完成后,继续匹配其他 rewrite 规则
- break:重写完成后不再继续匹配
- redirect:返回 302 重定向(临时重定向),客户端对重定向的 url 发起新的请求
- permanent:返回 301 重定向(永久重定向),客户端对重定向的 url 发起新的请求
一个 server 配置示例:
server {
 listen  80;
 server_name www.example.com;
 root /web/htdocs;

 location / {
  index index.html index.htm;
 }

 location /status {
  stub_status on;
  allow 10.0.0.0/8;
  deny all;
  access_log off;
}2.3 ssl 的配置
启用一个 ssl 虚拟主机
server {
  listen 443;
  server_name example.com;

  root /apps/www;
  index index.html index.htm;

  ssl on;
  ssl_certificate /etc/nginx/ssl/nginx.crt;
  ssl_certificate_key /etc/nginx/ssl/nginx.key;

#  ssl_protocols sslv3 tlsv1 tlsv1.1 tlsv1.2;
#  ssl_ciphers all:!adh:!export56:rc4+rsa:+high:+medium:+low:+sslv2:+exp;
#  ssl_prefer_server_ciphers on;

}其中 ssl_certificate 表示 ca 文件,ssl_certificate_key 表示密钥文件。
如果想把 http 请求强制转到 https,可以这样:
server {
listen  80;
server_name example.me;

return 301 https://$server_name$request_uri;
}
2.4 nginx 做负载均衡反向代理
nginx 做反向代理时,后端主机有多台,可以使用 upstream 定义一个后端主机池,在反向代理时直接使用主机池的名字。在 upstream 中可以定义负载均衡调度算法,权重,健康状态检测等参数。
例如:
upstream backend {
 server 172.16.0.1:80 weight=1 max-fails=3 fail_timeout=10;
 server 172.16.0.2:80 weight=1max-fails=3 fail_timeout=10;;
}
默认请求下,使用 round-robin 调度算法,并有健康状态检查和恢复主机的能力。
ningx 还可以使用这些算法:
ip_hash:基于源地址哈希,主要目的是会话保持
least_conn:基于最少活动连接进行调度
sticky:基于 cookie 进行会话绑定,nginx 会在客户端第一次访问时插入路由信息到 cookie 中,或者选择 cookie 中的某个字段的值作为键,以后每次请求将基于此信息进行调度
基于 cookie 的会话绑定共有 cookie,route 和 learn 三种。
例如,基于 cookie name 的调度:
upstream backend {
 server backend1.example.com;
 server backend2.example.com;

 sticky cookie srv_id expires=1h domain=.example.com path=/;
}
使用此主机组进行反向代理:
location / {
 proxy_pass http://backend;
 proxy_set_header host $host;
 proxy_set_haeder x-forwared-for $proxy_add_x_forwarded_for;
}
proxy_pass url 指定代理的后端主机,可以指定 "http" 或 "https" 协议,域名可以是 ip 地址,也可以是 upstream 池名字
如果代理指定的是一个 uri 地址,如 http://127.0.0.1/remote,那么将直接被代理至指定 uri,无论请求的 uri 是什么
如果代理指定的一个主机而没有 uri,如 http://127.0.0.1,客户端请求的uri将被传递至指定域名
如果 location 中使用模式匹配 url,那么 url 也会被传递至代理 url 的末端
如果 location 中使用了 uri 重写,那么 proxy_pass 会使用重写后的结果进行处理
proxy_set_header header value 对转发的报文首部进行修改
2.5 反向代理时的缓存相关设定
proxy_cache_path path [levels=levels] keys_zone=name:size
定义磁盘缓存路径,nignx 的缓存是以键值方式存放的,keys_zone 用于指定键存放的内存空间名字和大小,对应的值则存放在 path 指定的路径中。levels 可以指定缓存存放路径的级数和名称字符数。此设置只能在 http 段中定义。
如:
proxy_cache_path /var/cache/nginx/proxy levels=1:2 keys_zone=one:10m;
proxy_cache_valid [code ...] time 指定不同响应码的内容的缓存时间
如:
proxy_cache_valid 200 302 10m;
proxy_cache_valid 404  1m;
proxy_cache_valid any  1m;
proxy_cache_method method 定义哪些方法的请求结果可以被缓存,如:
proxy_cache_method get;
proxy_cache_method head;
proxy_cache name 指定使用预先定义的缓存空间用于缓存
2.6 fastcgi 代理的设置
使用 fastcgi 时,设置代理的方法同 porxy_pass 类似,同时还可以使用 fastcgi 缓存,设置的方法也和 proxy_cache 类似。
location ~ \.php$ {
 root   /web/htdocs;
 fastcgi_pass 127.0.0.1:9000;
 fastcgi_index index.php;
 fastcgi_param script_filename $document_root$fastcgi_script_name;
 include  fastcgi_params;
}
3. 一些常用内置变量
$arg_name: The name parameter in the request uri to
$args: All parameters of the request uri, the same as $query_string
$uri: The current request uri, without parameters
$request_uri: Request uri, with complete parameters
$host: The host header in the http request message. If there is no host header, it is replaced by the host name of the virtual host that handles this request.
$hostname: The host where the nginx service runs Name
$remote_addr: Client ip
$remote_port: Client port
$remote_user: The user name entered by the client user when using user authentication
$request_filename: The uri in the user request passes through the local root Or the local file path mapped after alias conversion
$request_method: request method
$server_addr: server address
$server_name: server name
$server_port: server port
$server_protocol: server to The protocol when the client sends the response, such as http/1.1, http/1.0
$scheme: The scheme used in the request, such as https
$http_name in https://www.magedu.com/: Match The specified header in the request message, such as $http_host matches the host header in the request message
$sent_http_name: matches the specified header in the response message, such as $sent_content_type matches the content-type header in the response message
$status: response status
The above is the detailed content of Nginx server setup and basic configuration example analysis. For more information, please follow other related articles on the PHP Chinese website!
 nginx restart
 Detailed explanation of nginx configuration
 Detailed explanation of nginx configuration
 What are the differences between tomcat and nginx
 What to do if the chm file cannot be opened
 python programming computer configuration requirements
 Recommended data analysis websites
 How to set path environment variable
 The role of subnet mask


![[Web front-end] Node.js quick start](https://img.php.cn/upload/course/000/000/067/662b5d34ba7c0227.png)


