 Operation and Maintenance
 Nginx
Nginx
 Analysis of Tomcat7 Nginx Redis configuration example under CentOS6.5
Analysis of Tomcat7 Nginx Redis configuration example under CentOS6.5
All configurations are completed on one machine, and the deployment topology information is as follows:
Note: Since the redis configuration is strict on jar packages and tomcat versions, please be sure to use tomcat7 and the ones provided in this article jar package.
Download address:
http://pan.baidu.com/s/1bo67ky
tomcat: tomcat1 localhost:8080
tomcat2 localhost:9080
nginx: localhost:1210
#redis: localhost:6379
1. tomcat Installation and configuration
1. In the server.xml file, modify the port of tomcat2. A total of 3 modifications are required, namely 8080, 8005 and 8009, which are modified to 9080, 9005 and 9008 respectively.
After configuring this step, enter http://localhost:8080 and http://localhost:9080 in the browser to see the tomcat homepage.
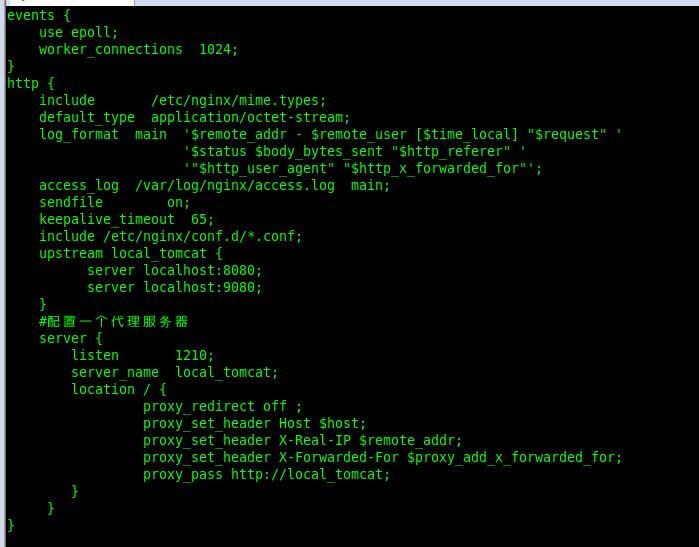
2. nginx configuration to achieve load balancing.
2.1 Install pcre. Because the rewrite module of nginx requires pcre support, the pcre library needs to be installed.
2.1.1. Obtain the pcre compilation and installation package. The latest version can be obtained at http://www.pcre.org/
2.1.2. Unzip pcre-xx. tar.gz package.
2.1.3. Enter the decompression directory and execute ./configure.
2.1.4. make
2.1.5. make install
2.2 Install nginx. Since the nginx we want does not exist in the yum source, we need to create a yum source. The steps are as follows:
2.2.1. vim /etc/yum.repos.d/nginx.repo
Enter the following content, then save and exit.
[nginx]
name=nginx repo
baseurl=http://nginx.org/packages/centos/$releasever/$basearch/
gpgcheck=0
enabled=1
2.2.2. Check whether the yum source is configured properly and execute the following command. If there is a result, the configuration is successful.
yum list |grep nginx
2.2.3. Install nginx.
yum -y install nginx
2.2.4. Configure nginx. Achieve load balancing. The main task is to configure the nginx.conf file and use the rpm -qc nginx command to query the location of the configuration file.

2.2.5 Check whether the configuration file is correct and restart nginx.
nginx -t
service nginx restart 此处也可用如下命令: nginx -s reload
2.3 Verify the load balancing configuration
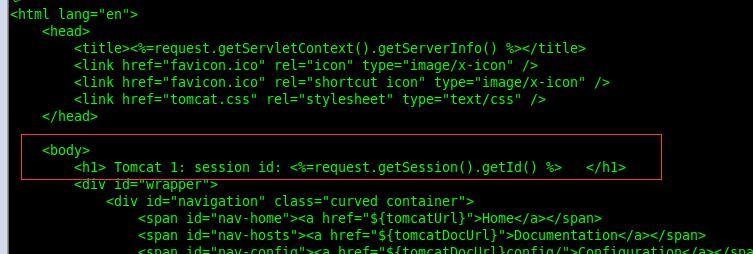
2.3.1 Modify the tomcat1 and tomcat2 homepage files respectively, obtain the login session id value, and add the h1 tag in the red box in the figure below

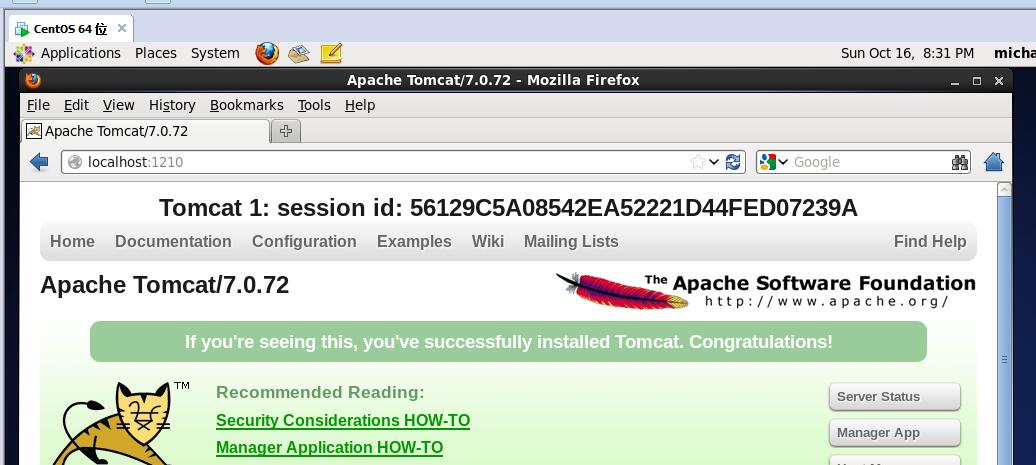
2.3.2 Enter: localhost:1210 in the browser and check whether the configuration is successful. You can see that you have jumped to the tomcat page and the configuration is successful.

#3. redis configuration, tomcat shared session.
3.1 Download and install redis3
3.1.1 Go to the redis official website to download redis3, the steps are omitted.
3.1.2 Unzip the file
tar -xvf redis-3.0.2.tar.gz
3.1.3 Compile and install.
cd redis-3.0.2
make
make install
./utils/install_server.sh # 配置redis随机启动
3.1.4 Starting and shutting down redis.
service redis_6379 start #6379 is the default port number of redis. After modification according to requirements, the service name will change
service redis_6379 stop
service redis_6379 restart
3.2 Configure tomcat to share the redis-based session mechanism.
3.2.1 Copy the following three jar packages to tomcat's lib directory respectively:
commons-pool-1.3.jar jedis-2.0.0.jar tomcat-redis-session-manager-1.2-tomcat-7-java-7.jar
3.22 Modify the context.xml file in tomcat's conf directory, in the
<valve classname="com.radiadesign.catalina.session.redissessionhandlervalve" />
<manager classname="com.radiadesign.catalina.session.redissessionmanager"
host="localhost"
port="6379"
database="0"
maxinactiveinterval="60" />
3.3 Restart tomcat, enter localhost:1210 in the browser, and find that the sessions of tomcat1 and tomcat2 have been shared.


The above is the detailed content of Analysis of Tomcat7 Nginx Redis configuration example under CentOS6.5. For more information, please follow other related articles on the PHP Chinese website!

Hot AI Tools

Undresser.AI Undress
AI-powered app for creating realistic nude photos

AI Clothes Remover
Online AI tool for removing clothes from photos.

Undress AI Tool
Undress images for free

Clothoff.io
AI clothes remover

Video Face Swap
Swap faces in any video effortlessly with our completely free AI face swap tool!

Hot Article

Hot Tools

Notepad++7.3.1
Easy-to-use and free code editor

SublimeText3 Chinese version
Chinese version, very easy to use

Zend Studio 13.0.1
Powerful PHP integrated development environment

Dreamweaver CS6
Visual web development tools

SublimeText3 Mac version
God-level code editing software (SublimeText3)

Hot Topics
 1386
1386
 52
52
 How to optimize CentOS HDFS configuration
Apr 14, 2025 pm 07:15 PM
Improve HDFS performance on CentOS: A comprehensive optimization guide to optimize HDFS (Hadoop distributed file system) on CentOS requires comprehensive consideration of hardware, system configuration and network settings. This article provides a series of optimization strategies to help you improve HDFS performance. 1. Hardware upgrade and selection resource expansion: Increase the CPU, memory and storage capacity of the server as much as possible. High-performance hardware: adopts high-performance network cards and switches to improve network throughput. 2. System configuration fine-tuning kernel parameter adjustment: Modify /etc/sysctl.conf file to optimize kernel parameters such as TCP connection number, file handle number and memory management. For example, adjust TCP connection status and buffer size
 Centos stops maintenance 2024
Apr 14, 2025 pm 08:39 PM
CentOS will be shut down in 2024 because its upstream distribution, RHEL 8, has been shut down. This shutdown will affect the CentOS 8 system, preventing it from continuing to receive updates. Users should plan for migration, and recommended options include CentOS Stream, AlmaLinux, and Rocky Linux to keep the system safe and stable.
 How to check CentOS HDFS configuration
Apr 14, 2025 pm 07:21 PM
Complete Guide to Checking HDFS Configuration in CentOS Systems This article will guide you how to effectively check the configuration and running status of HDFS on CentOS systems. The following steps will help you fully understand the setup and operation of HDFS. Verify Hadoop environment variable: First, make sure the Hadoop environment variable is set correctly. In the terminal, execute the following command to verify that Hadoop is installed and configured correctly: hadoopversion Check HDFS configuration file: The core configuration file of HDFS is located in the /etc/hadoop/conf/ directory, where core-site.xml and hdfs-site.xml are crucial. use
 Centos shutdown command line
Apr 14, 2025 pm 09:12 PM
The CentOS shutdown command is shutdown, and the syntax is shutdown [Options] Time [Information]. Options include: -h Stop the system immediately; -P Turn off the power after shutdown; -r restart; -t Waiting time. Times can be specified as immediate (now), minutes ( minutes), or a specific time (hh:mm). Added information can be displayed in system messages.
 How to check the name of the docker container
Apr 15, 2025 pm 12:21 PM
You can query the Docker container name by following the steps: List all containers (docker ps). Filter the container list (using the grep command). Gets the container name (located in the "NAMES" column).
 What steps are required to configure CentOS in HDFS
Apr 14, 2025 pm 06:42 PM
Building a Hadoop Distributed File System (HDFS) on a CentOS system requires multiple steps. This article provides a brief configuration guide. 1. Prepare to install JDK in the early stage: Install JavaDevelopmentKit (JDK) on all nodes, and the version must be compatible with Hadoop. The installation package can be downloaded from the Oracle official website. Environment variable configuration: Edit /etc/profile file, set Java and Hadoop environment variables, so that the system can find the installation path of JDK and Hadoop. 2. Security configuration: SSH password-free login to generate SSH key: Use the ssh-keygen command on each node
 Centos install mysql
Apr 14, 2025 pm 08:09 PM
Installing MySQL on CentOS involves the following steps: Adding the appropriate MySQL yum source. Execute the yum install mysql-server command to install the MySQL server. Use the mysql_secure_installation command to make security settings, such as setting the root user password. Customize the MySQL configuration file as needed. Tune MySQL parameters and optimize databases for performance.
 How to mount hard disk in centos
Apr 14, 2025 pm 08:15 PM
CentOS hard disk mount is divided into the following steps: determine the hard disk device name (/dev/sdX); create a mount point (it is recommended to use /mnt/newdisk); execute the mount command (mount /dev/sdX1 /mnt/newdisk); edit the /etc/fstab file to add a permanent mount configuration; use the umount command to uninstall the device to ensure that no process uses the device.


