
 Operation and Maintenance
Nginx
How to ban specified IPs and foreign IPs from accessing the website based on Nginx
Operation and Maintenance
Nginx
How to ban specified IPs and foreign IPs from accessing the website based on Nginx
How to ban specified IPs and foreign IPs from accessing the website based on Nginx

Use Nginx to prohibit specified IPs and foreign IPs from accessing my website
There are many ways to achieve this function. Below I will introduce the one based on Nginx ngx_http_geoip2 module to prevent foreign IPs from accessing the website.
①Install geoip2 extension dependency:
[root@fxkj ~]# yum install libmaxminddb-devel -y
②Download ngx_http_geoip2_module module:
[root@fxkj tmp]#  git clone https://github.com/leev/ngx_http_geoip2_module.git
[ro tmp]#
③Unzip the module to the specified path
I unzip it here to /usr/ Under the local directory:
[root@fxkj tmp]# mv ngx_http_geoip2_module/ /usr/local/
[root@fxkj local]# ll ngx_http_geoip2_module/
total 60
-rw-r--r-- 1 root root  1199 Aug 13 17:20 config
-rw-r--r-- 1 root root  1311 Aug 13 17:20 LICENSE
-rw-r--r-- 1 root root 23525 Aug 13 17:20 ngx_http_geoip2_module.c
-rw-r--r-- 1 root root 21029 Aug 13 17:20 ngx_stream_geoip2_module.c
-rw-r--r-- 1 root root  3640 Aug 13 17:20 README.md
④Install the nginx module
First explain the environment. My nginx version is 1.16. I checked online that installing the ngx_http_geoip2 module requires at least version 1.18 and above, so this During the first installation, I upgraded nginx1.18 and added the ngx_http_geoip2 module.
Download nginx 1.18 version:
[root@fxkj ~]# yum install libmaxminddb-devel -y
Unzip the nginx1.18 software package, upgrade to nginx1.18, and add the ngx_http_geoip2 module.
Note:
To upgrade nginx and add modules, you only need to compile and then perform the make operation. If you execute make install, the new version of nginx will completely replace the online nginx.
Before compiling, you need to check which modules are currently installed in nginx.
[root@fxkj tmp]# /usr/local/nginx/sbin/nginx -V
nginx version: nginx/1.16.0
built by gcc 4.8.5 20150623 (Red Hat 4.8.5-39) (GCC)
built with OpenSSL 1.0.2k-fips 26 Jan 2017
TLS SNI support enabled
configure arguments: –with-http_stub_status_module –prefix=/usr/local/nginx –user=nginx –group=nginx –with-http_ssl_module –with-stream
Compile and install:
[root@fxkj tmp]# tar -xf nginx-1.18.0.tar.gz
[root@fxkj tmp]# cd nginx-1.18.0/
[root@fxkj nginx-1.18.0]# ./configure --with-http_stub_status_module \
 --prefix=/usr/local/nginx \
 --user=nginx --group=nginx --with-http_ssl_module --with-stream \
 --add-module=/usr/local/ngx_http_geoip2_module
[root@fxkj nginx-1.18.0]# make
[root@fxkj nginx-1.18.0]# cp /usr/loca/nginx/sbin/nginx /usr/loca/nginx/sbin/nginx1.16    #备份
[root@fxkj nginx-1.18.0]# cp objs/nginx /usr/local/nginx/sbin/    #用新的去覆盖旧的
[root@fxkj nginx-1.18.0]# pkill nginx     #杀死nginx
[root@fxkj nginx-1.18.0]# /usr/local/nginx/sbin/nginx    #再次启动Nginx
Check the nginx version and installed modules:
[root@fxkj nginx-1.18.0]# /usr/local/nginx/sbin/nginx -V
nginx version: nginx/1.18.0
built by gcc 4.8.5 20150623 (Red Hat 4.8.5-39) (GCC)
built with OpenSSL 1.0.2k-fips 26 Jan 2017
TLS SNI support enabled
configure arguments: –with-http_stub_status_module –prefix=/usr/local/nginx –user=nginx –group=nginx –with-http_ssl_module –with-stream –add-module=/usr/local/ngx_http_geoip2_module
⑤Download the latest IP address database file
After the module is installed successfully, you need to specify the database in Nginx. When installing the runtime library, two are installed by default, located in the /usr/share/GeoIP/ directory, one only has IPv4, and the other includes IPv4 and IPv6.
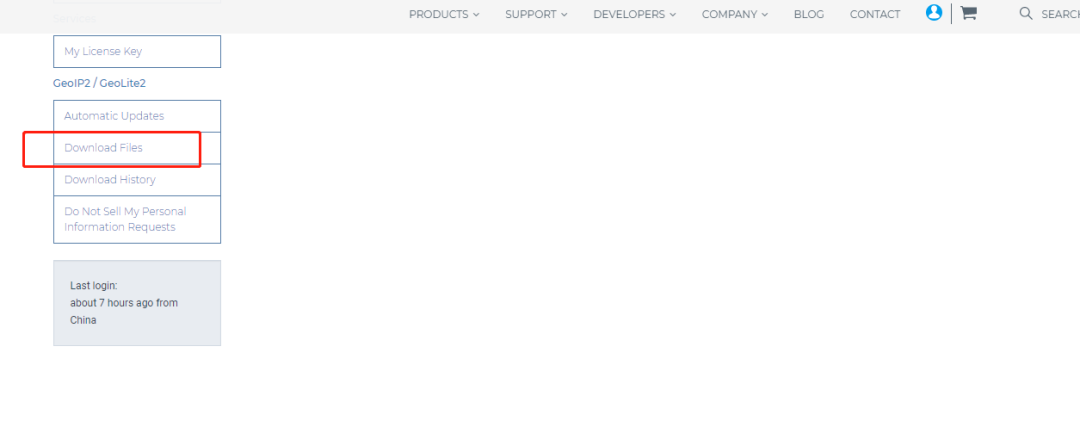
Enter the www.maxmind.com website, register an account and download the latest library files. Click Download Files on the left, skip the account creation steps
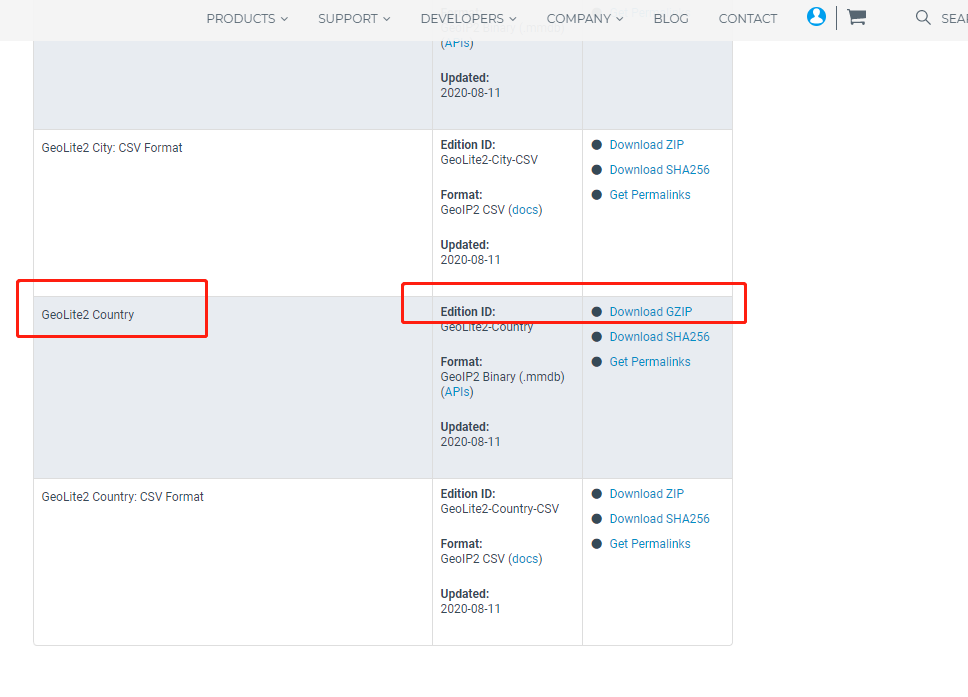
Select GeoLite2 Country, click Download GZIP to download:
Upload to /usr/share/GeoIP/ and decompress:
[root@fxkj local]# cd /usr/share/GeoIP/
[root@fxkj GeoIP]# ll
total 69612
lrwxrwxrwx. 1 root root       17 Mar  7  2019 GeoIP.dat -> GeoIP-initial.dat
-rw-r--r--. 1 root root  1242574 Oct 30  2018 GeoIP-initial.dat
lrwxrwxrwx. 1 root root       19 Mar  7  2019 GeoIPv6.dat -> GeoIPv6-initial.dat
-rw-r--r--. 1 root root  2322773 Oct 30  2018 GeoIPv6-initial.dat
-rw-r--r--  1 root root  3981623 Aug 12 02:37 GeoLite2-Country.mmdb
⑥Configure nginx configuration file
Back up the configuration file before modifying:
[root@fxkj ~]# cp /usr/local/nginx/conf/nginx.conf /usr/local/nginx/conf/nginx.conf-bak
[root@fxkj ~]# vim /usr/local/nginx/conf/nginx.conf
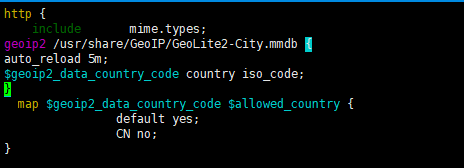
In http Add a few lines to define the location of the database file:
geoip2 /usr/share/GeoIP/GeoLite2-City.mmdb {
auto_reload 5m;
$geoip2_data_country_code country iso_code;
}
  map $geoip2_data_country_code $allowed_country {
                default yes;
                CN no;
}
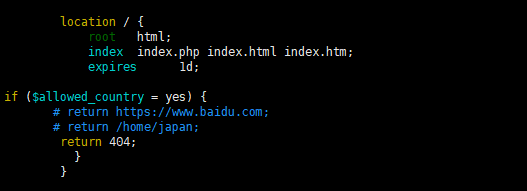
Add conditions under the location in the server. If the IP is a foreign IP, perform the following return action. Here I am Three types are defined and two of them are annotated.
When the accessed IP is a foreign IP, 404 will be returned directly:
if ($allowed_country = yes) {
       # return https://www.baidu.com;
       # return /home/japan;
        return 404;
 }
[root@fxkj ~]# /usr/local/nginx/sbin/nginx -t
nginx: the configuration file /usr/local/nginx/conf/nginx.conf syntax is ok
nginx: configuration file /usr/local/nginx/conf/nginx.conf test is successful
[roo@fxkj ~]# /usr/local/nginx/sbin/nginx -s reload

“13.125.1.194 – – [14/Aug/2020:16:15:51 +0800] “GET /favicon.ico HTTP/1.1” 404 548 “https://www.fxkjnj.com/” “Mozilla/5.0 (Windows NT 10.0; Win64; x64) AppleWebKit/537.36 (KHTML, like Gecko) Chrome/84.0.4147.125 Safari/537.36”

The above is the detailed content of How to ban specified IPs and foreign IPs from accessing the website based on Nginx. For more information, please follow other related articles on the PHP Chinese website!

Hot AI Tools

Undresser.AI Undress
AI-powered app for creating realistic nude photos

AI Clothes Remover
Online AI tool for removing clothes from photos.

Undress AI Tool
Undress images for free

Clothoff.io
AI clothes remover

Video Face Swap
Swap faces in any video effortlessly with our completely free AI face swap tool!

Hot Article
Hot Tools

Notepad++7.3.1
Easy-to-use and free code editor

SublimeText3 Chinese version
Chinese version, very easy to use

Zend Studio 13.0.1
Powerful PHP integrated development environment

Dreamweaver CS6
Visual web development tools

SublimeText3 Mac version
God-level code editing software (SublimeText3)
Hot Topics
 1386
1386
 52
52

 How to configure cloud server domain name in nginx
Apr 14, 2025 pm 12:18 PM
How to configure cloud server domain name in nginx
Apr 14, 2025 pm 12:18 PM
How to configure an Nginx domain name on a cloud server: Create an A record pointing to the public IP address of the cloud server. Add virtual host blocks in the Nginx configuration file, specifying the listening port, domain name, and website root directory. Restart Nginx to apply the changes. Access the domain name test configuration. Other notes: Install the SSL certificate to enable HTTPS, ensure that the firewall allows port 80 traffic, and wait for DNS resolution to take effect.
 How to check whether nginx is started
Apr 14, 2025 pm 01:03 PM
How to check whether nginx is started
Apr 14, 2025 pm 01:03 PM
How to confirm whether Nginx is started: 1. Use the command line: systemctl status nginx (Linux/Unix), netstat -ano | findstr 80 (Windows); 2. Check whether port 80 is open; 3. Check the Nginx startup message in the system log; 4. Use third-party tools, such as Nagios, Zabbix, and Icinga.
 How to check nginx version
Apr 14, 2025 am 11:57 AM
How to check nginx version
Apr 14, 2025 am 11:57 AM
The methods that can query the Nginx version are: use the nginx -v command; view the version directive in the nginx.conf file; open the Nginx error page and view the page title.
 How to start nginx server
Apr 14, 2025 pm 12:27 PM
How to start nginx server
Apr 14, 2025 pm 12:27 PM
Starting an Nginx server requires different steps according to different operating systems: Linux/Unix system: Install the Nginx package (for example, using apt-get or yum). Use systemctl to start an Nginx service (for example, sudo systemctl start nginx). Windows system: Download and install Windows binary files. Start Nginx using the nginx.exe executable (for example, nginx.exe -c conf\nginx.conf). No matter which operating system you use, you can access the server IP
 How to create a mirror in docker
Apr 15, 2025 am 11:27 AM
How to create a mirror in docker
Apr 15, 2025 am 11:27 AM
Steps to create a Docker image: Write a Dockerfile that contains the build instructions. Build the image in the terminal, using the docker build command. Tag the image and assign names and tags using the docker tag command.
 How to check the name of the docker container
Apr 15, 2025 pm 12:21 PM
How to check the name of the docker container
Apr 15, 2025 pm 12:21 PM
You can query the Docker container name by following the steps: List all containers (docker ps). Filter the container list (using the grep command). Gets the container name (located in the "NAMES" column).
 How to run nginx apache
Apr 14, 2025 pm 12:33 PM
How to run nginx apache
Apr 14, 2025 pm 12:33 PM
To get Nginx to run Apache, you need to: 1. Install Nginx and Apache; 2. Configure the Nginx agent; 3. Start Nginx and Apache; 4. Test the configuration to ensure that you can see Apache content after accessing the domain name. In addition, you need to pay attention to other matters such as port number matching, virtual host configuration, and SSL/TLS settings.
 How to check whether nginx is started?
Apr 14, 2025 pm 12:48 PM
How to check whether nginx is started?
Apr 14, 2025 pm 12:48 PM
In Linux, use the following command to check whether Nginx is started: systemctl status nginx judges based on the command output: If "Active: active (running)" is displayed, Nginx is started. If "Active: inactive (dead)" is displayed, Nginx is stopped.
